Glowforge: Troubleshooting - Stuck on Centering or Scanning
Problem Overview:
Well it finally happened. Over a year into using my machine I encountered my first hardware problem. I turned on my machine, it began to focus (the clicking sound) and then it would not move to center. The machine was stuck on centering (or occasionally scanning). This is a common problem, and there are tons of threads and forums out there that will give you options for troubleshooting, but since I encountered the issue personally, I thought it would be good to put all the advice in one place and offer a trouble shooting workflow.
Centering or Scanning? Sometimes the machine gets stuck in either scanning or centering. Certain things like changing artwork can cause it to skip centering and get stuck on scanning instead – you might think this is progress, but it may not have solved the problem. Centering is the process of the Glowforge positioning the head, and Scanning is the process of the camera reading the bed image. Typically when either of these problems arise your bed image will not refresh – it will be stuck on your last job even if you switch to a new file.
If you encounter this problem do not panic, follow the steps below. Many of these steps can be combined (aka you can clean the lenses at the same time as adjusting the lighting), but I have divided it up. My reasoning is sometimes you literally just have to turn the damn thing on and off a bunch of times to get it to connect to Wifi. As a result, I did it in cycles for each problem – turning it on and off for each troubleshooting workflow. This may help you determine exactly what went wrong. You can do these in any order – I put them in an order that matches how I generally will do things.
TRY THIS
My suggestions are a bit more in-depth, but you can read the Glowforge version of this here:
Forum Troubleshooting (Another Good Link)
It could be the lighting or material:
The Glowforge uses the camera in order to determine the position of the print head. If you have complex or reflective material in the machine it can cause the camera to be confused. This is more likely to solve the problem if you’re stuck on scanning (vs. centering) and your print head actually moves at some point (if it does not move at any point in the setup it could be a different issue)
- Turn the machine off
- Open the lid, remove any material on your crumb tray
- If you started the machine without the crumb tray put the crumb tray back in
- Push the print head gently to the starting position in the back left corner.
- Turn off any lights in the room and remove glare – sometimes a bright window or nearby lamp can confuse the camera. Make the area nearby as dim as possible so that only the LEDs in the lid are illuminating the interior of the machine.
- Turn the machine back on.
- * Try switching to a different file – this isn’t likely to work, but you never know. If you only have issue with one file, try deleting, re-saving, and re-uploading that design.
It could be your lenses:
As stated above – the camera is how it determines positioning. If your lenses are dirty, your machine can get stuck, unable to see the crumb tray or the print head.
- Turn your machine off – pretty much any maintenance MUST be done with the machine off. Do NOT try and move the print head or clean the machine with it on.
- Clean your lenses with a Zeiss lens wipe. Make sure to clean the main lens in the print head as well as the lenses that face each other on the left.
- Push the print head gently to the starting position in the back left corner.
- Turn the machine back on.
It could be your cable connections:
The black cable in the back controls the LEDs and the positioning of the print head. If it isn’t connected properly your print head may not move.
- Turn off your machine, open the lid.
- Check all of your cable connections (Click here to jump below for photos) and make sure they are straight, seated well, and don’t show any burnt areas
- The black cable connects on the right and left along the sides of the lid and in the back on the right side.
- The white cable connects from the lid camera to the left side.
- Unclip and re-clip the printer head cable into the print head. Make sure it is not twisted.
- Push the print head gently to the starting position in the back left corner.
- Turn the machine back on
It could be your internet:
If your machine is not connected properly to the internet then it cannot send the camera images to the Cloud to determine positioning. It sounds strange but essentially you may need to refresh the connection by restarting all of your devices. Just because your laptop or phon can connect – doesn’t mean you GF can! So don’t assume.
See Glowforge’s Wifi Troubleshooting for additional info.
- Turn off your machine and unplug it
- Shut down your computer, tablet, or phone device
- Turn off/Unplug your router and your modem.
- Wait 2-3 minutes
- Turn on the modem, router, computer, and the Glowforge (in that order ideally). Let each item setup fully before moving to the next one.
- Confirm you can connect to the internet on your device and that your speed is in line with your current internet package. Visit Google.com and type in “Speed Test”. The first search result will let you run a quick speed test.
- If you cannot connect, or want to go deeper, try re-setting up the Glowforge’s internet connection all together by following the instructions in Glowforge’s Wifi Troubleshooting
- * Some people have described wifi interference from having other enabled devices (Roku, Apple TV, etc) near the machine. Try turning these off and restarting.
It could be that your camera isn’t seeing the Glowforge Logo:
The Glowforge logo on the top of the print head helps the Glowforge determine the positioning of the print head. If the logo is dirty, damaged, or obscured it may not be able to position correctly.
- Turn off your machine
- Open the lid and clean off the top of the print head and all of the cameras if you have not already
- Gently move the print head so that the logo is centered under the lid camera when you close the machine
- Turn on the machine.
Your machine might just be struggling to connect:
This is a weird workaround but for some people, it worked. It’s a variation on something we have just tried above.
- Turn off the machine.
- Move the print head to the center so the logo is centered under the lid camera
- Turn on the Machine
- Open the Lid and Wait 5-15 minutes
- Close the lid – letting the machine idle while open and then closing the lid will cause it to try the centering/scanning cycle again.
It may be a hardware problem:
This is the worst-case scenario. If any of your cable connections look damaged (burnt, bend, chipped) or your black cable has failed then you will need to reach out to Glowforge. In most cases, the issue is simply that the black cable needs to be replaced which is not too difficult to fix.
- When doing any of the above troubleshooting does the print head ever move? If it does not move, it is more likely to be a black cable issue. If your LEDs on either side do not illuminate, it is also likely a black cable problem. If your machine recognizes “lid open” but the print head does not move, again it is likely the black cable.
- If none of the above work, first take photos of each of the connections (Glowforge will ask for these)
- Contact Glowforge – begin the process with them now via Chat or by email. Tell them everything you have tried and send them the photos of the connections.
- As a last resort, unclip and open all the black cable connections. (Left, Right, Bottom). To unclip them you flip up the black bar and gently pull the connections back and out. See if there are any burnt spots, scratches, or obvious damage. Just because you do not see any damage doesn’t mean it isn’t the black cable. You can try reconnecting them and starting up the machine one more time. Do not do this until you have already spoken with GF, you can fry your electronics if you put them back in wrong. I would wait to do this until you have a new black cable on the way.
- If you see any burnt areas you will likely need to send your entire machine back in as the circuit boards may be damaged.
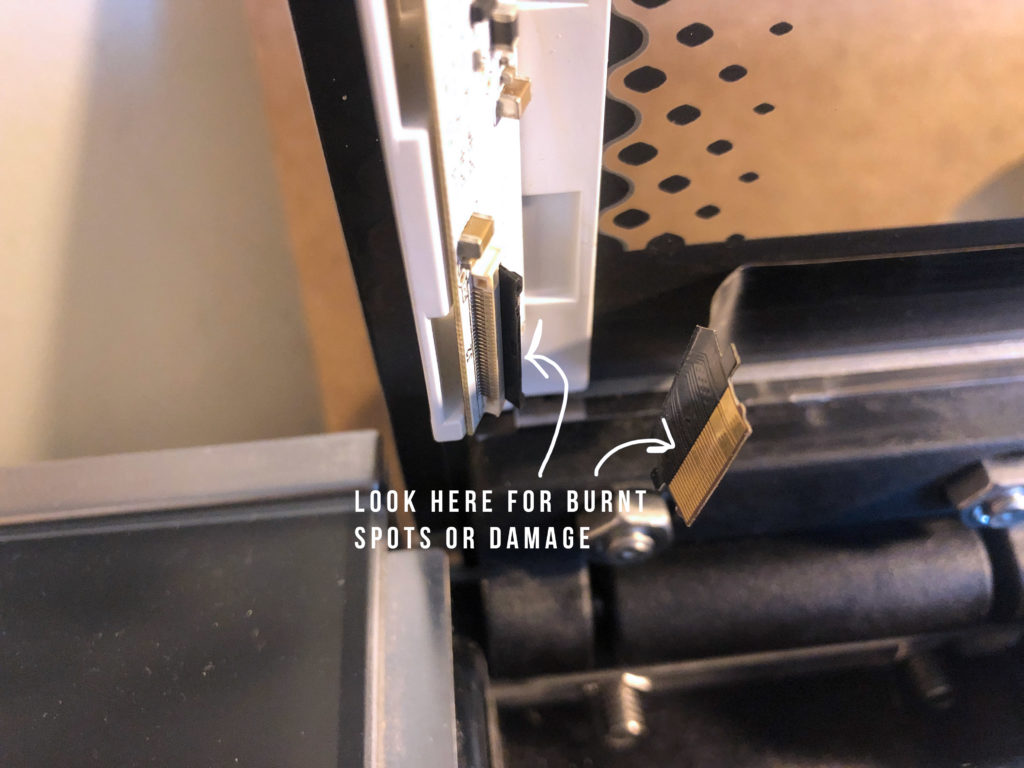
Check These Cable Connections
Take photos of all of these connections before contacting Glowforge. Do not unclip or mess with any of the connections at first. Just look at them to see if they are properly seated. As a last resort you can open the connections and look at them (last photo), but I wouldn’t do this until you have contacted Glowforge.
Black Cable
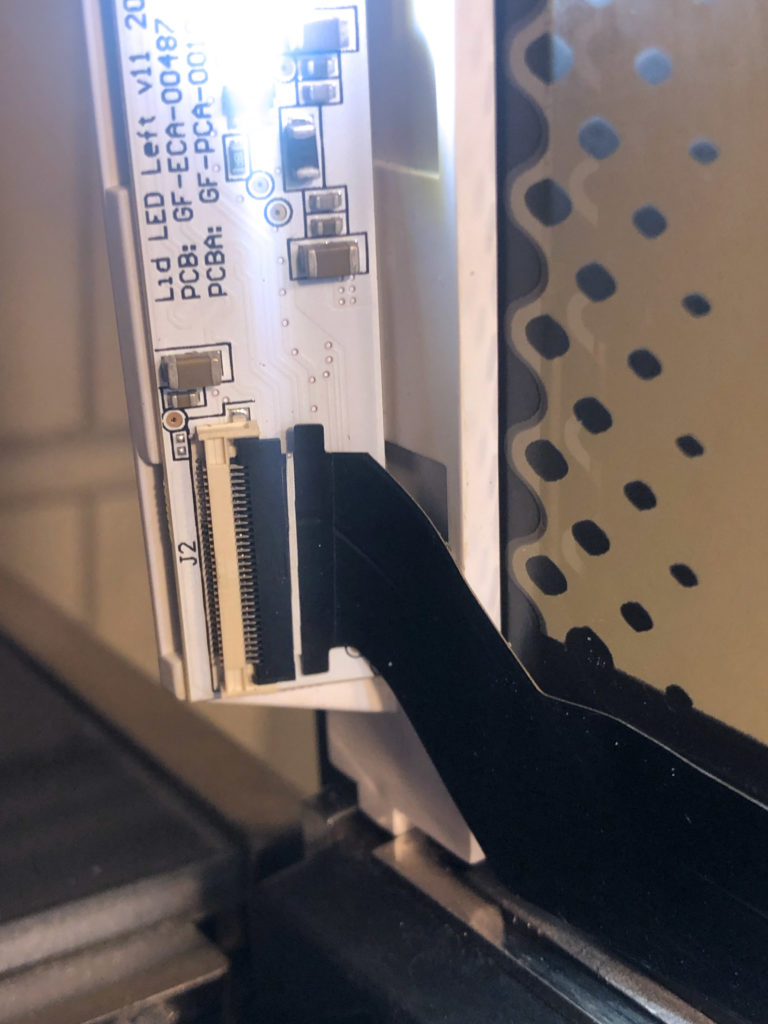
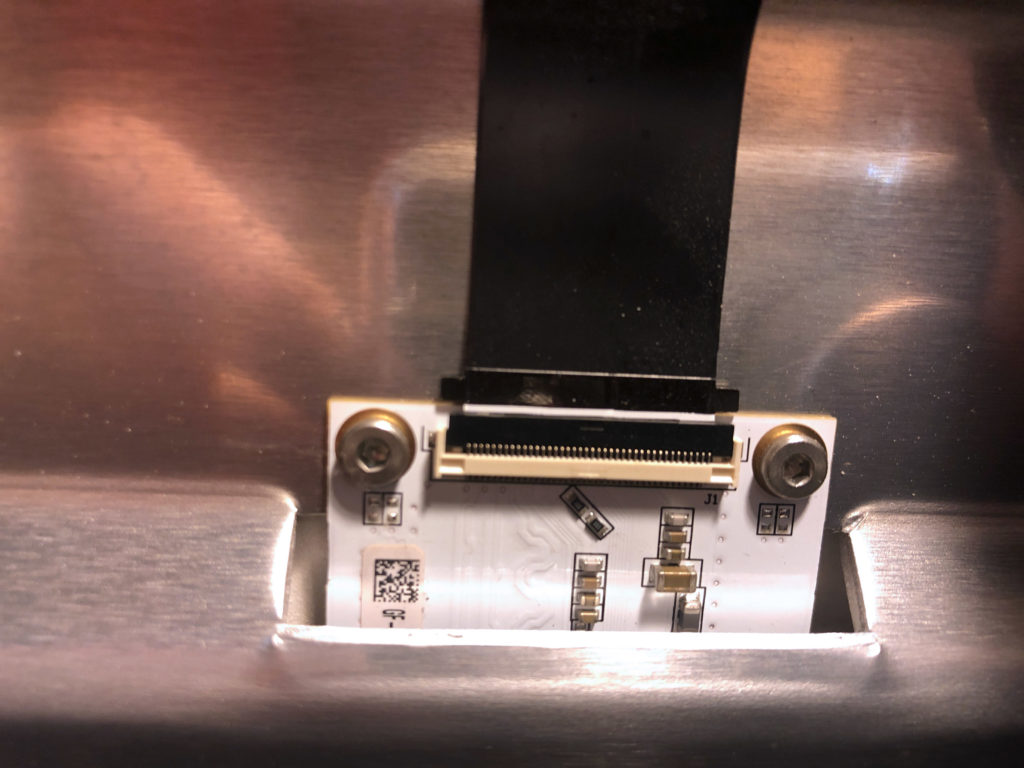
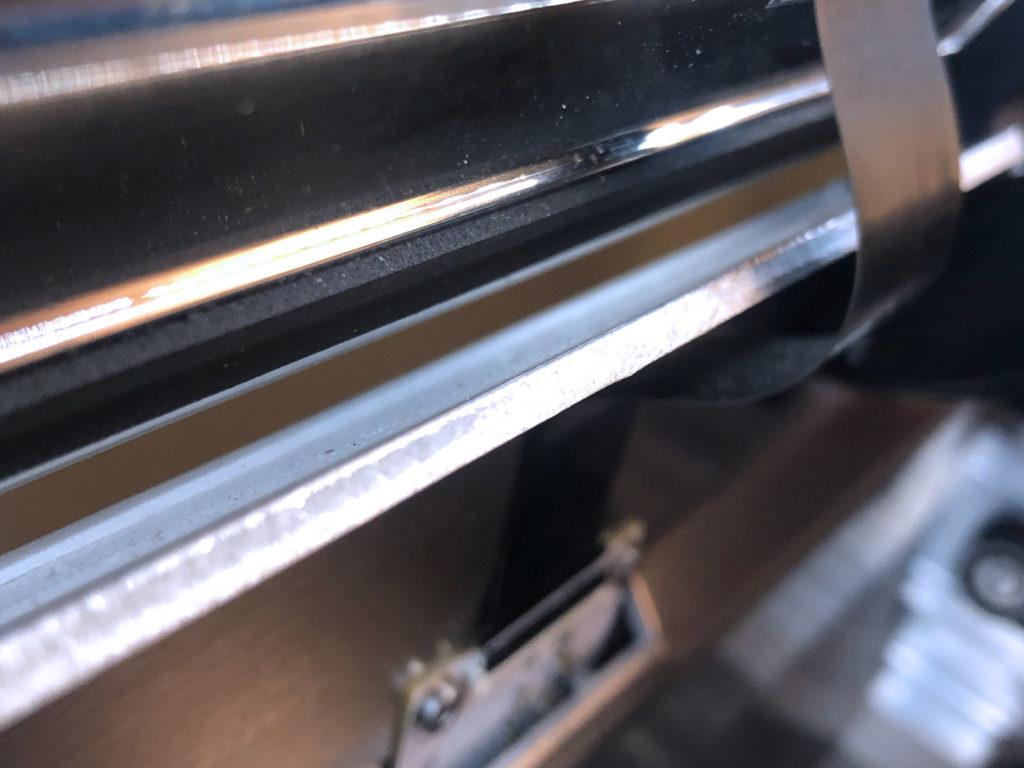
Don’t forget to check the cable “bend/loop” for damage from rubbing on the metal bar of the lid. You will see that none of my connections look damaged, my cables are seated straight, and there are not obvious bent or missing pins.
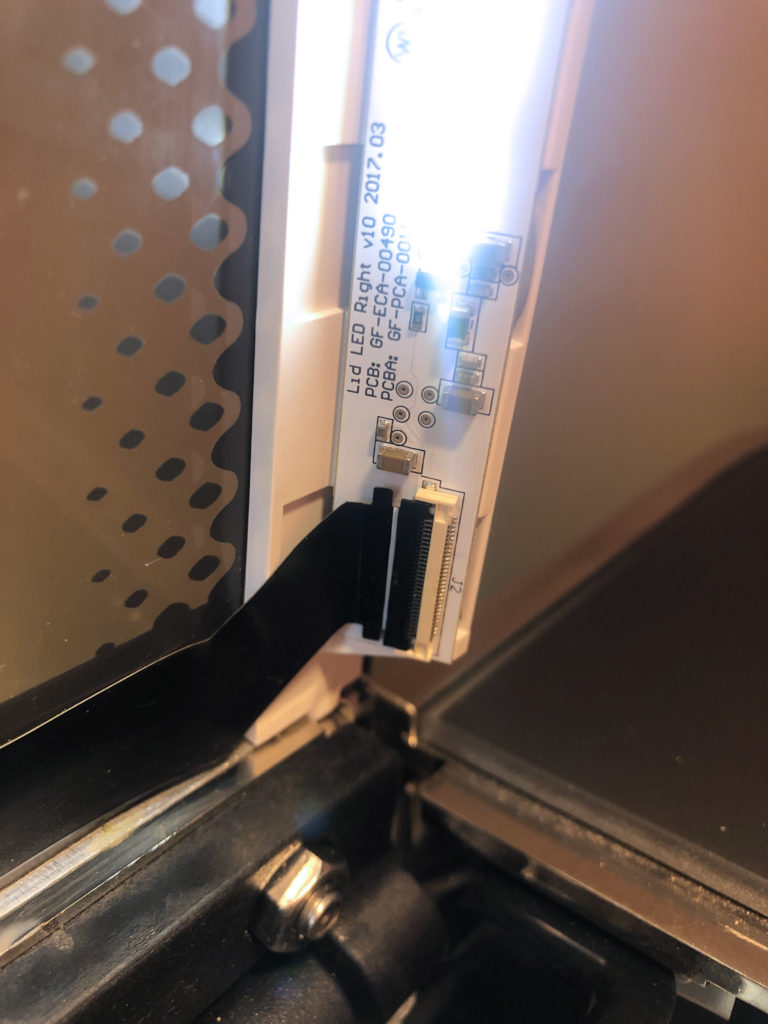
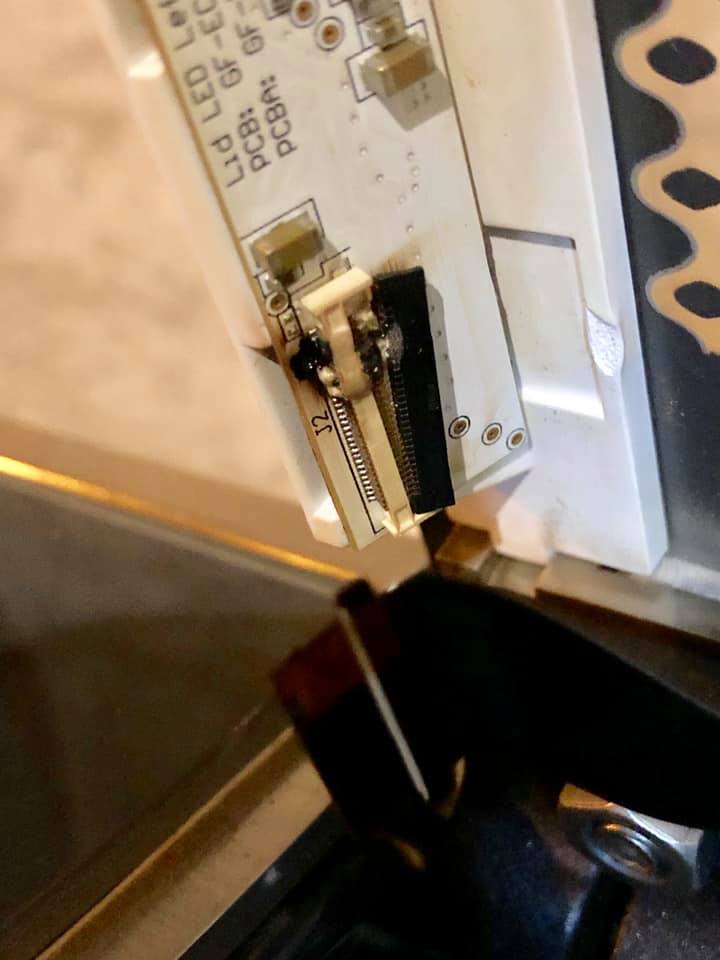
Lid Camera Cable
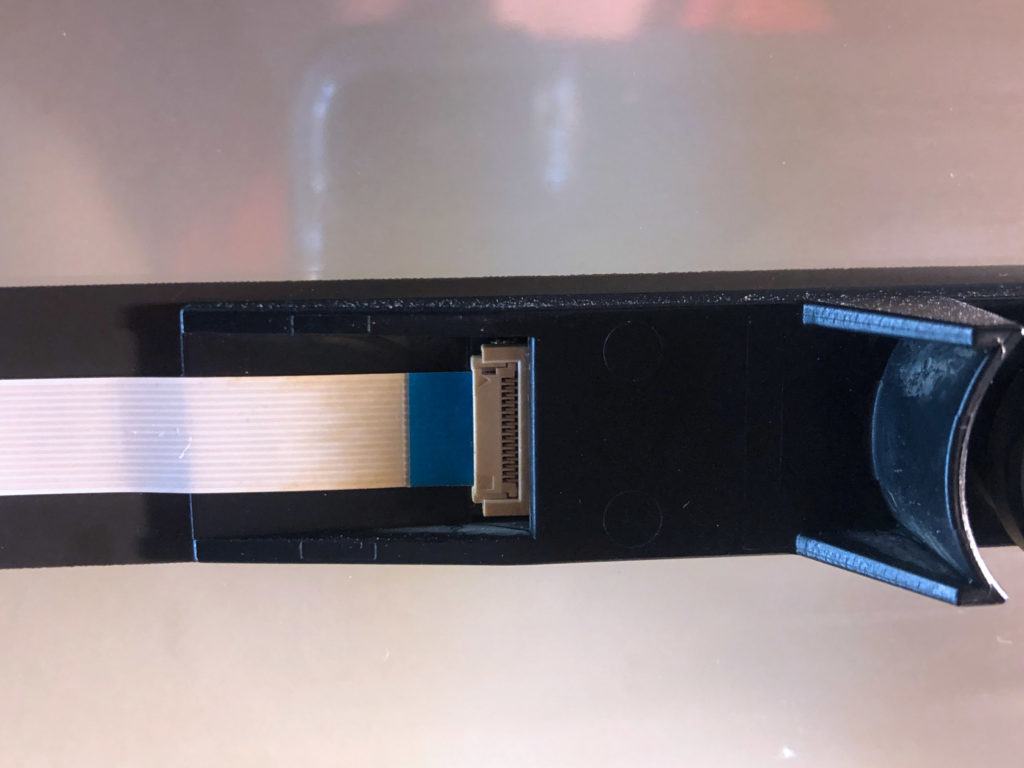
The gif below from Glowforge sows how to unclip your cables. Don’t do this until after you have explored all other options and contacted Glowforge. I would personally only do this as Hail Mary while you wait for a new cord to arrive.
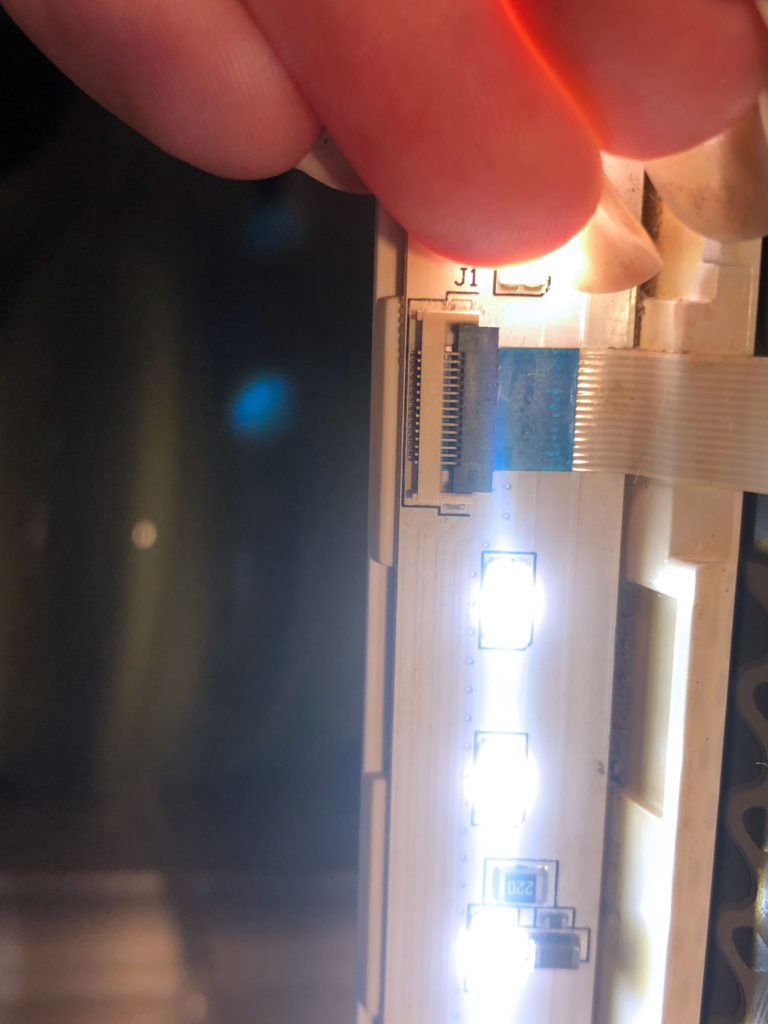
If you have damage like below you may need to send your machine in for repair. Potentially they can ship you an entirely new LED light strip for that side. I do not know if they will send this to you or require you to ship the whole machine in (some users say they sent it out, others said the whole machine was replaced), . It is fixable – but it’s definitely a bad thing to open your lid and see. If you do NOT clip your cables in correctly this can happen. The below picture is from a user who has JUST installed a new cable – likely this clip was not seated correctly and when they turned on the machine it fried the connection.
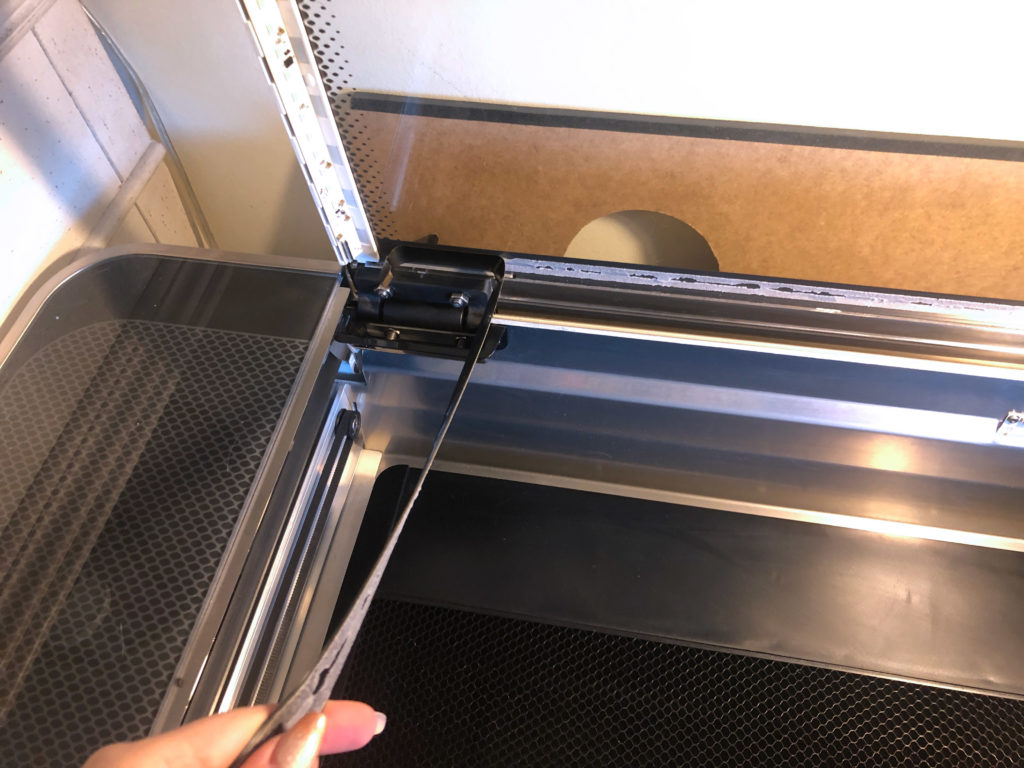
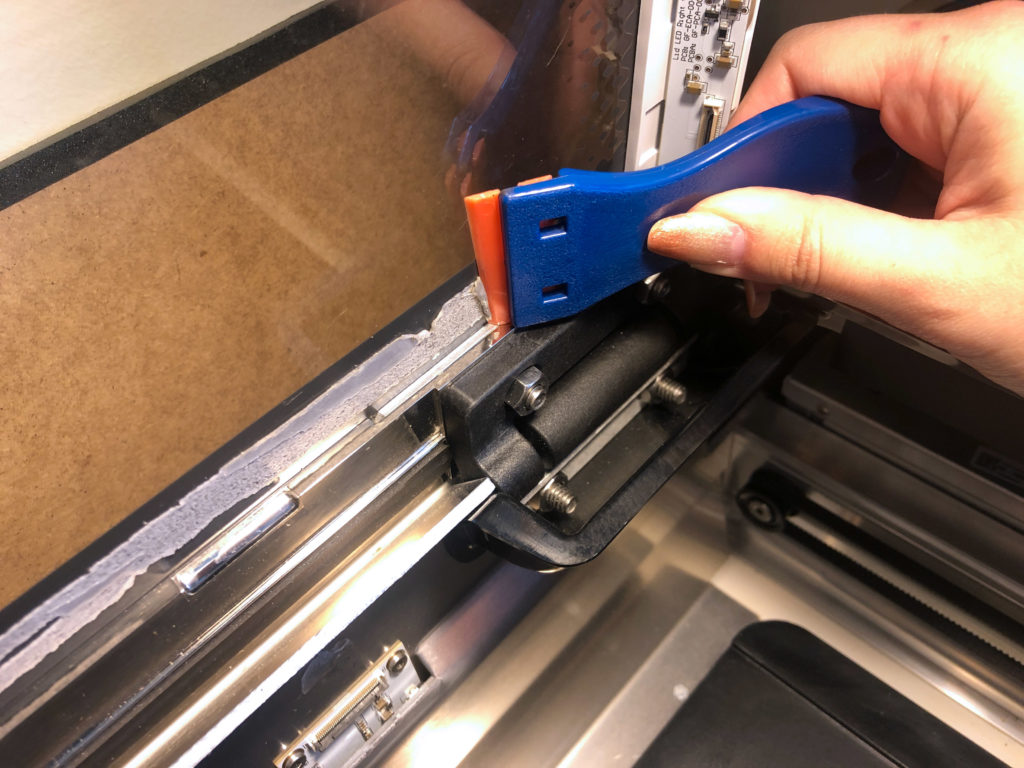
Replacing The Dreaded Black Cable
If between the troubleshooting above and your conversation with Glowforge you do determine it is likely a black cable issue, don’t fret. You will be down for a few days, but the fix is pretty easy. When the cable arrives it will come in a cardboard tube. Your first steps are to remove the old black cable, clean the adhesive off, and replace it with your new black cable.
Glowforge has great instructions for this with photos – so I won’t re-invent the wheel here. Just go to their instructions.
One little tip: If you have a plastic razor blade it will make quick work of removing the adhesive. When removing the adhesive be CAREFUL. don’t rush and DO NOT rest your arms on the laser tube (harder to avoid than you’d think). Move the print head out of the way and just go slow.
How can I Prevent the Black Cable Issue?
To some degree you cannot totally prevent this. If this is a true hardware failure based on the manufacture of the cable there isn’t much you can do, but the following tips can greatly reduce you chance of encountering this problem:
- Keep your machine clean – The number one thing you can do is keep your lenses, fans, and machine interior clean.
- Do not start your Glowforge with material on the crumb tray (or with the crumb tray out). Having too many voids in your material can confuse the camera. If you have a jig in place you cannot move, you can place a sheet of black paper or mat board over it, and that will likely work.
- Do not spray cleaner into your machine – Only apply liquid cleaner to your cloths. Do not get the connections wet and do not wipe over them with a wet cloth. Gently brush them off with a soft clean brush if they get sooty. VERY gently I might add, you don’t want to push debris into them or have brush hairs get into the connections.
- Do not pull on the cables or fiddle with them. Do not open them just to look at them. Leave them alone unless you have an issue.
- Don’t open your machine all the way – obviously you can’t totally avoid this, but if you can don’t push your lid all the way back and open. This can put stress or rub the black cable loop.
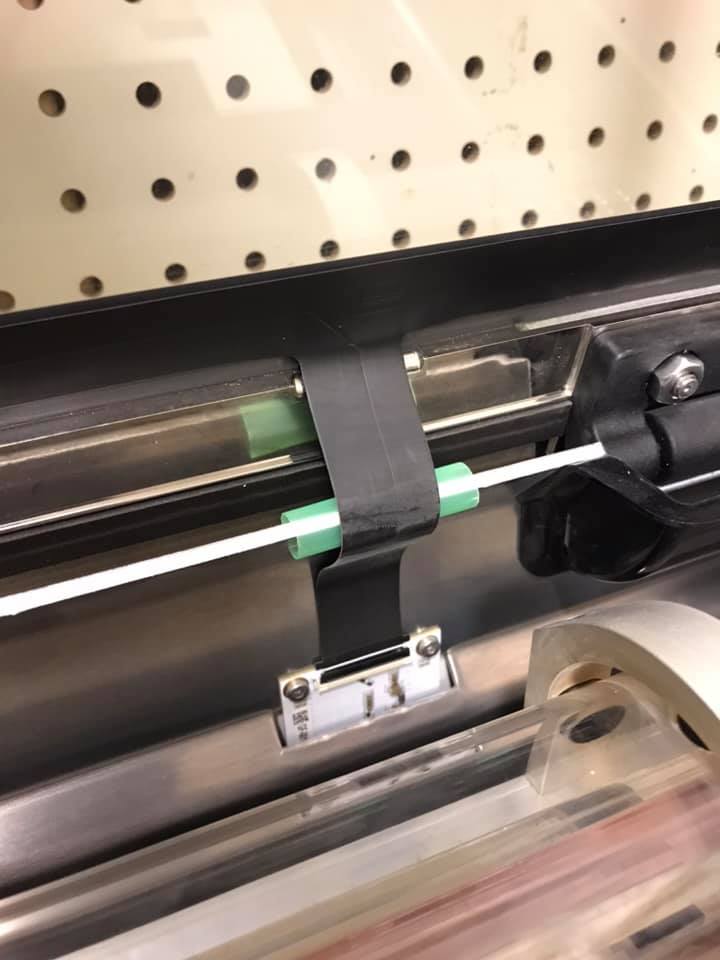
- Add a bit of padding behind the black cable that comes down from the lid – if you have an older machine you may have a shorter cable here which can rub on the metal lip and become damaged (the internal wires tend to get broken).
* The image below by Wood and Whisp shows how they protect their black cable from damage. A piece of tape, a straw, a strip of felt etc may help prevent rubbing. Just make sure it’s secured so it doesn’t drop into the machine and cause a fire hazard.
NAVIGATE POSTS
Helpful Links
Latest Posts
Posts by Category
Explore Posts By Tags
Acrylic Adobe Illustrator Alcohol Ink Baby Room Beginner Post Book Binding BuyTheFile Christmas Felt freefiles Gifts Gilding Glowforge Holiday Jewelry Journal Kaleidoscope LED Notebook Resin Rubber Stamp Settings Sign Stamping Yupo
Get Your Own Glowforge Laser
If you have found this post helpful and would like to purchase a Glowforge of your own you can receive a discount using my referral link when you are ready to purchase:
Sign Up to Blog Newsletter
CONCLUSIONS
This issue is incredibly common. It’s one of the most common hardware failures. Luckily if it is your black cable it’s not an expensive fix even if you’re out of warranty. It cost me a total of $28 dollars to get a new cable and it was shipped out within 24 hours of me contacting Glowforge. I had a very good experience with customer service – they responded quickly (even though it was evening) and resolved the issue in a timely manner. All in all I was down 6 days from first problem to installing the new cable. You can ask to expedite the cable at your expensive – so if you need it overnight it can be done (I think it comes out to about $40)
I hope this post will help anyone that is going through a “stuck on centering” issue!
Obligatory Glowforge Discount Code Plug
If you found this post helpful and you plan to buy a Glowforge you can use my code (https://glowforge.us/r/QHDONFXB) for a discount of $100 off the Basic, $250 of the Plus, or $500 of the Pro:
Sign Up for Blog Posts Updates
And finally, if you’d like to be updated on posts like these in the future you can sign up for my email list. You will only receive an email if there is new content, and only once weekly in that case: