
Laser Cut Clutches
Project Overview:
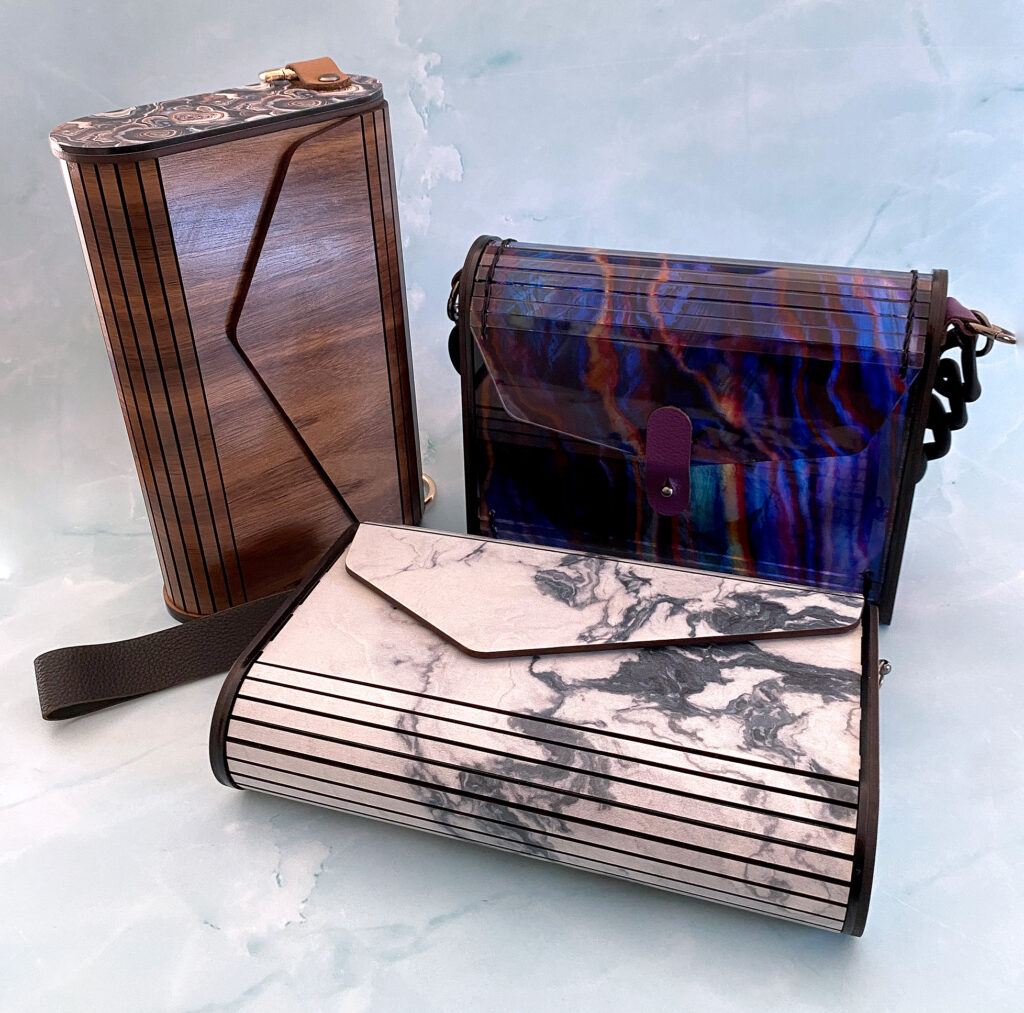
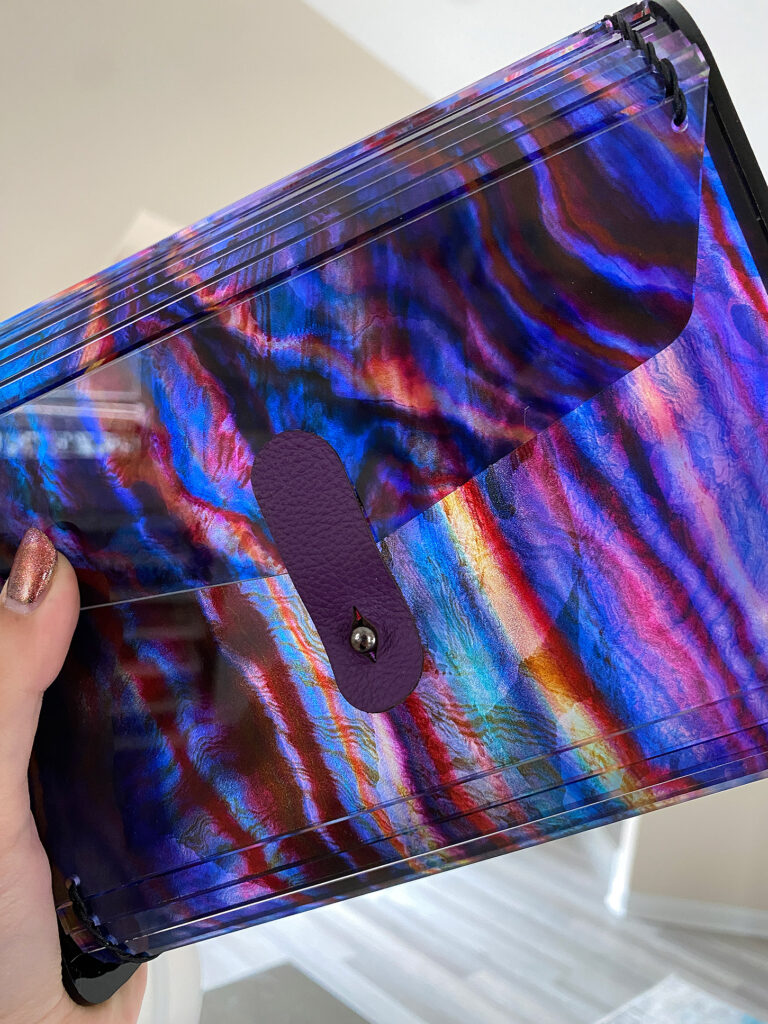
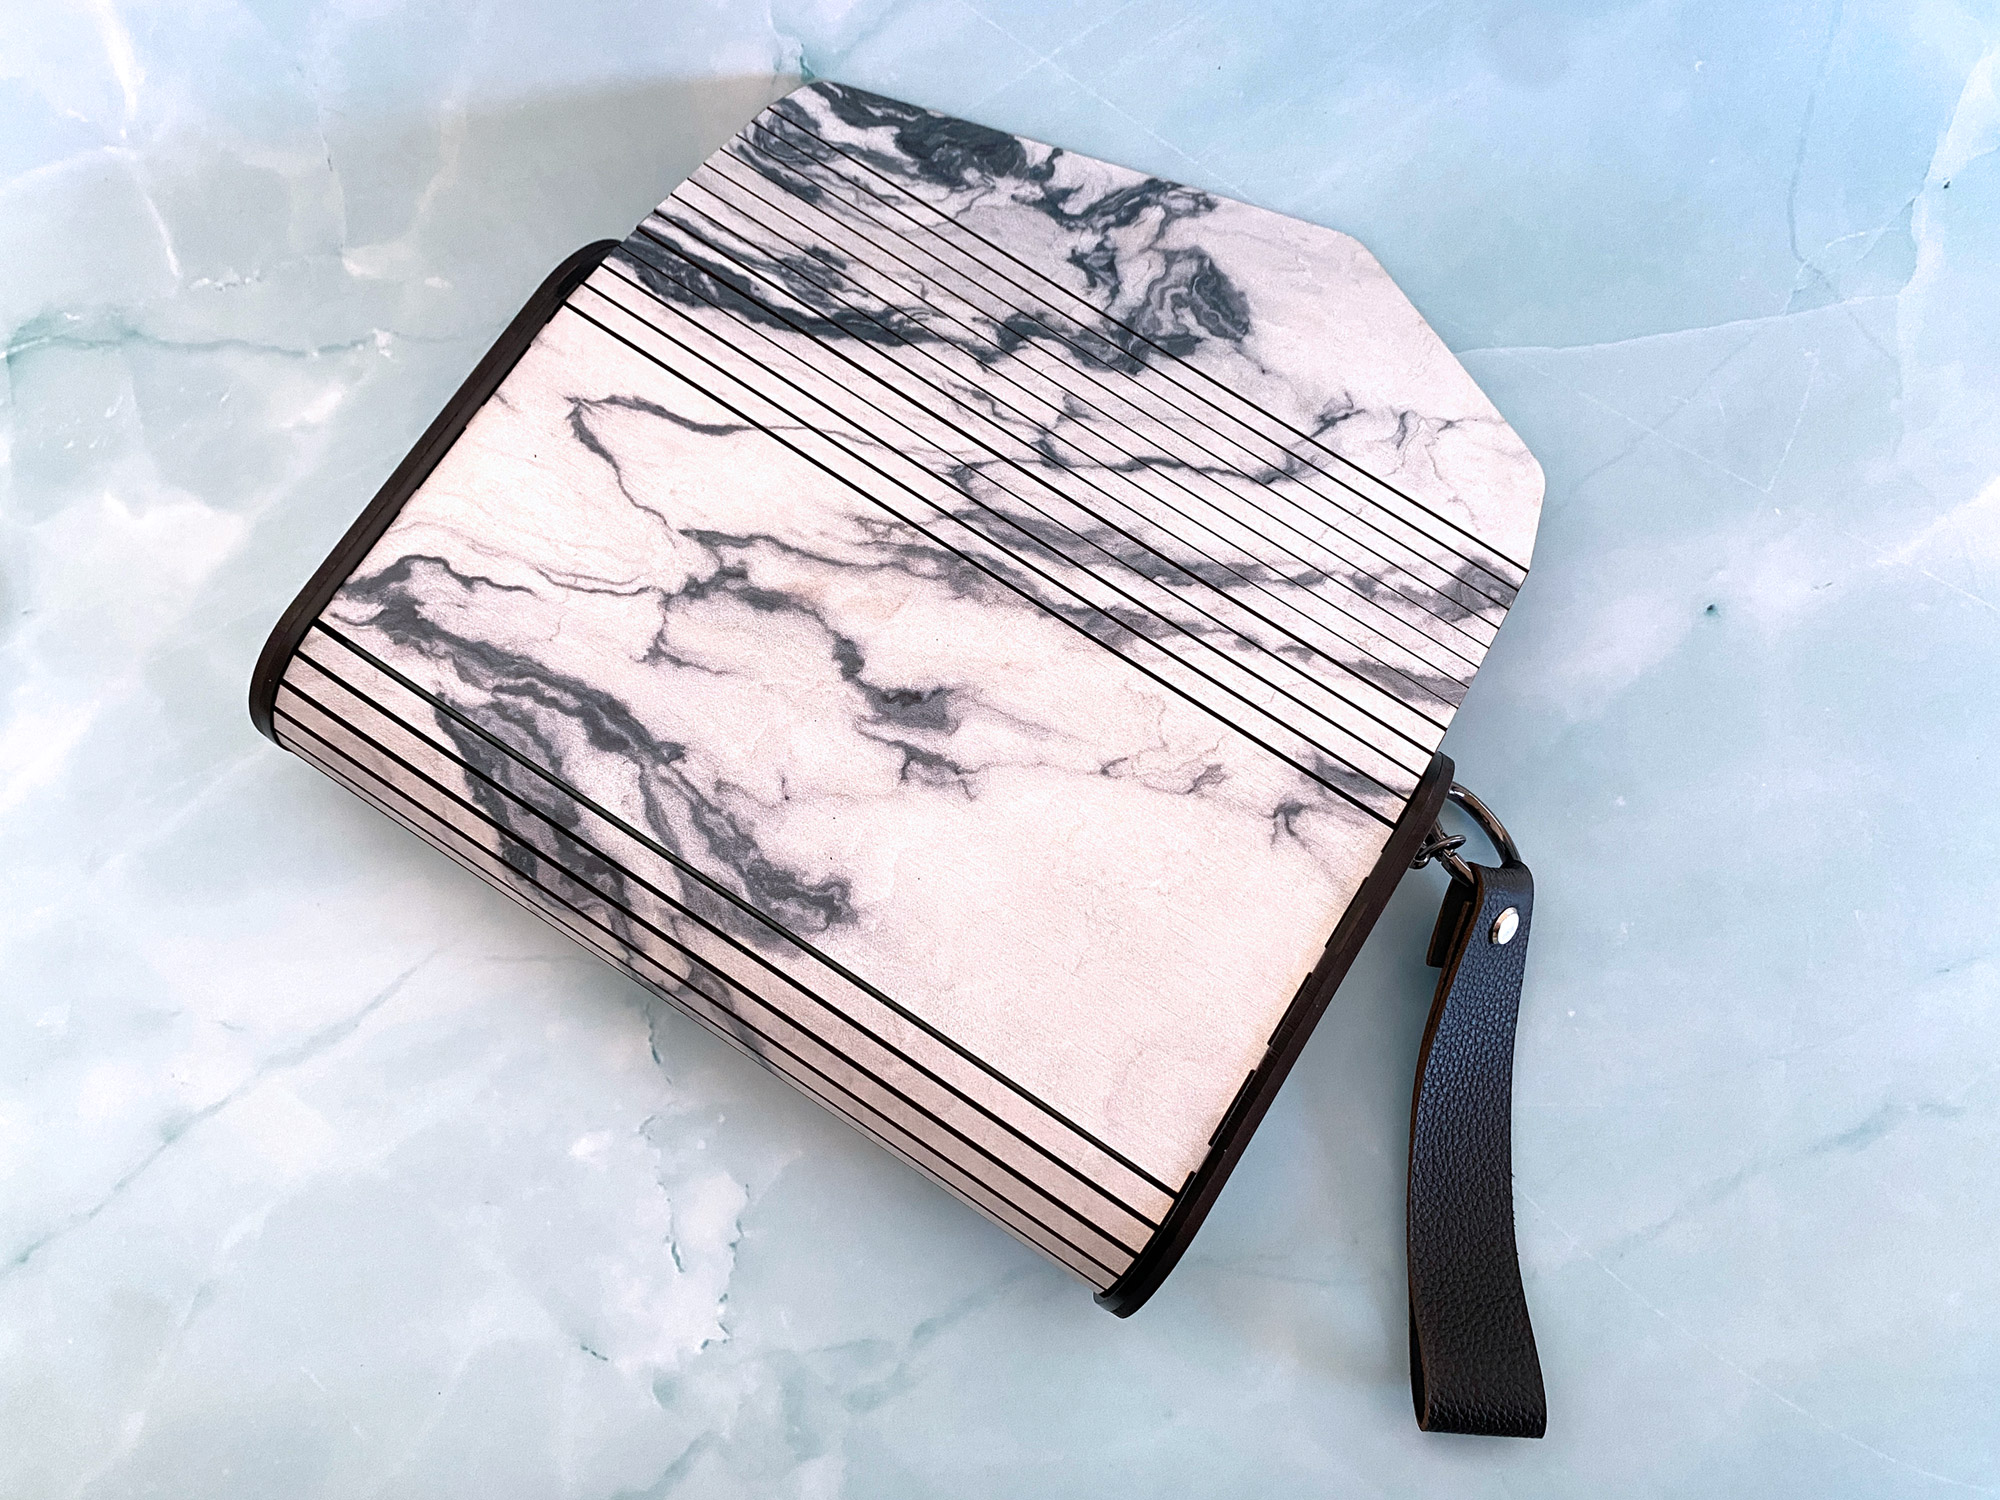
So, I’m not a fan of the living hinge. They are delicate and prone to breakage, the can be stiff if they don’t go the correct direction with the grain, and I kind just think they look…ugly (that’s obviously a personal opinion). I saw a post by someone online looking for a way to make her clear purses (with the living) hinge more durable, and I got to thinking. Eventually I settled in on the designs you see below. I like that the hinge is more simple looking than the living hinge, and that you can either use a liner to adhere the purse, or sew the hinge (so you can use translucent materials).
Get The File
I won’t be talking to much about the design process here, so if you want to make the purses exactly as I have made them you can buy the file on my Etsy.
Project Overview Video
About the Materials
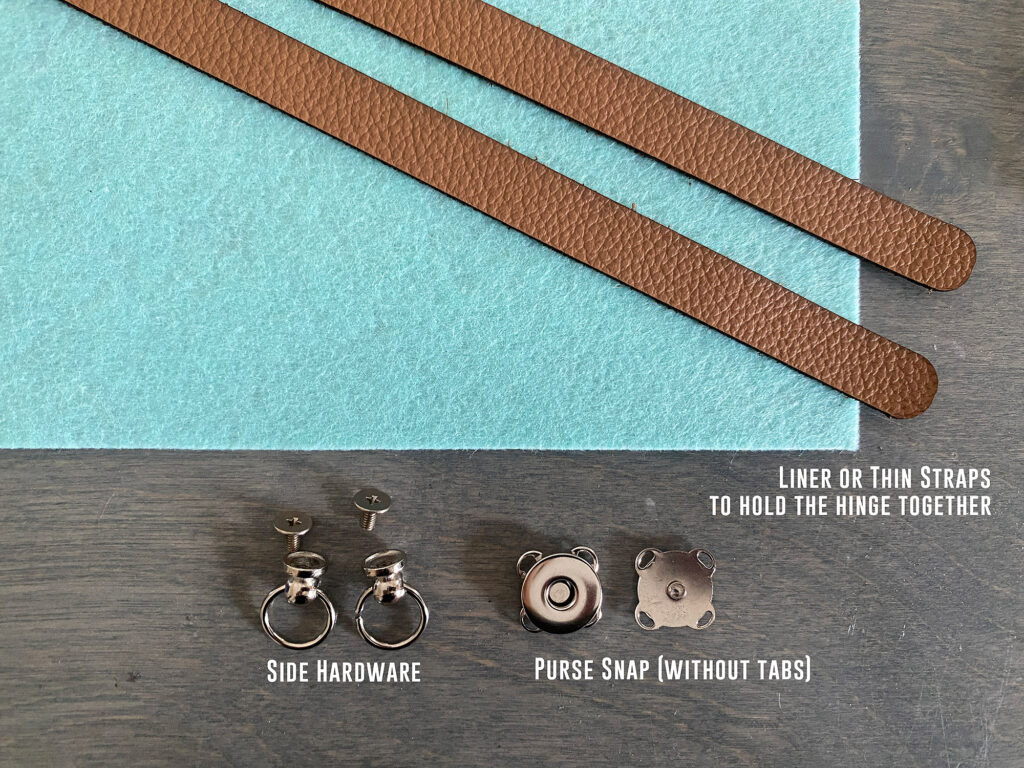
This purse is actually very quick to assemble once you’ve done it once or twice, so it’s a great option for making for events or gifts. It’s also a fun project for mixing and matching your fancy materials. You will need a little more an a single sheet of 1/8″ material, some glue, and some hardware pieces. I also have options for leather parts, but those are not required.
MATERIALS OVERVIEW
You will probably want to watch the first video to get a better explanation of every item I used. I will walk you through the parts and explain how each item is used.
- 3mm (1/8″) or 6mm (1/4″) Acrylic or wood of your choice (1-2 sheets)
- Small Scrap of Leather if desired for tabs
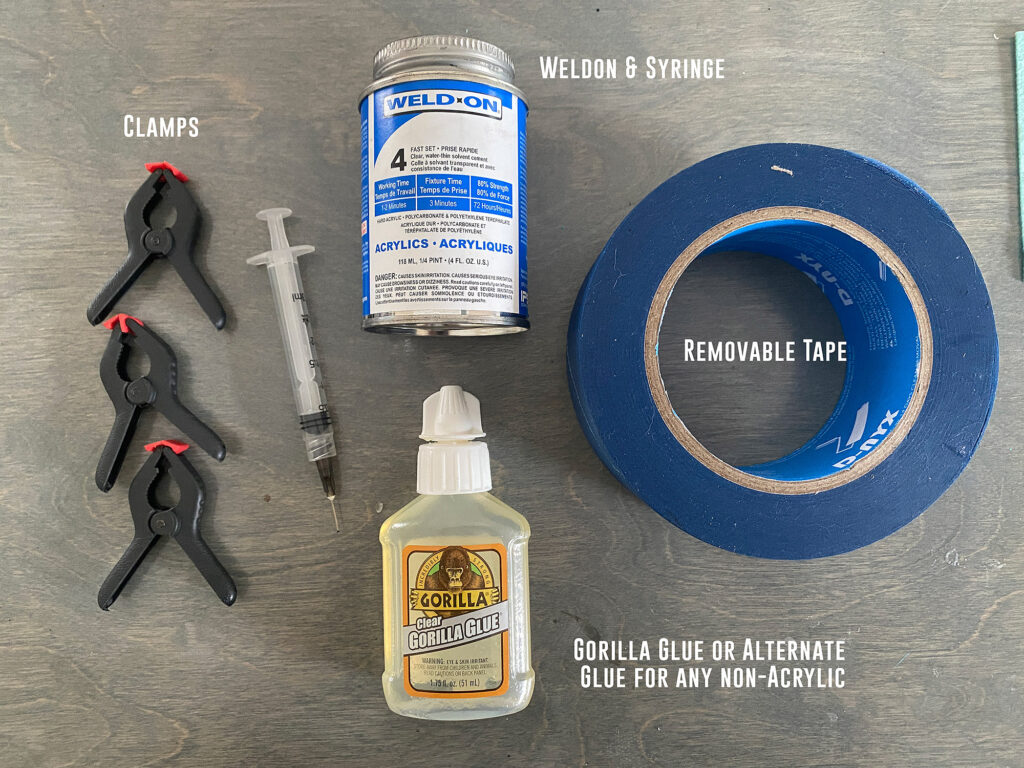
- Permanent, thin tape (Tyvek tape, Gorilla clear tape)
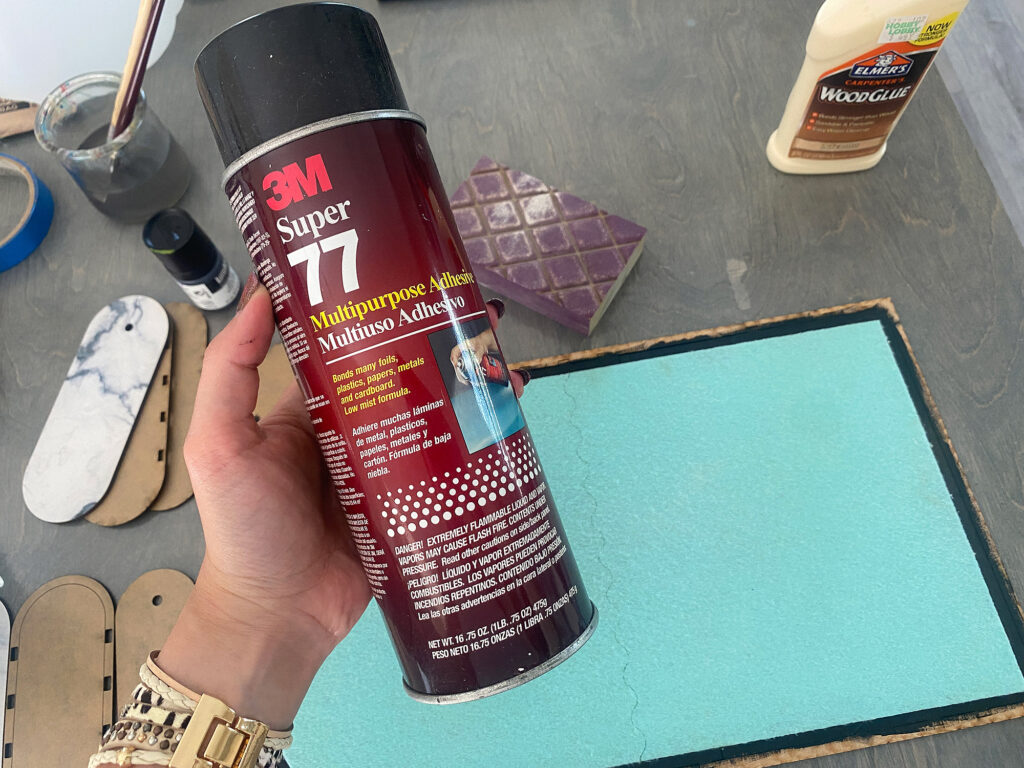
- Acrylic glue like Weldon if using acrylic
- Fabric for Liner if using a liner or 1mm nylon thread if sewing purse
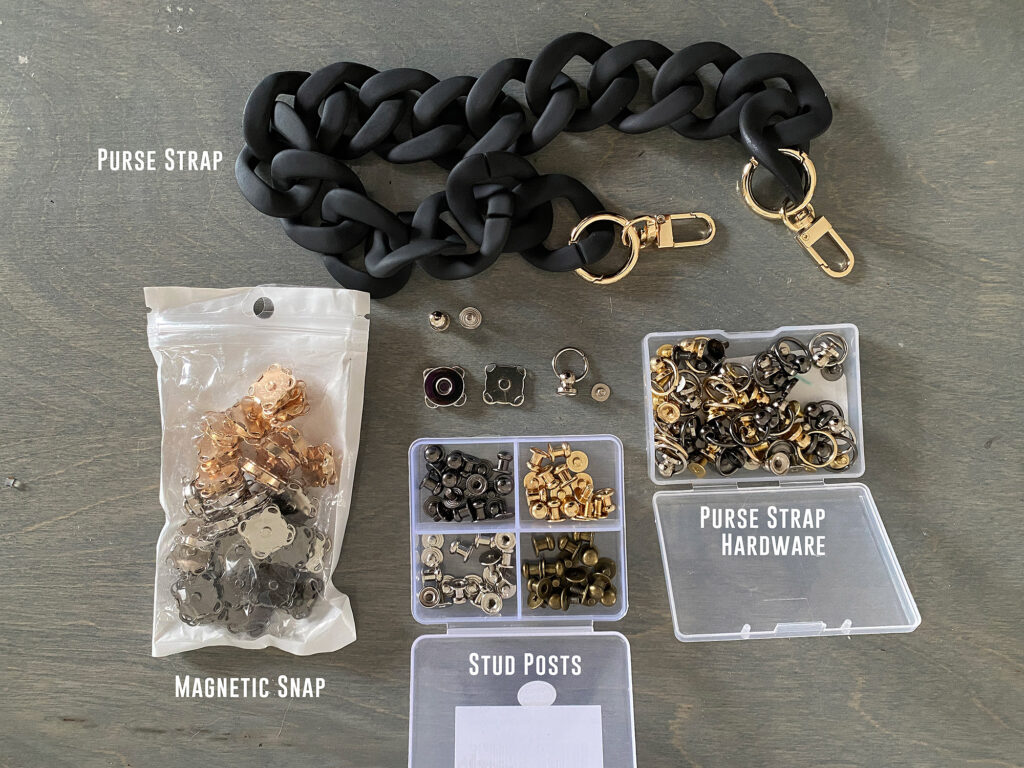
- Hardware of your choice for the design you choose – button snaps (sew on, not tabbed), strap hardware, stud posts etc.
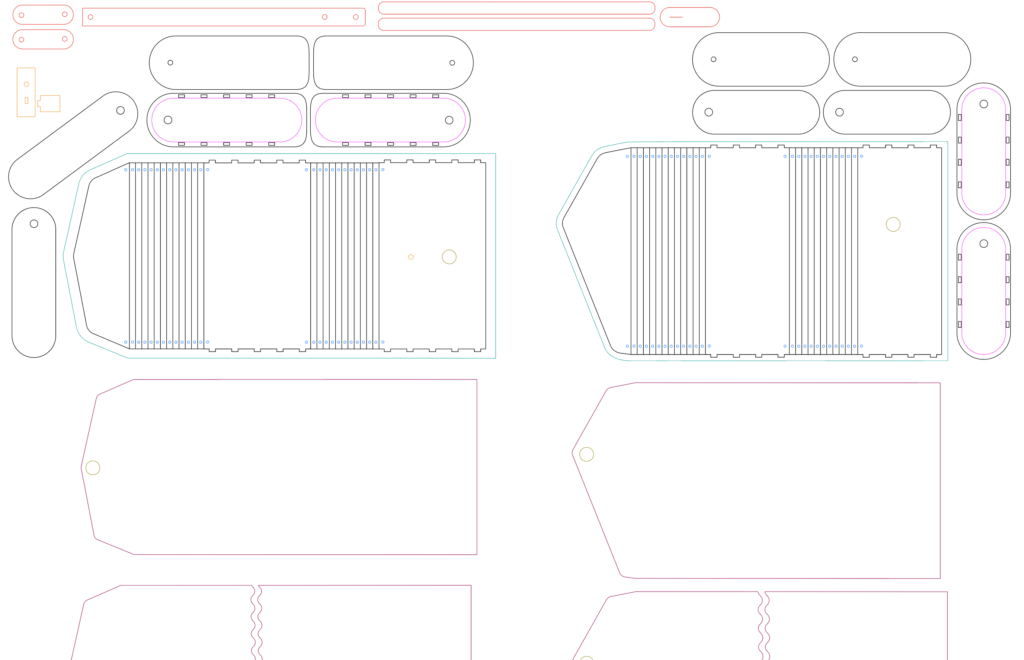
About the File
There are two types of clutches in my file and two methods of assembly (so four total style options) The video below will walk you through both styles but simply these are your options:
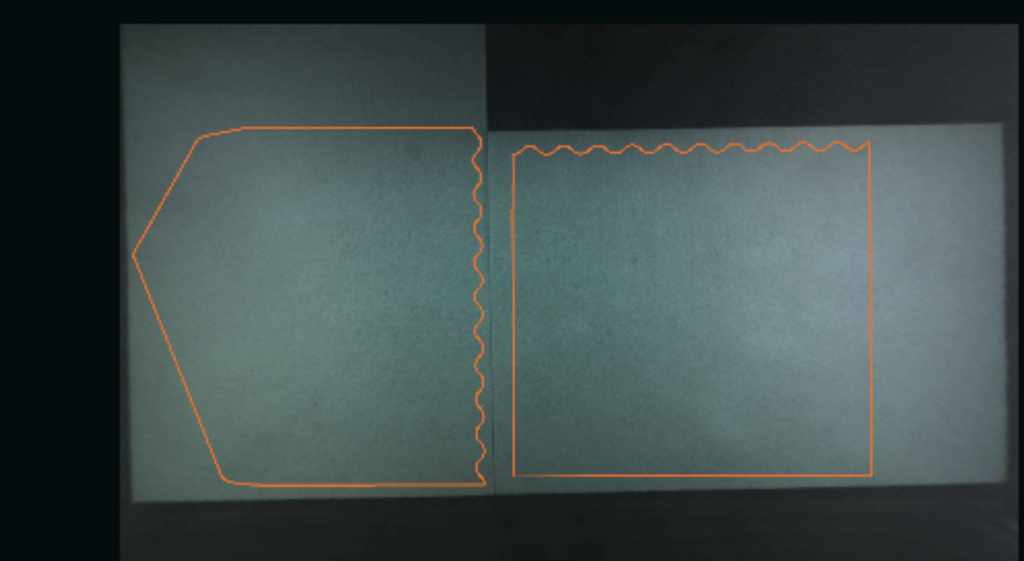
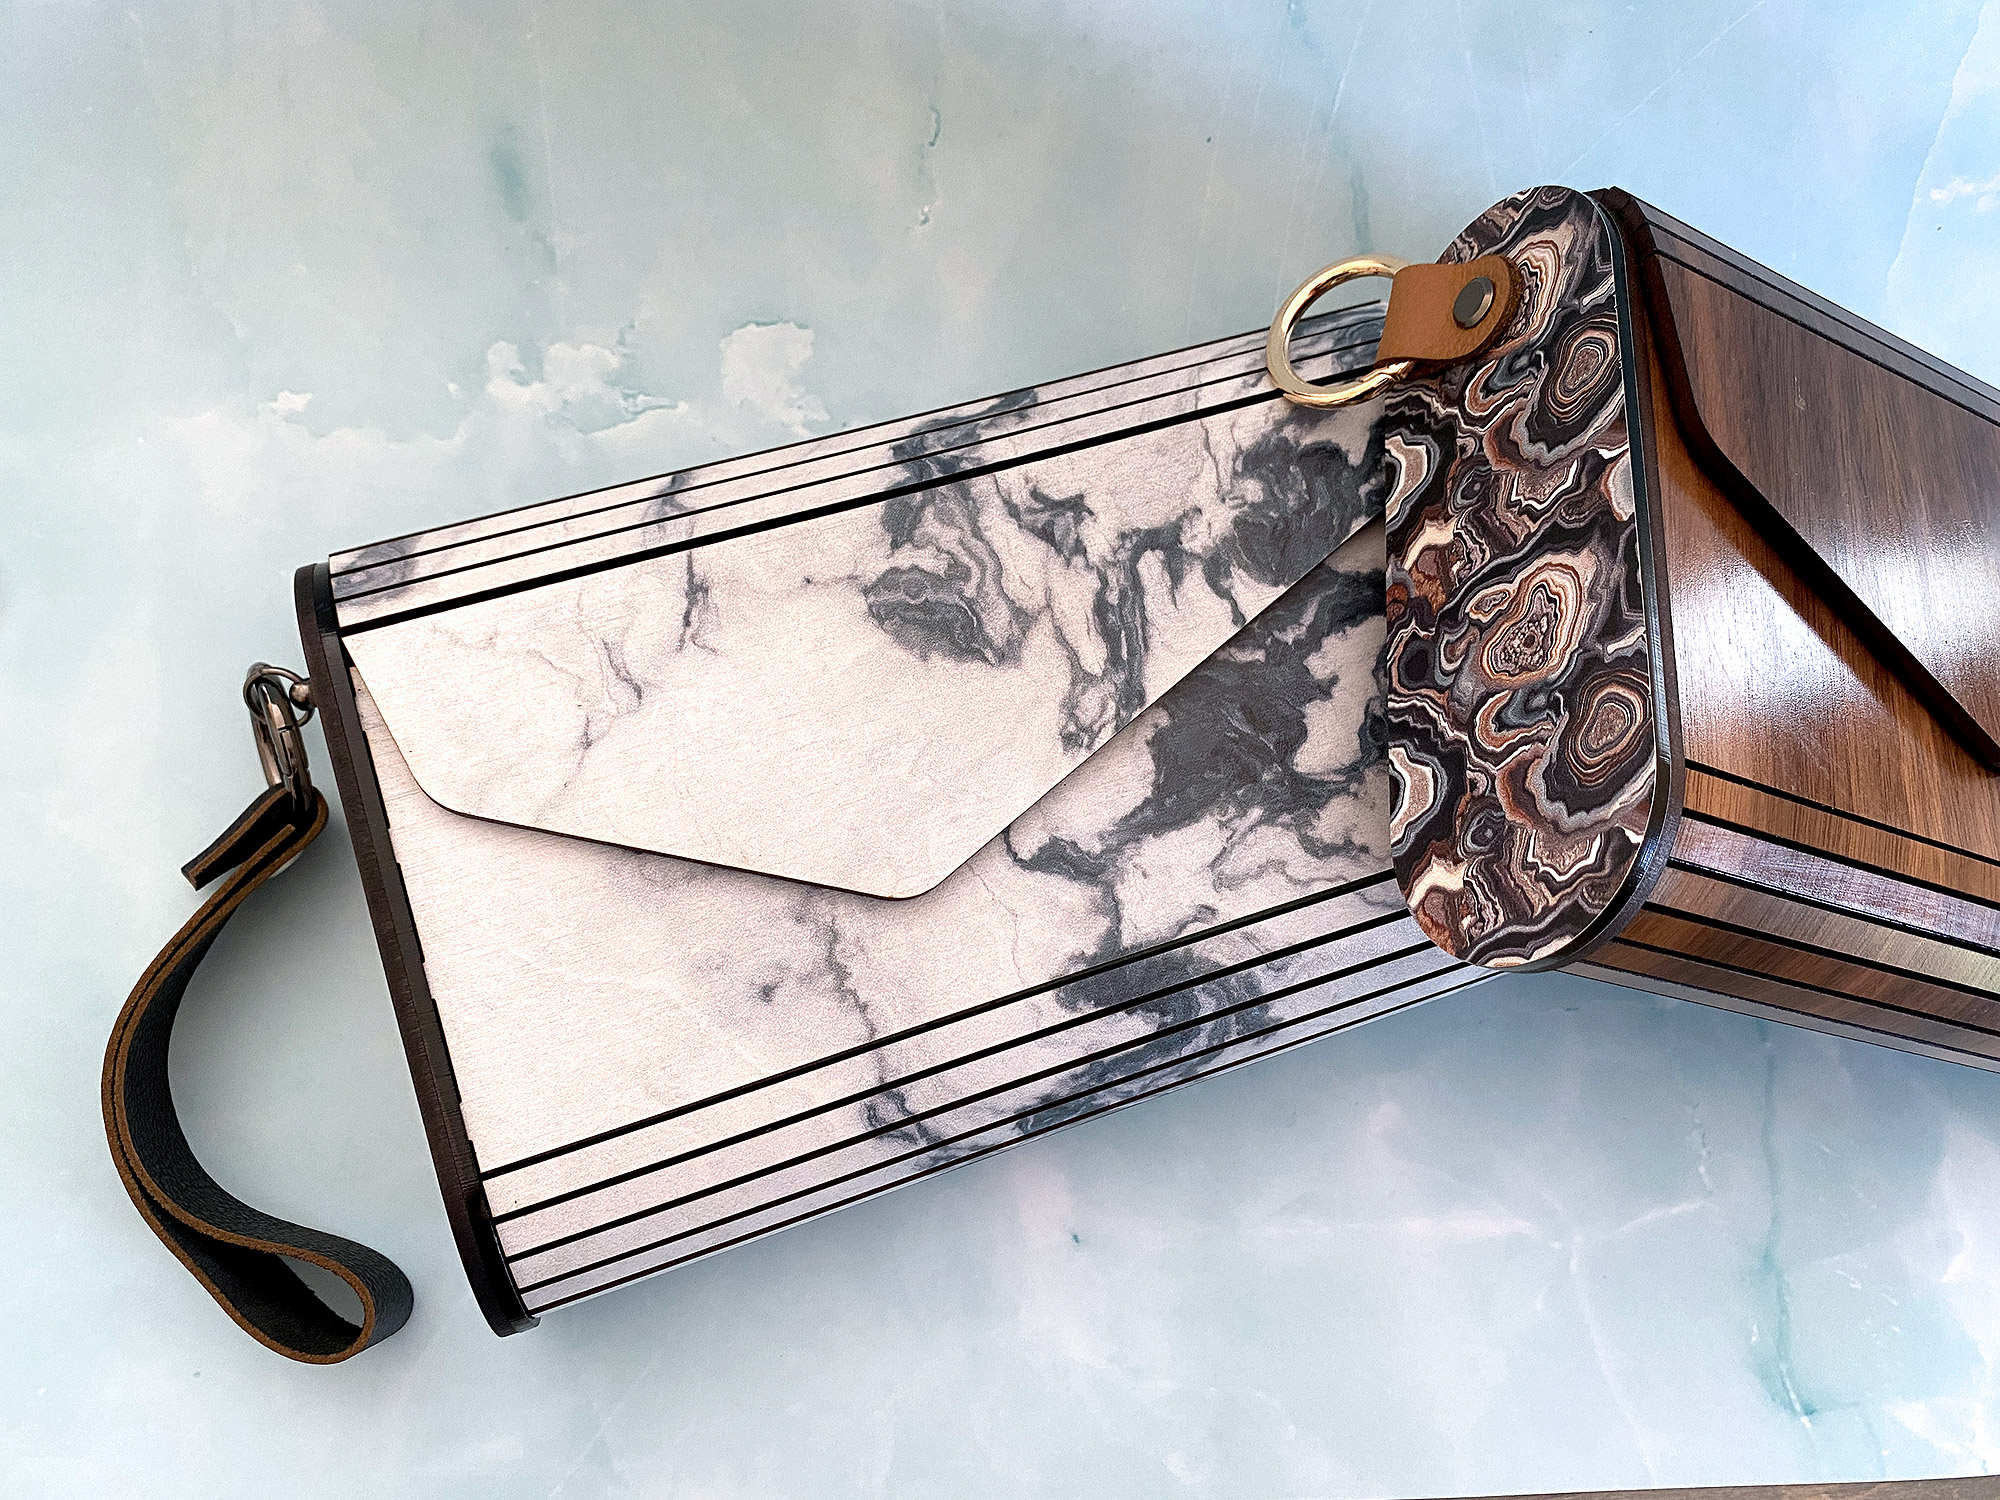
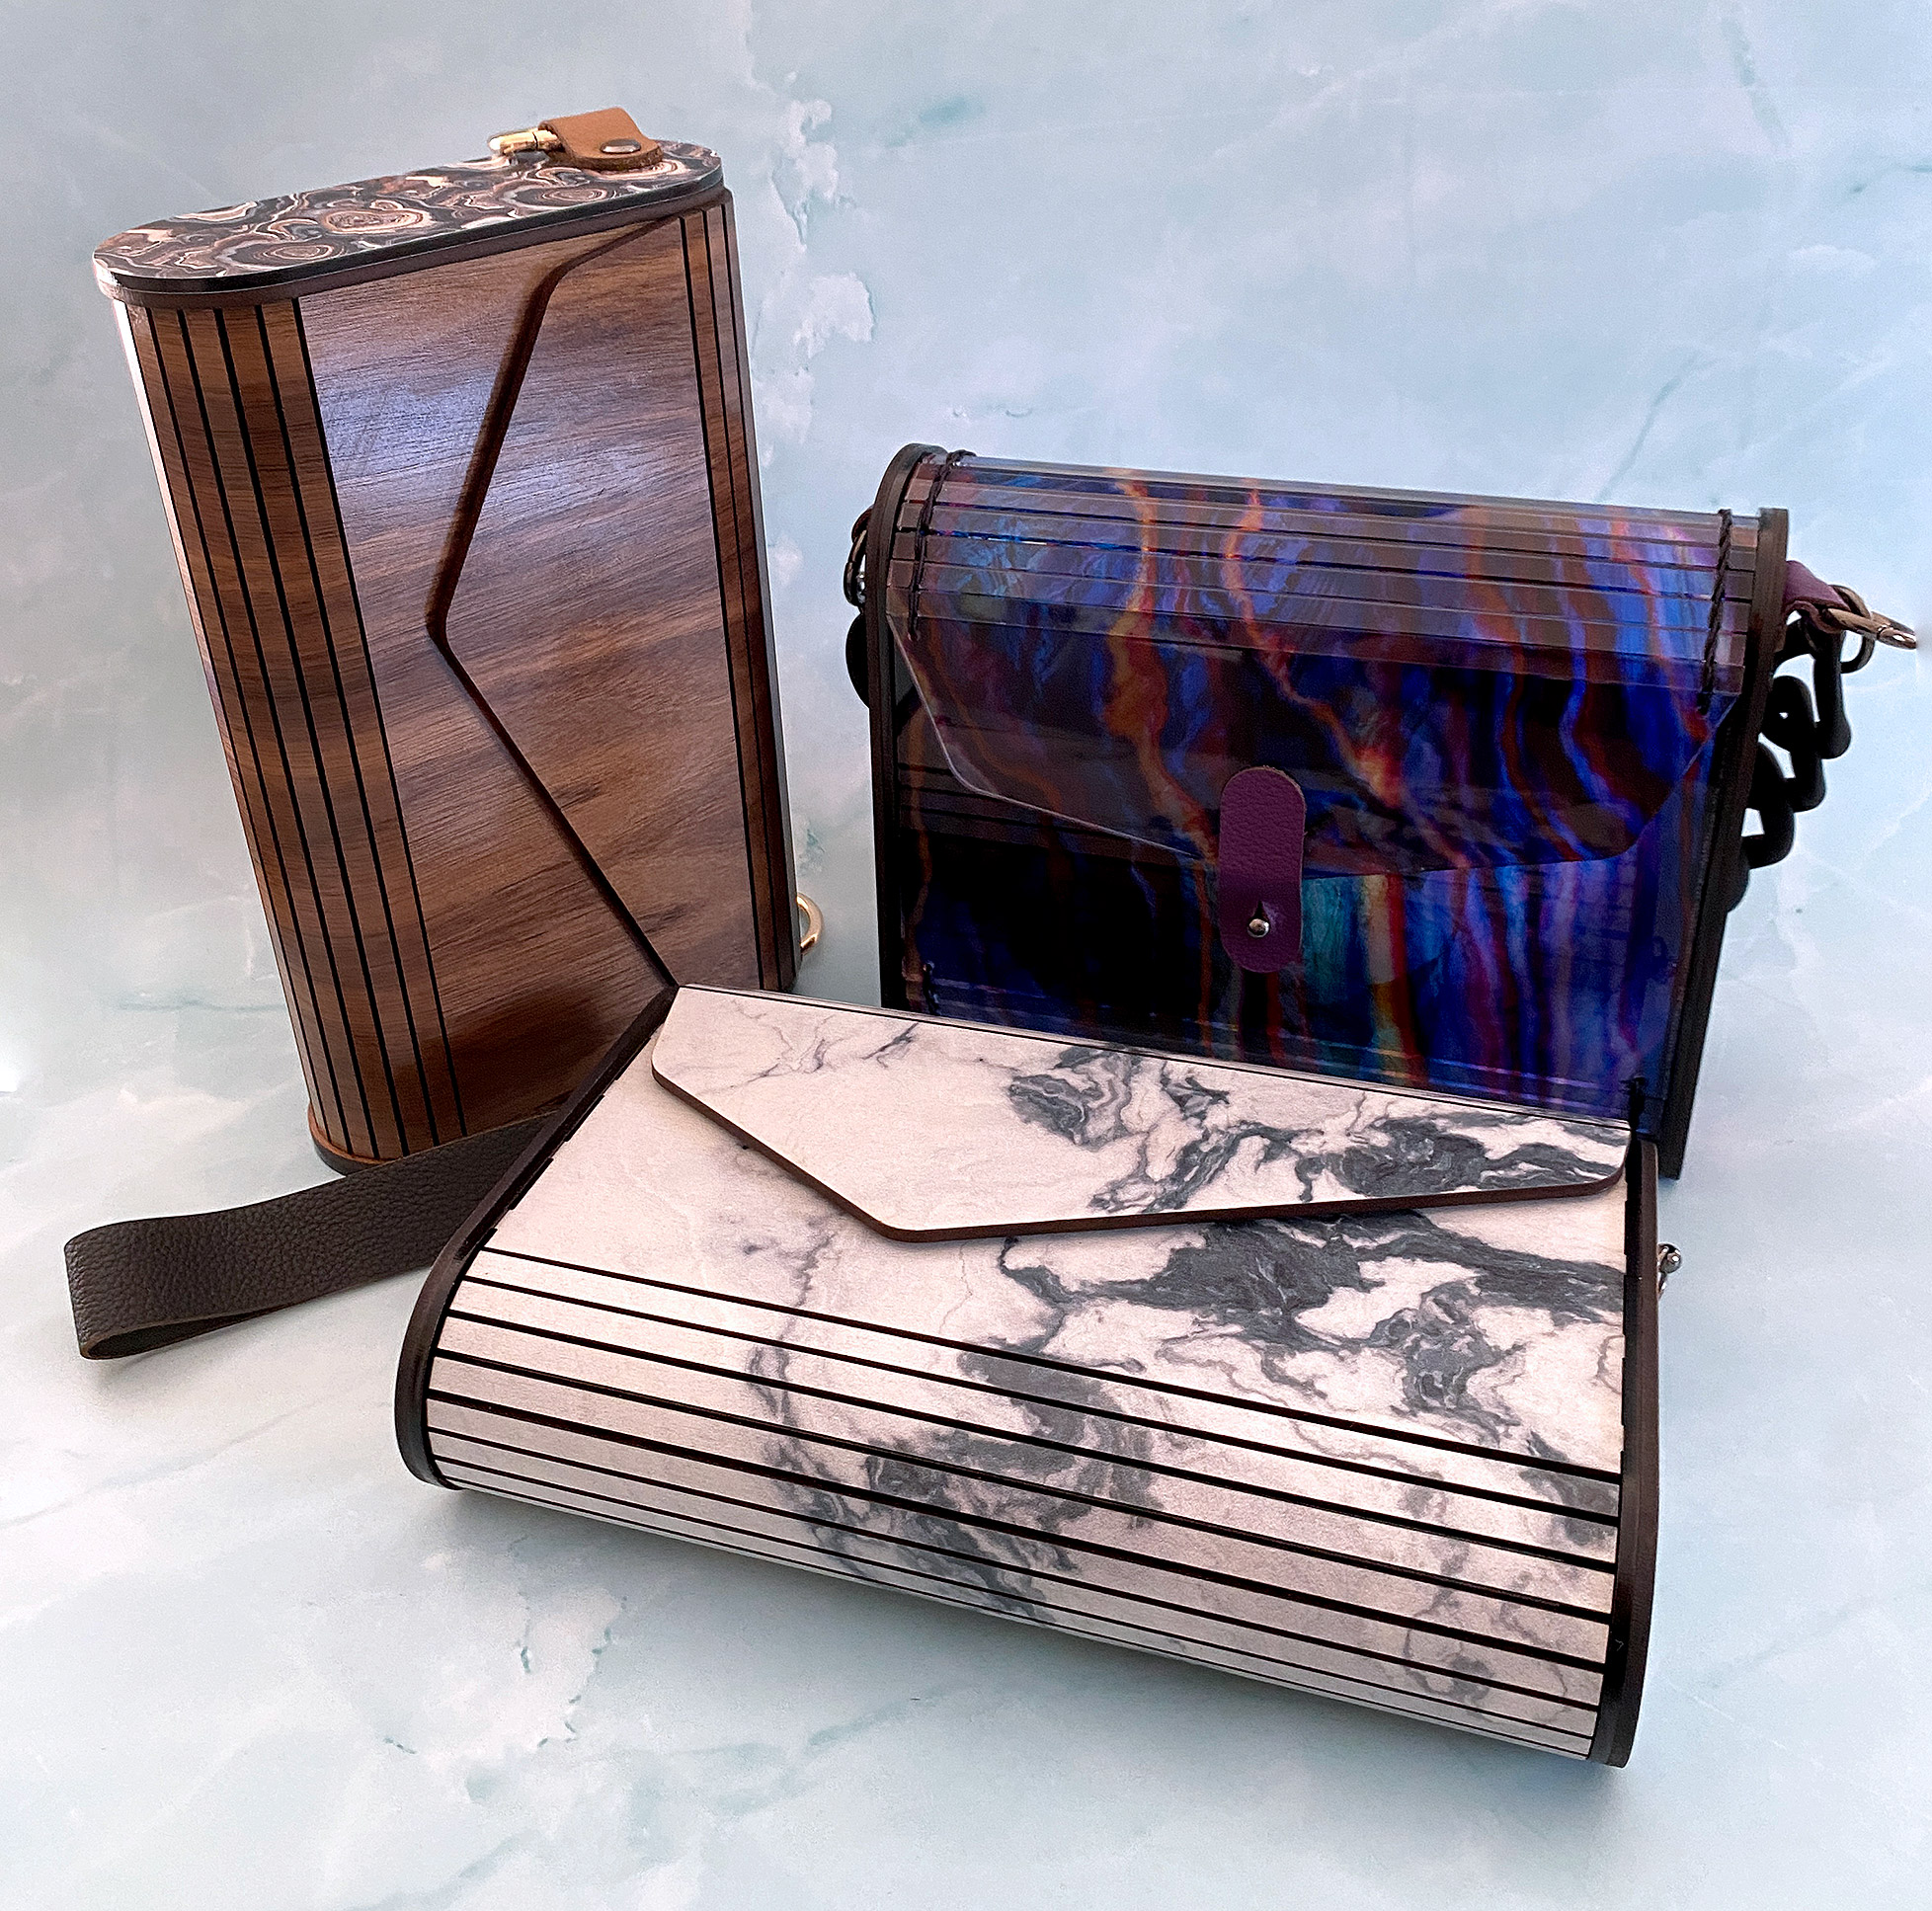
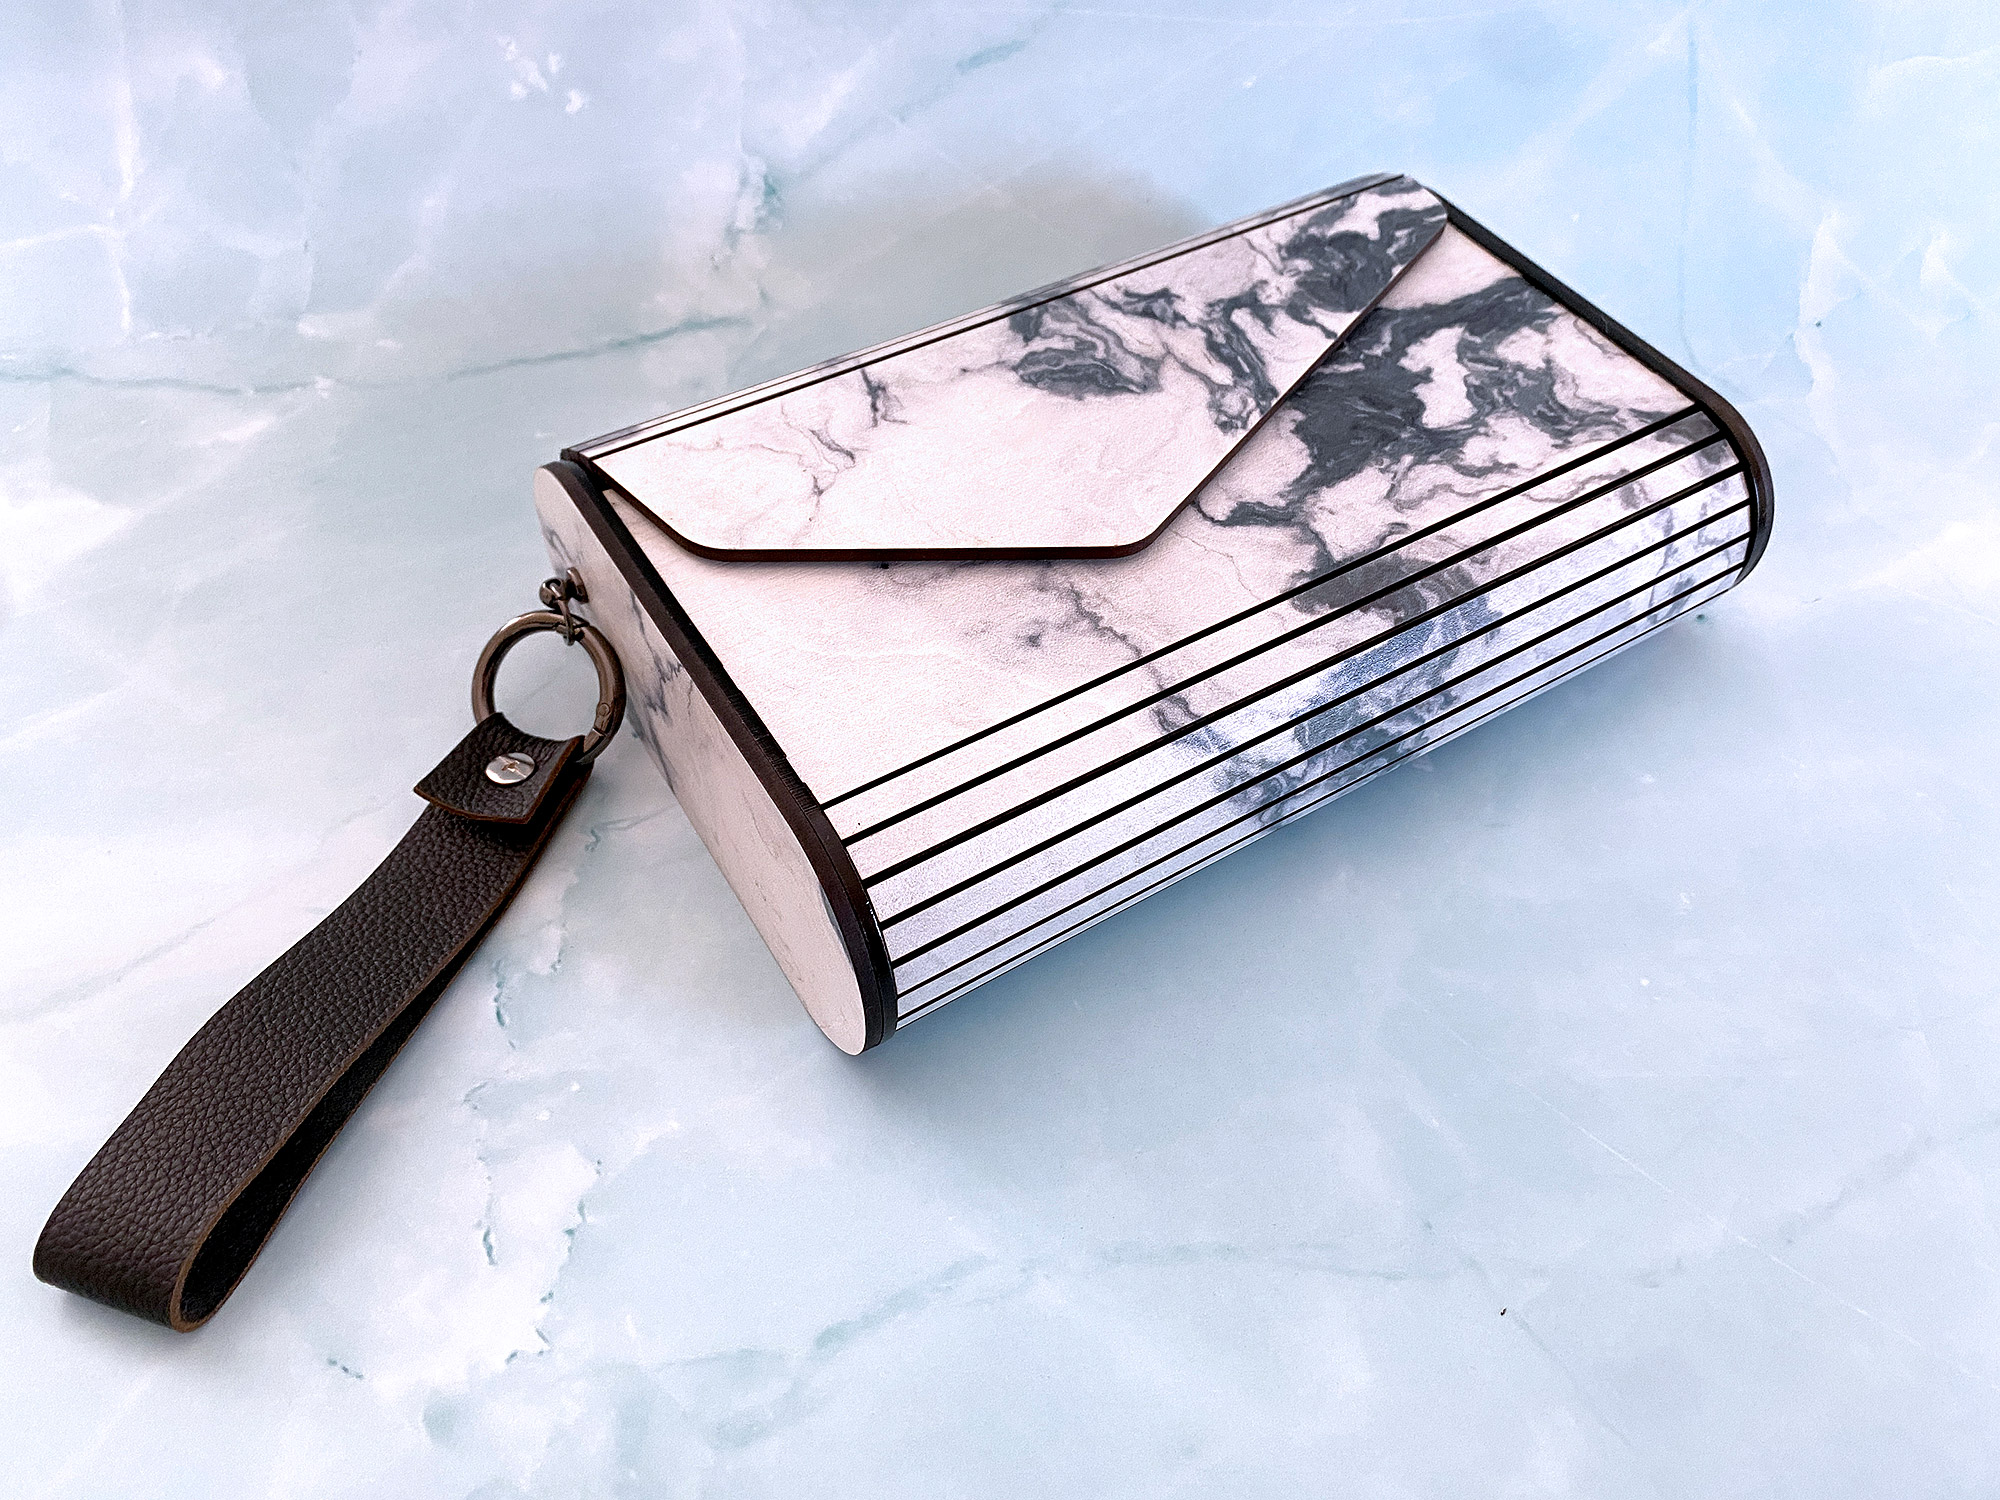
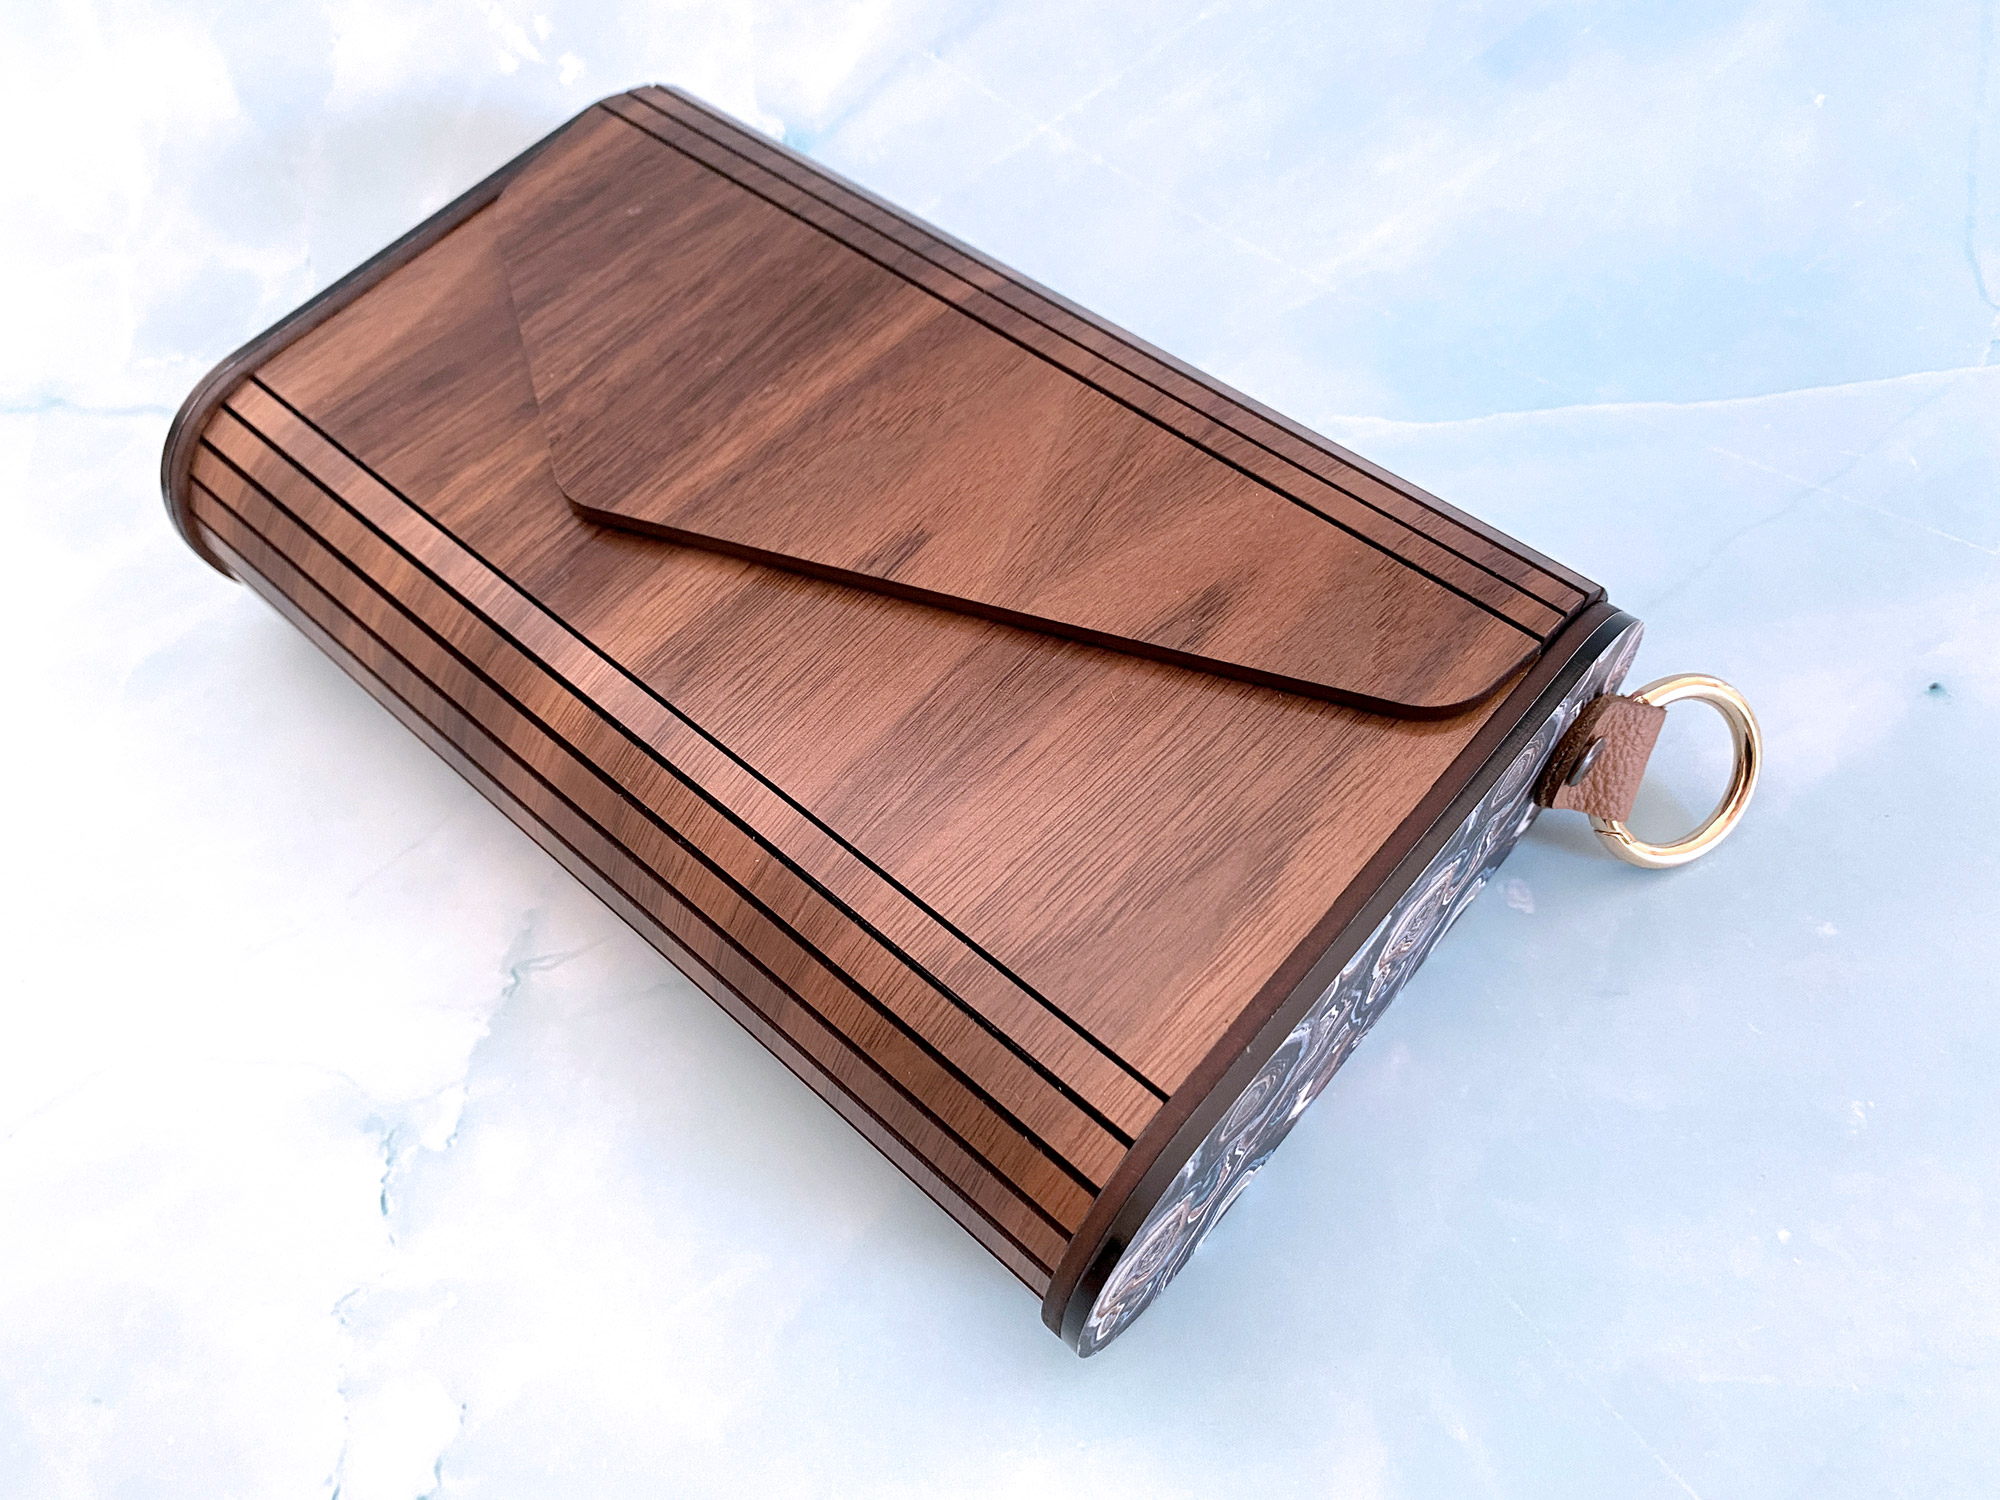
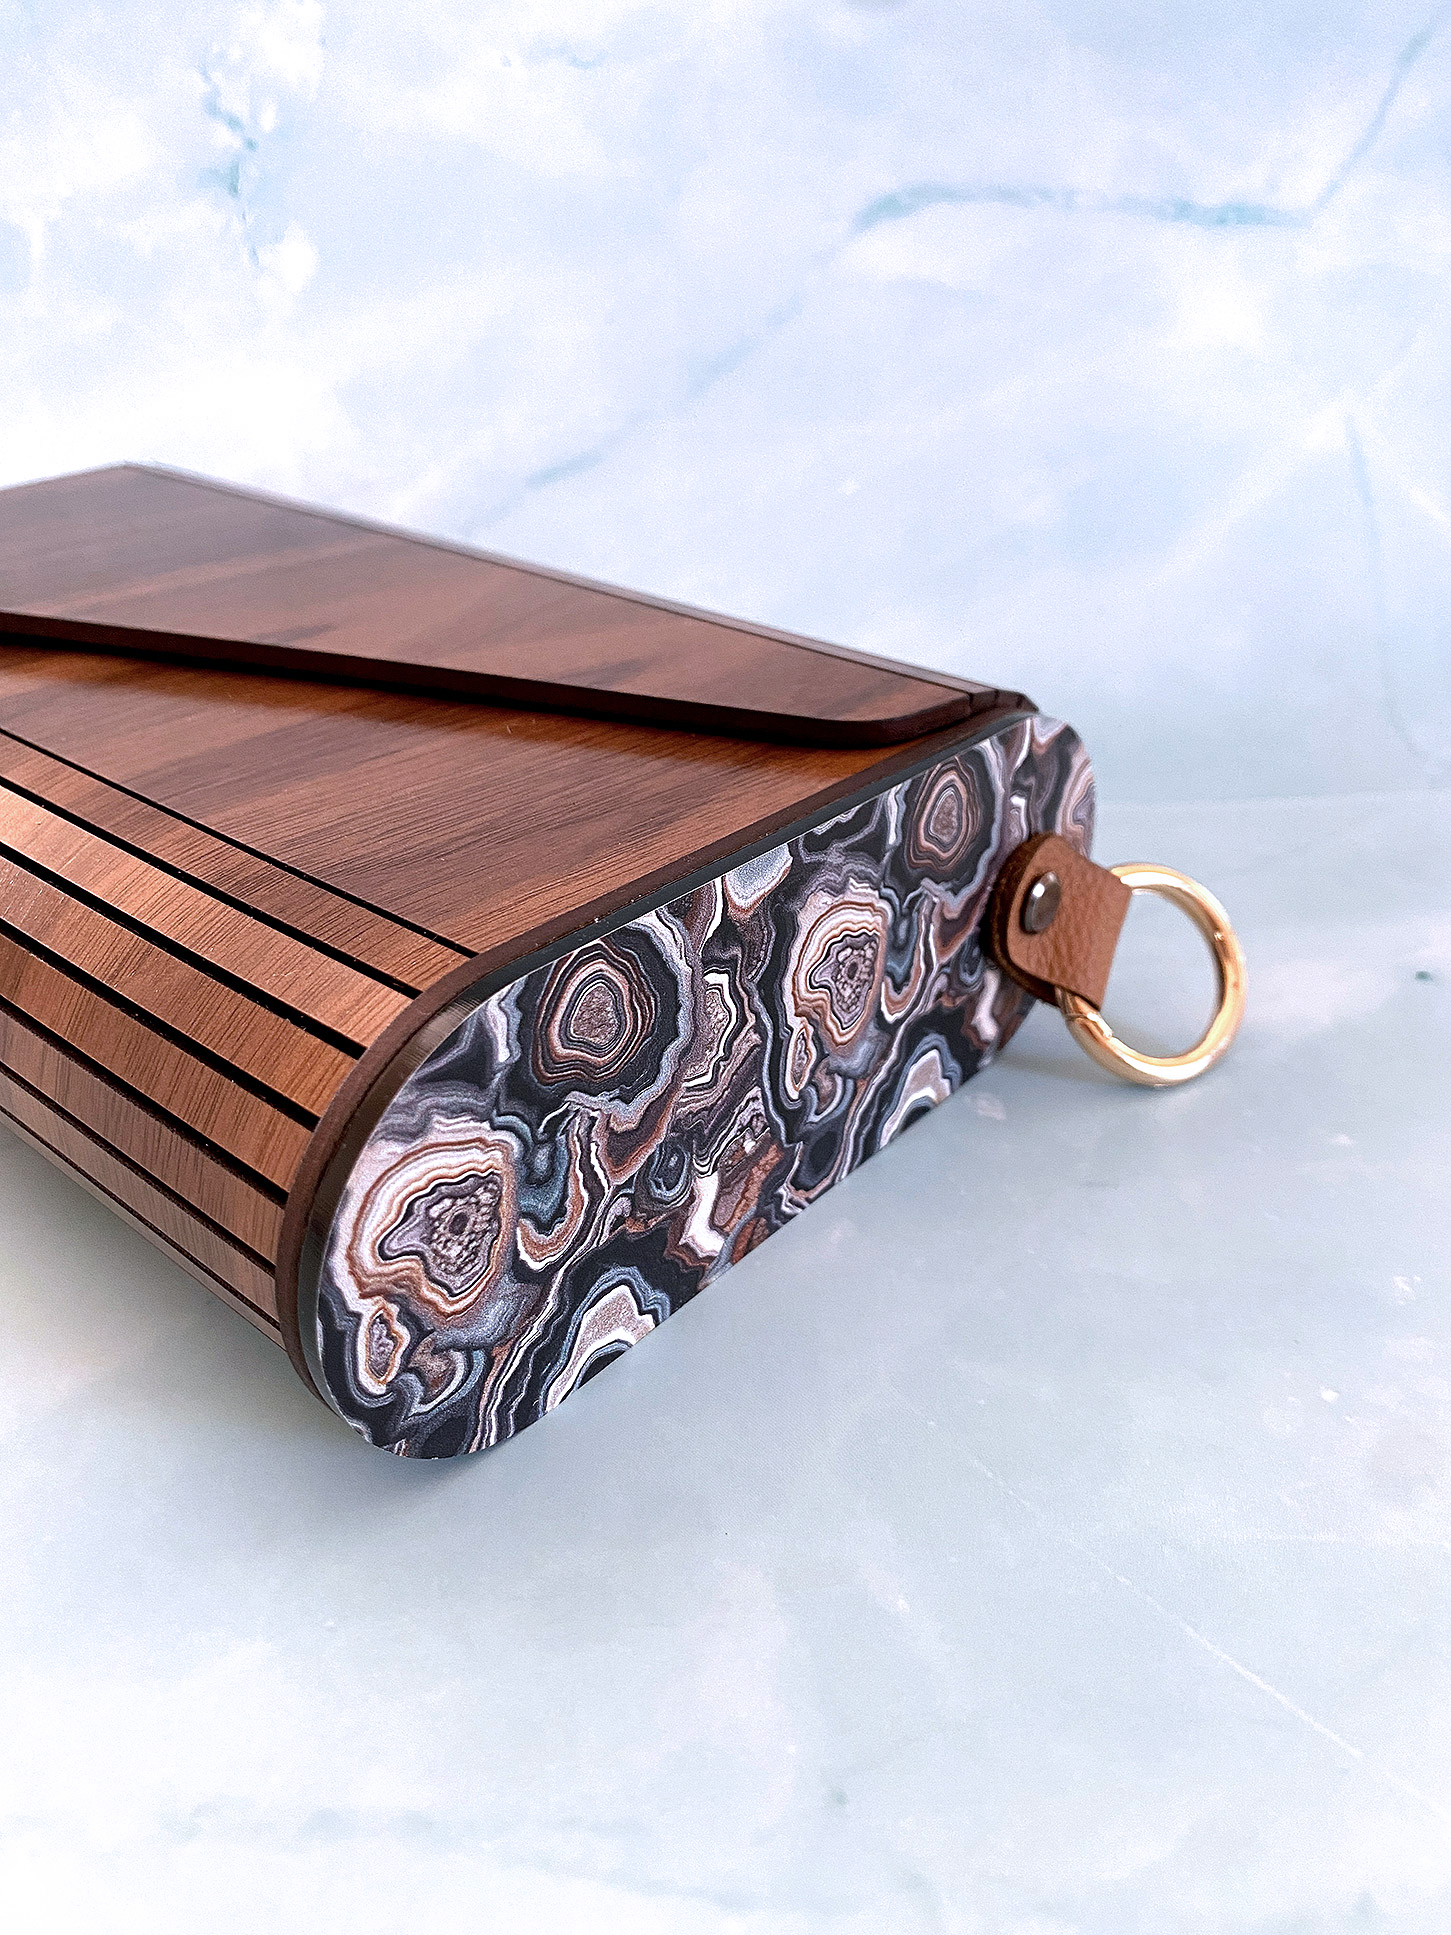
- Symmetrical Envelope Clutch – This clutch is a bit taller, has a flat base so it stands up on its own, and isn’t as wide as the other option.
- Asymmetrical Envelope Clutch – This is a more classic rounded clutch and it’s longer than the first design
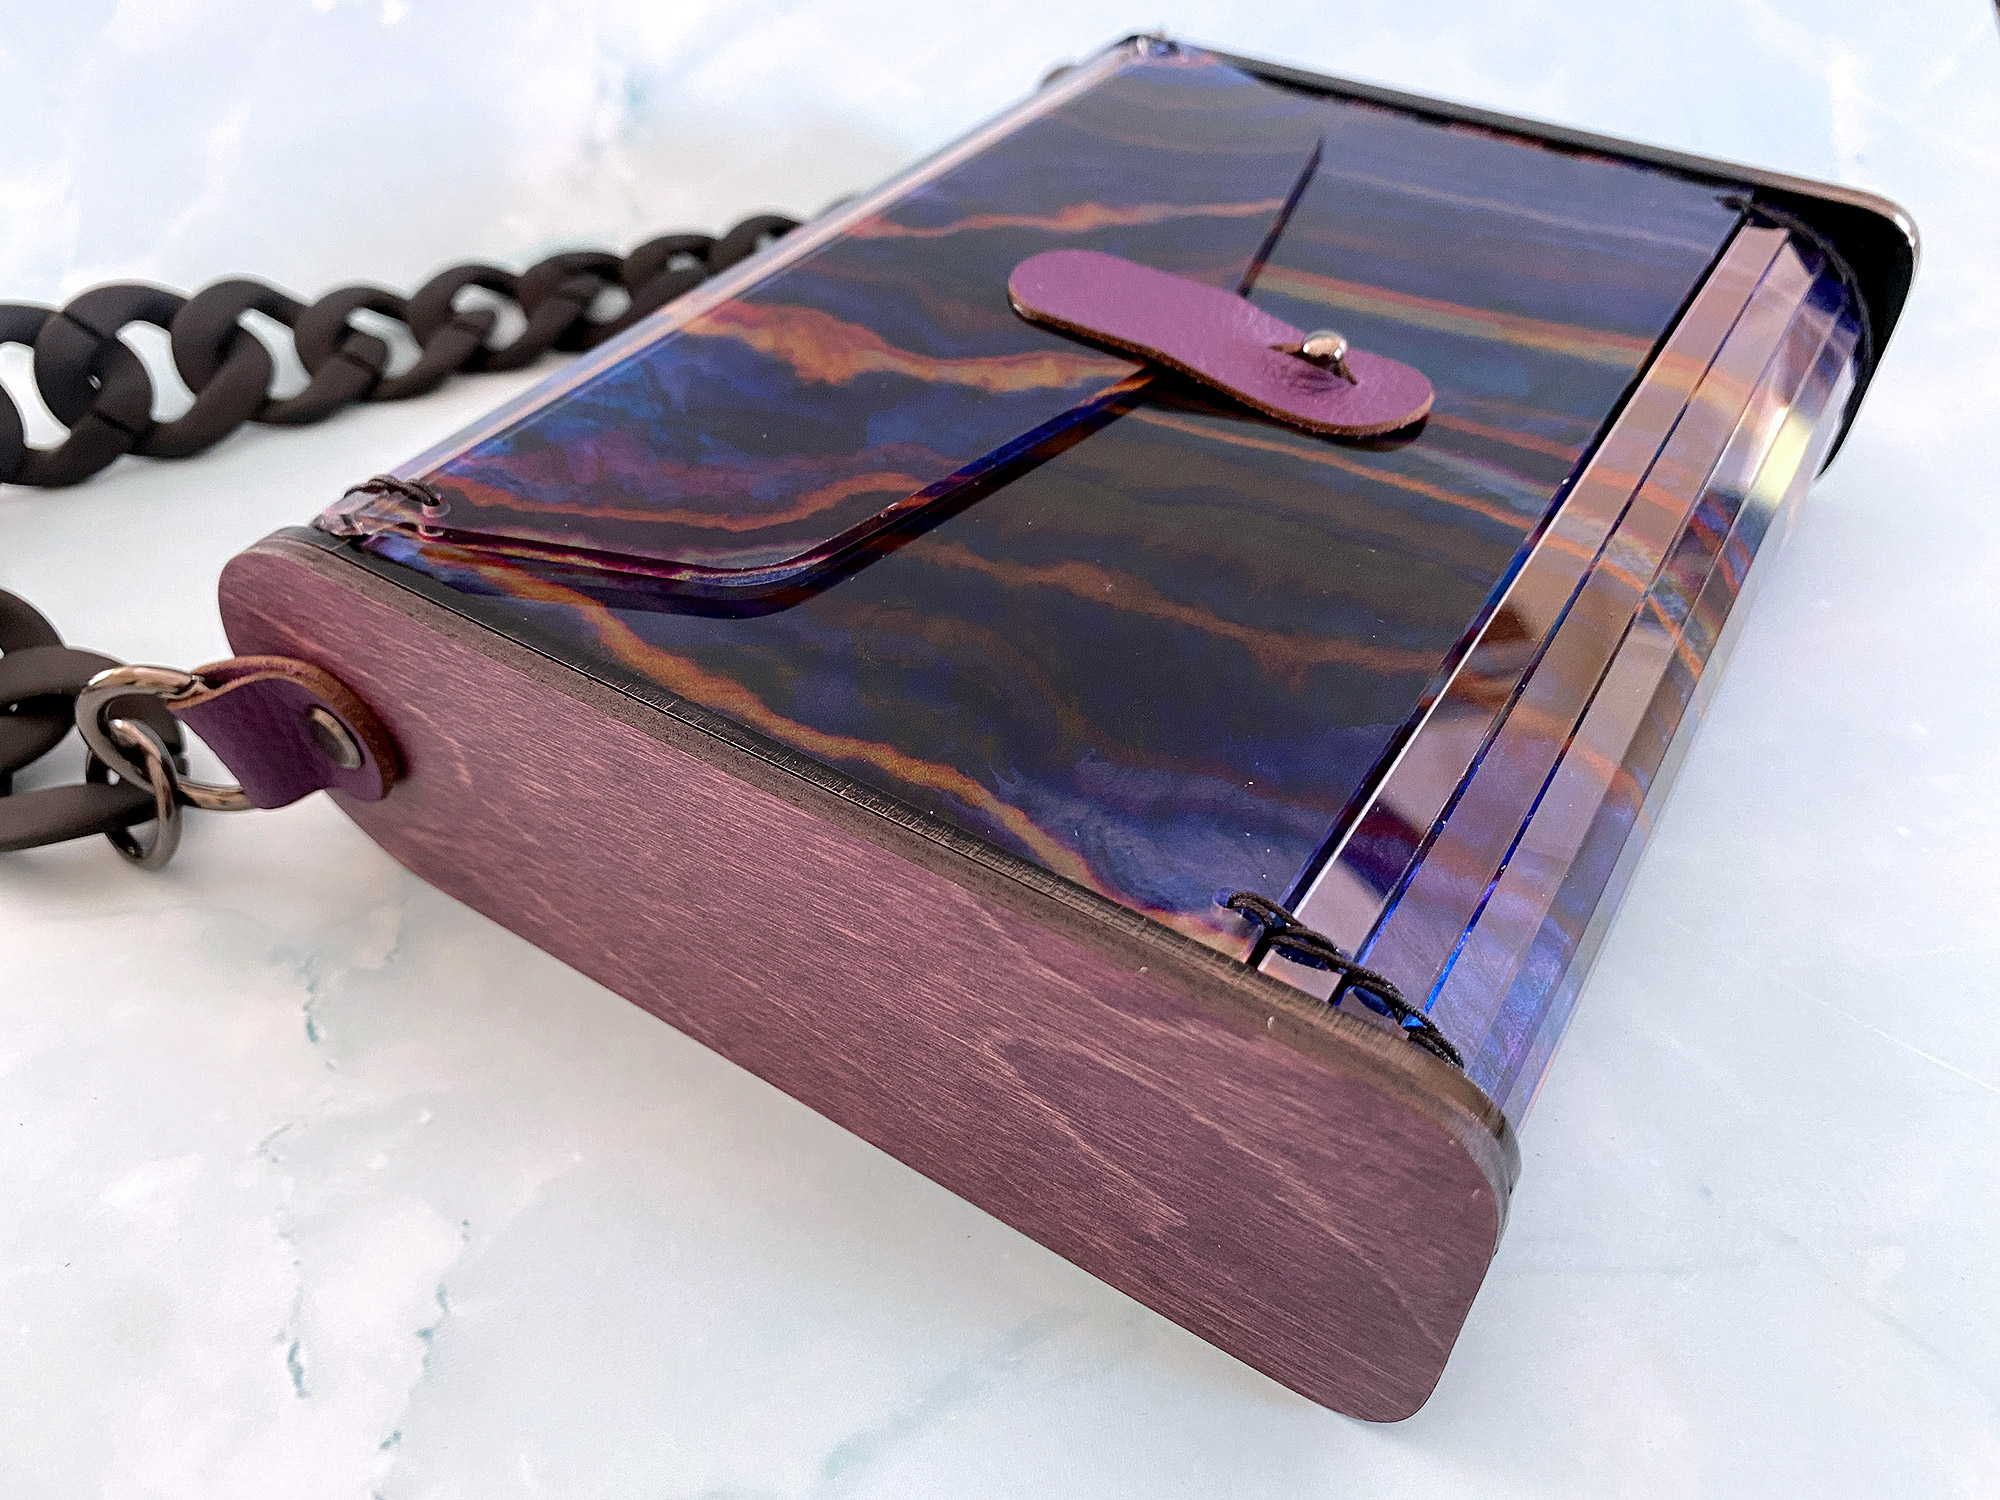
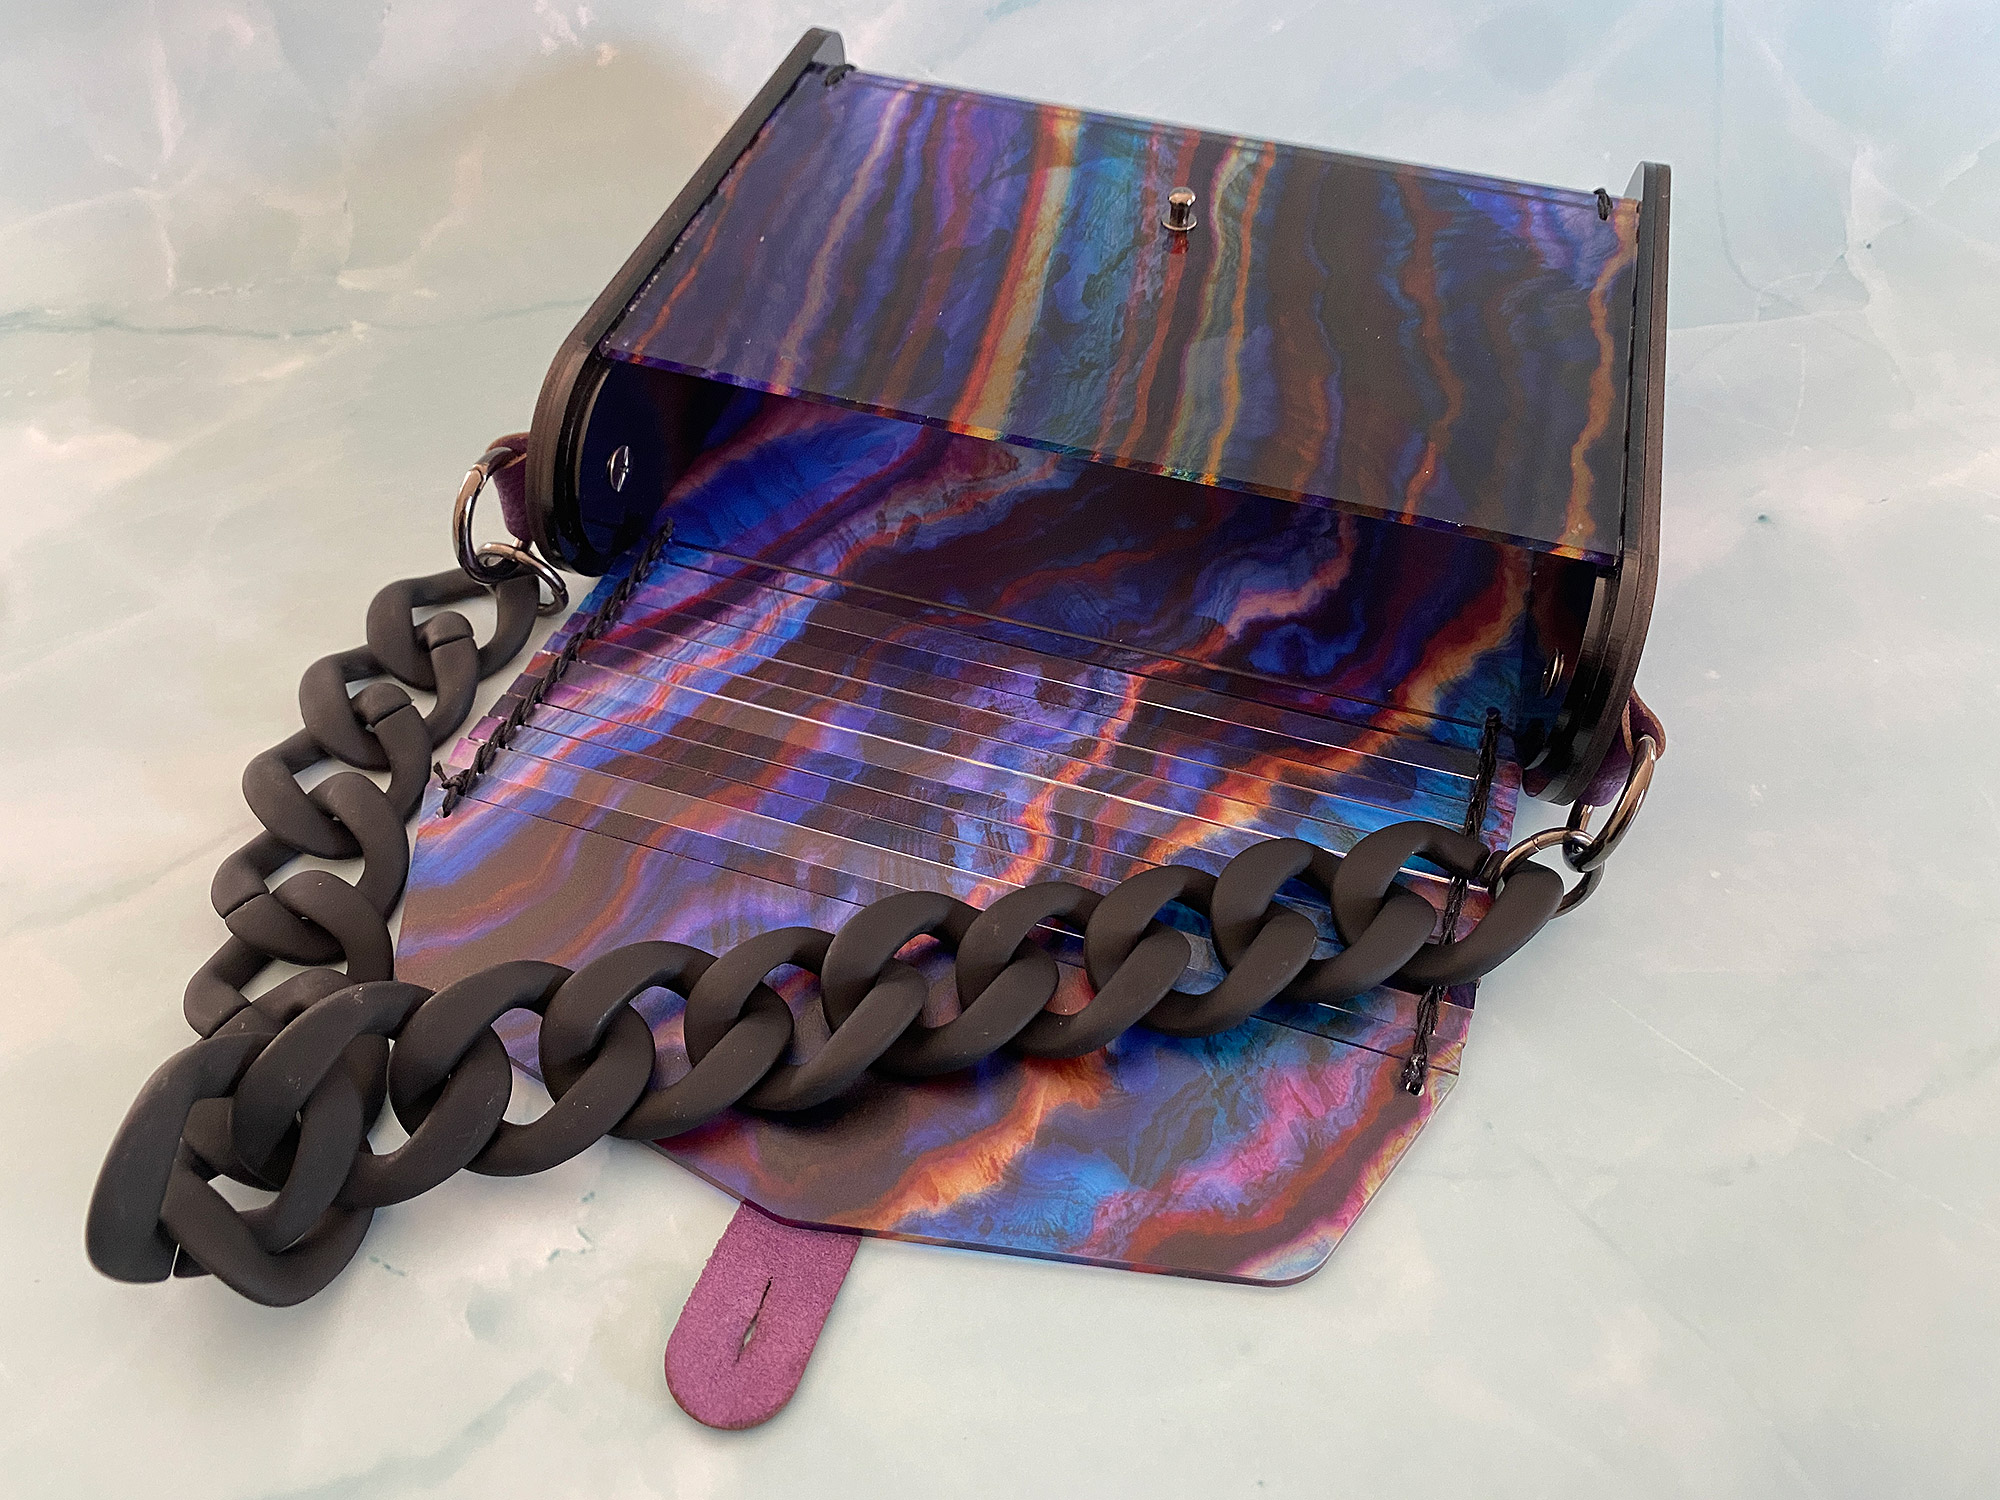
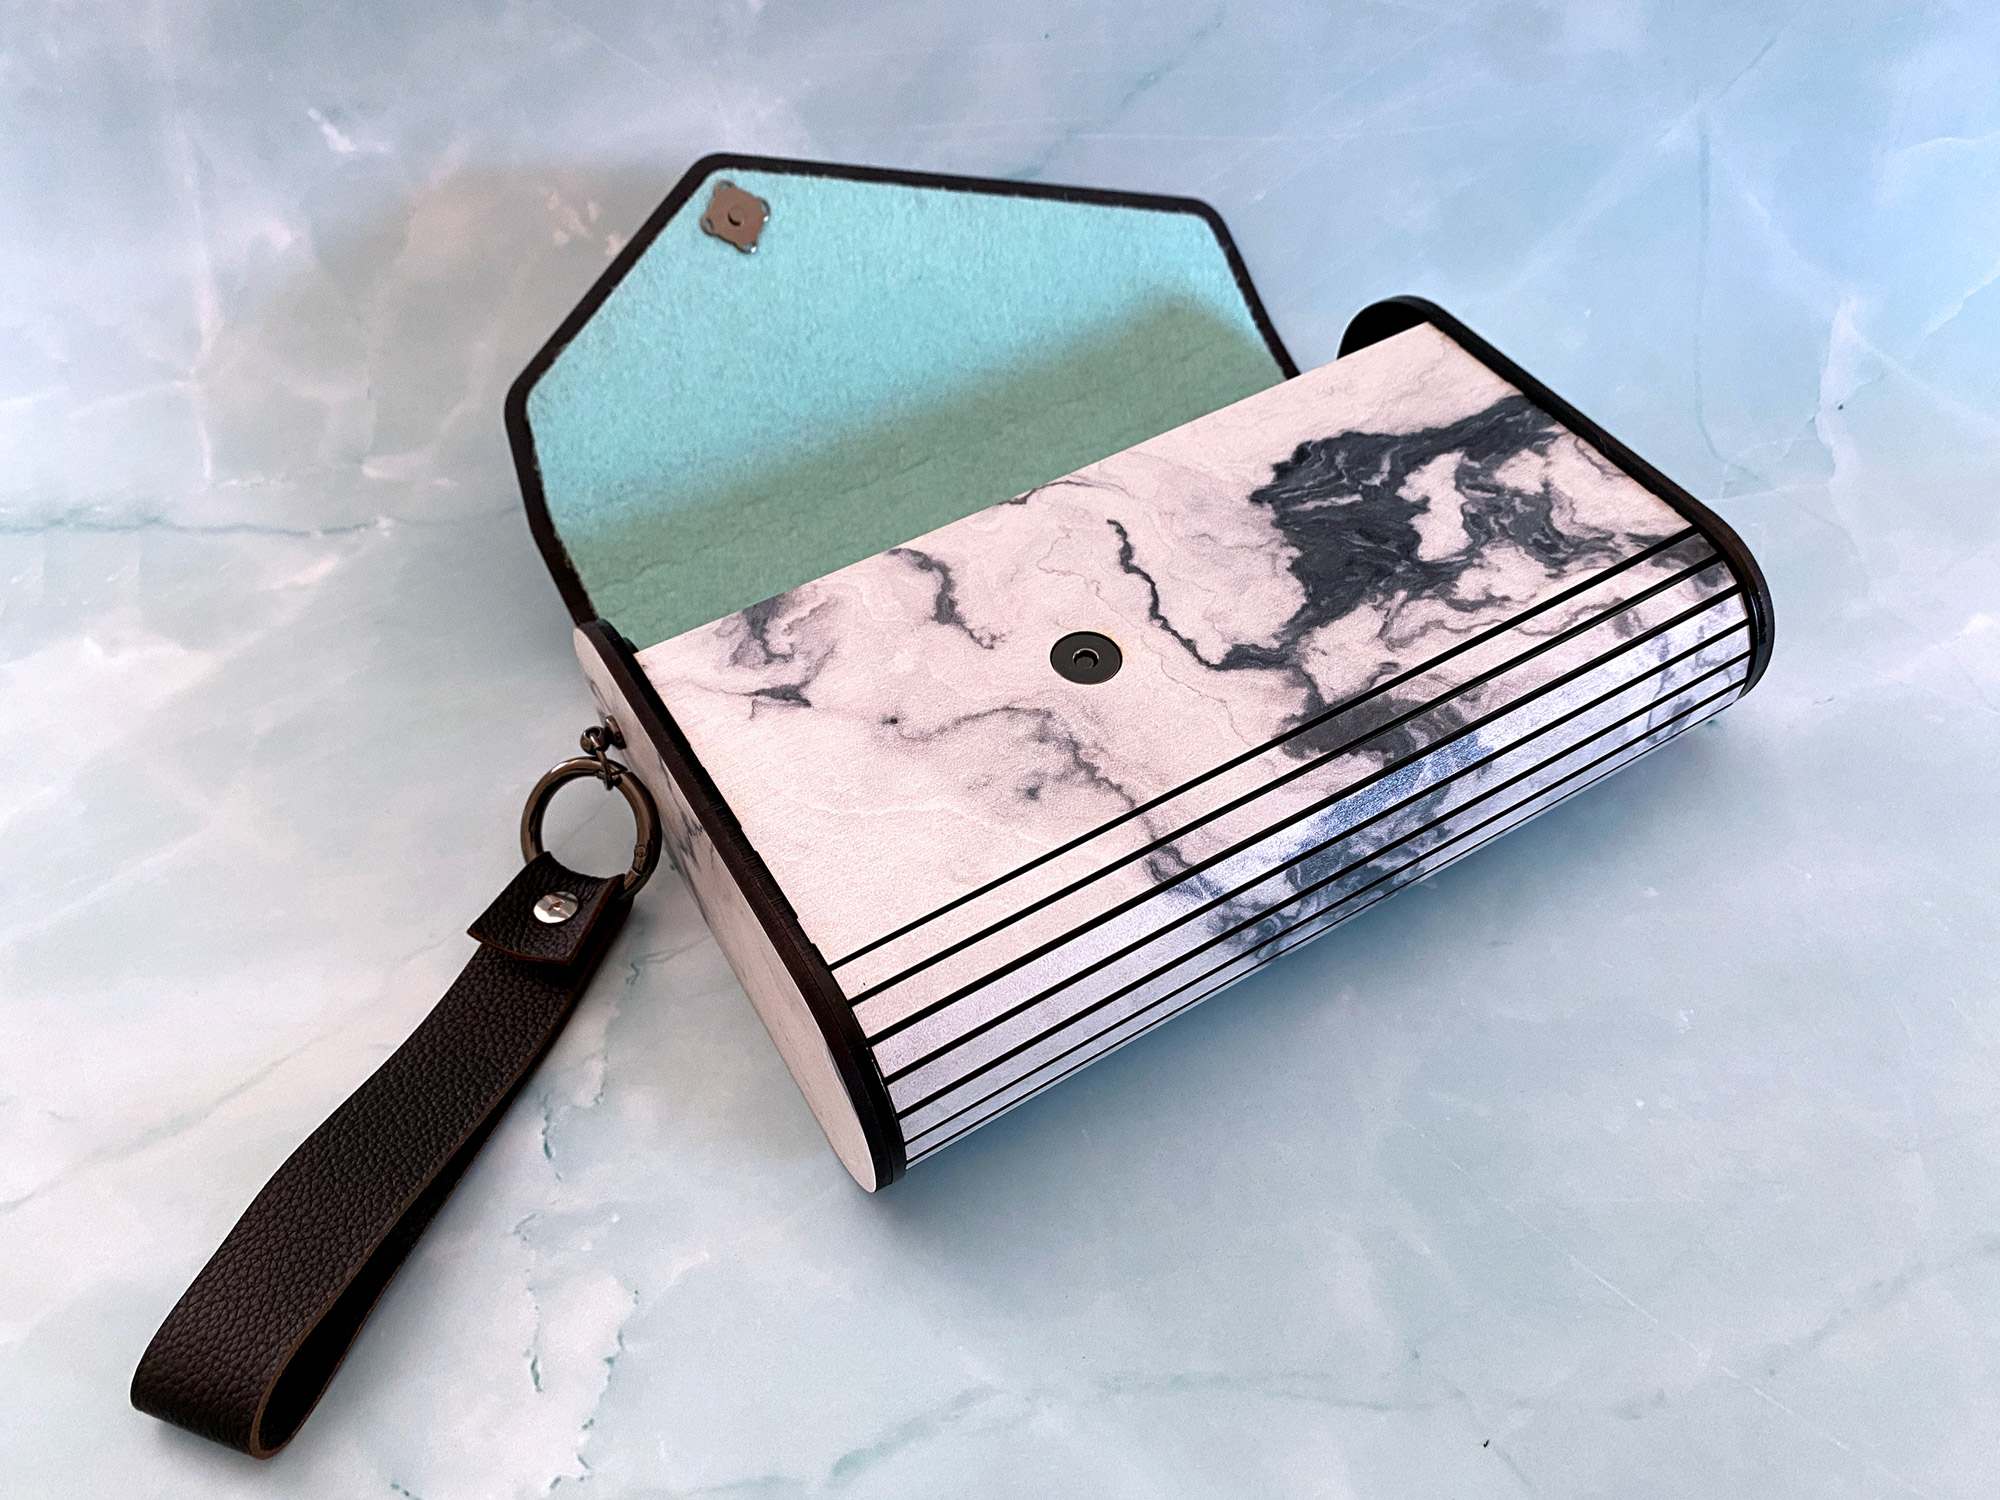
- Sewn – If you cut the blue holes in the file you can use 1mm thread to sew the hinges together, this results in a much looser hinge that can be folded all the way back. This is the option you want if you want your clutch to be clear or translucent
- Lined – If you don’t want to sew your clutch you can cut the included liners and glue your hinge. I love the look of this and it’s my preferred method.
Either style can be sewn or lined. I really suggest watching the video – it explains a lot of the smaller elements of the file as well as how to adjust the tabs if they don’t work for you specific material.
NAVIGATE POSTS
Helpful Links
Latest Posts
Posts by Category
Explore Posts By Tags
Acrylic Adobe Illustrator Alcohol Ink Baby Room Beginner Post Book Binding BuyTheFile Christmas Felt freefiles Gifts Gilding Glowforge Holiday Journal Kaleidoscope Laser Cutting Notebook Resin Rubber Stamp Settings Sign Stamping Yupo Yupo Paper
Get Your Own Glowforge Laser
If you have found this post helpful and would like to purchase a Glowforge of your own you can receive a discount using my referral link when you are ready to purchase:
Sign Up to Blog Newsletter
Cutting & Assembling
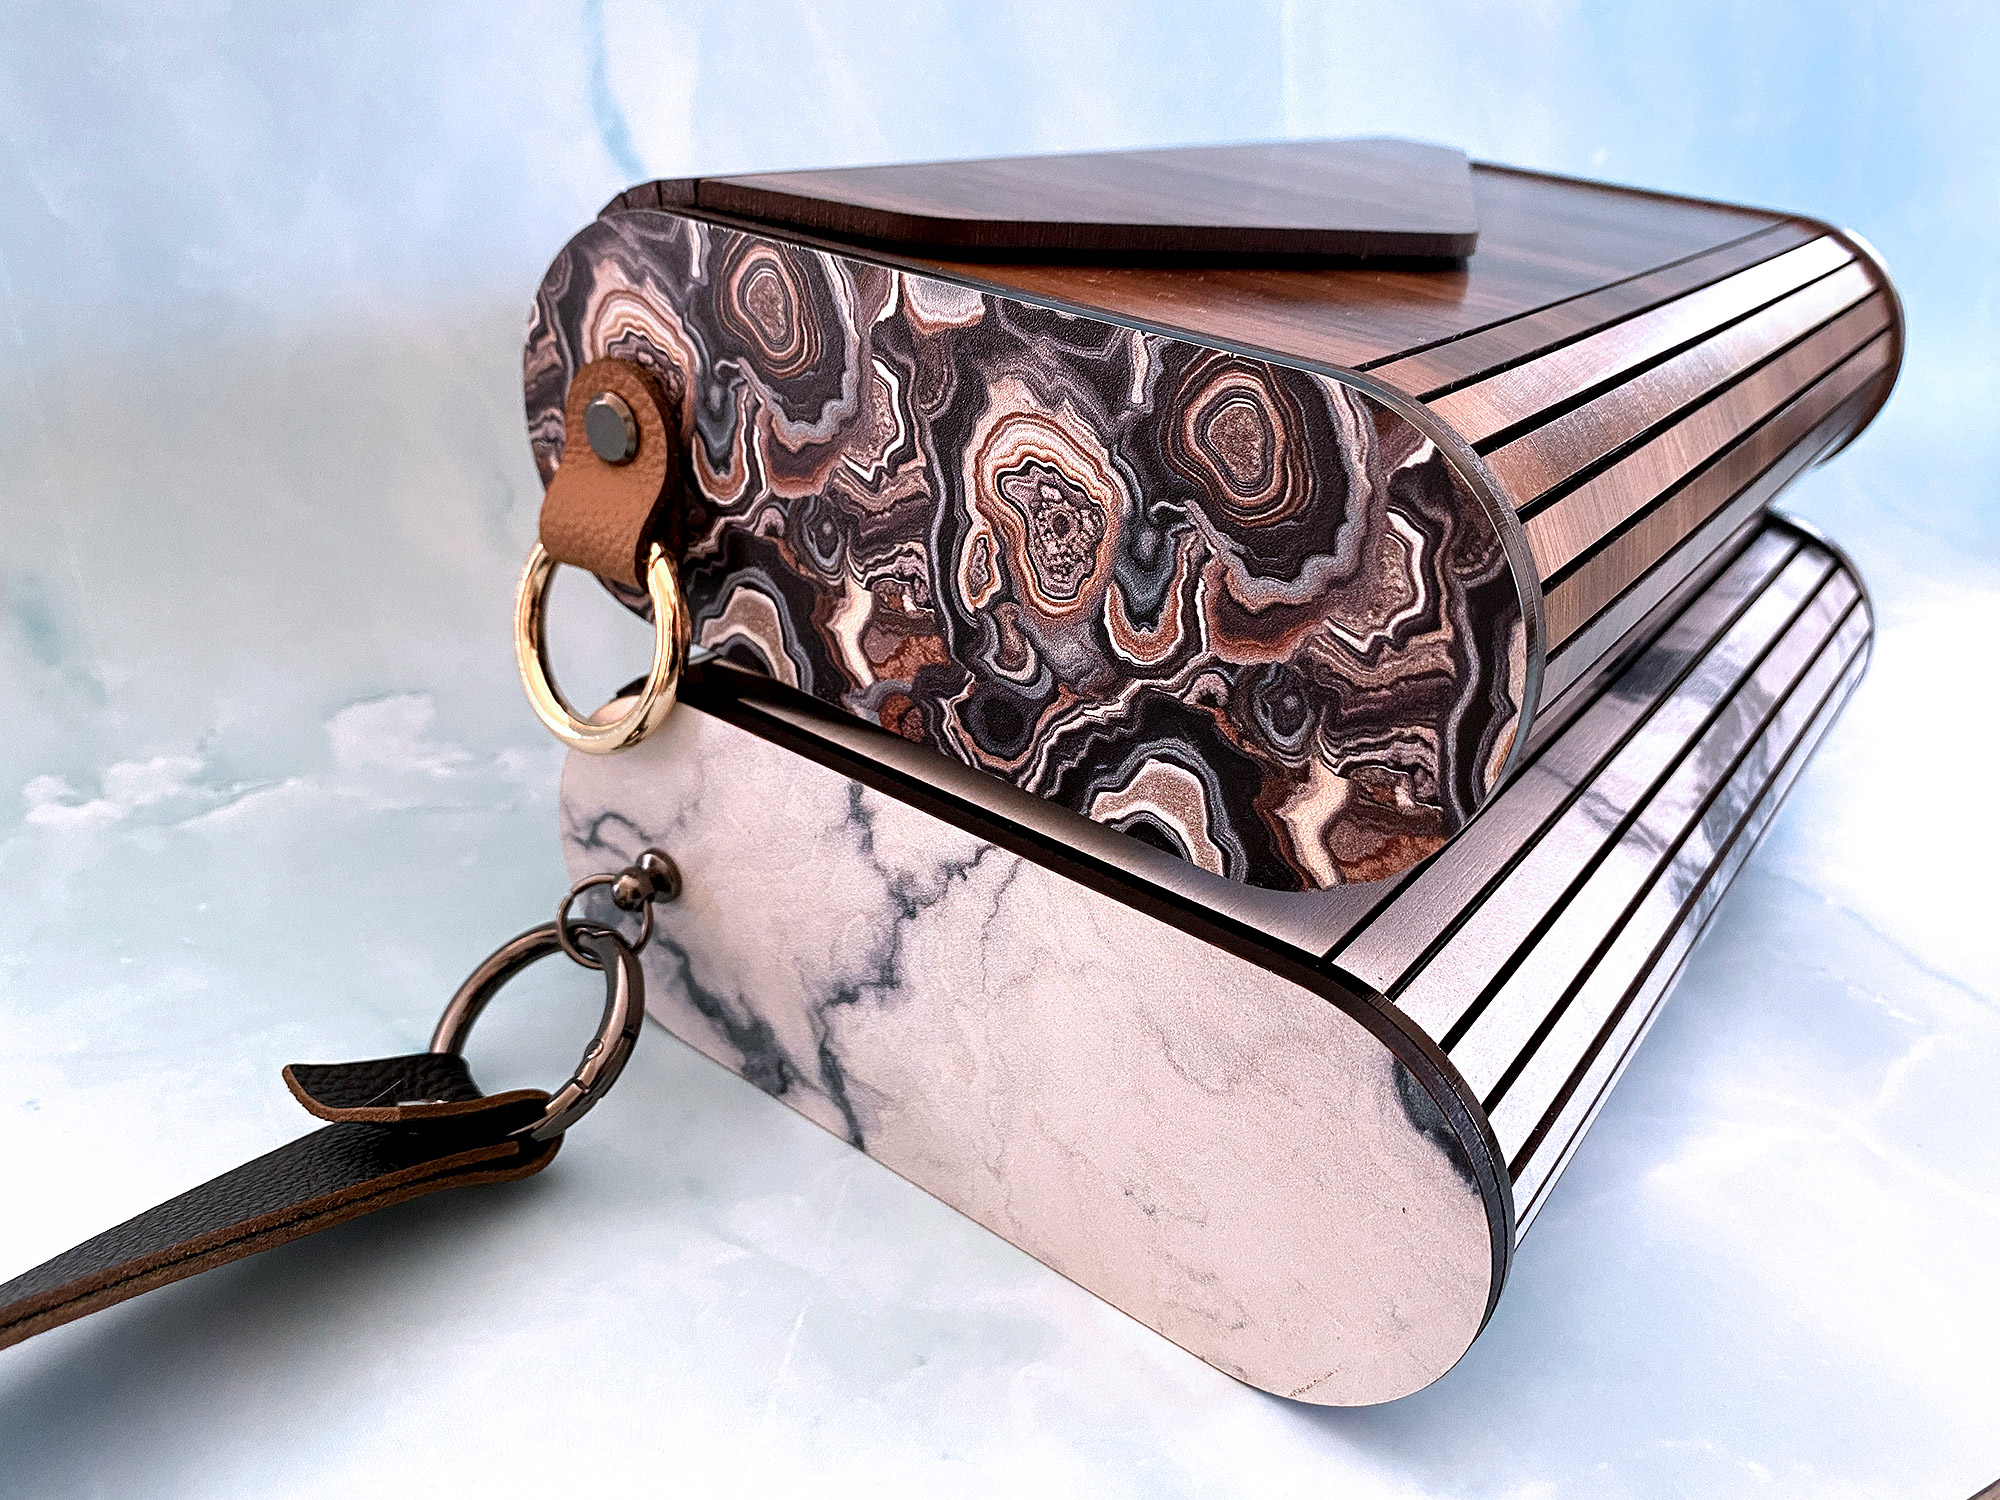
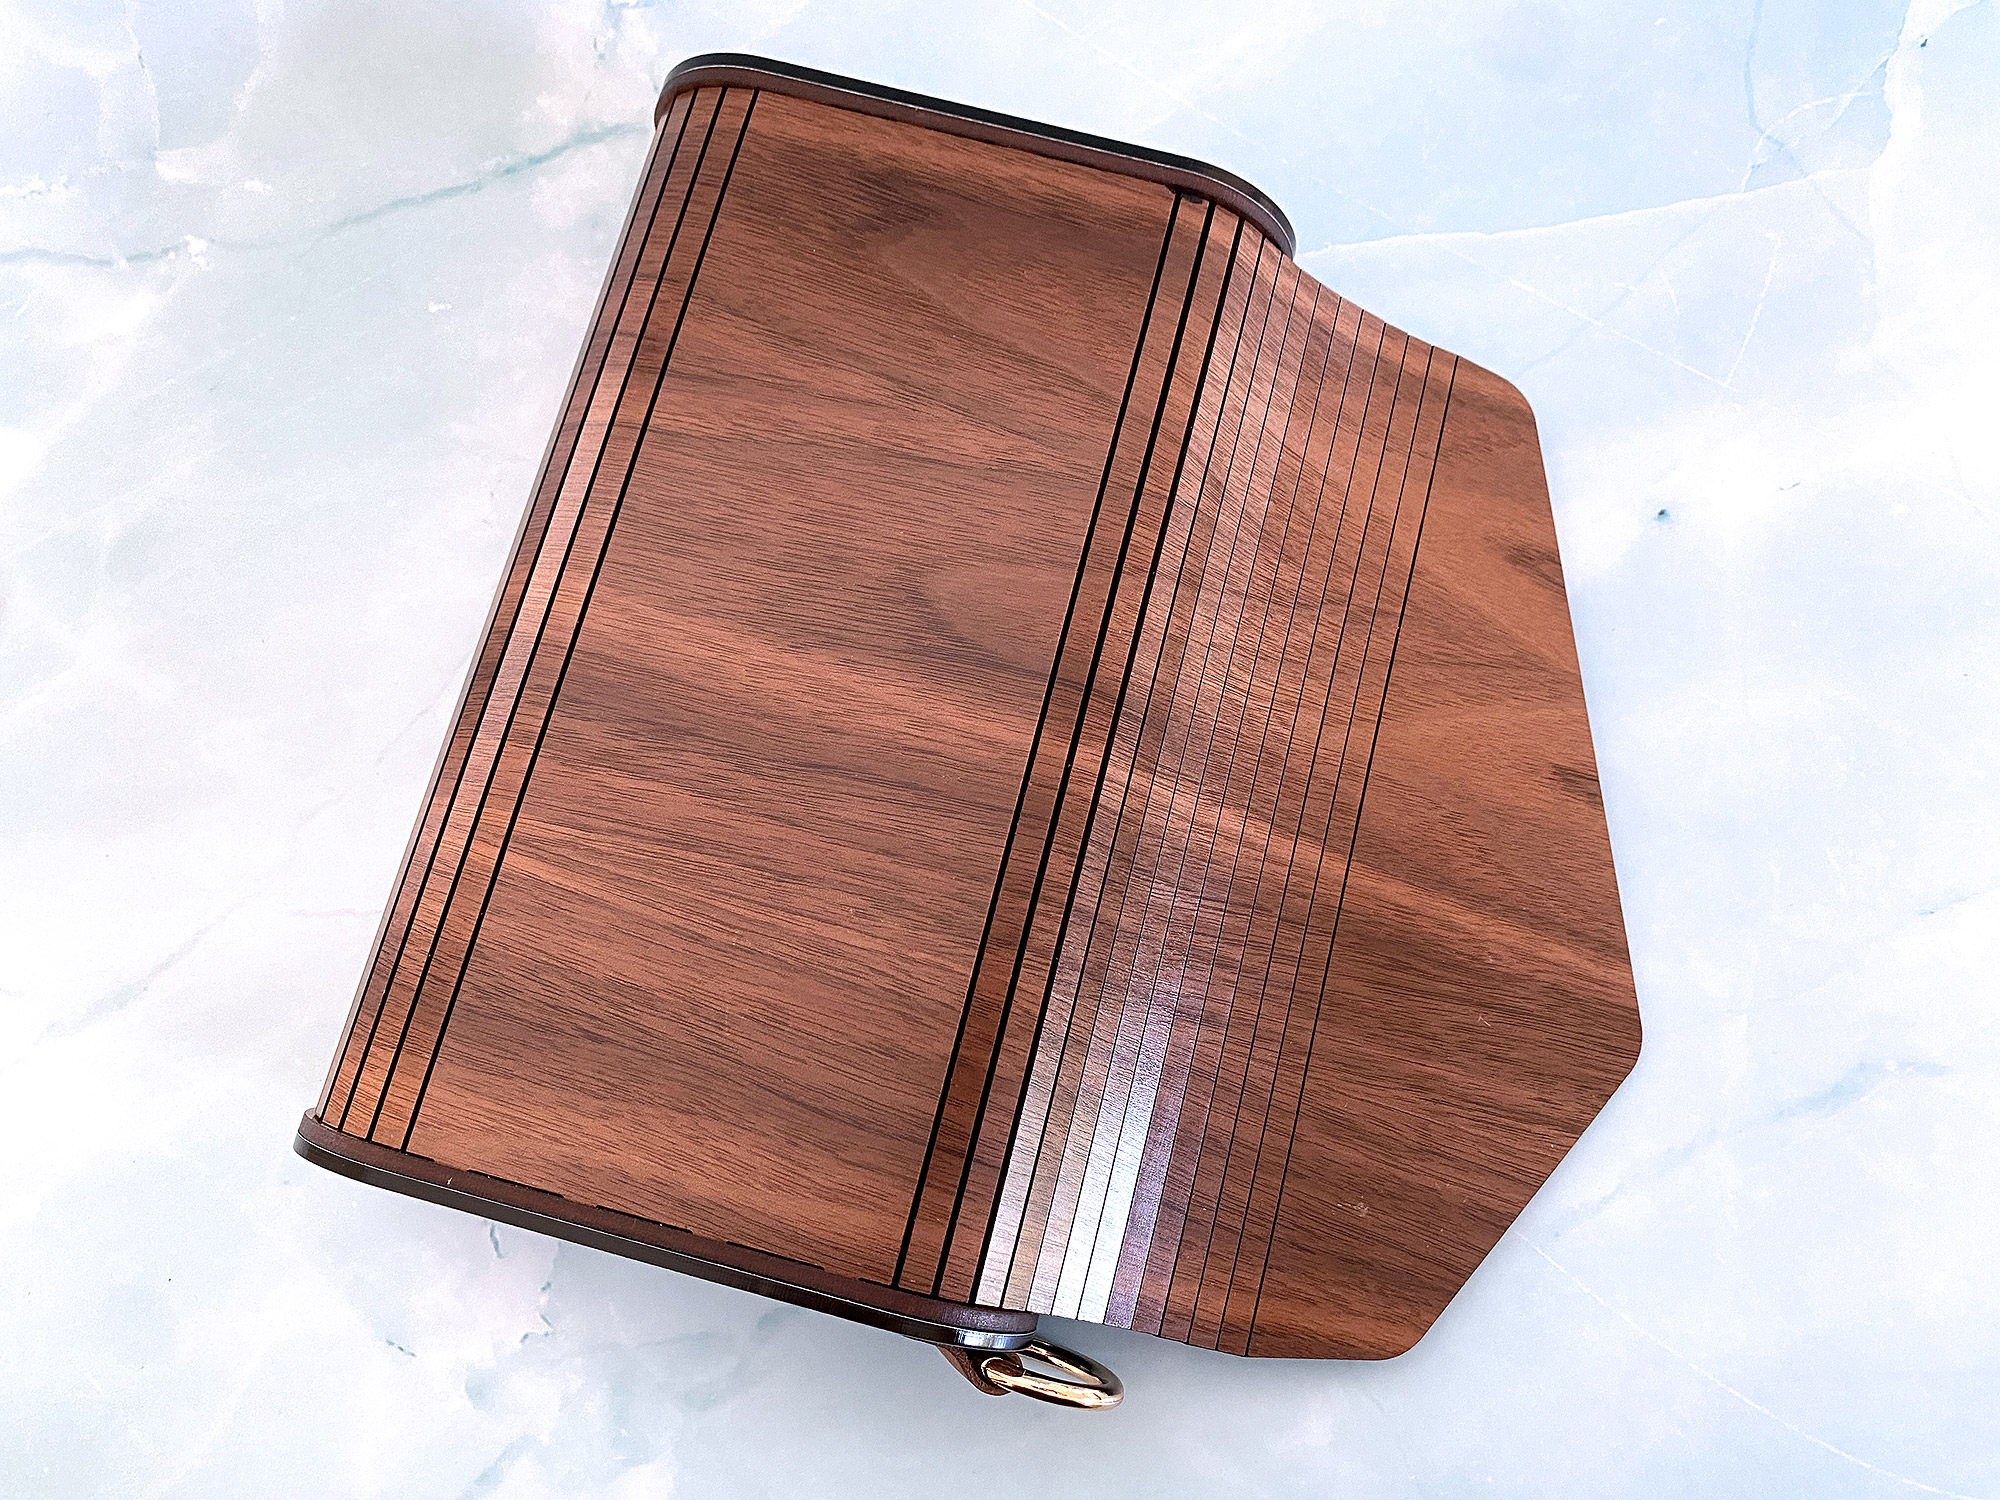
There isn’t much to making these (which is what’s so great about this project lol!) Simply cut two matching covers, and as many cardboard and paper inserts as you’d like (that will fit within the bolt lengths you selected). I will talk about hardware options after this section, but in general you just need to use the proofgrade settings for the material you’ve chosen. I made presses from four different materials – 1/8″ acrylic, MDF core Patternply (made by Smokey Hills Laser Supply), MDF Core Walnut Plywood, and 1/4″ MDF core Plywood. I really like the hefty feel of the 1/4″ covers but the 1/8″ works just fine. We aren’t binding thick books or anything – flowers are delicate, they need to be flattened but they don’t have to be squeezed into oblivion.
- Cut the Tab/Slot checker out of your materials and test the slots/tabs. If they don’t fit nicely then watch the video above and adjust. Once you have the slots ready proceed.
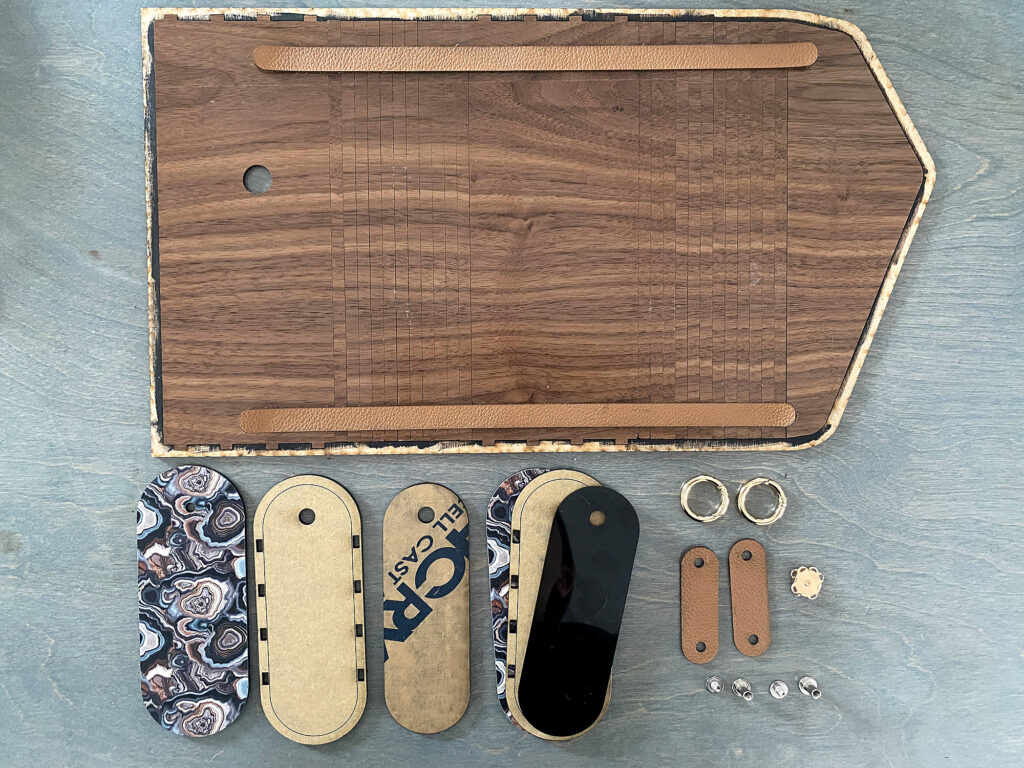
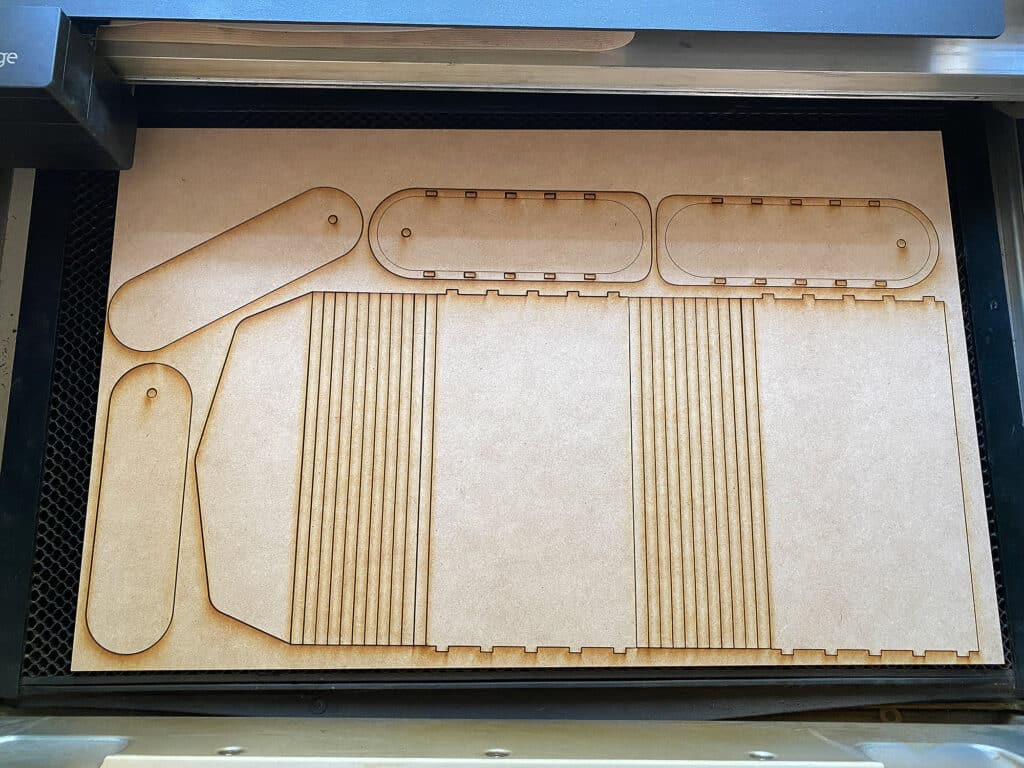
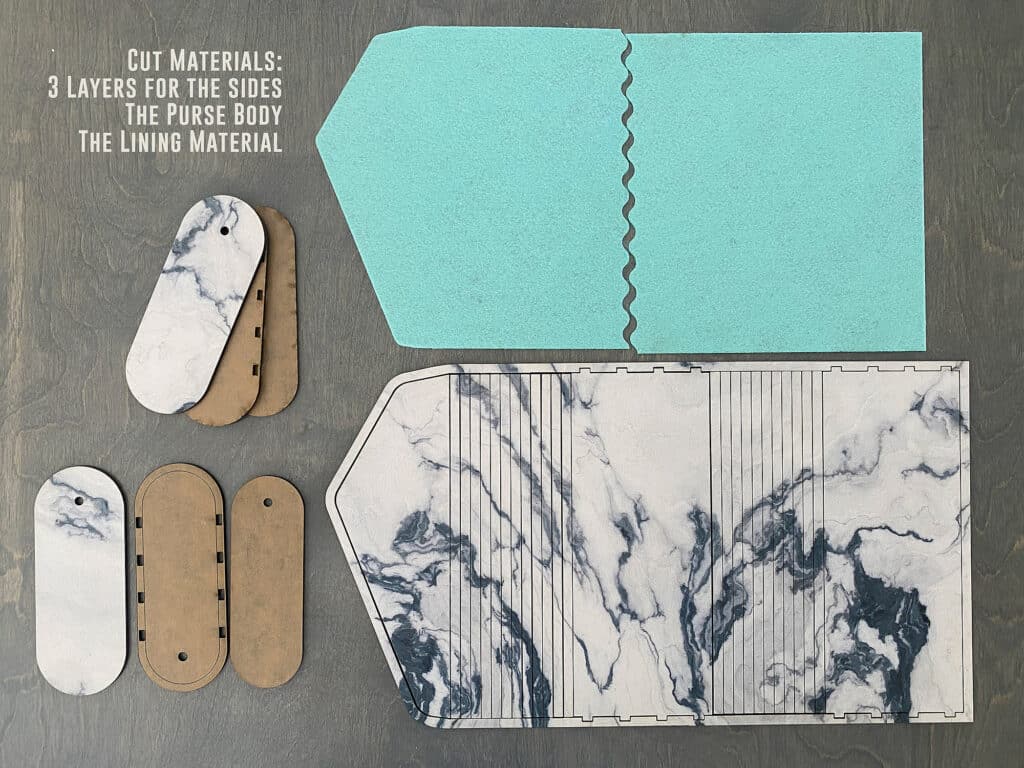
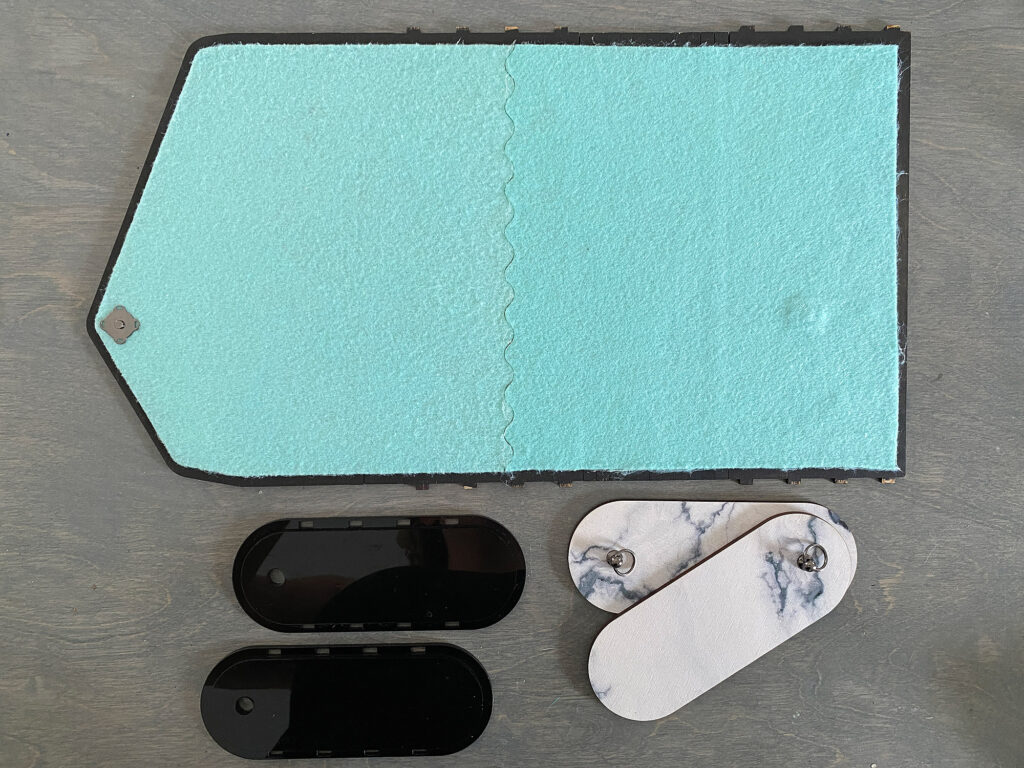
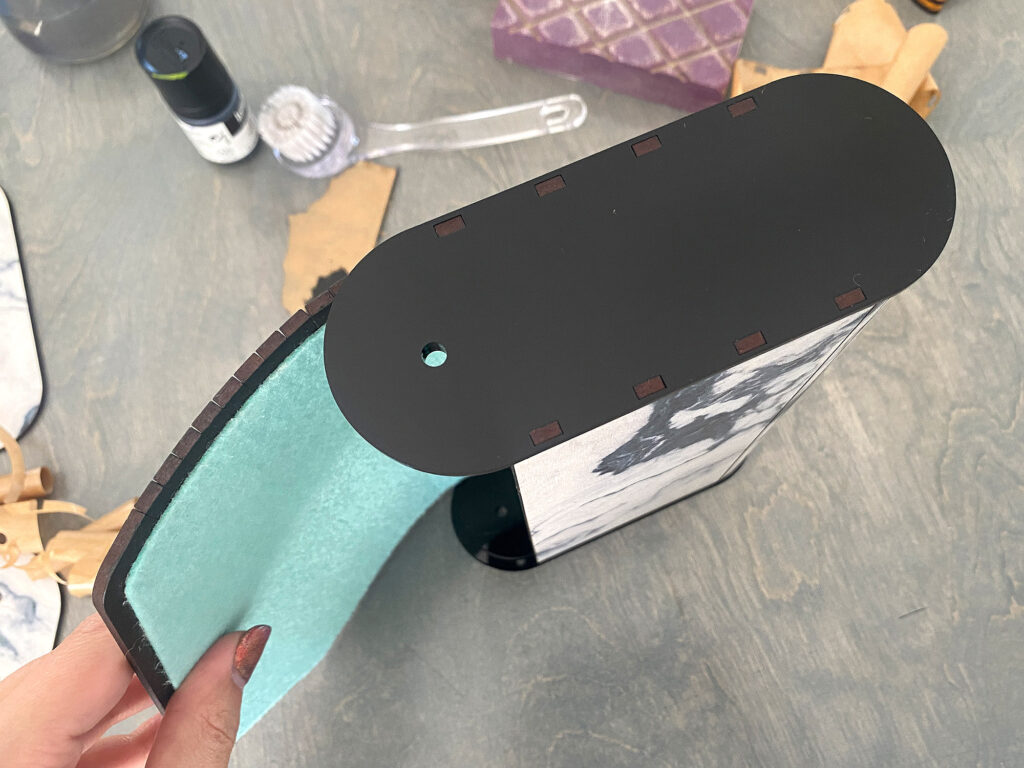
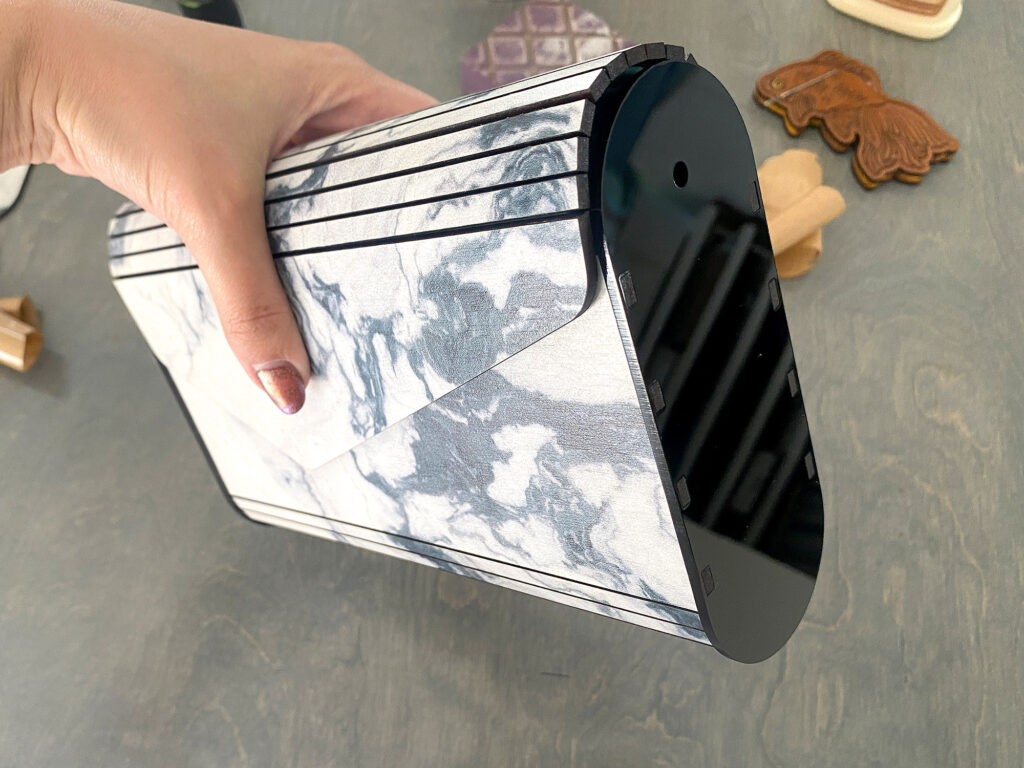
- Cut your main purse body – You can ALMOST fit every part on a single sheet. The only piece you cannot fit is the outermost decorative faceplates for the sides. If you choose not to cut these, this is a one sheet project!
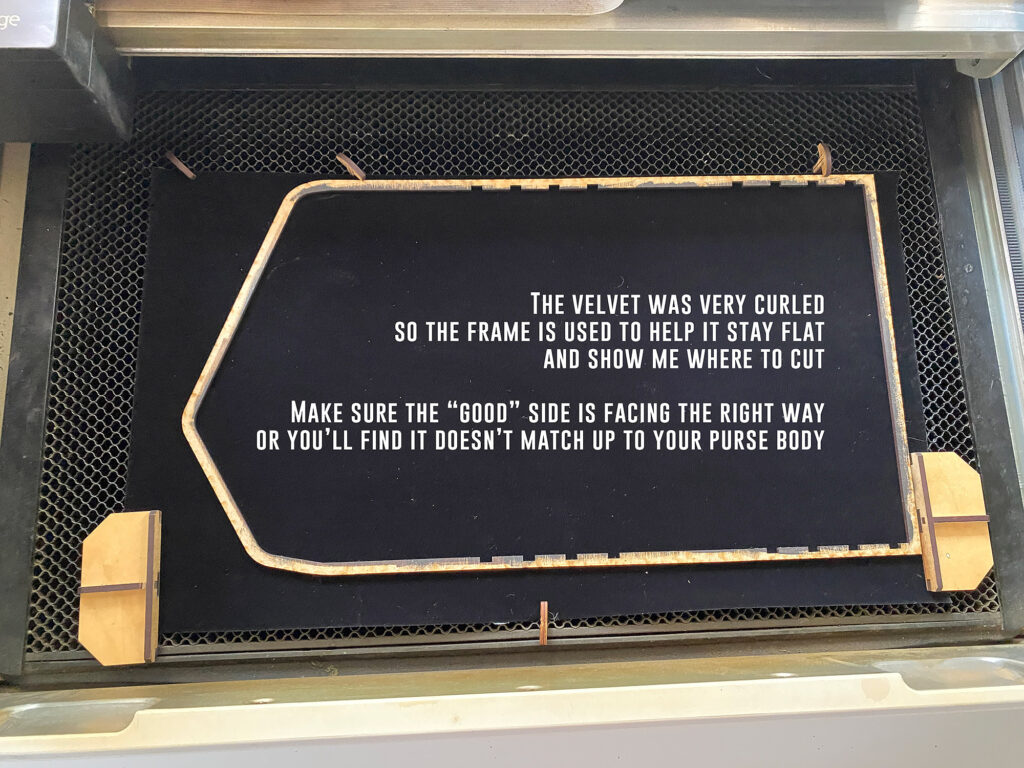
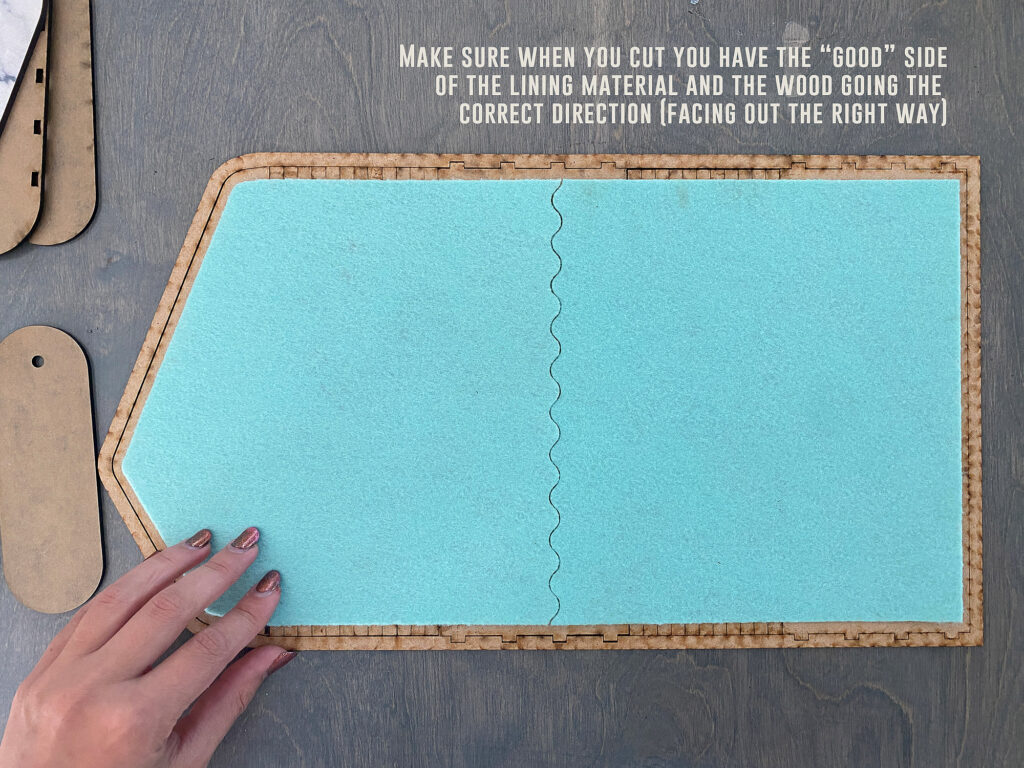
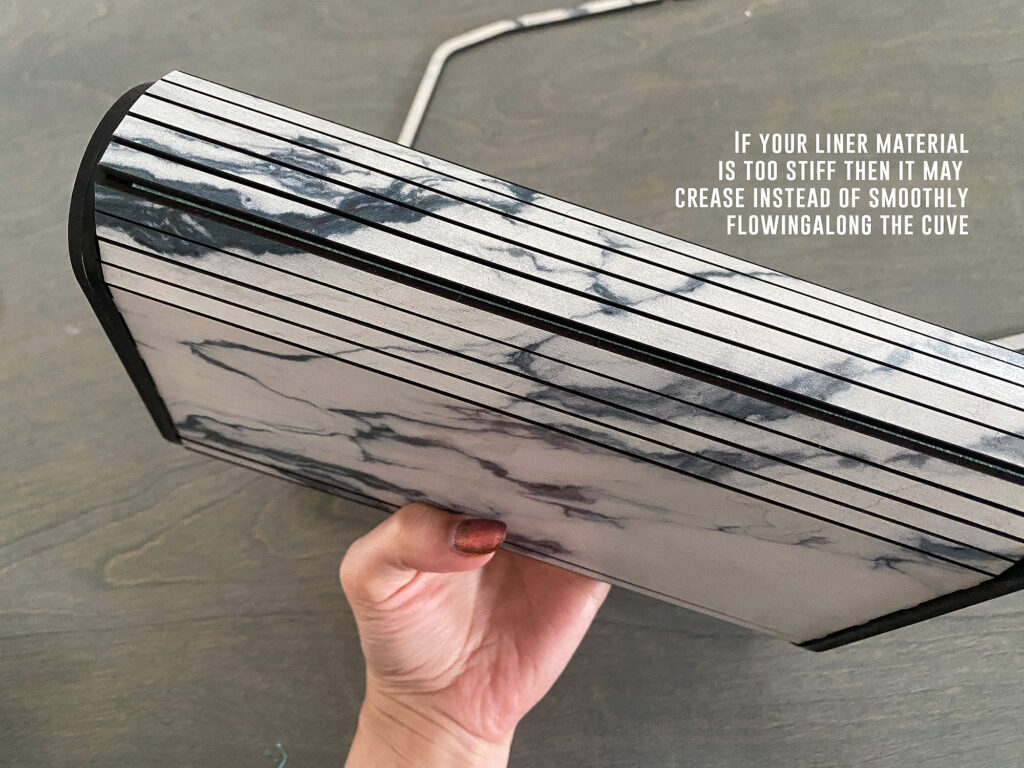
- Cut The Liner if desired. Choose something that has decent flexibility – if using felt, use soft felt, not stiff felt. Any fabric should work! For one of my designs I used flocked self adhesive fabric – the adhesive was not strong enough but I have a workaround I’ll show
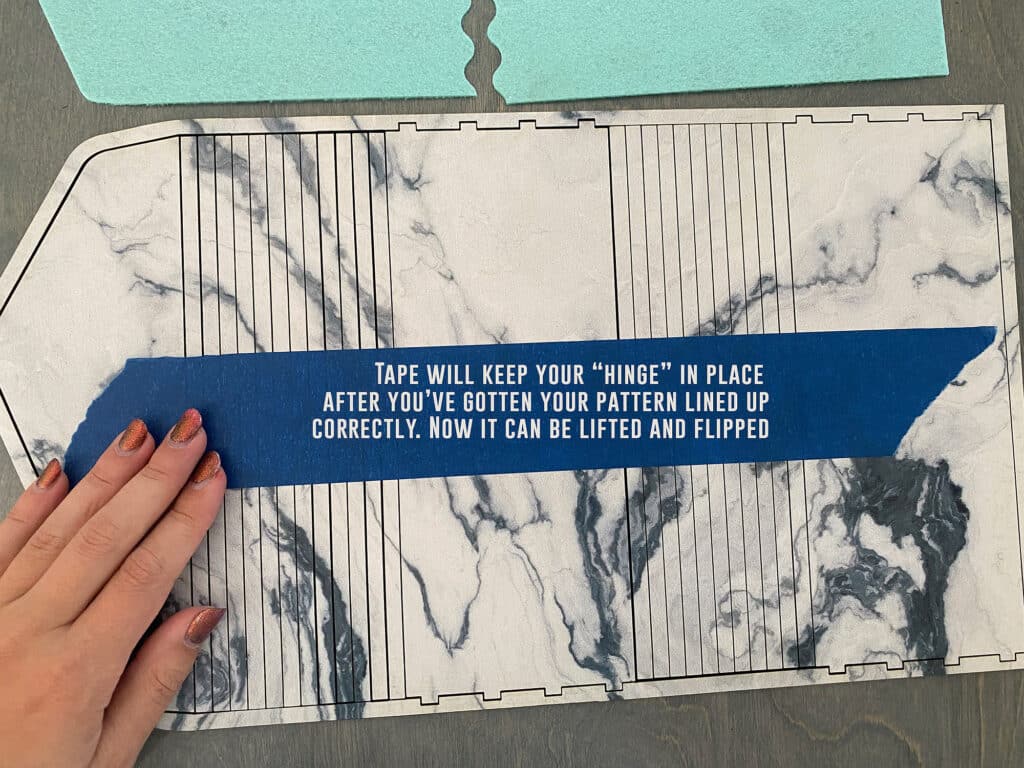
- Using the included “frame” (You only need to ever cut this once for each purse style), arrange your purse body to keep your pattern aligned (or not)
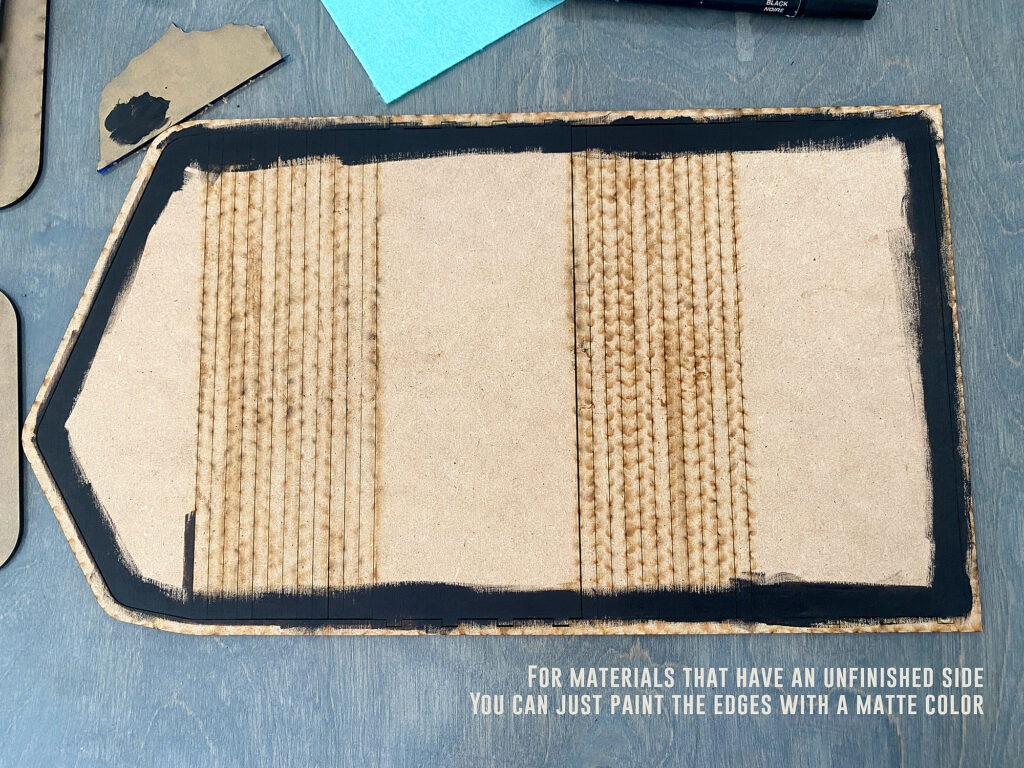
- Apply Painters tape to the purse body so the slats all stay together, then flip
- Paint interior edge if desired (only needed if you’re using a one sided material
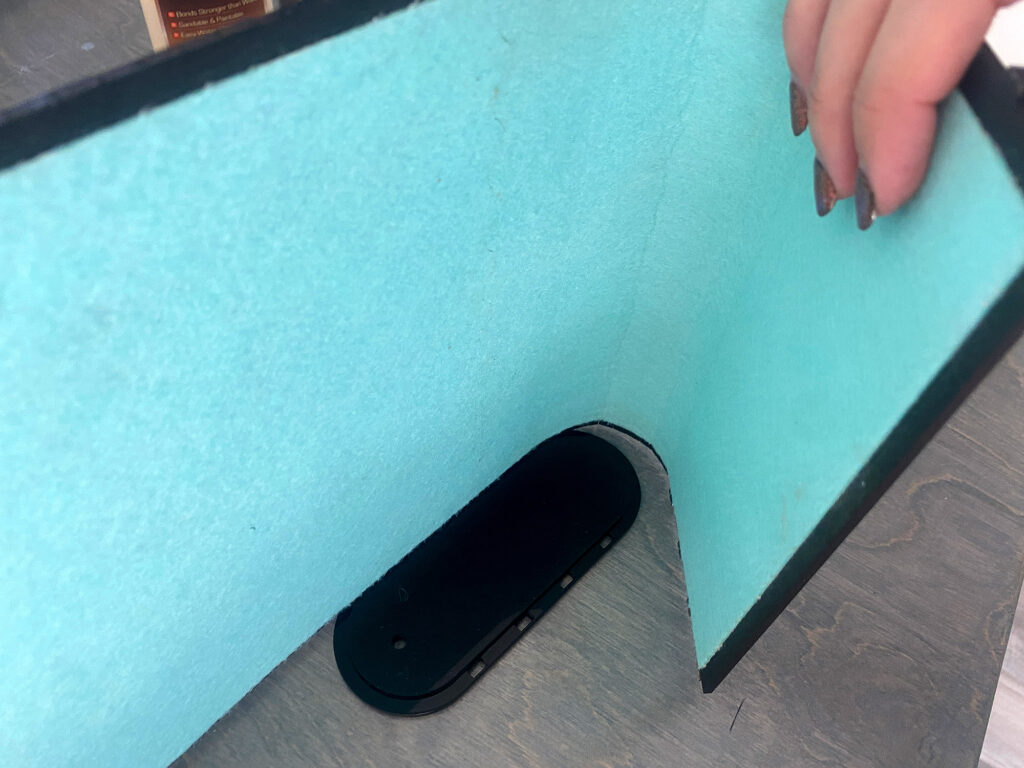
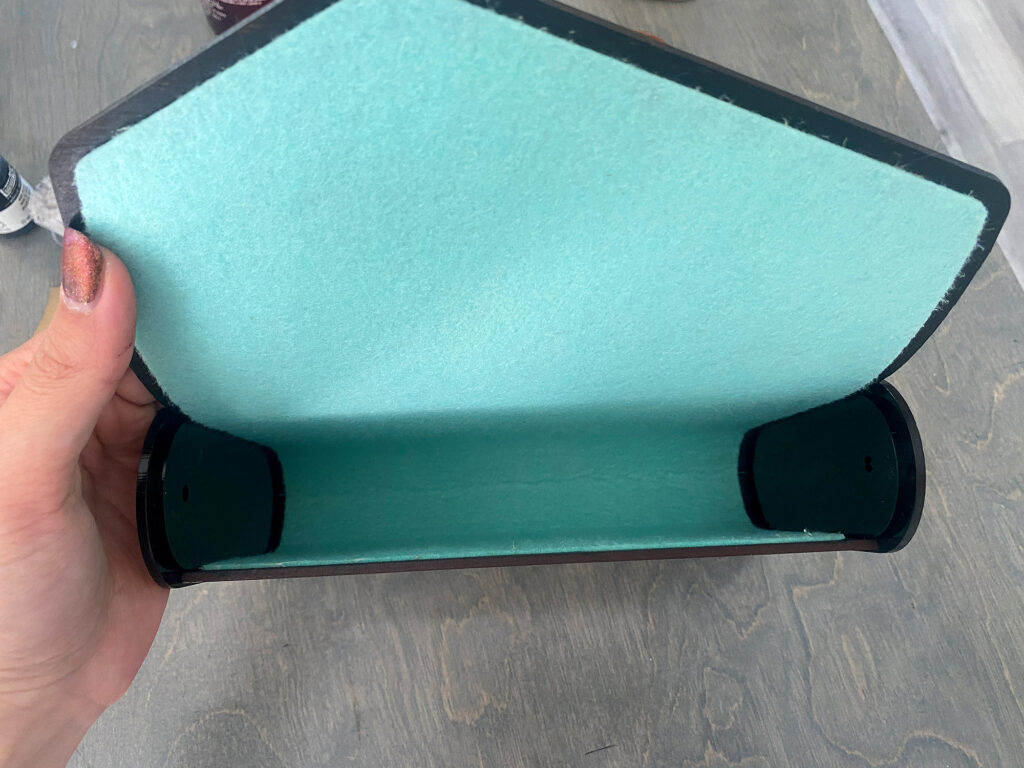
- Glue in the snap if using and then the liner – if you’re not using liner than instead you will sew your pieces together (JUMP TO THE SEWING SECTION)
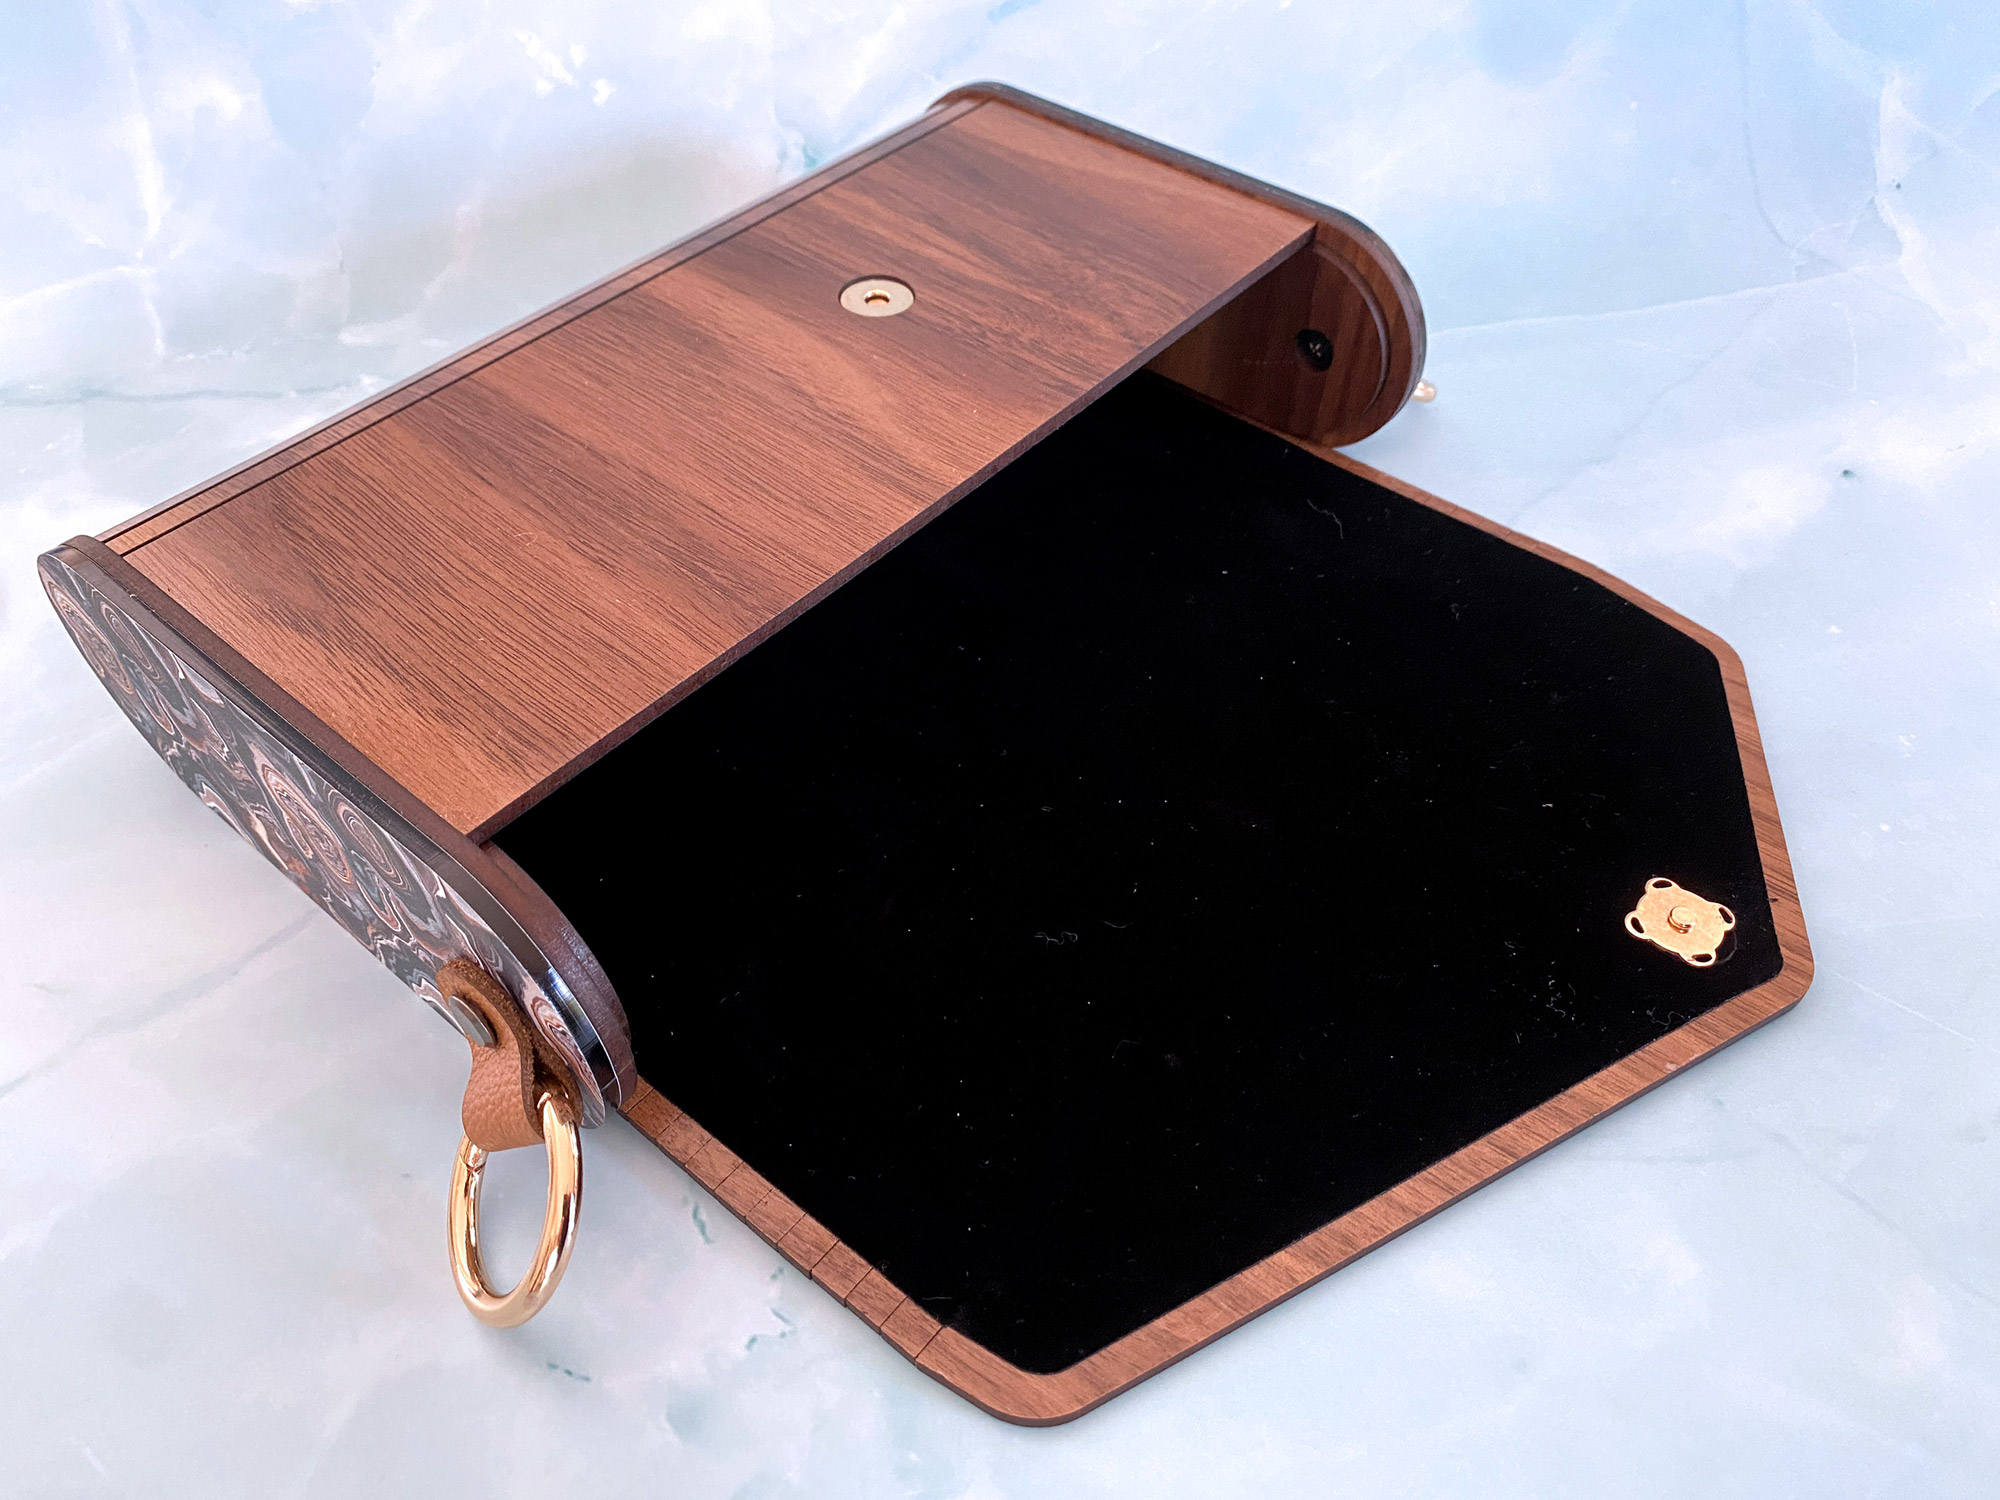
- Glue the inner ovals (the skinnier ones without tabs) to match the scored circles on your side plates – this is the lip that the purse hinge rests on and you do need this part)
- Once everything is dry, fit the tabs into the slots for both sides – I would definitely add glue for security, but I like to dry fit first to make sure I don’t do something dumb like put one on upside down (yes, I definitely did that once)
- Glue on your decorative outer face plates for the sides if desired
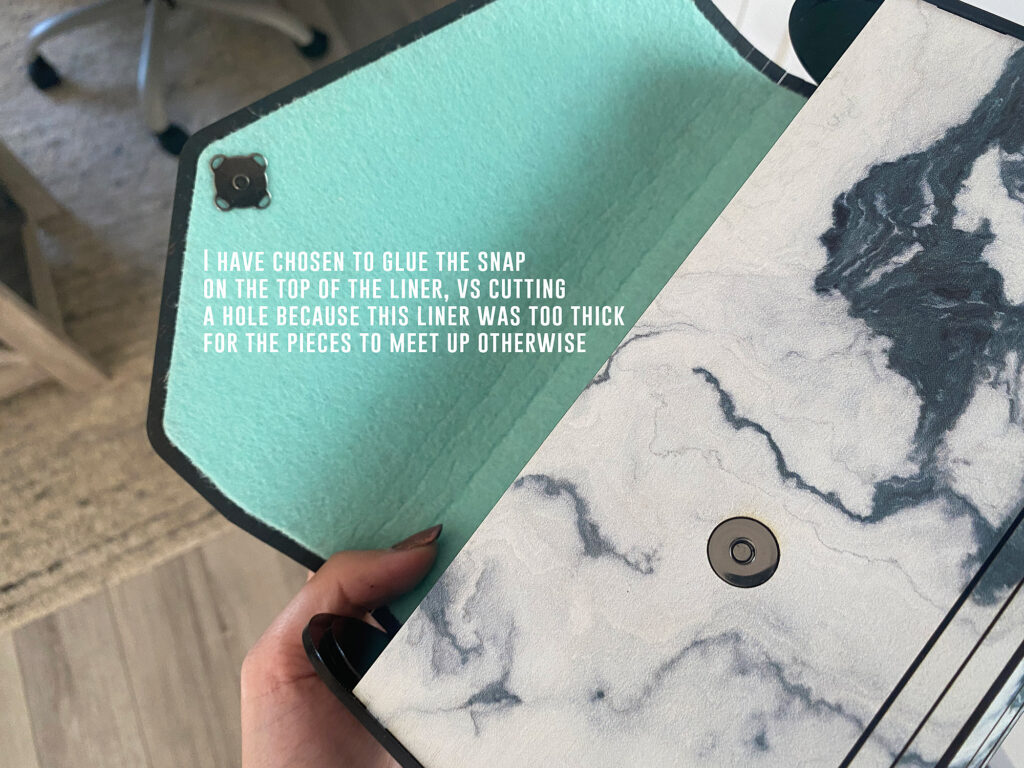
- Glue or attach the other side of the snap if using (I like the purse fully assembled so I can get the proper lineup). I chose to attach the snap on top of the liner, vs putting it behind the liner and cutting a hole because it’s really tough to line it up otherwise
- Add your straps or side hardware and you’re done!
STEP TWO – CUTTING YOUR MATERIALS:
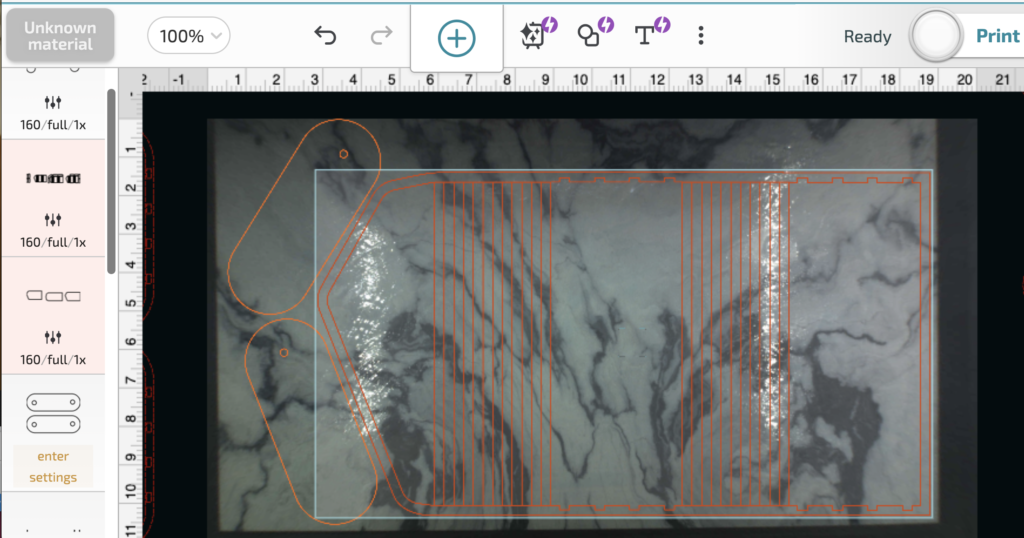
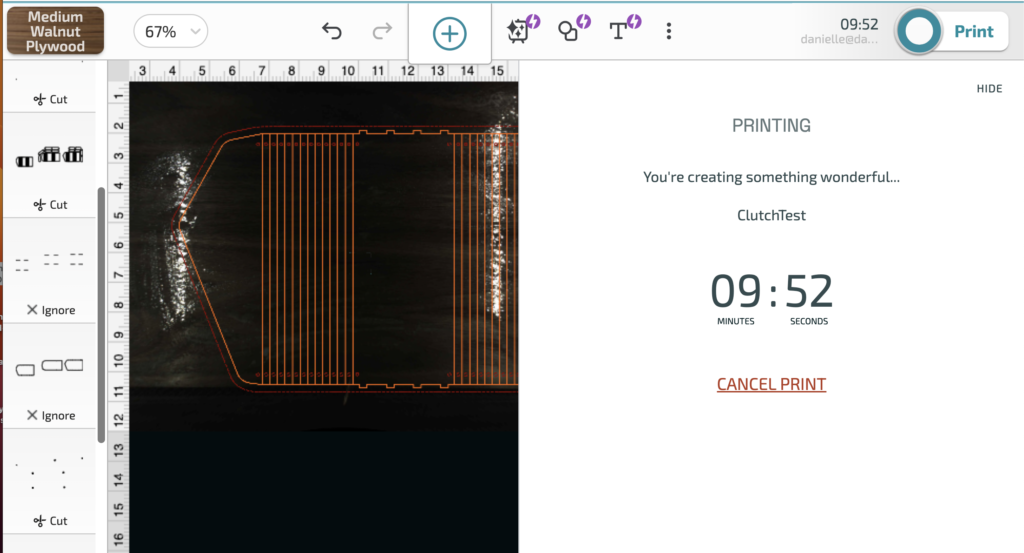
Cut and gather all your materials first. Below you can find my settings and see everything I cut for the purses. I suggest using tape to keep your hinge parts together when you lift your purse out of the machine (if you want the pattern/grain to stay aligned). Cutting is actually super quick for this project. It’s only about 10-15 minutes for the main purse body and sides. Even if you’re cutting from multiple materials you can probably cut everything un about 20 minutes.
NOTE: Don’t forget to SCORE (NOT CUT) that inner line on the slotted side pieces. It’s a separate step but the Glowforge will guess that it is a cut and you need to manually change it.
MDF Patternply
For my Patternply and Leather from Smokey Hills Laser Supply I used the following settings:
Speed: 160
Power: Full
One Pass
Leather
Speed: 250
Power: 100
One Pass
Felt
Speed: 150
Power: 2 (yes, two)
One Pass
Flocked Velvet
Speed: 400
Power: 55
One Pass

STEP THREE – CUT YOUR LINER :
I used felt for my initial tests because it’s cheap. If you cannot find a piece of felt long enough you can use the divided version of the liner in my file. The seam is not noticable once the purse is fully assembled, so don’t worry too much if you have to use two 8.5×11″ pieces. I also tried a flocked velvet pre-adhesive fabric which I loved the look of, but it required another step to make the hinge secure.
STEP FOUR, FIVE, & SIX – ALIGN YOUR PURSE PIECES BACK UP, FLIP, & PAINT IF NEEDED:
I typically use dish soap as my masking. For any non-absorbent material I just wipe on a bunch of dish soap and toss it in and cut. Afterwards I wipe each piece clean with a damp rag and a dry rag. Then I re-arranged all the pieces to make sure the pattern lined up. At this stage I also laid everything out to make sure I had all my parts including hardware.
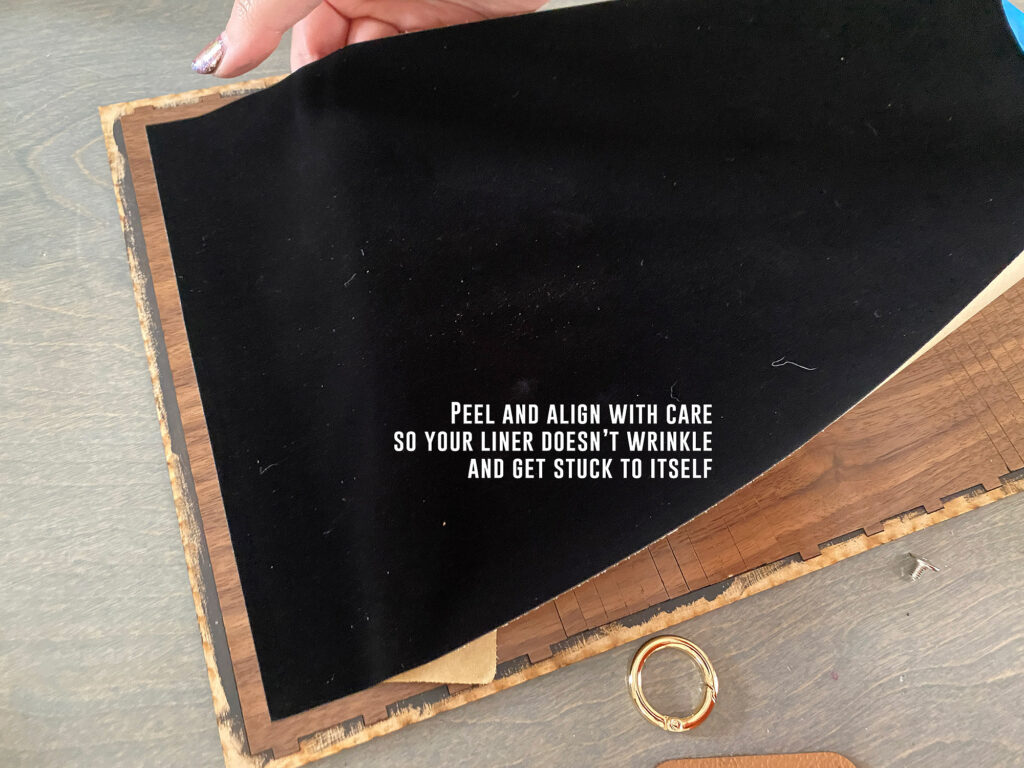
STEP SEVEN – GLUE IN LINER OR SEW:
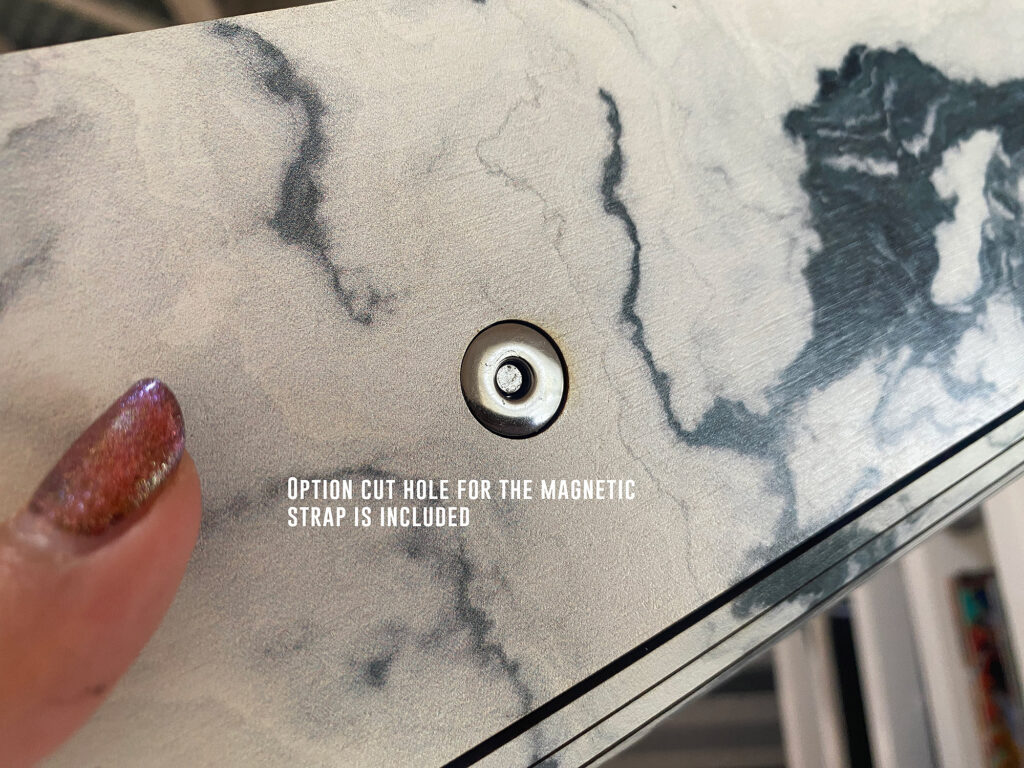
I have no idea what got into me when I typed the photo caption below, but yeah… glue in your magnetic latch if you cut the hole for it.
Then glue your liner, or skip down to the sewing instructions.
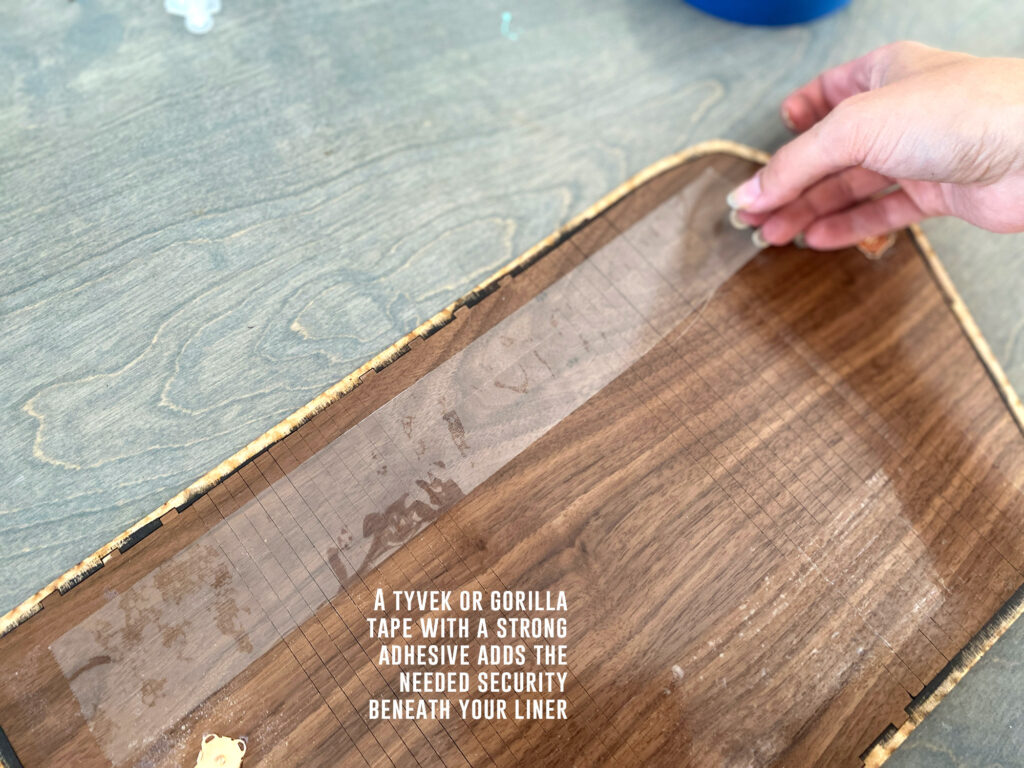
I used Super 77 applied to one side of my felt and it really seemed to hold up. If you are using a self adhesive velvet or just don’t totally trust the glue you’ve choses hear me out – tape. Using a strong, permanent, but thin tape (Gorilla Clear Tape, Tyvek Tape, etc.) apply it to the purse behind your liner. It won’t be visible unless it’s super brightly colored and it will add a little security. Don’t completely cover the interior with tape – you want both the tape and the glue to be working together.
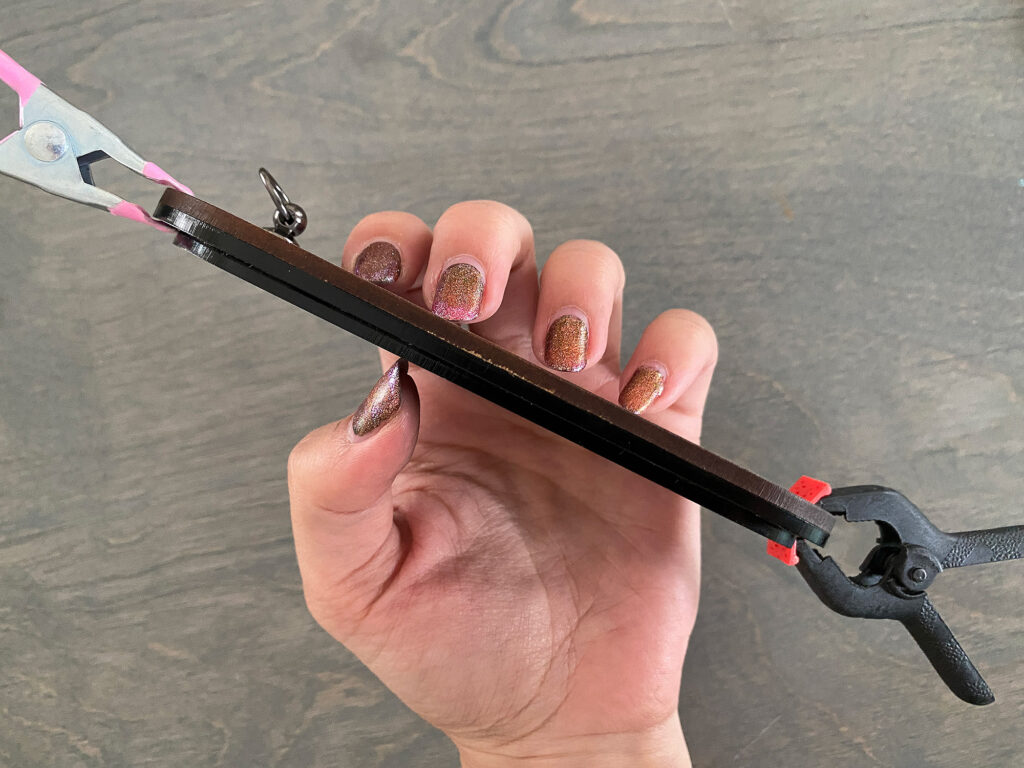
SEWING
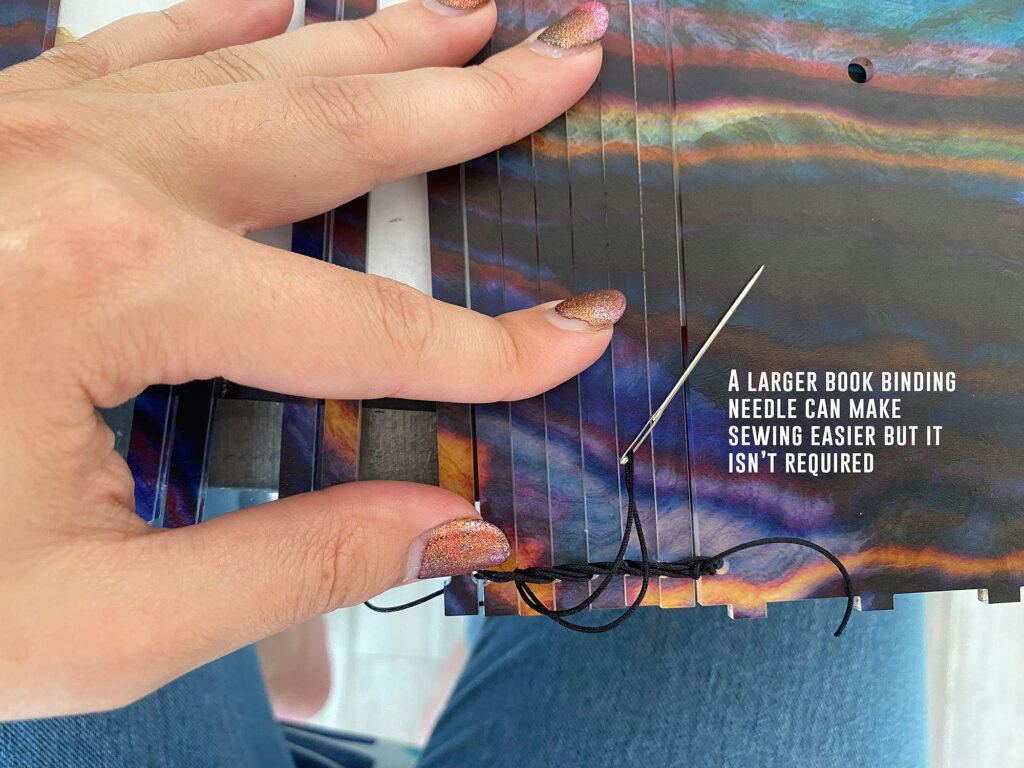
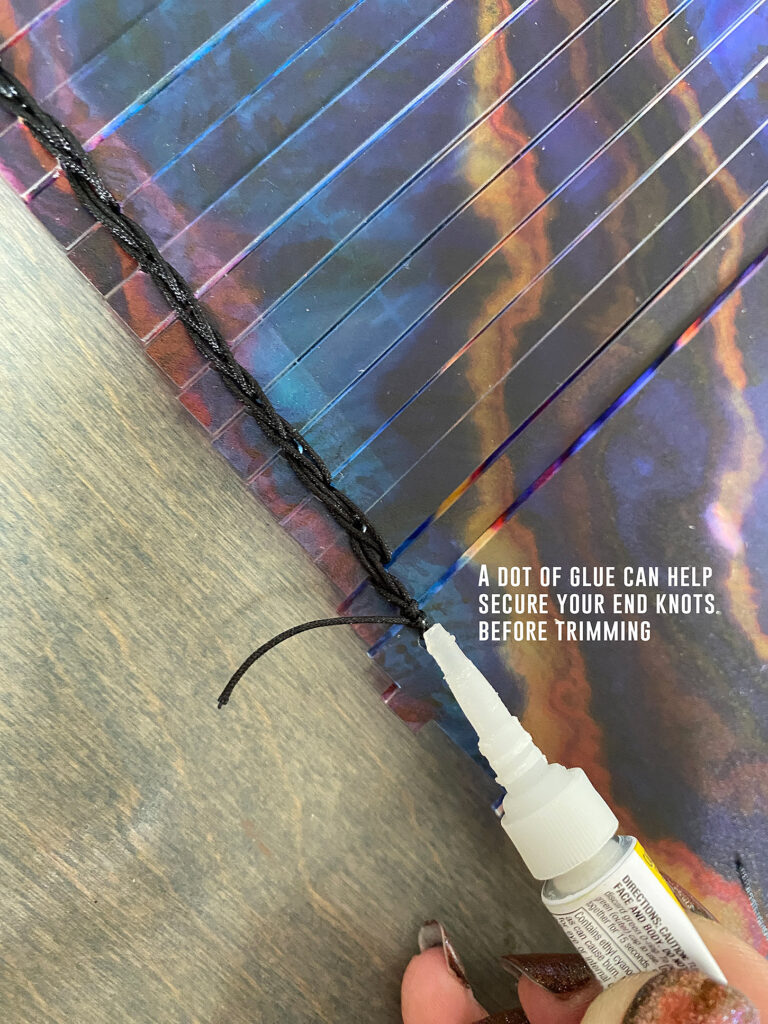
The sewing technique I used is literally so simple it’s laughable. It’s just a matter of threading a string through the starting hole (on the side or flap of the purse) leaving two long tails, and then going over under through the holes until you reach the end where you tie a knot. Like… that’s it. I tried a variety of different sewing techniques with knots or other methods but this over under over under yielded a smooth hinge with minimal gaps.
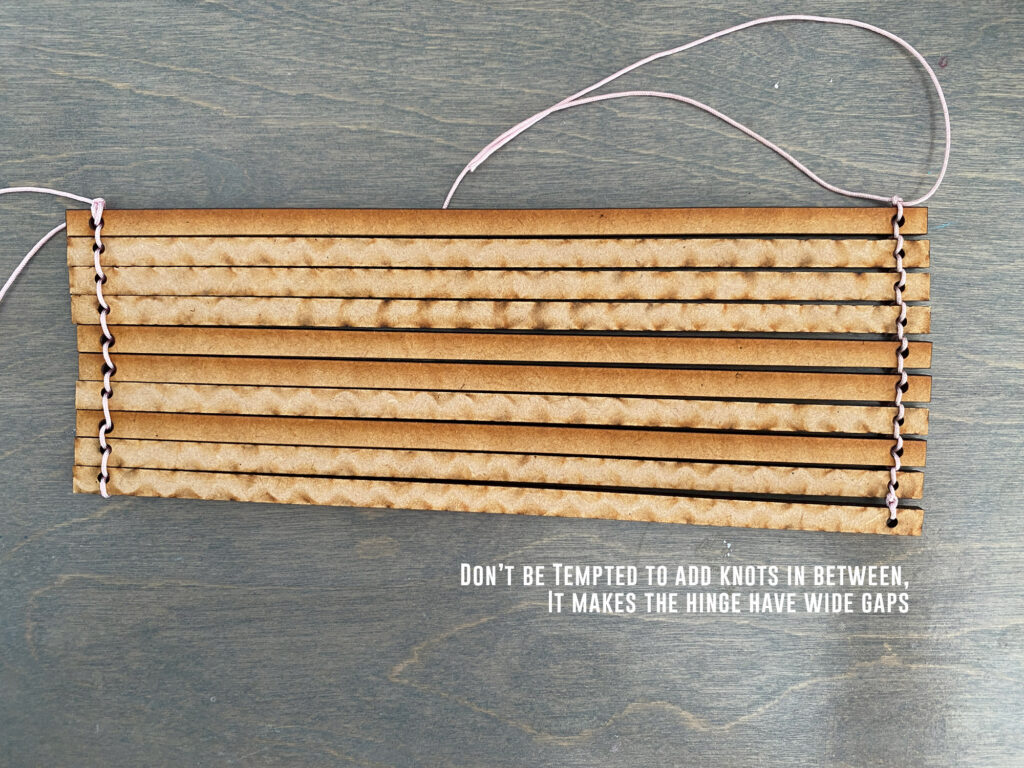
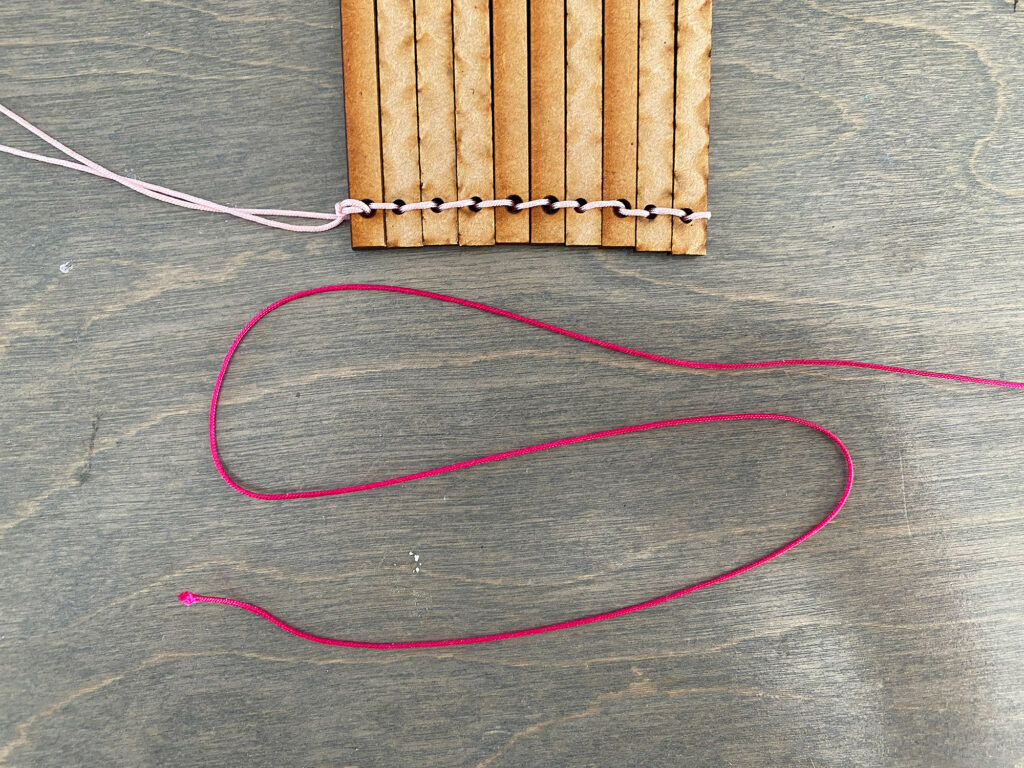
Cut a String that is 3x as long as the living hinge section. Slide it through the first hole leaving two long, equal tails
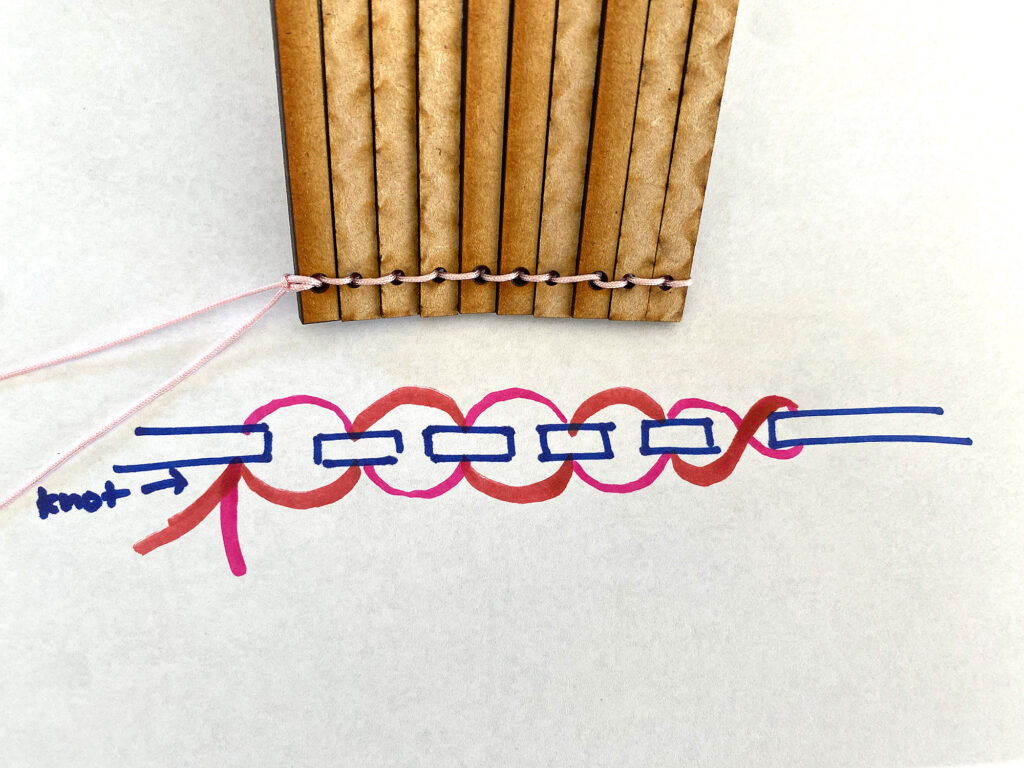
Over under, over under
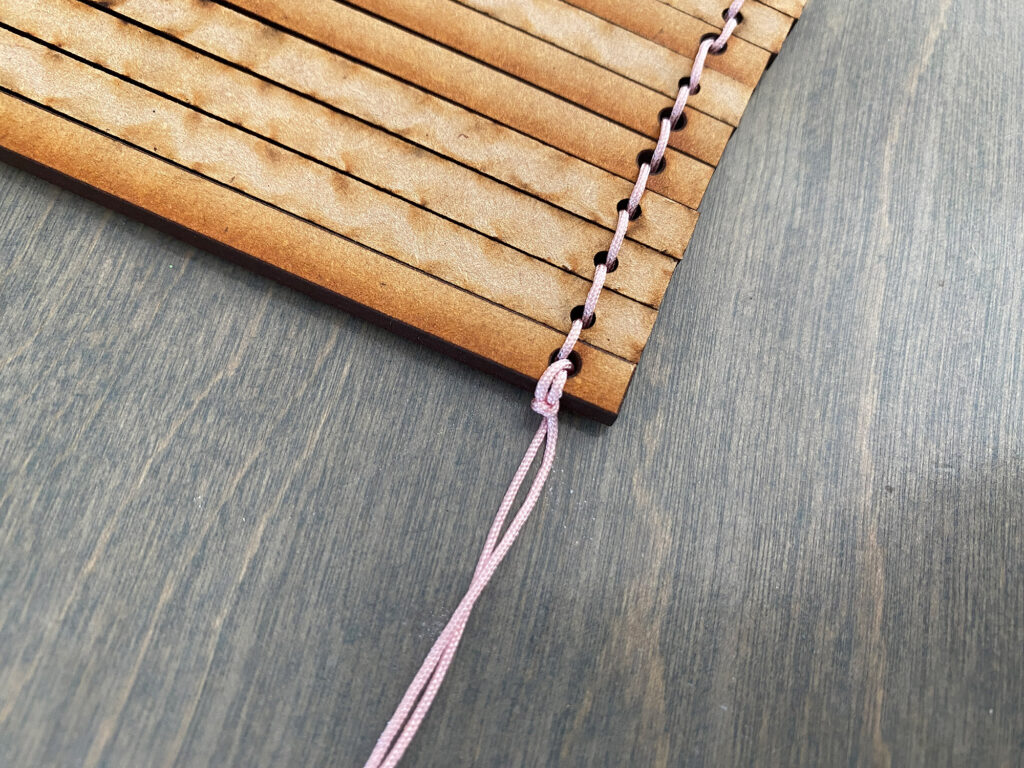
Tie a Knot - Done
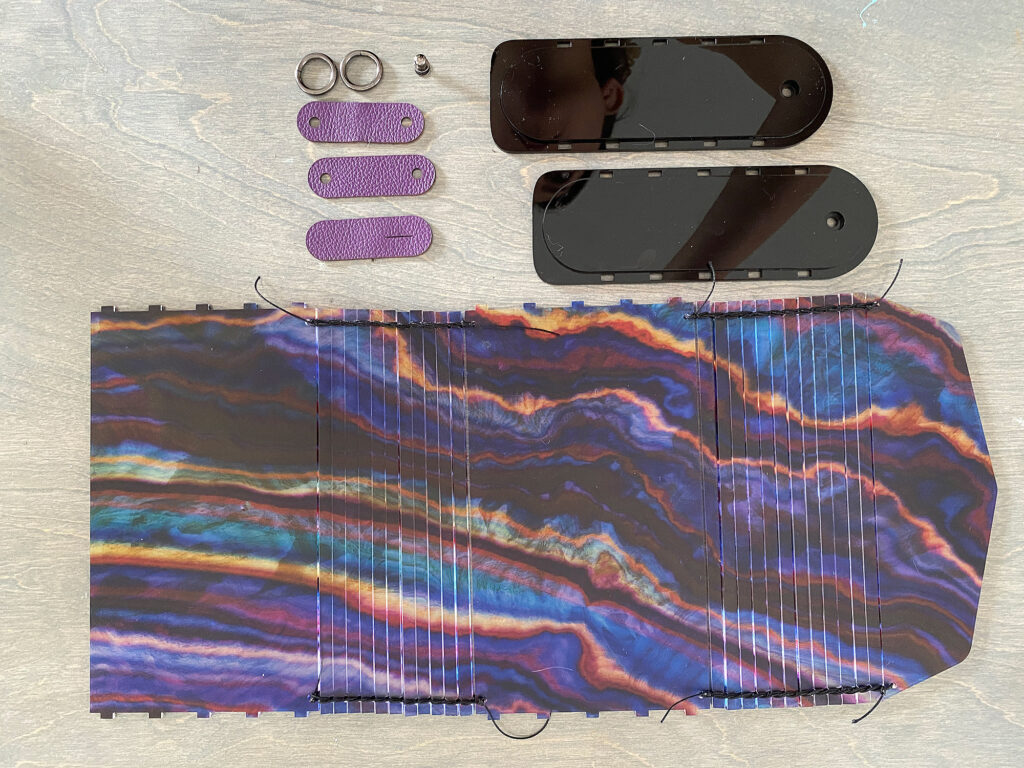
STEPS EIGHT, NINE, & TEN – ASSEMBLE THE SIDES
Assembling the sides is pretty simple:
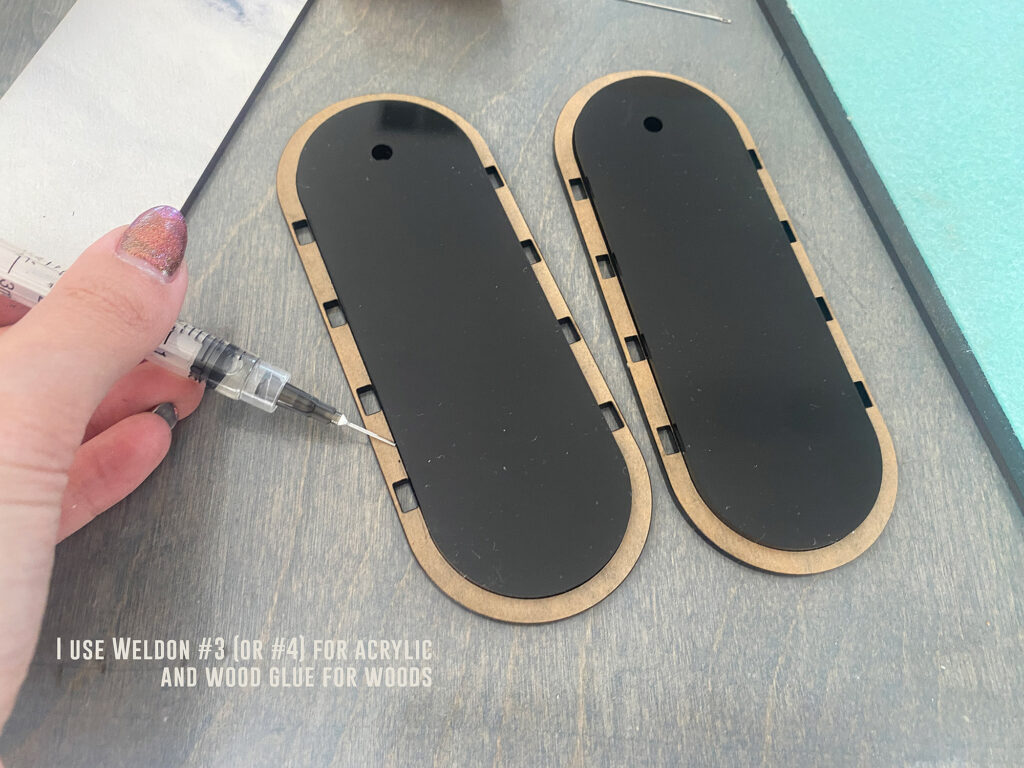
- Glue the inner plate to the plate with slots using the score line as a guide. For Acrylic I like to use Weldon #4 with a syringe because it makes a very strong bond. For Wood or other mixed materials I typically use Gorilla Glue Gel. Avoid super glue for acrylics as it tends to off-gas and etch the surface with a white film.
- Fit the Purse into the slots ensuring the hardware hole is at the top on both sides. The glued on smaller plate should face INSIDE the bag as this is the lip for the purse hinge
- If everything looks right then glue on your outer decorative plate if you’re using one. I like to dab a bit of glue on and around the tab/slots for extra security
Alternatively, you can choose to assemble the three layers and glue them together before putting the purse body on. Either way is fine, I just strongly suggest dry fitting everything first to make sure your tabs and slots are right before gluing everything together.
STEPS ELEVEN & TWELVE – ADD YOUR FINAL SNAP & HARDWARE
For attaching the other side of your snap, simply stick your snap plate onto the one you’ve already glued in . Then add a dot of paint to the back/center. Gently close the purse so it is lined up how you want it. When you open the purse back up there will be paint dot where you need to line up the center of the snap plate. Glue in place, done (if that is confusing watch the hardware video).
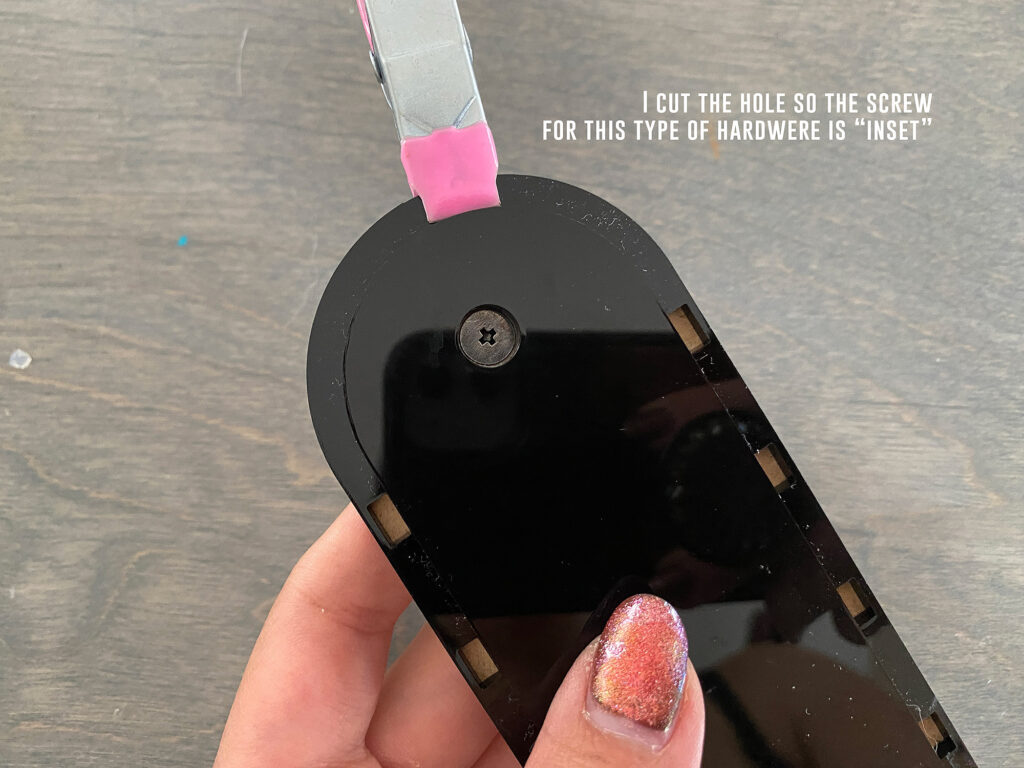
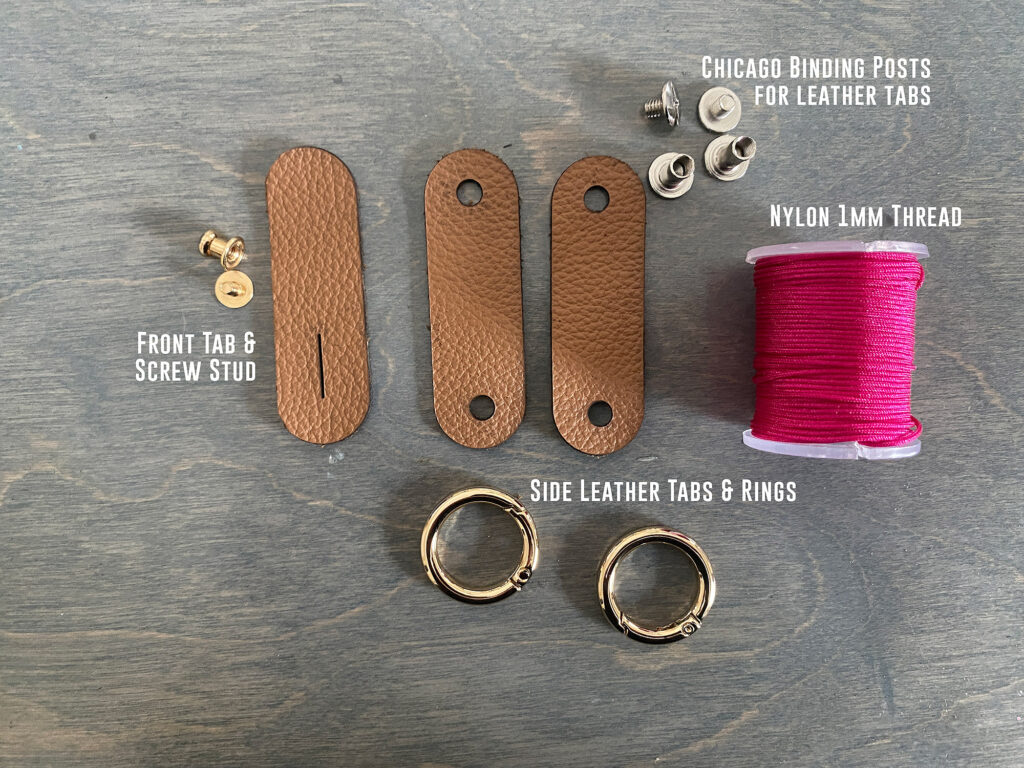
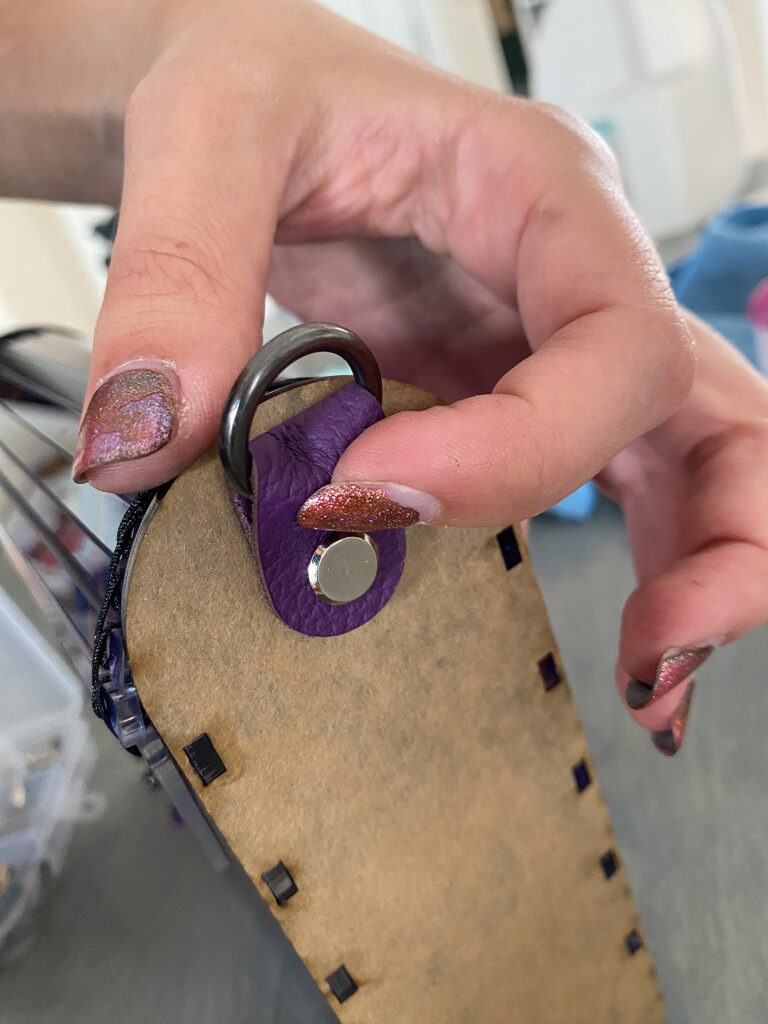
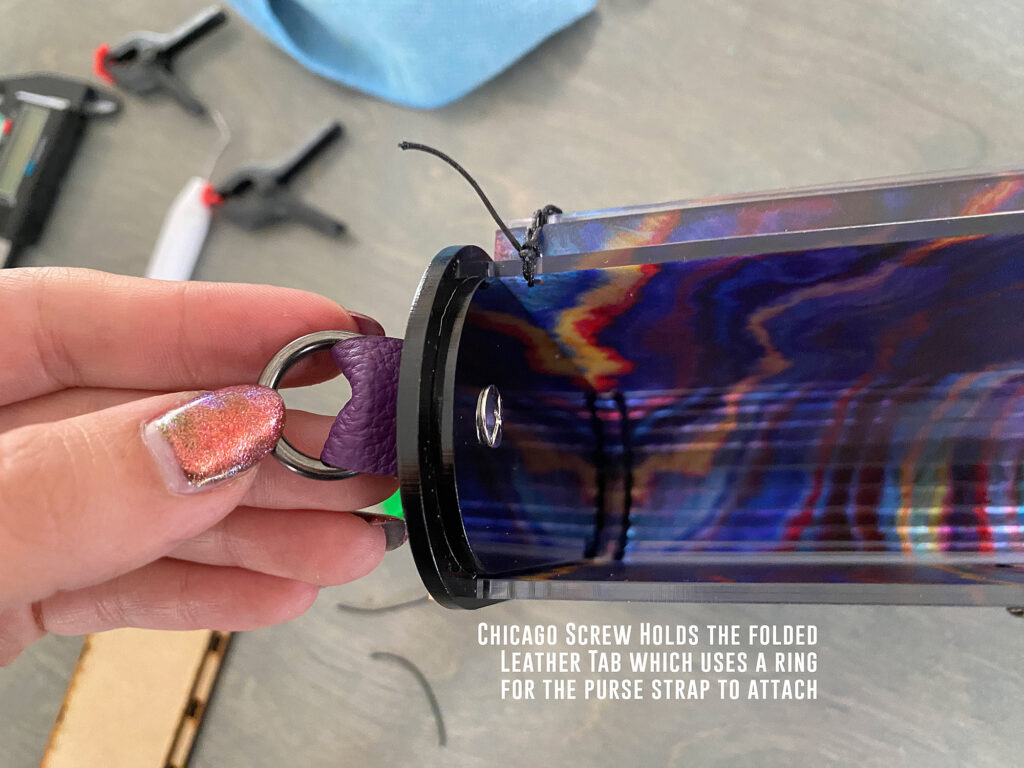
For the hardware, there isn’t much to do other than screw on your chosen side pieces and add your strap.


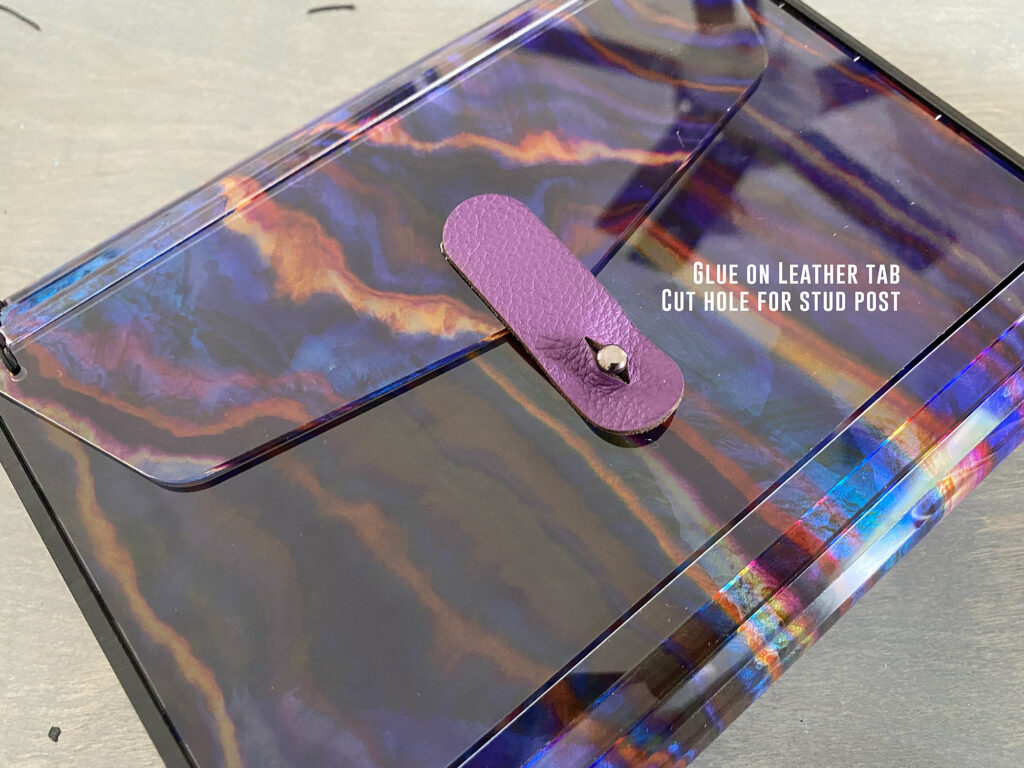
The hardware you choose will depend on which design you’ve made. For the sewn version you will probably want to use the Front tab and screw stud (as this looks better on clear than the magnetic snap). For the magnetic snap option I prefer to use a liner and opaque purse materials. The side hardware you choose doesn’t matter for either purse shape or attachment method. You can use my little leather tabs with rings or buy separate purse strap hardware and skip the leather all together.
FINAL THOUGHTS
I hope this tutorial will help you to create some beautiful clutches to sell, gift, or enjoy!
FINAL TIPS:
- The first time you make one of these purses lay out all the parts and ensure you have all the hardware you need, once you’ve made one or two of these you’ll realize how super simple they are and you’ll be able to assemble a new one in no time flat
- There are two things you need to check before you cut – the side of the holes on the side of the bag, and the tabs/slot fit. My video on the file shows you how to adjust these, but make sure the hole is the right size for the hardware or Chicago screws you’ve purchased and that your tab and slots work for the materials you are using. (Just because something is labeled 1/8″ doesn’t mean it actually is, some things are thicker or thinner and the cut settings you use can affect how much material is burned away which also affects fit)
Where to Get the Materials:
Get 50% off your first Wish.com order with my code: mfvjgnw | I buy lots of odds and ends here, so if you need some small item and don’t mind waiting, this can be a fun shop to check out.
Black Diamond Pigments – These are some killer resin pigments.
The Amazon links below are typically affiliate links. They don’t cost you more but they do help me keep creating content.
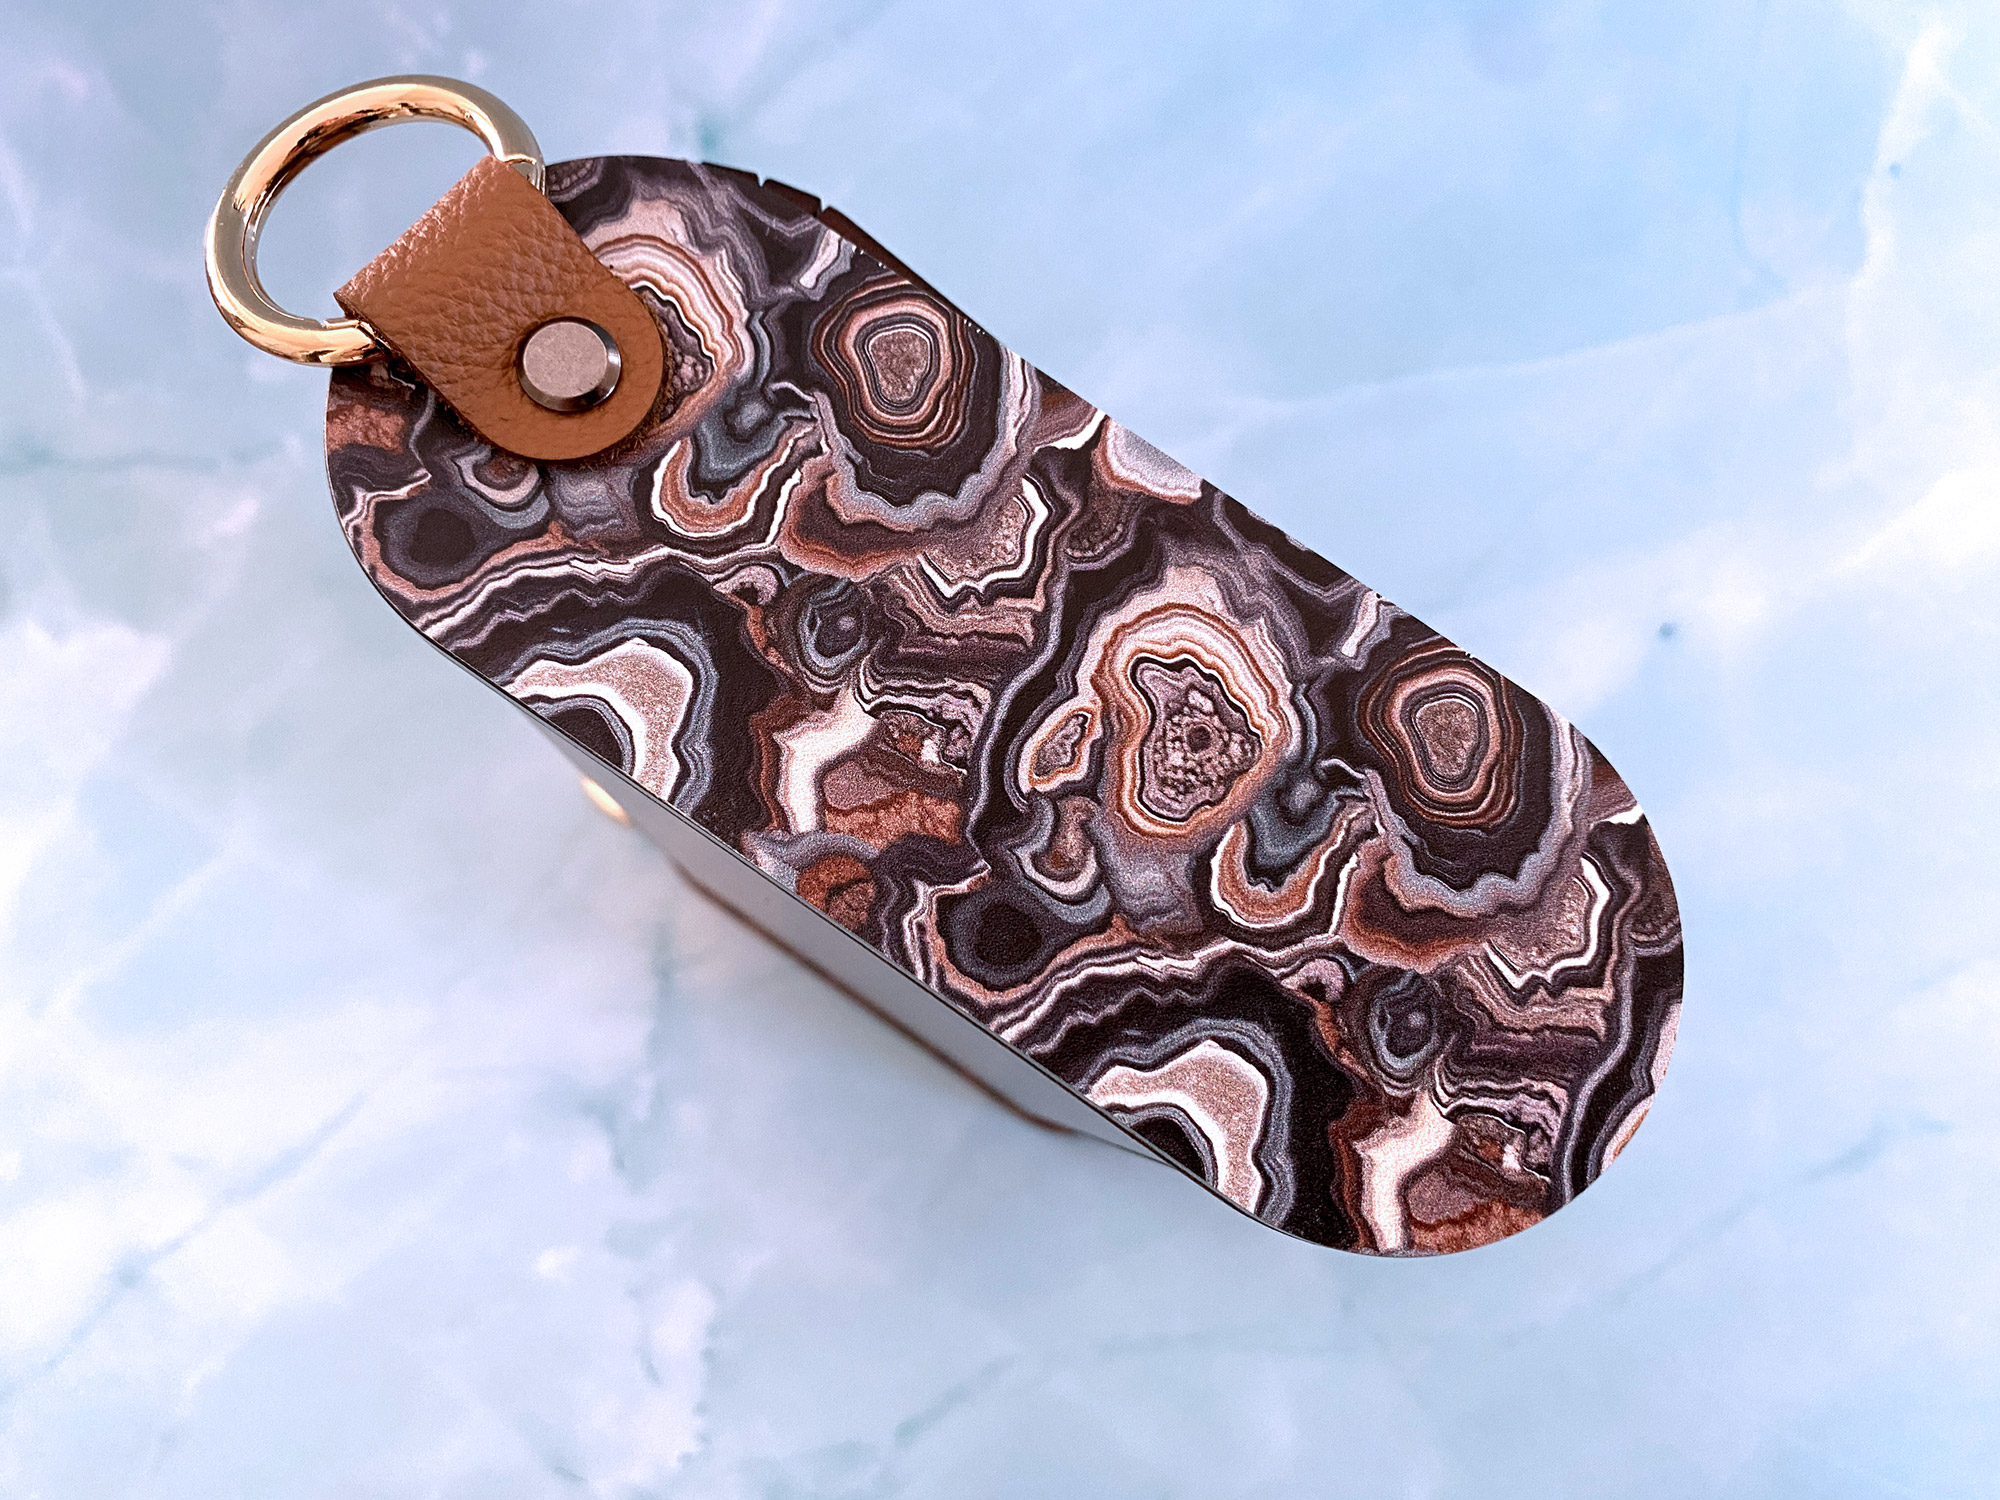
- Patterned Materials & Leather – The Patternply wood (the geode one on the ends of the wooden purse and the purple acrylic) as well as the leather shown here is from Smokey Hills Laser Supply.
The Walnut is Laserbits from Johnson Plastic Plus - The Felt – Any craft felt or fabric you like will work, I got my felt from Ollie’s on sale so I don’t have a link
- The Velvet/Flocked Liner – This was purchased on Amazon, it is not sticky enough to hold the purse together on its own (even if you try and apply extra glue on top – I did try that) but when used with the Gorilla tape method shown will work and has a really nice look.
- Gorilla Tape – This works to add some extra security before gluing down your liner
- Weldon – This is my preferred glue for acrylic to acrylic, I use #3 or #4 and a non medical syringe to apply it.
- Syringes – For applying the Weldon
Hardware – You don’t need every item, watch the video on hardware to get an idea of which items you would like to buy for the style of bag you want to make: - The Purse Side Hardware – These are the ones with the little loops, you do not need leather tabs with this style.
- Magnetic Closure Snaps – These are different than most of the ones you’ll see because they are “sew on” and do not have long metal folding tabs
- The Nylon Beading Thread for Sewing the Purses – I used 1mm shambala bracelet cording
- The Acrylic Purse Strap – I really liked this chunky strap and it came with carabiner loops for the sides of the bag which worked great with my leather tabs
- Carabiner Rings – I used these with the leather tabs so that a strap could be attached
- Chicago Binding Screws in Three Colors – These are used to attach the leather tabs to the sides of the bag
- Button Studs – This works for the leather tab closure that I put on the clear purpler purse
Great Vendors for beautiful sheet materials: None of these are affiliate links! I purchase materials from all of these vendors because I like their products:
Woodcraft – Exotic Veneers, 1/8″ wood
Johnsons Plastics Plus – Rowmark Acrylic, Saddle Faux leather (laser safe), Finished plywood, Flexibrass etc. Veneers (with and without 3M)
Craft Closet – Shell veneer, acrylic (Glitter for days), wood, colorboard
Cerulean Tides- So many gorgeous acrylics
Smokey Hills – Wood, Plywood, Basic Acrylics, Patternply in Acyrlic and Wood(beautiful pattern printed boards)
Custom Made Better – So many fun different materials and they also release tutorials for learning new techniques
Obligatory Glowforge Discount Code Plug
If you found this post helpful and you plan to buy a Glowforge you can use my code (https://glowforge.us/r/QHDONFXB) for a discount of $125 off the Basic, $250 of the Plus, or $500 of the Pro:
Sign Up for Blog Posts Updates
And finally, if you’d like to be updated on posts like these in the future you can sign up for my email list. You will only receive an email if there is new content, and only once weekly in that case:
