For the past couple of months I’ve been taking a lithography class at the Honolulu Museum Art School with master lithography David Smith. In an effort to reinforce what I’ve learned (and to serve as a reminder down the line should I ever have access to litho facilities once again) I am creating a visual catalogue of the steps I took to make my first set of lithographs.
 2. While the drawing is being fleshed out, it’s time to prepare the stone. Yeah, this is not the most enjoyable part. First a stone is checked for its level using a straight edge. A slip of newsprint is held under the tear bar and tugged to determine there aren’t any low/high spots as it will slip out when there is a low area.
 After the low spots are marked and the grinding pattern is established, grinding starts with a coarse grit.
 Grinding is done in tight circles on a wet stone until the grit is worn down to a white foamy state.
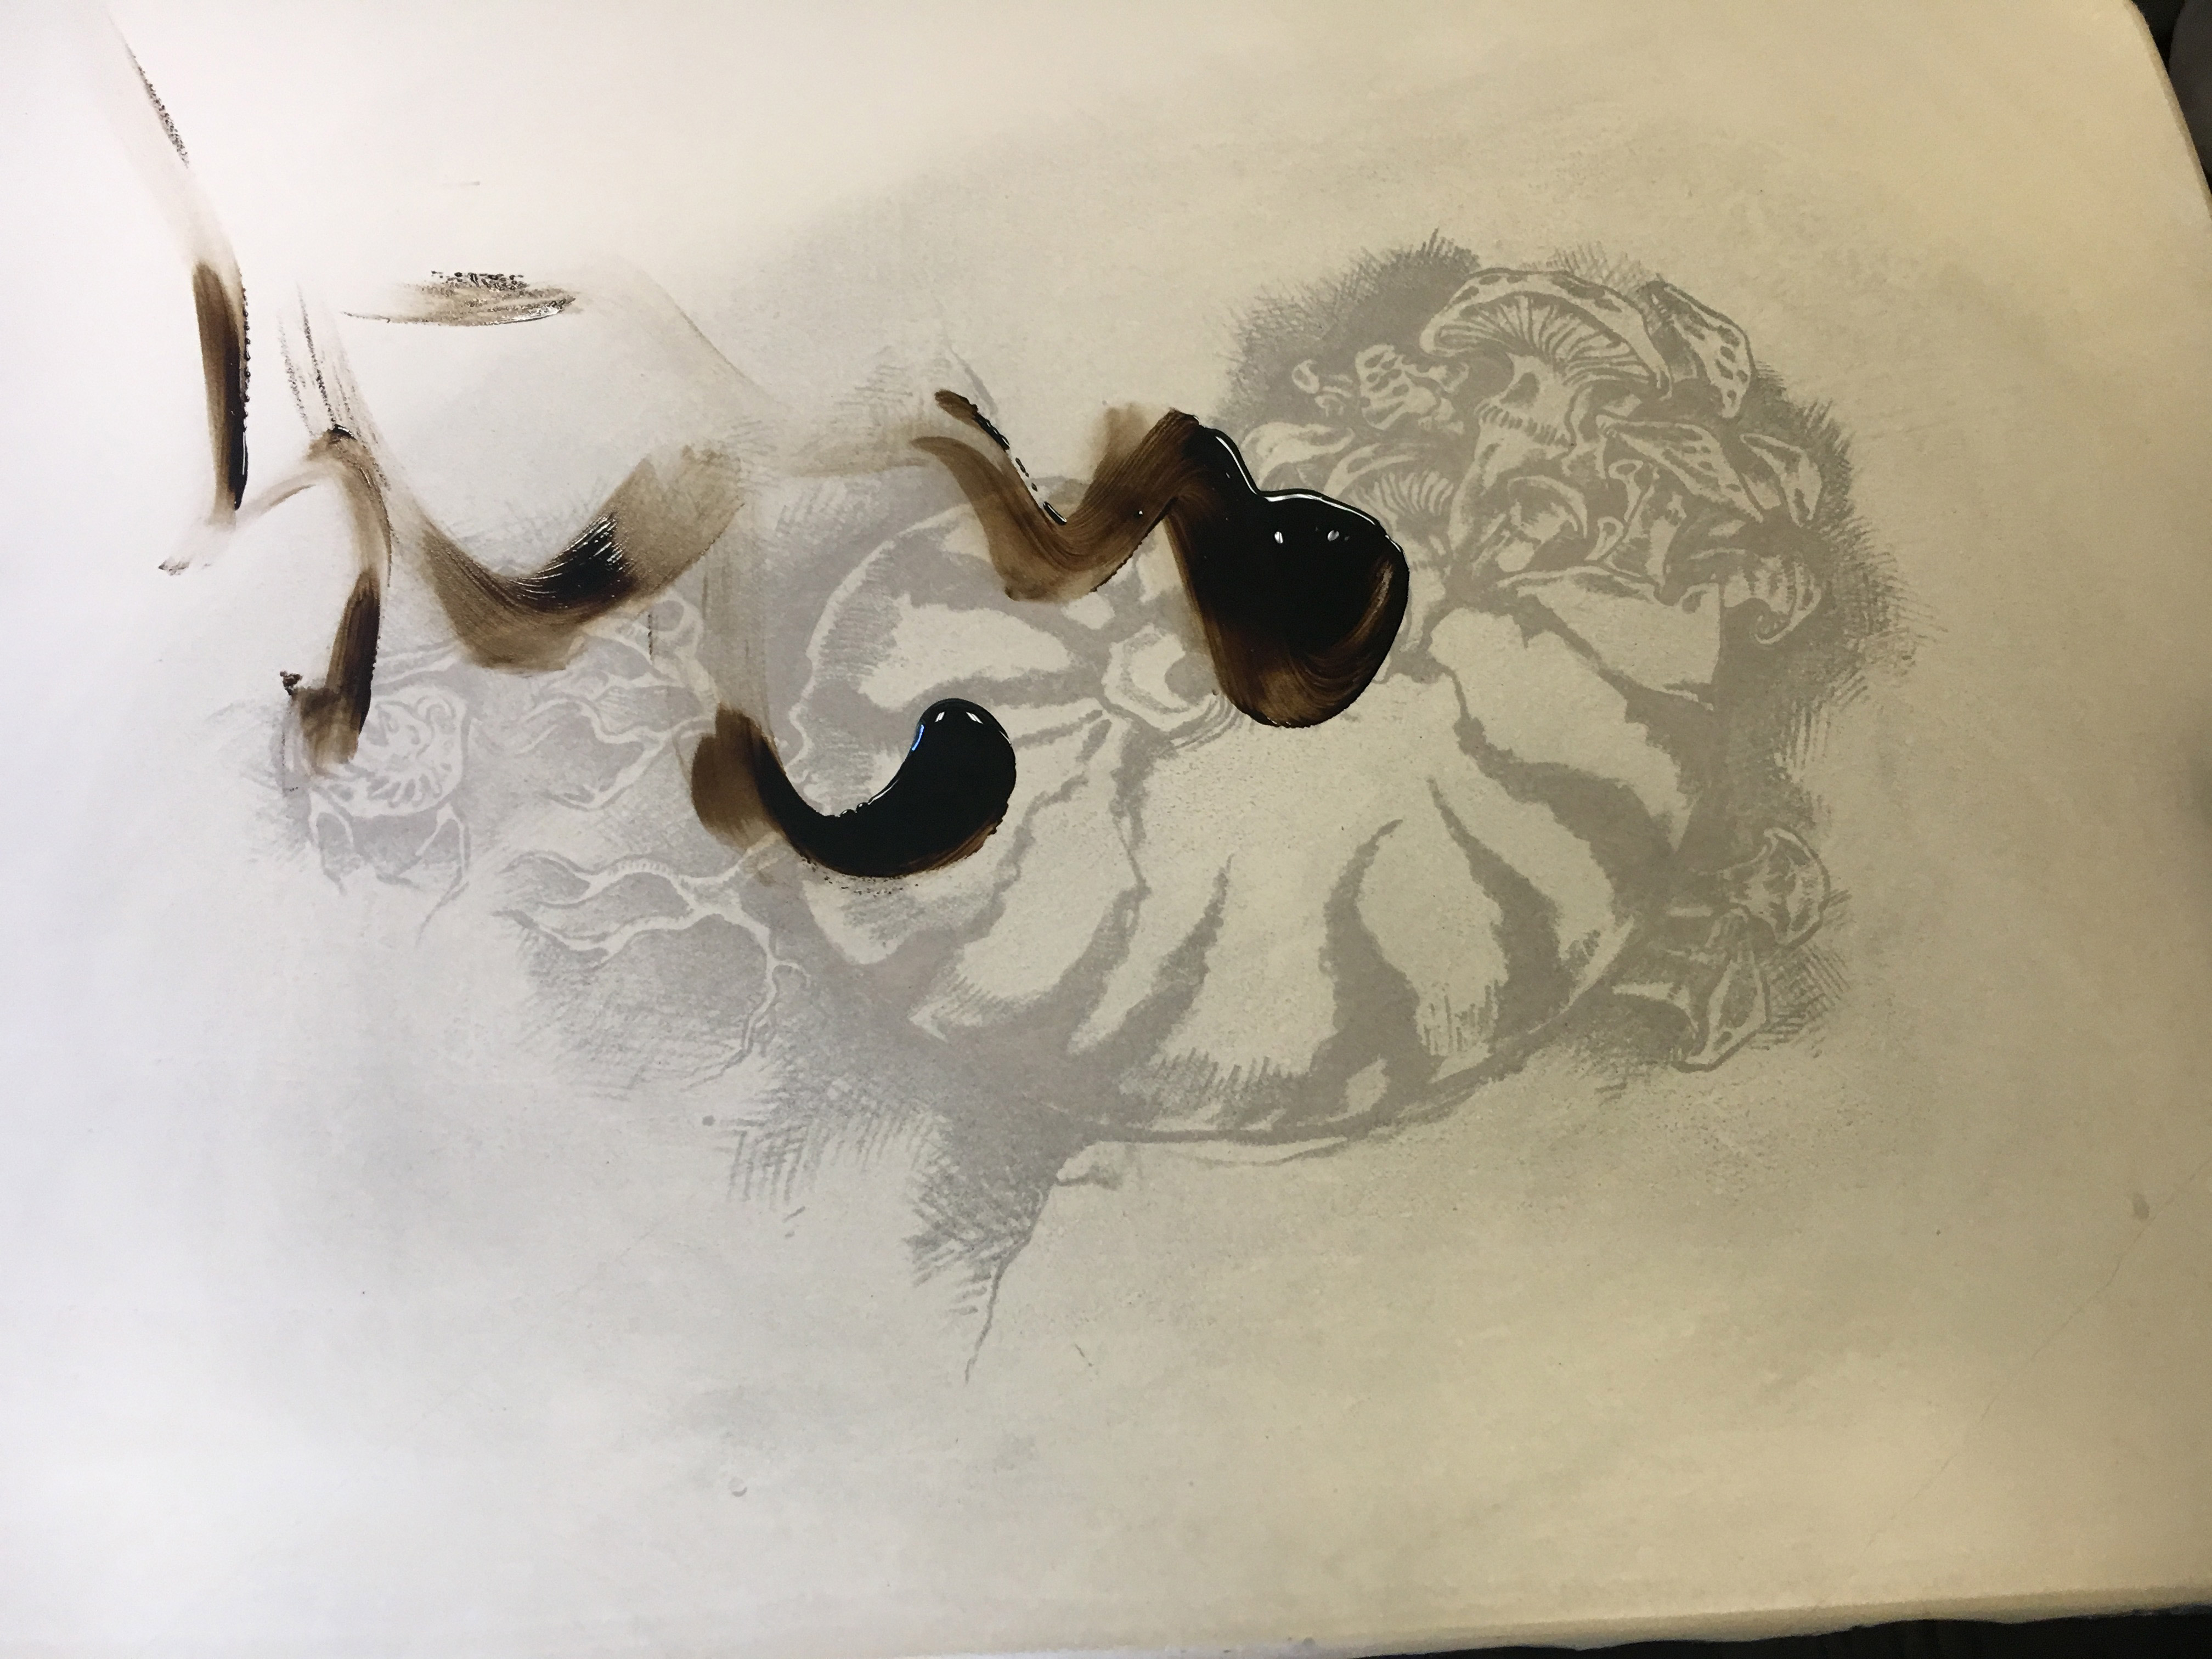
 The stone is then rinsed and checked again, until it is level and the previous lithograph is completely erased. This may take forever – especially for stubborn images, as if they aren’t fully erased they may show up in your prints. You can see one of the stubborn images I battled below.
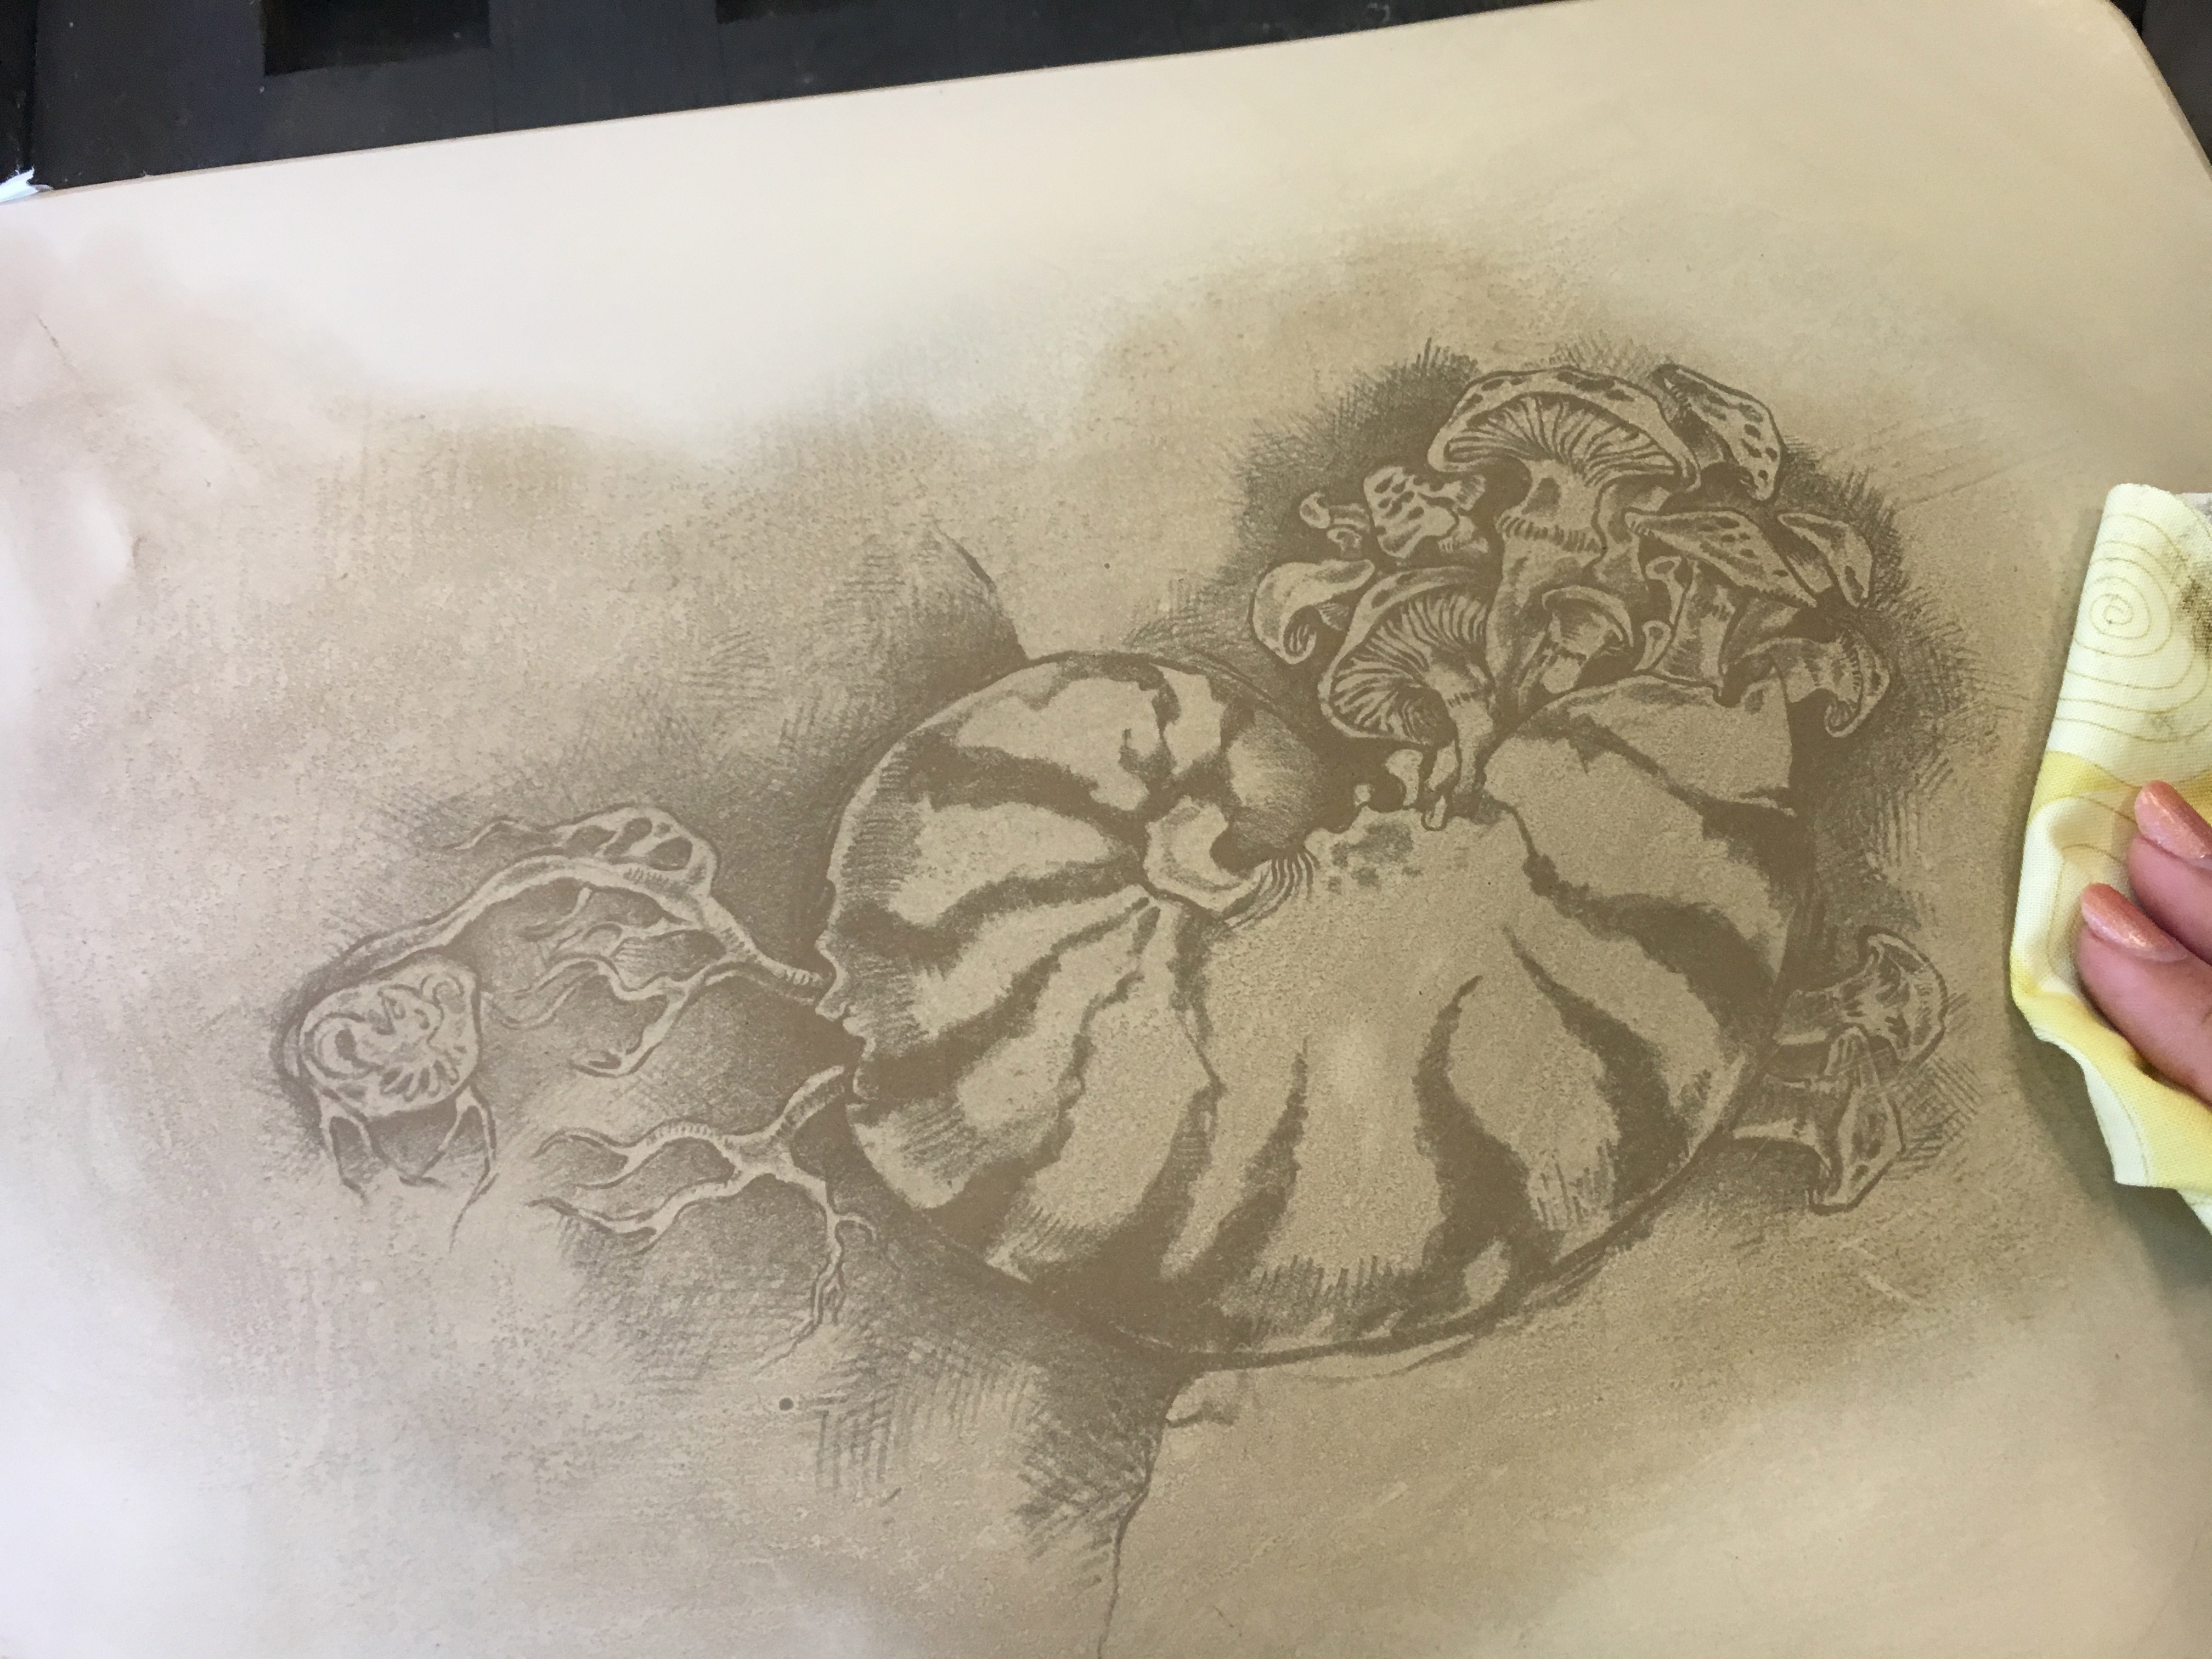
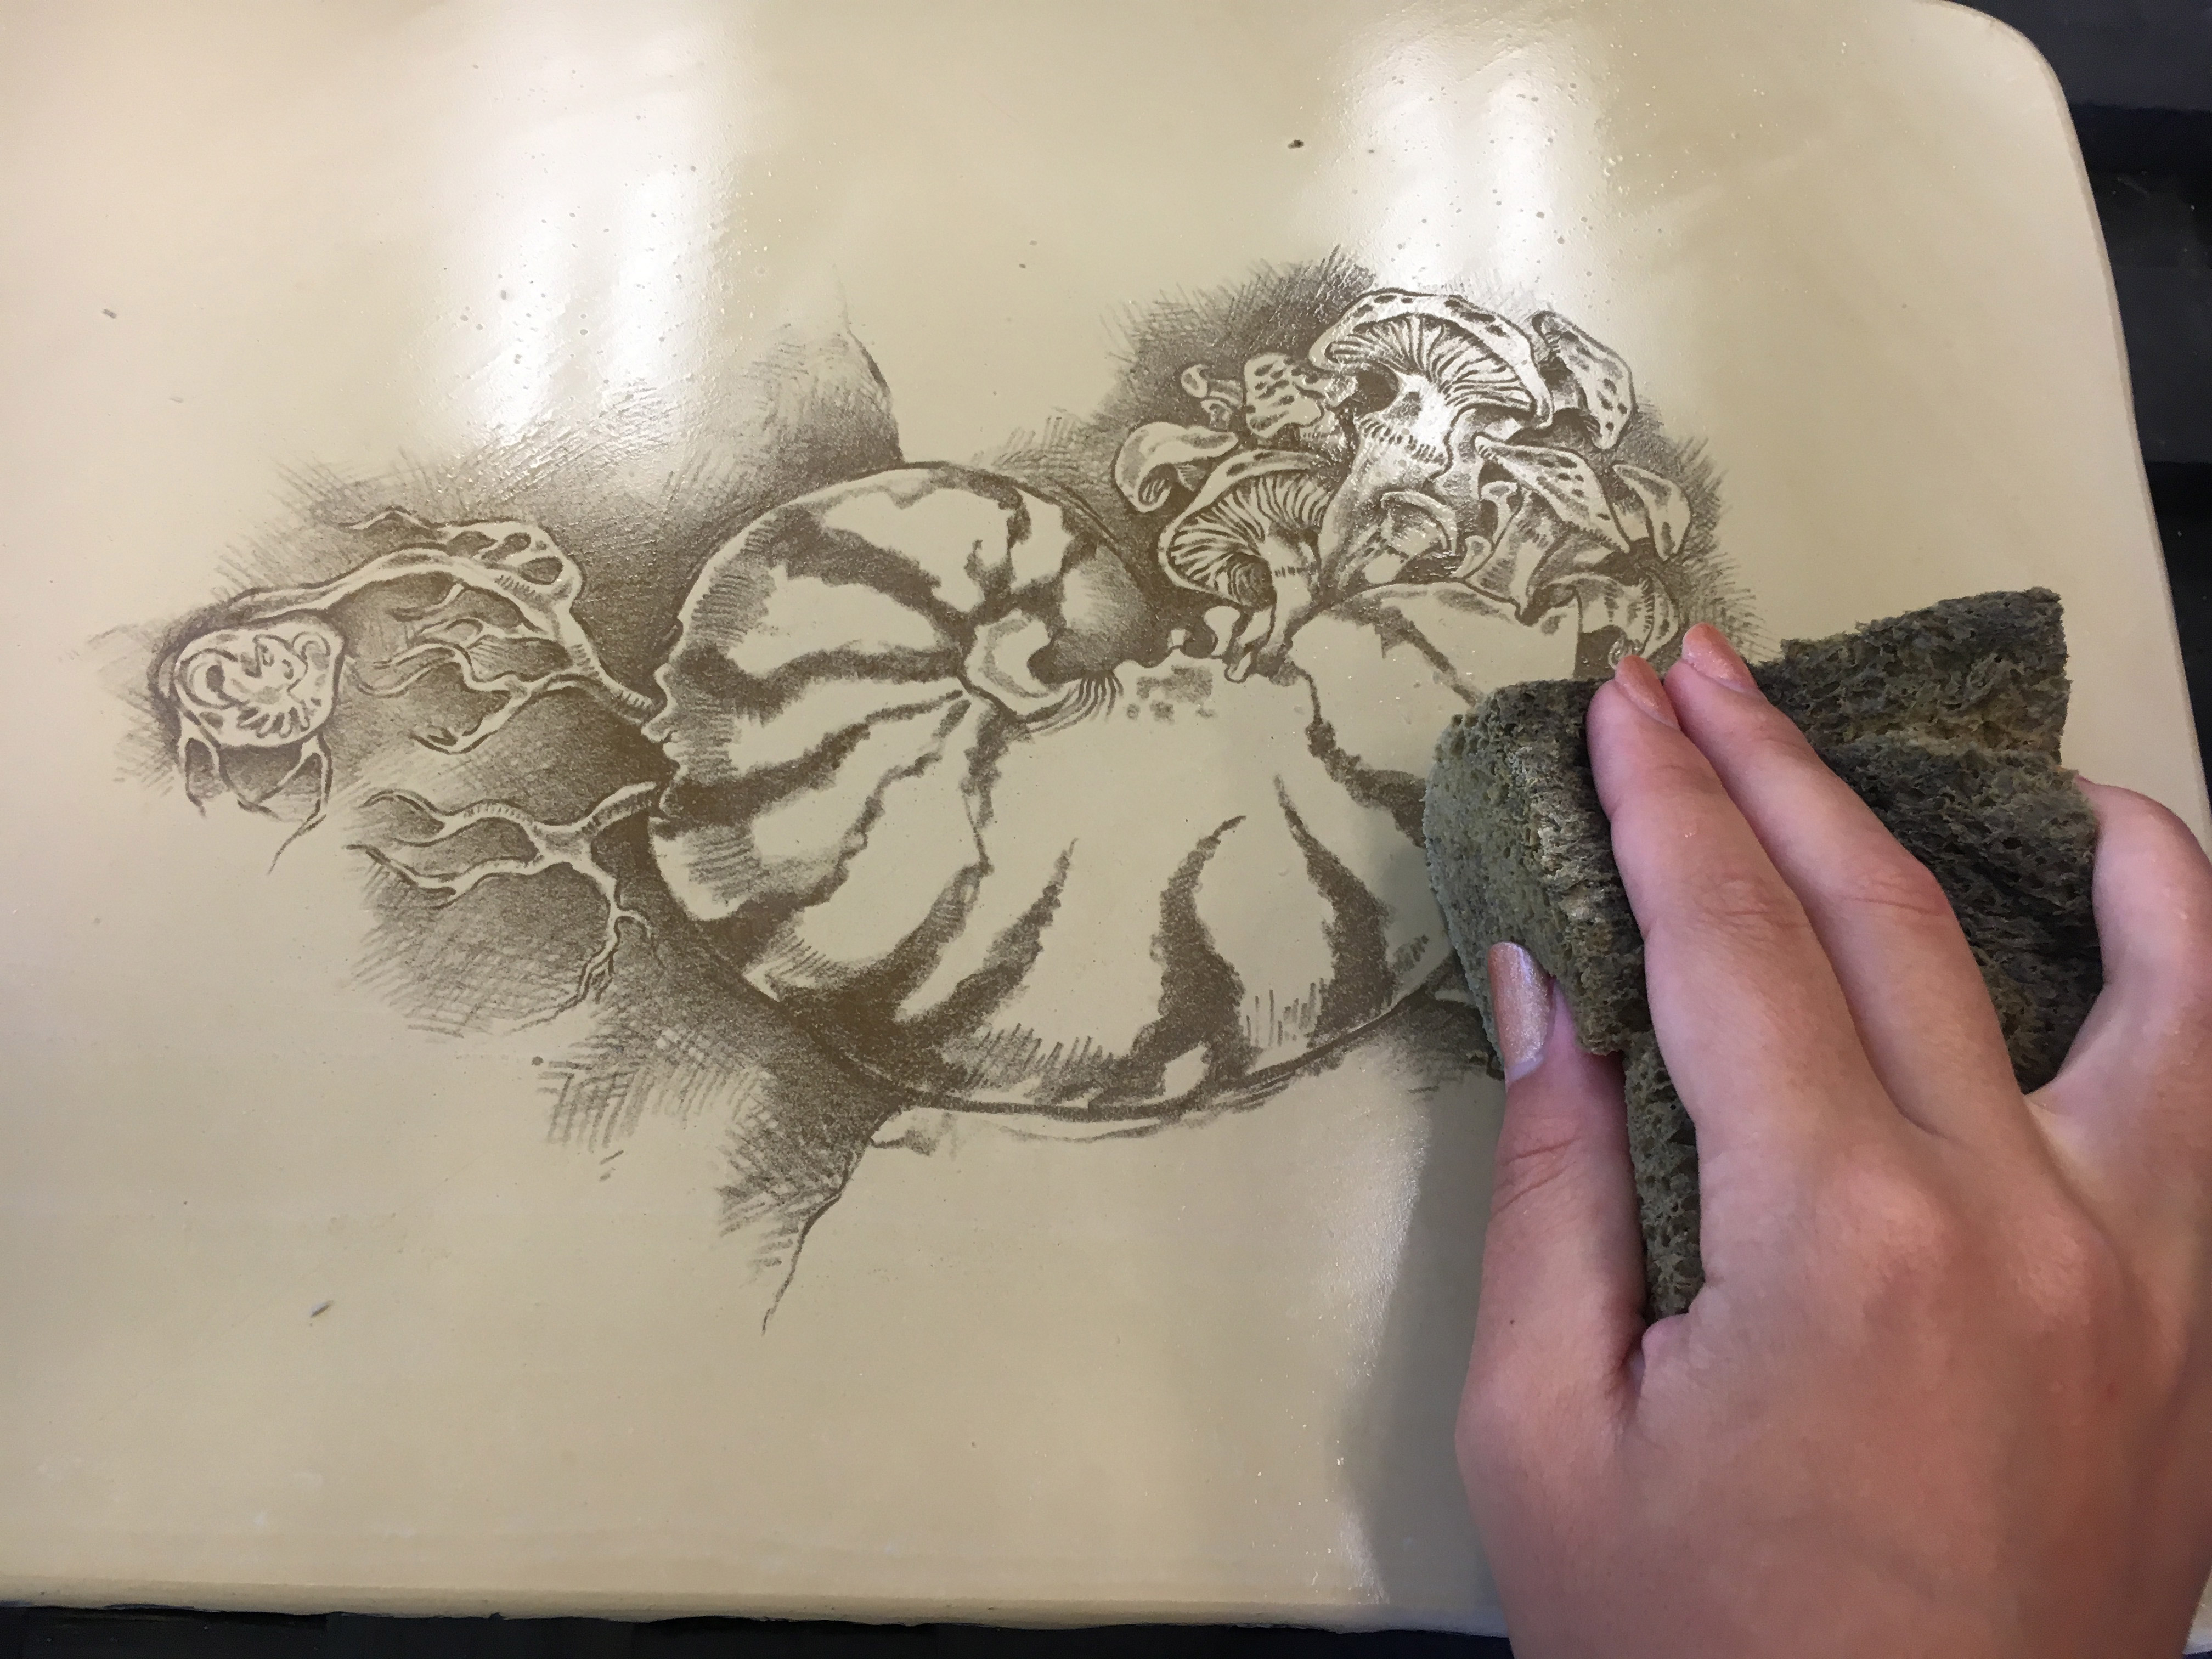
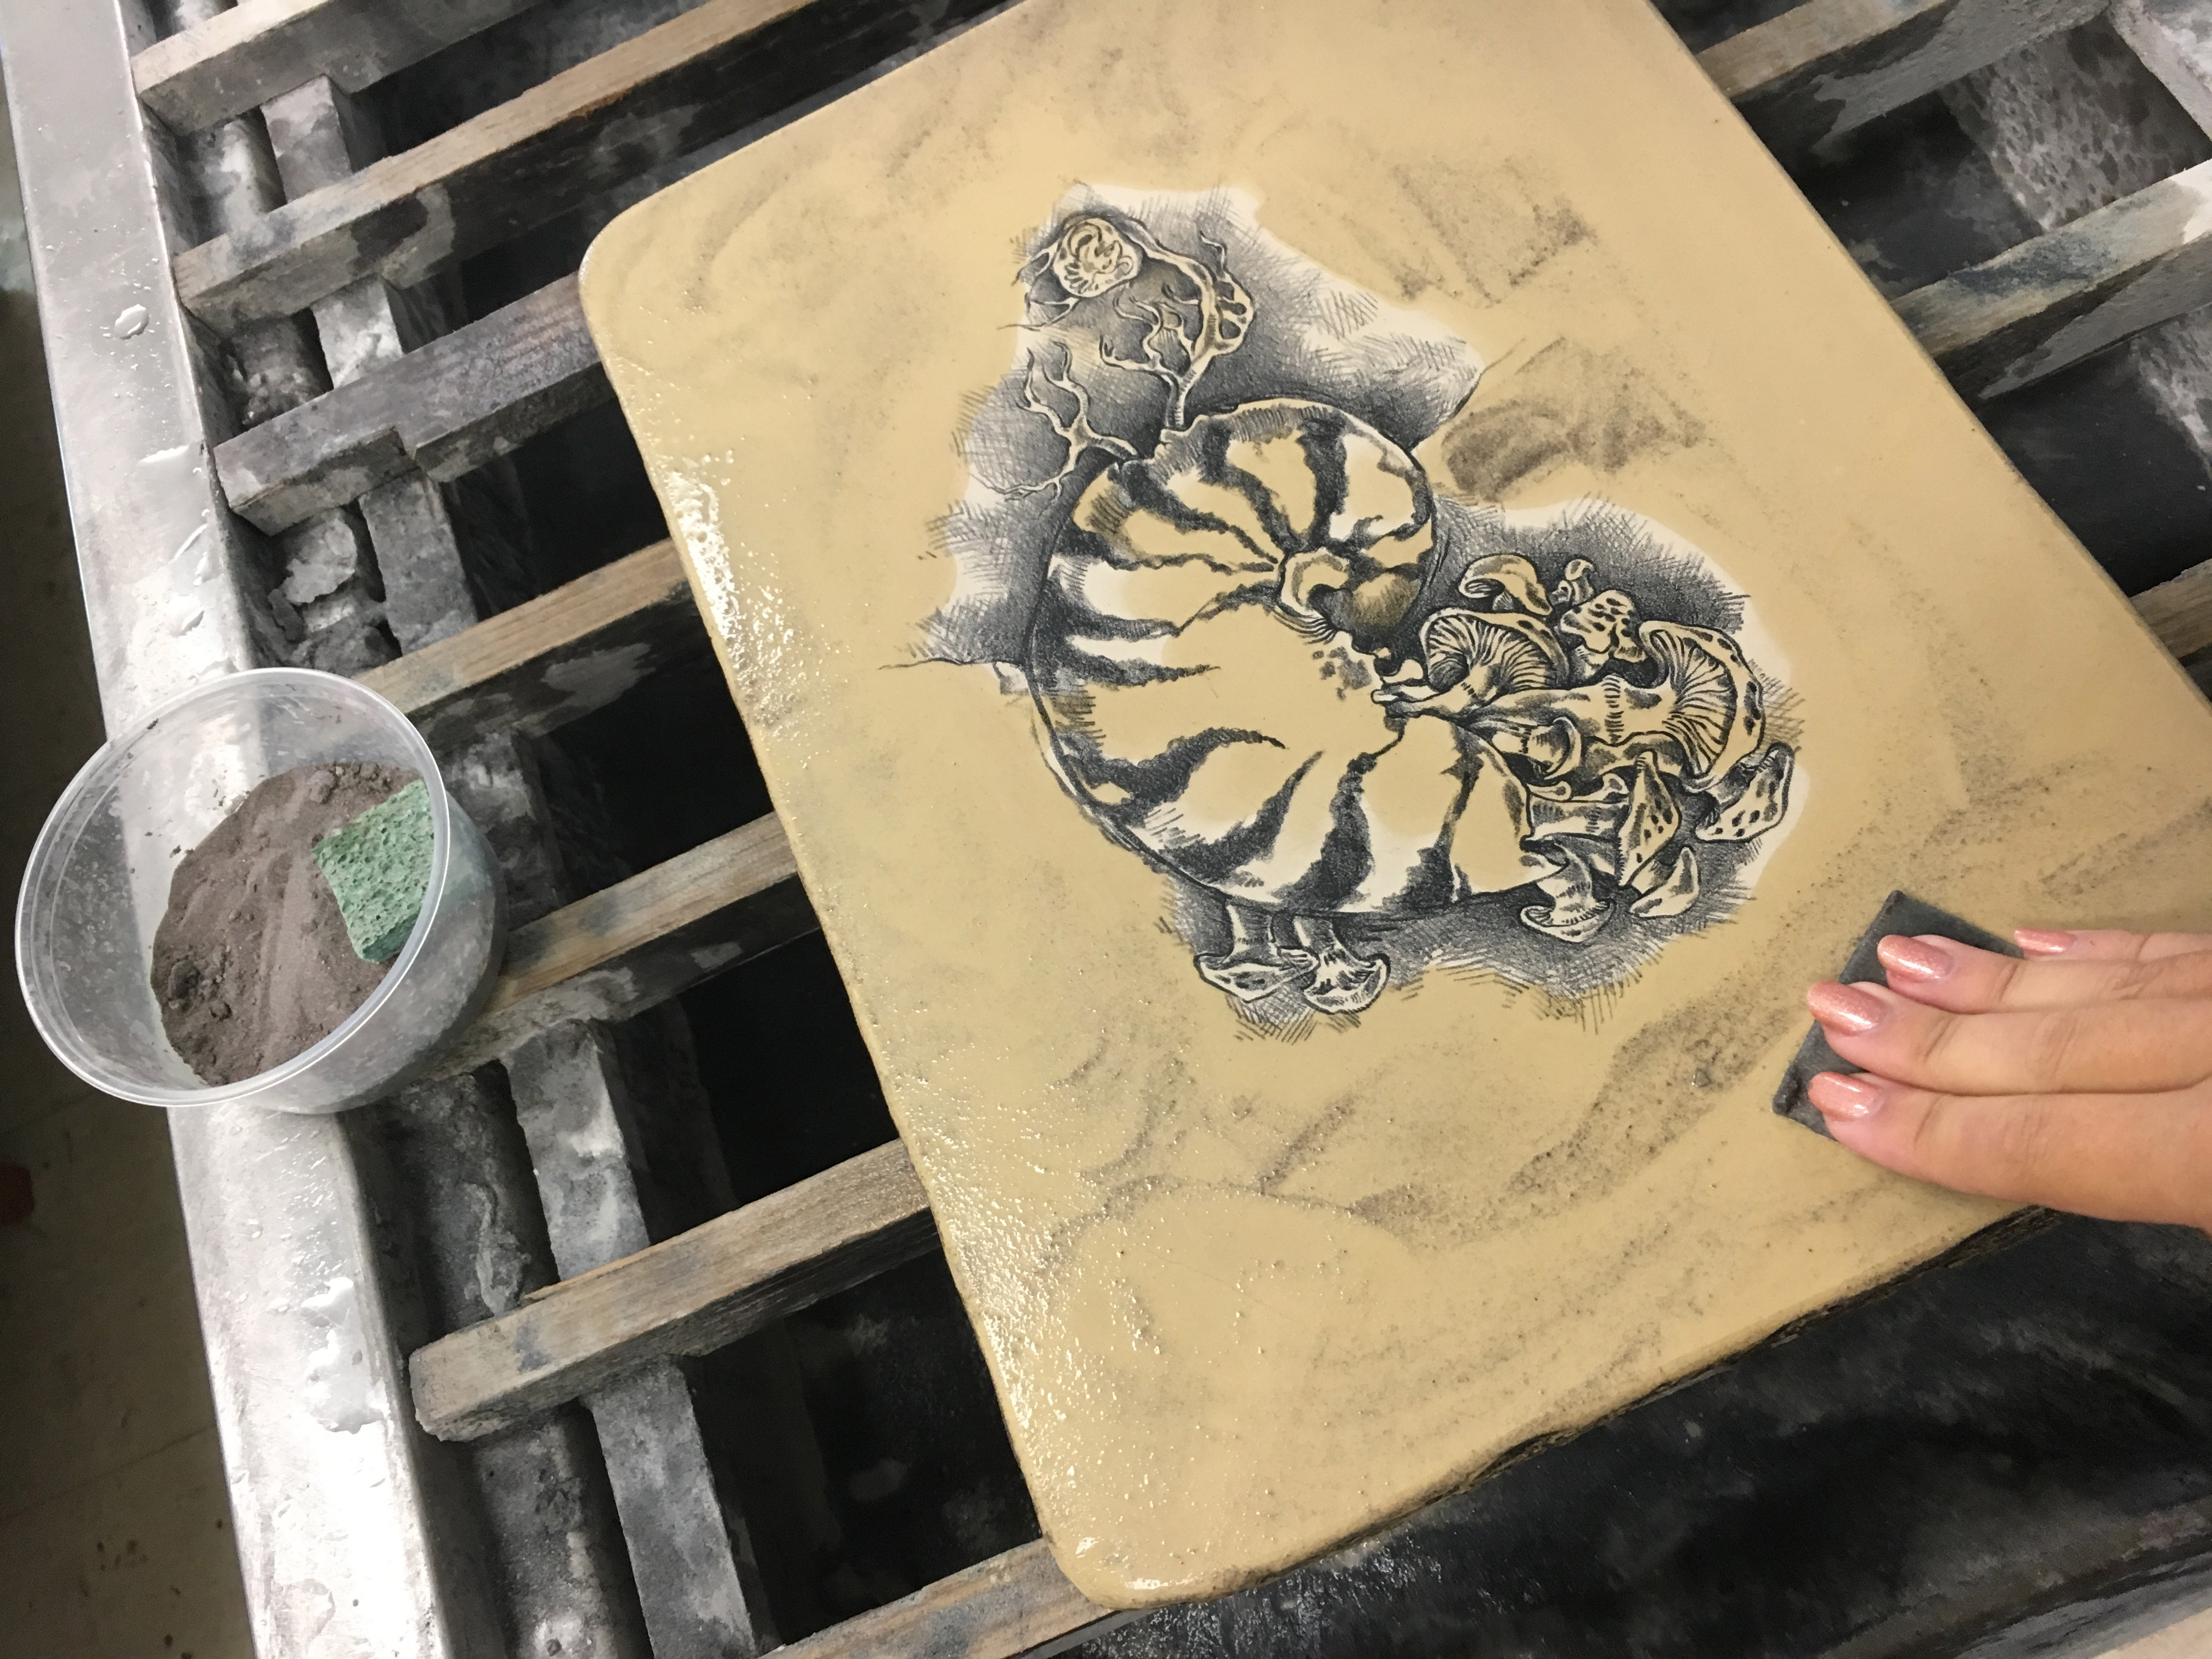
 Once everything is level and completely erased the stone is beveled with a file and polished with increasingly fine grits until it gets a pseudo glossy finish. Finally, it is dried, and ready for the drawing stage.
 You can see the above stone already had a very nice bevel to it. At this stage handling the face of the stone must be completely avoided – any grease may show up once the image is etched.
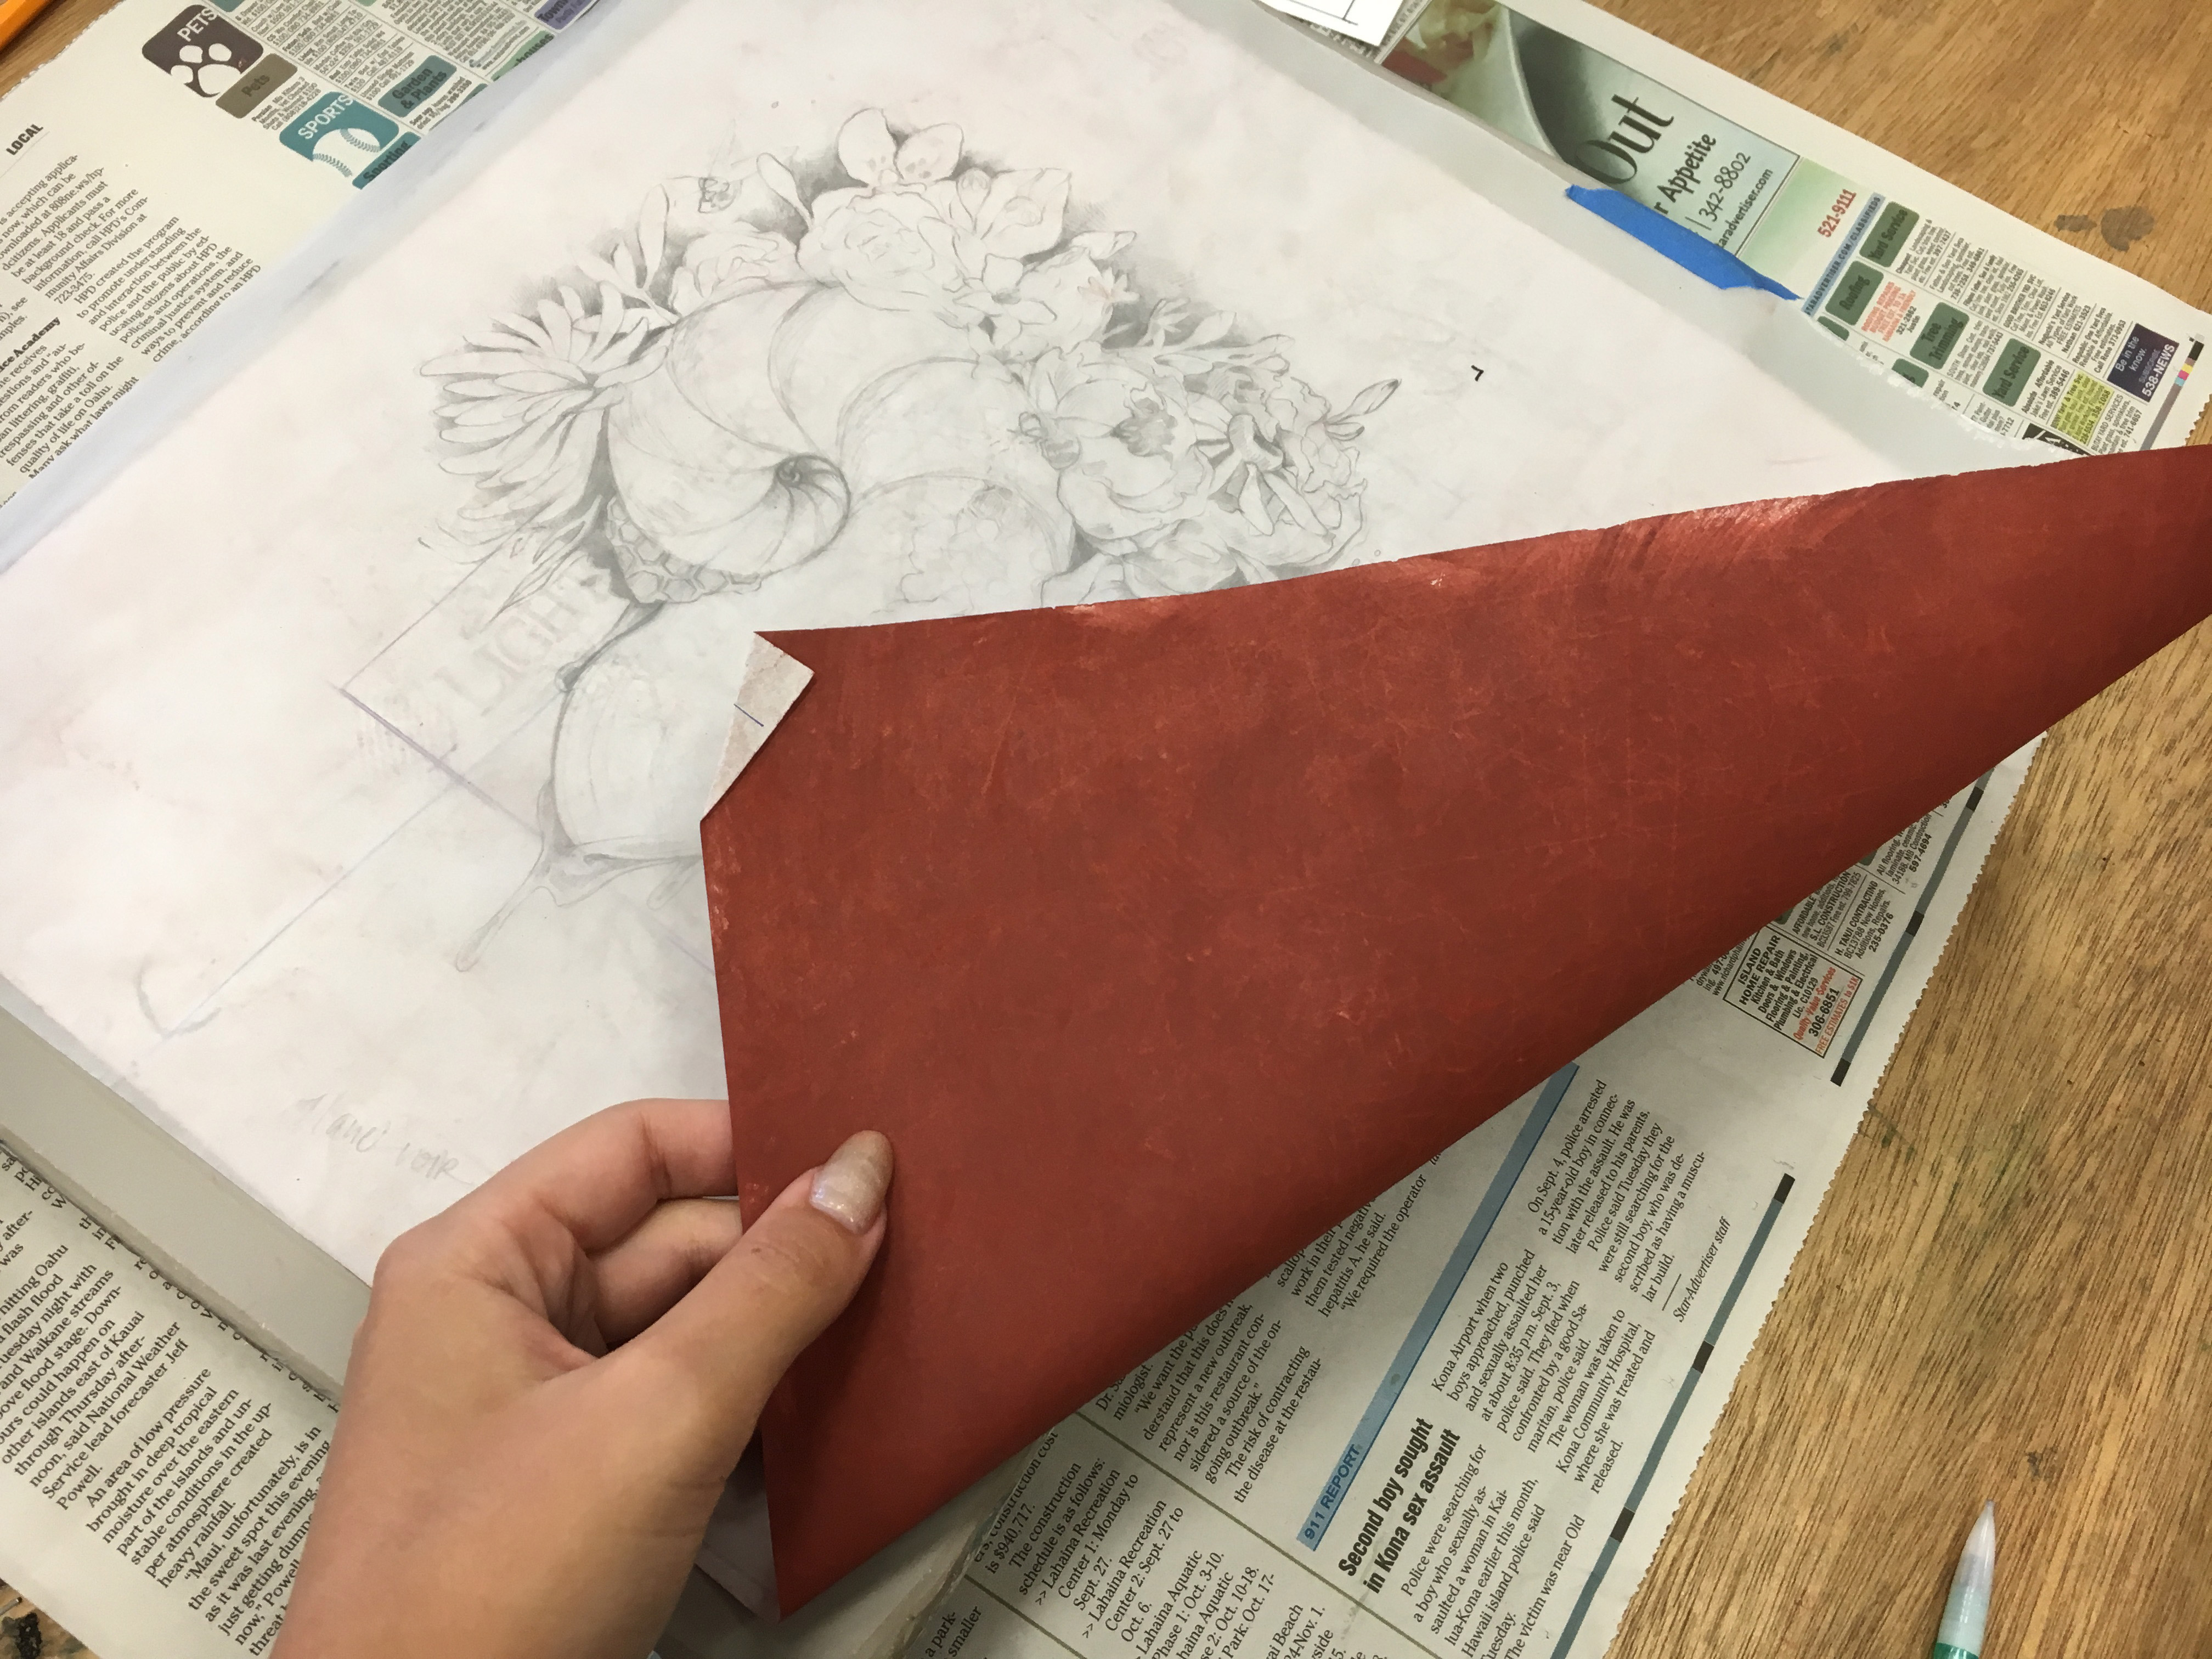
3. Image transfer is done with a home made iron oxide tracing paper (iron oxide which will not etch is rubbed onto tracing paper to make a nice transfer sheet). The sketch is taped down to the stone (NOT ON THE FACE as tape adhesive may remain and print later), and the transfer paper is slipped beneath. Then some gentle pressure with a pen or pencil will transfer the line. I used a mechanical pencil with the lead retracted.
You can see the above stone already had a very nice bevel to it. At this stage handling the face of the stone must be completely avoided – any grease may show up once the image is etched.
3. Image transfer is done with a home made iron oxide tracing paper (iron oxide which will not etch is rubbed onto tracing paper to make a nice transfer sheet). The sketch is taped down to the stone (NOT ON THE FACE as tape adhesive may remain and print later), and the transfer paper is slipped beneath. Then some gentle pressure with a pen or pencil will transfer the line. I used a mechanical pencil with the lead retracted.
 4. Now to one of the best parts of the process – drawing. Care is taken to keep skin away from the face of the stone with gloves and news print. Here I am drawing with a Dermatagraph Grease Pencil.
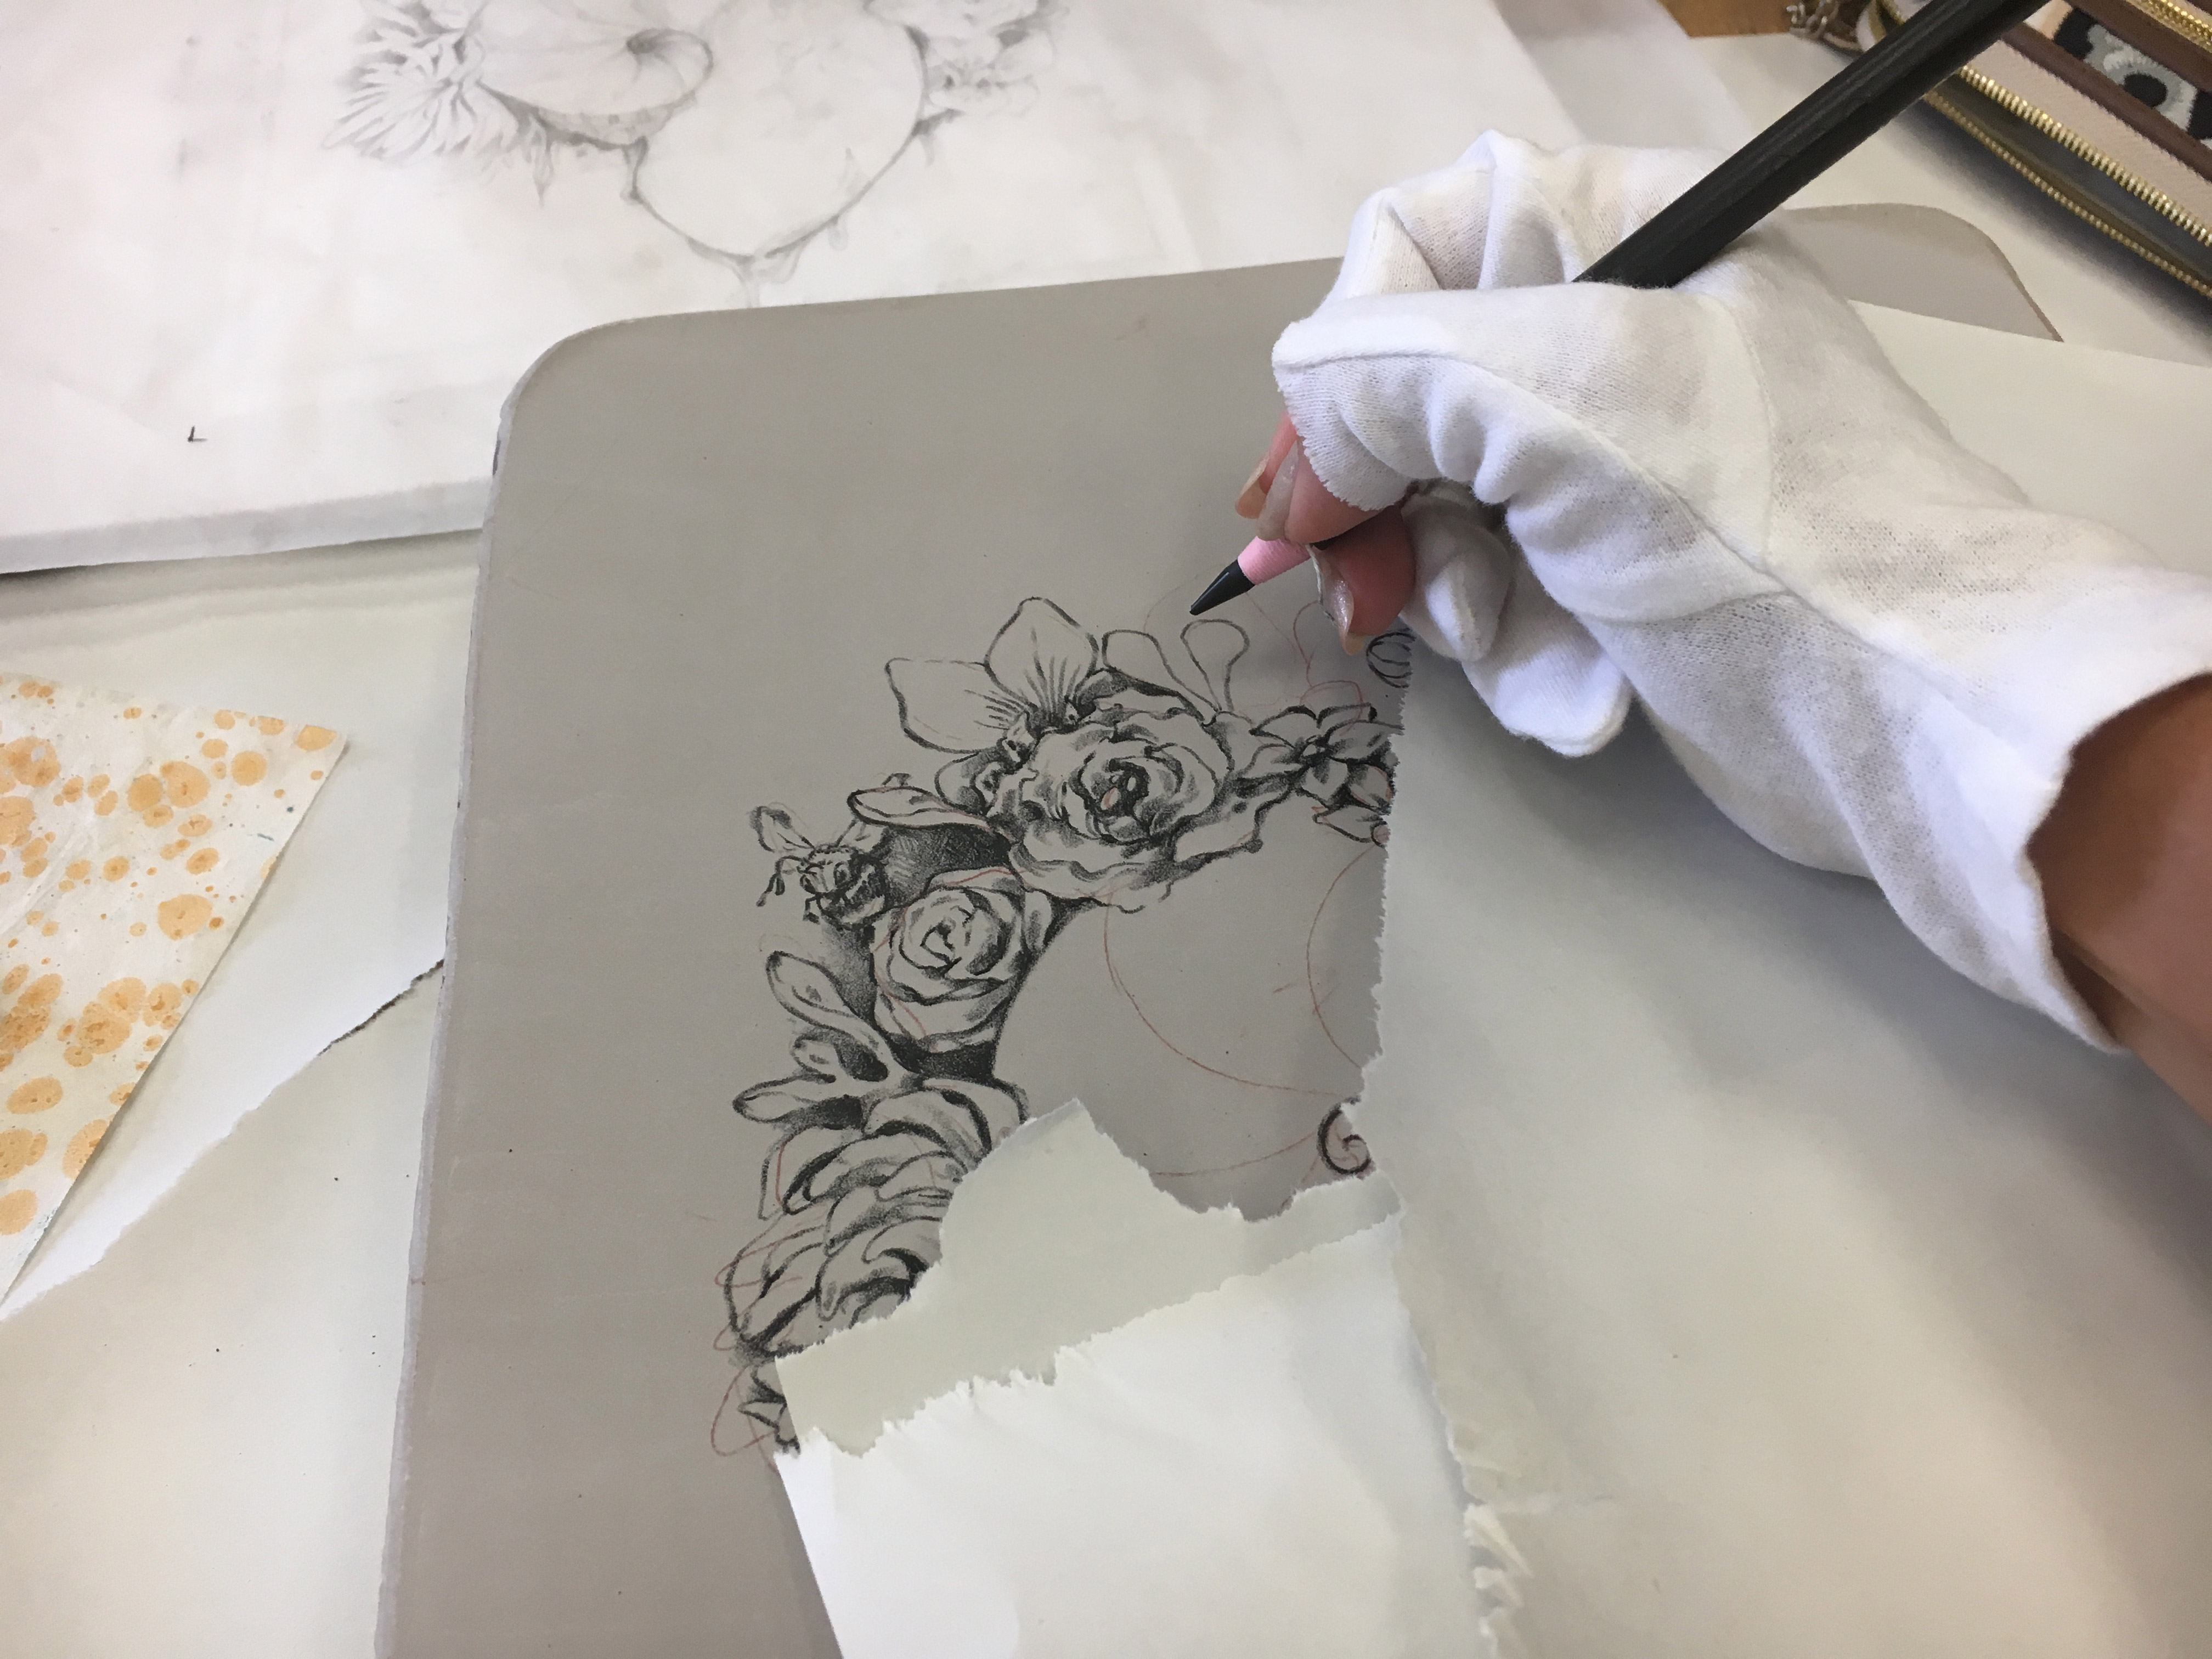 The grease pencil is sort of crumbly. After drawing is complete any stray bits are lightly scraped away with an X-acto knife.
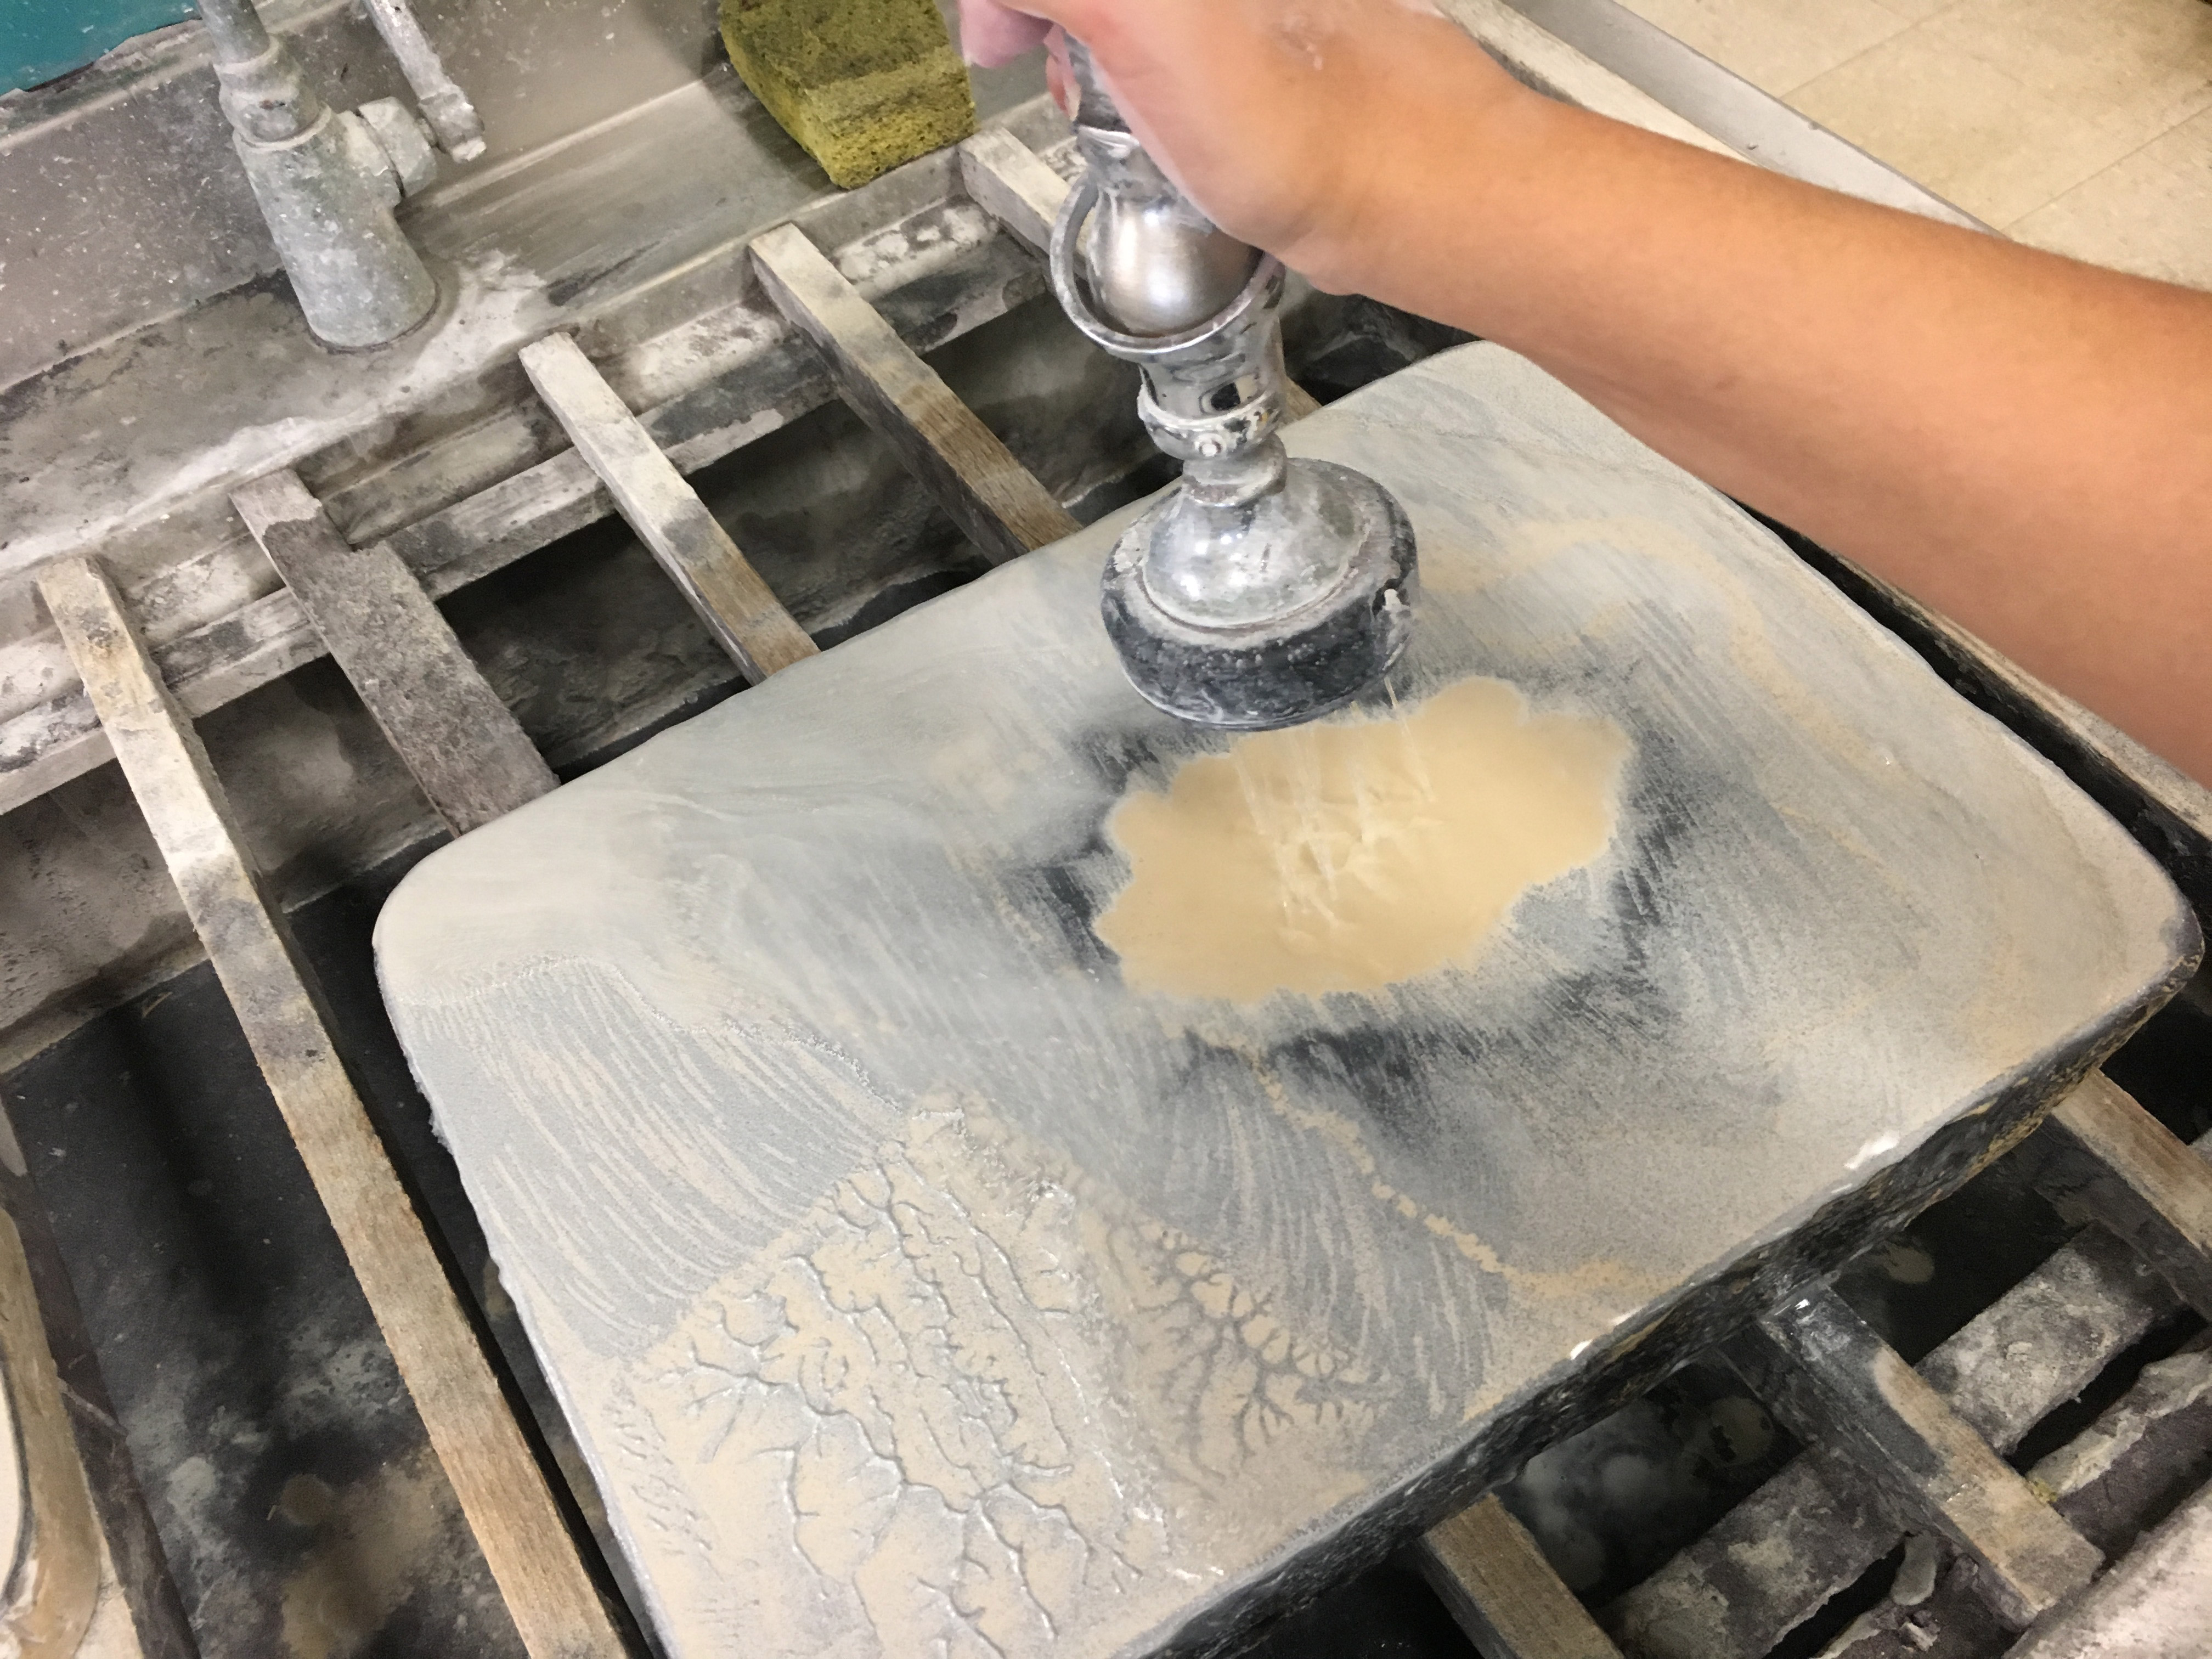
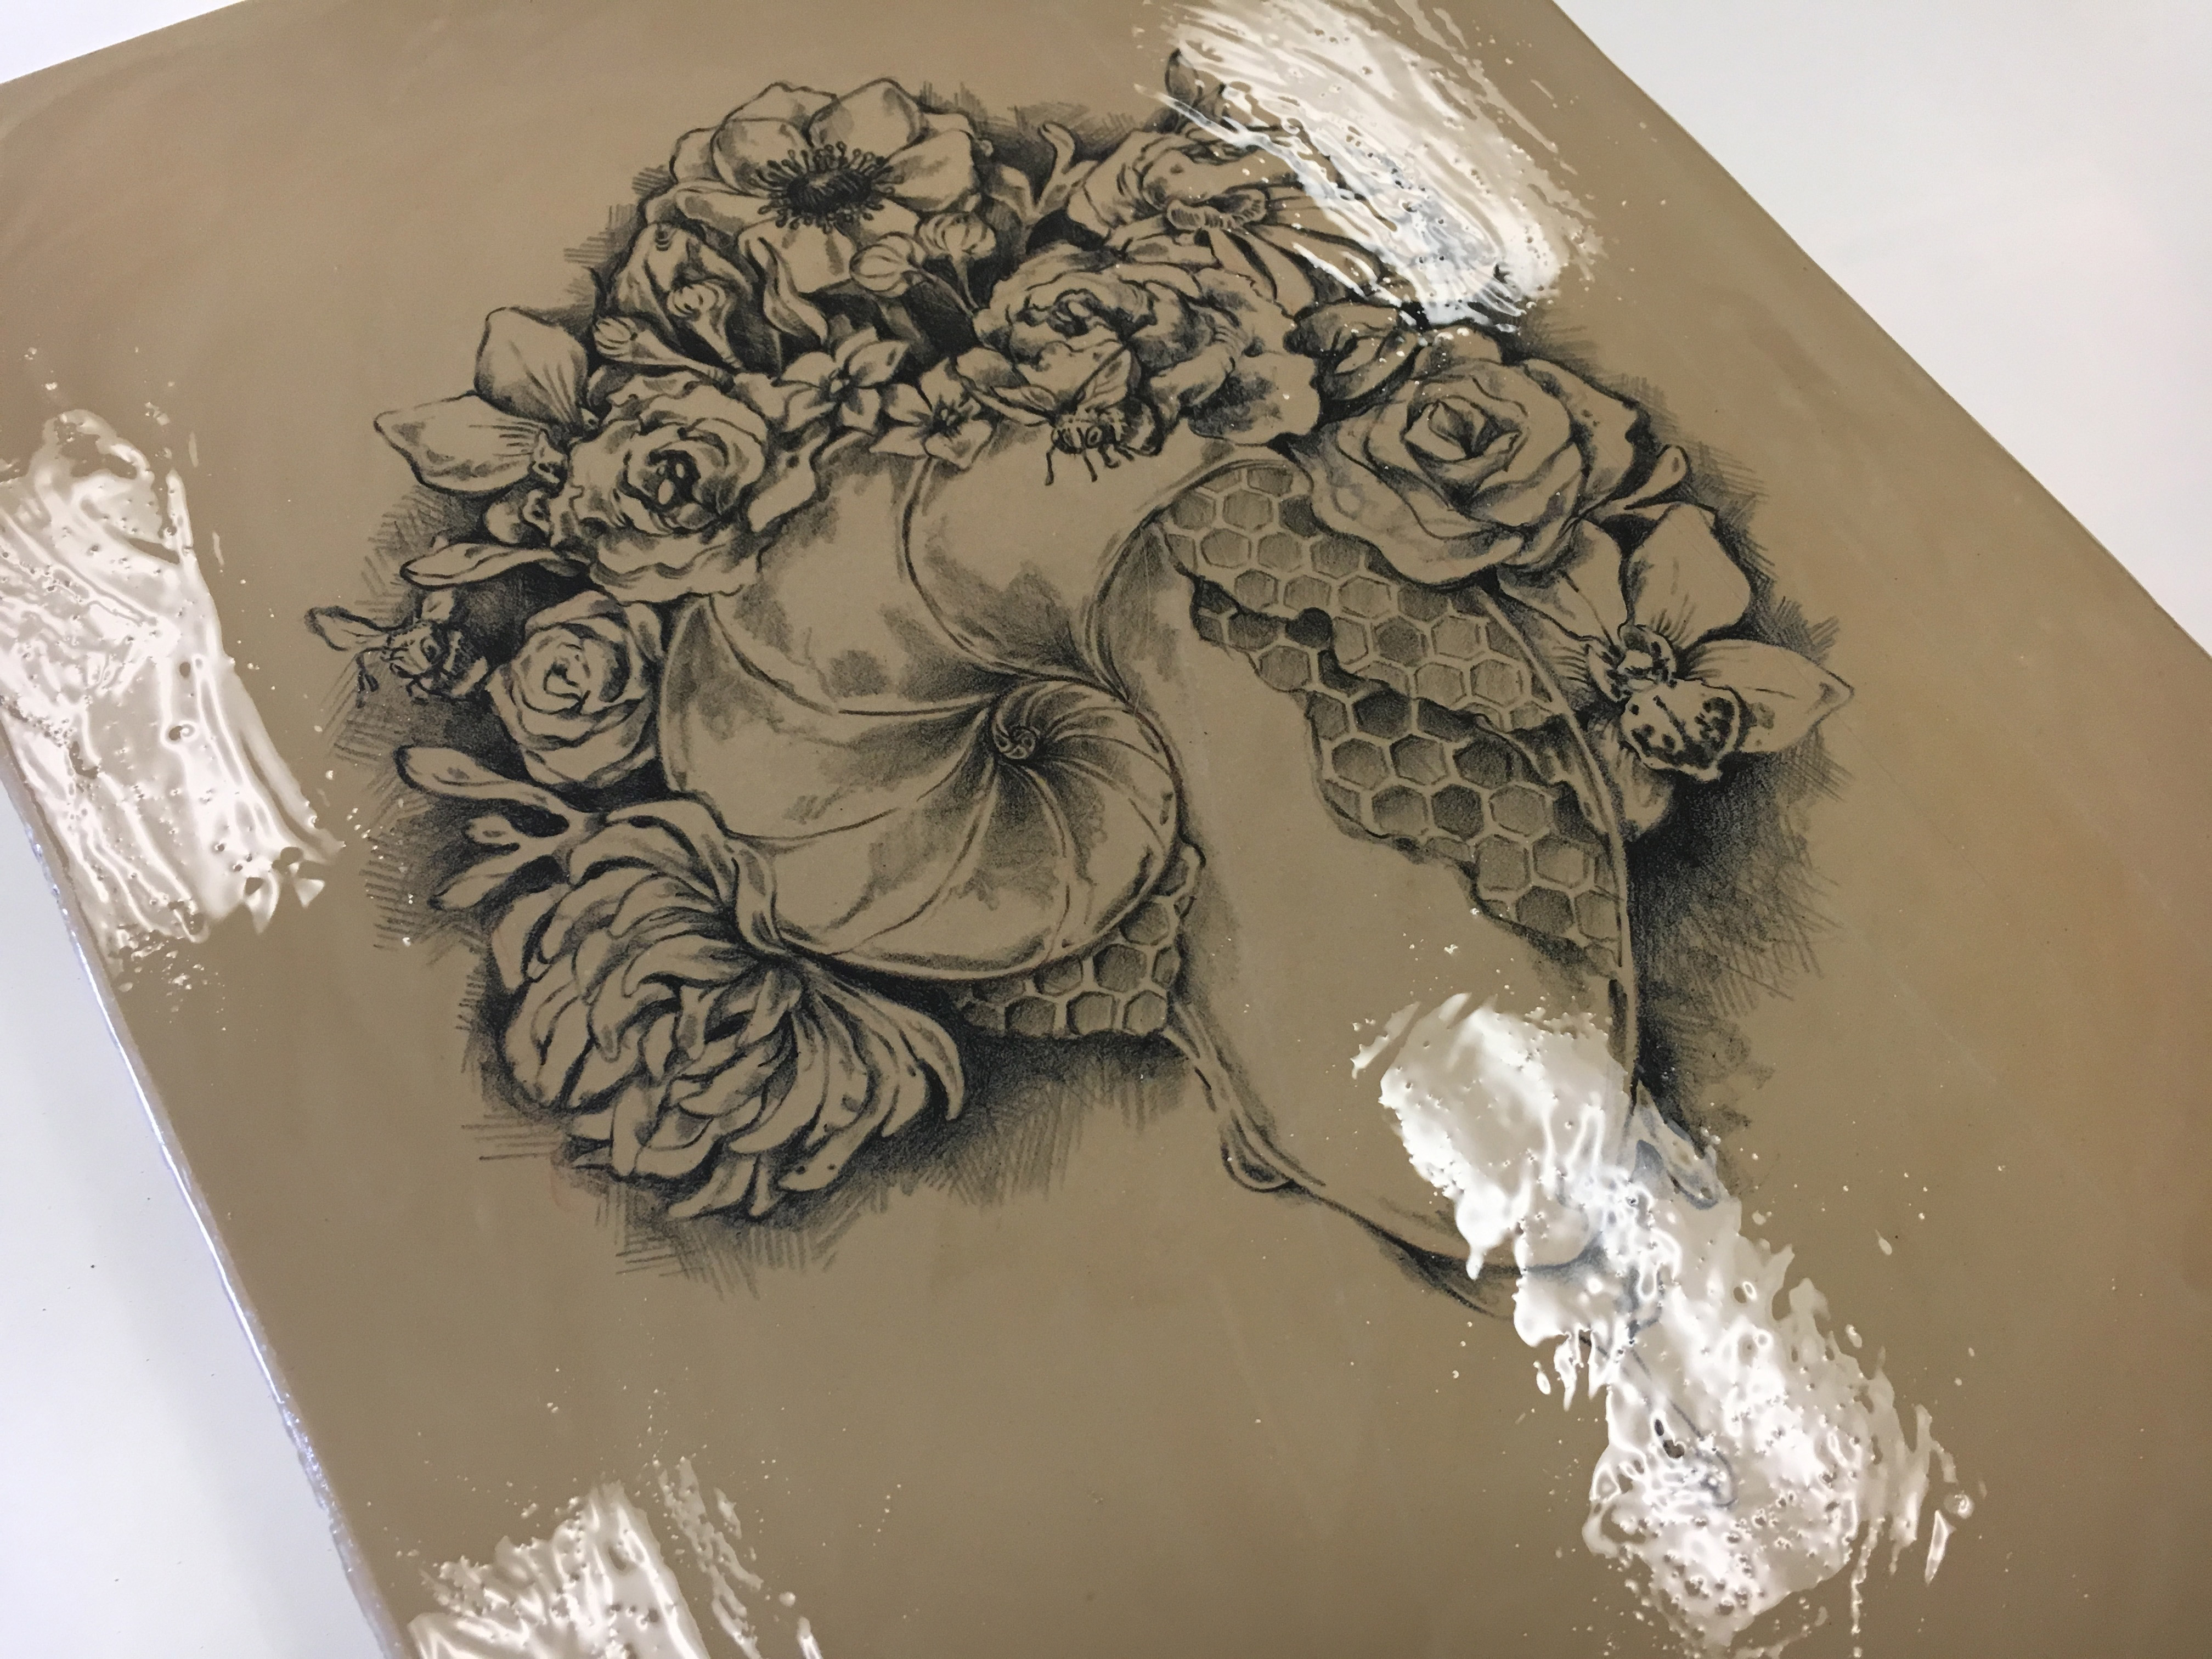
 5. Once the drawing is finished the greasy material is ‘set’ with a light buffing/dusting of Rosin (tan colored) and afterwards Talc (white colored).
6. Now comes the chemical part – which for me was the hardest part to remember. The lightest most delicate areas are painted in with straight Gum Arabic.
5. Once the drawing is finished the greasy material is ‘set’ with a light buffing/dusting of Rosin (tan colored) and afterwards Talc (white colored).
6. Now comes the chemical part – which for me was the hardest part to remember. The lightest most delicate areas are painted in with straight Gum Arabic.
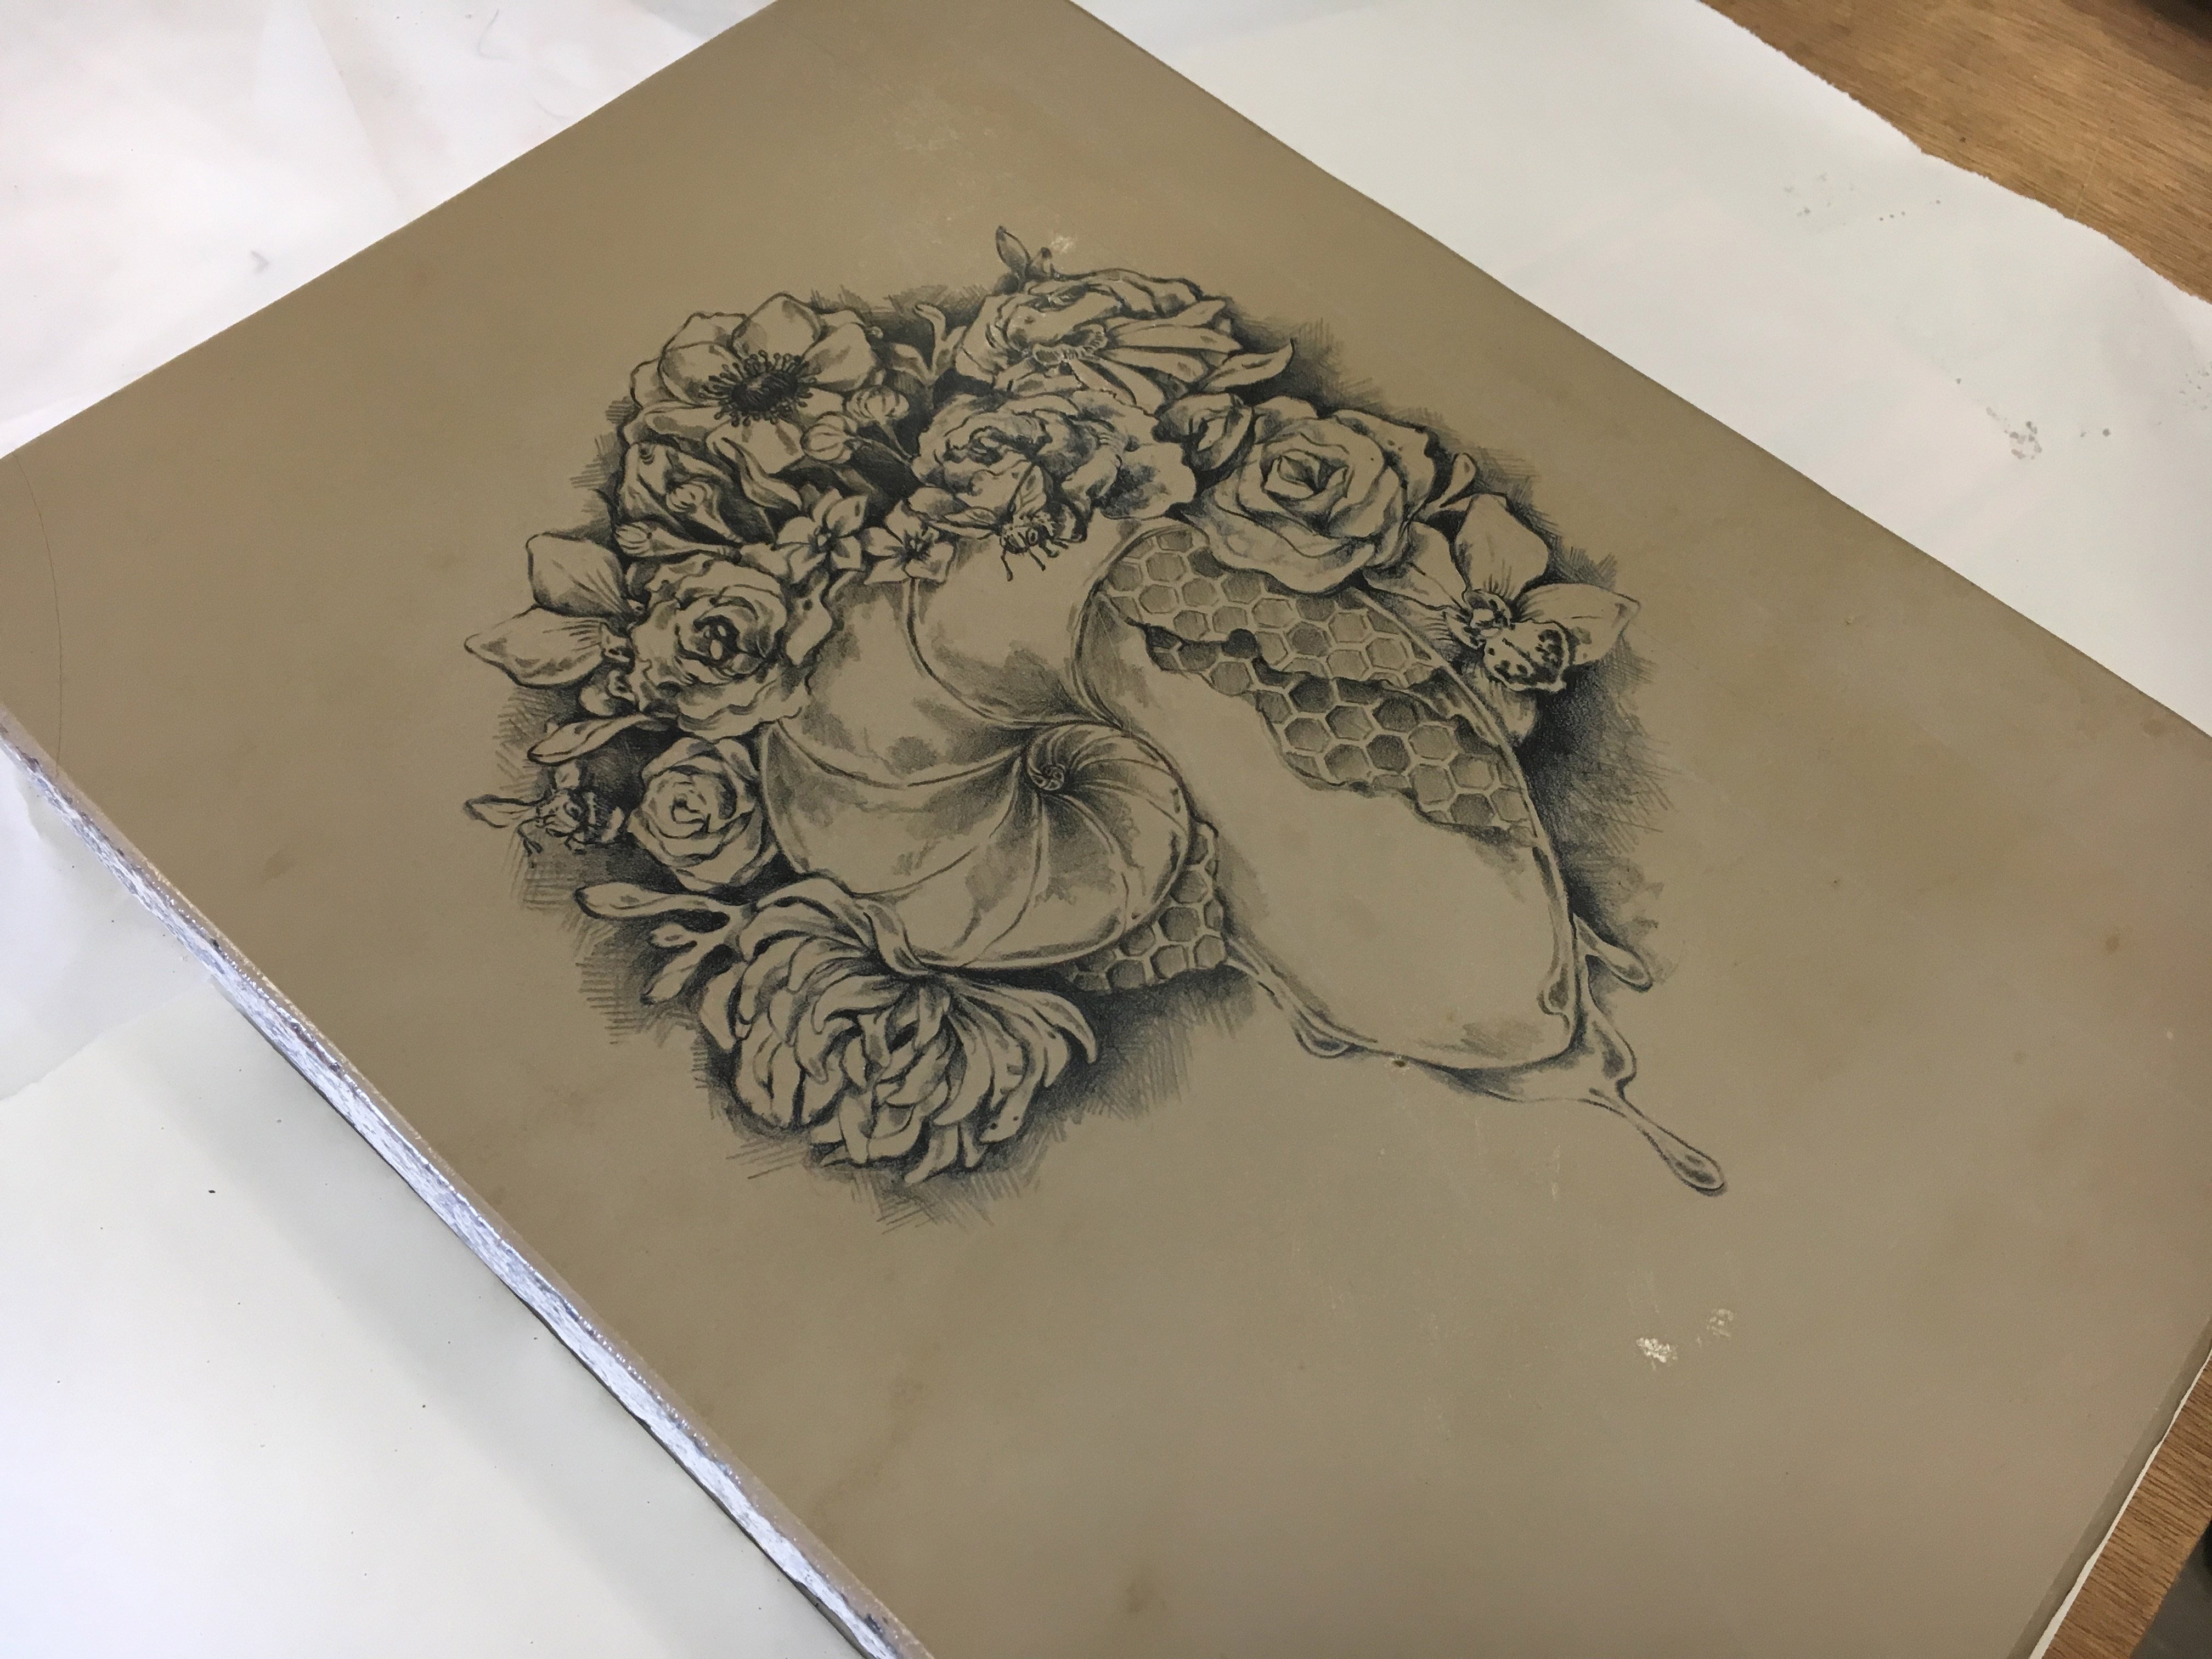
 The next set of values is painted in with about an oz of gum mixed with a drop or two of acid. The values go up until you’ve reached the level needed – which depends on the drawing material itself and the darkness of the drawing. I won’t pretend to be an expert on determining this. There are lots of charts out there which detail it more accurately. I think this image went up to a 6 drop etch.
 Finally, additional Gum Arabic is massaged into the stone for two to three minutes.
 A barely damp sponge is blotted over the stone to remove excess gum. You can then buff the gum in tight with cheese cloth or strip it with newsprint (lay a sheet of newsprint onto the stone, rub the back, and then peel it back. We generally newsprint stripped twice.
 The etch now has to cure for about 8 hours.
7. After the stone has cured. It’s time to do the second etch.
First the grease material is washed out with solvent. Currently, the gum is protecting the non image area so as long as no water touches it you will be fine removing the drawing material. I’m showing the second etch process on a different stone than shown above but it works the same.
The etch now has to cure for about 8 hours.
7. After the stone has cured. It’s time to do the second etch.
First the grease material is washed out with solvent. Currently, the gum is protecting the non image area so as long as no water touches it you will be fine removing the drawing material. I’m showing the second etch process on a different stone than shown above but it works the same.
 After the image area is washed out, you buff in asphaltum. This creates a base for the ink to stick to.
 Now we need to roll up the image to see how it takes ink. Sponge it down first – as shown in the image above it shouldn’t be soaking wet and glossy, but matte. It shouldn’t ink up too fast and generally will take a couple of passes.
 If needed, you can buff out any dots/flecks or finger prints with a very fine grit and a pad. Wet the stone and be careful to not scrape into wanted image areas.
 Finally, if it looks good, Rosin and Talc are dusted on again, etch (Gum Arabic or something stronger if needed) is re applied and buffed in (or stripped). Now we let it cure again for at least 8 hours – preferably overnight.
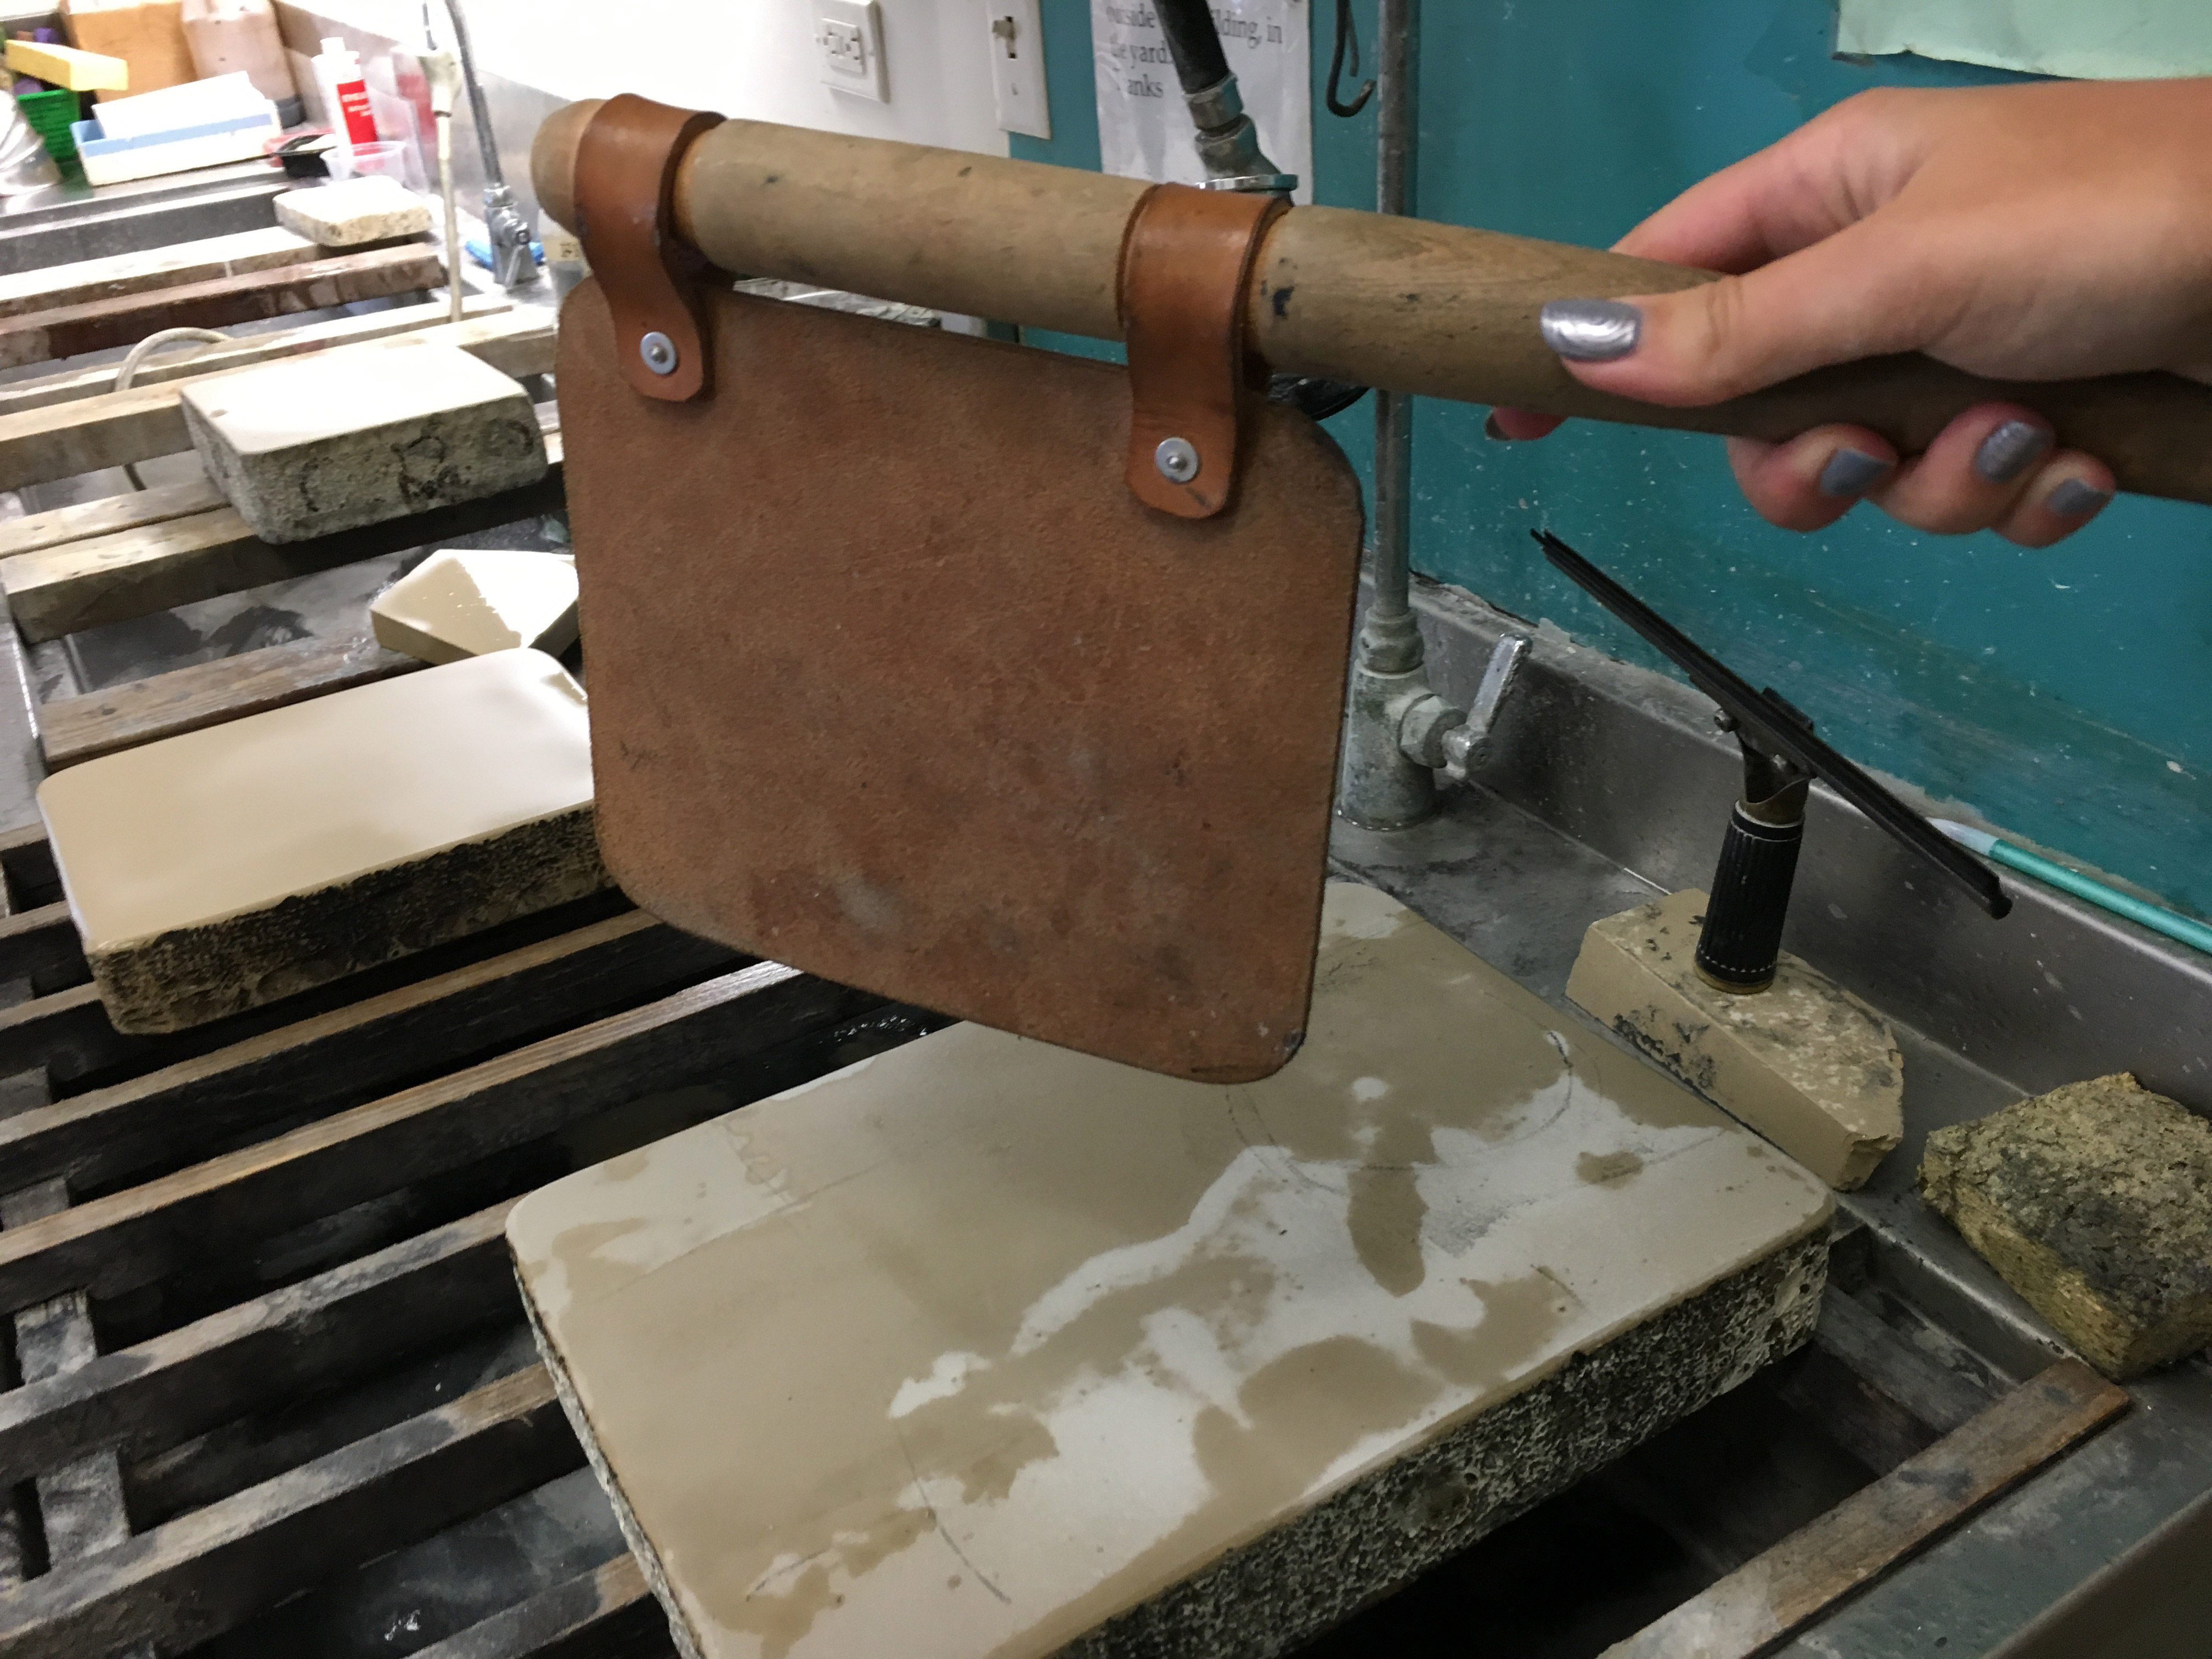
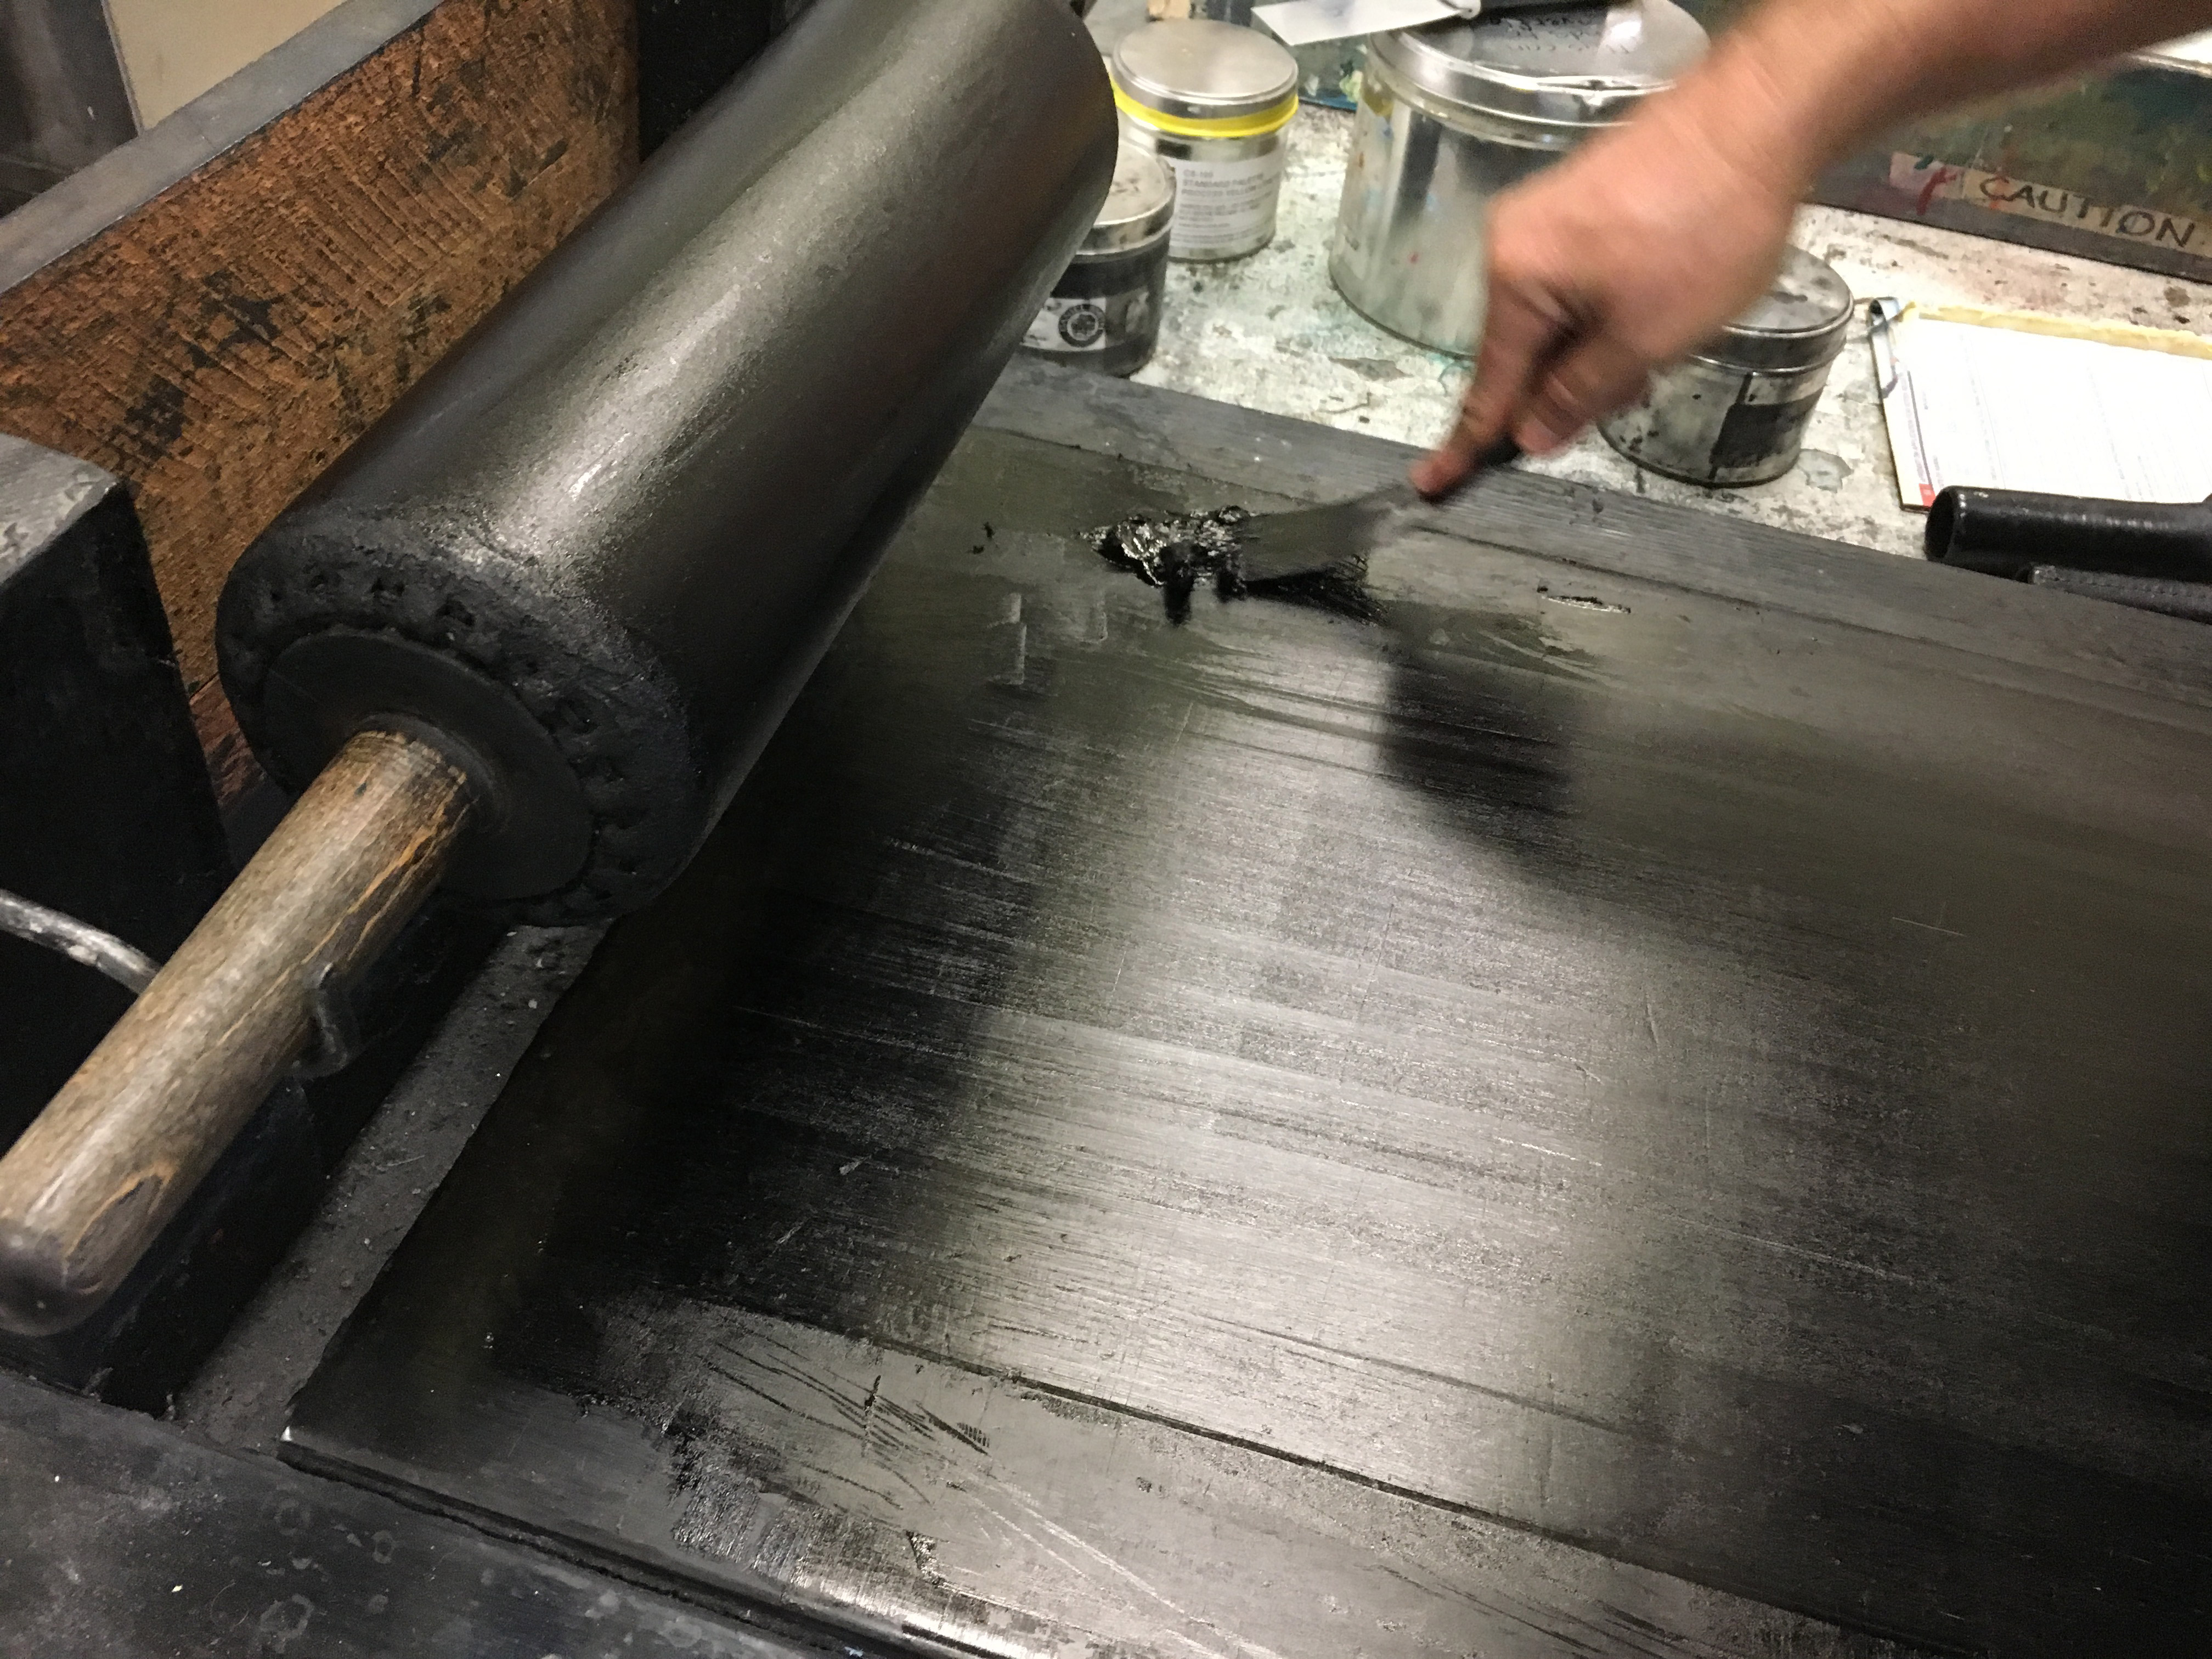
8. FINALLY, once all of that chemical stuff is done, it’s time to print. Paper is torn down and prepped and Ink is rolled up. Here we use a leather roller and some very stiff black ink. This stuff is so stiff I would probably have thrown it out not realizing it was still usable. Lithography uses the thinest film of ink of probably any print process and it uses stiffer ink than what would normally be used for letterpress or any relief process I have worked with.
Finally, if it looks good, Rosin and Talc are dusted on again, etch (Gum Arabic or something stronger if needed) is re applied and buffed in (or stripped). Now we let it cure again for at least 8 hours – preferably overnight.
8. FINALLY, once all of that chemical stuff is done, it’s time to print. Paper is torn down and prepped and Ink is rolled up. Here we use a leather roller and some very stiff black ink. This stuff is so stiff I would probably have thrown it out not realizing it was still usable. Lithography uses the thinest film of ink of probably any print process and it uses stiffer ink than what would normally be used for letterpress or any relief process I have worked with.
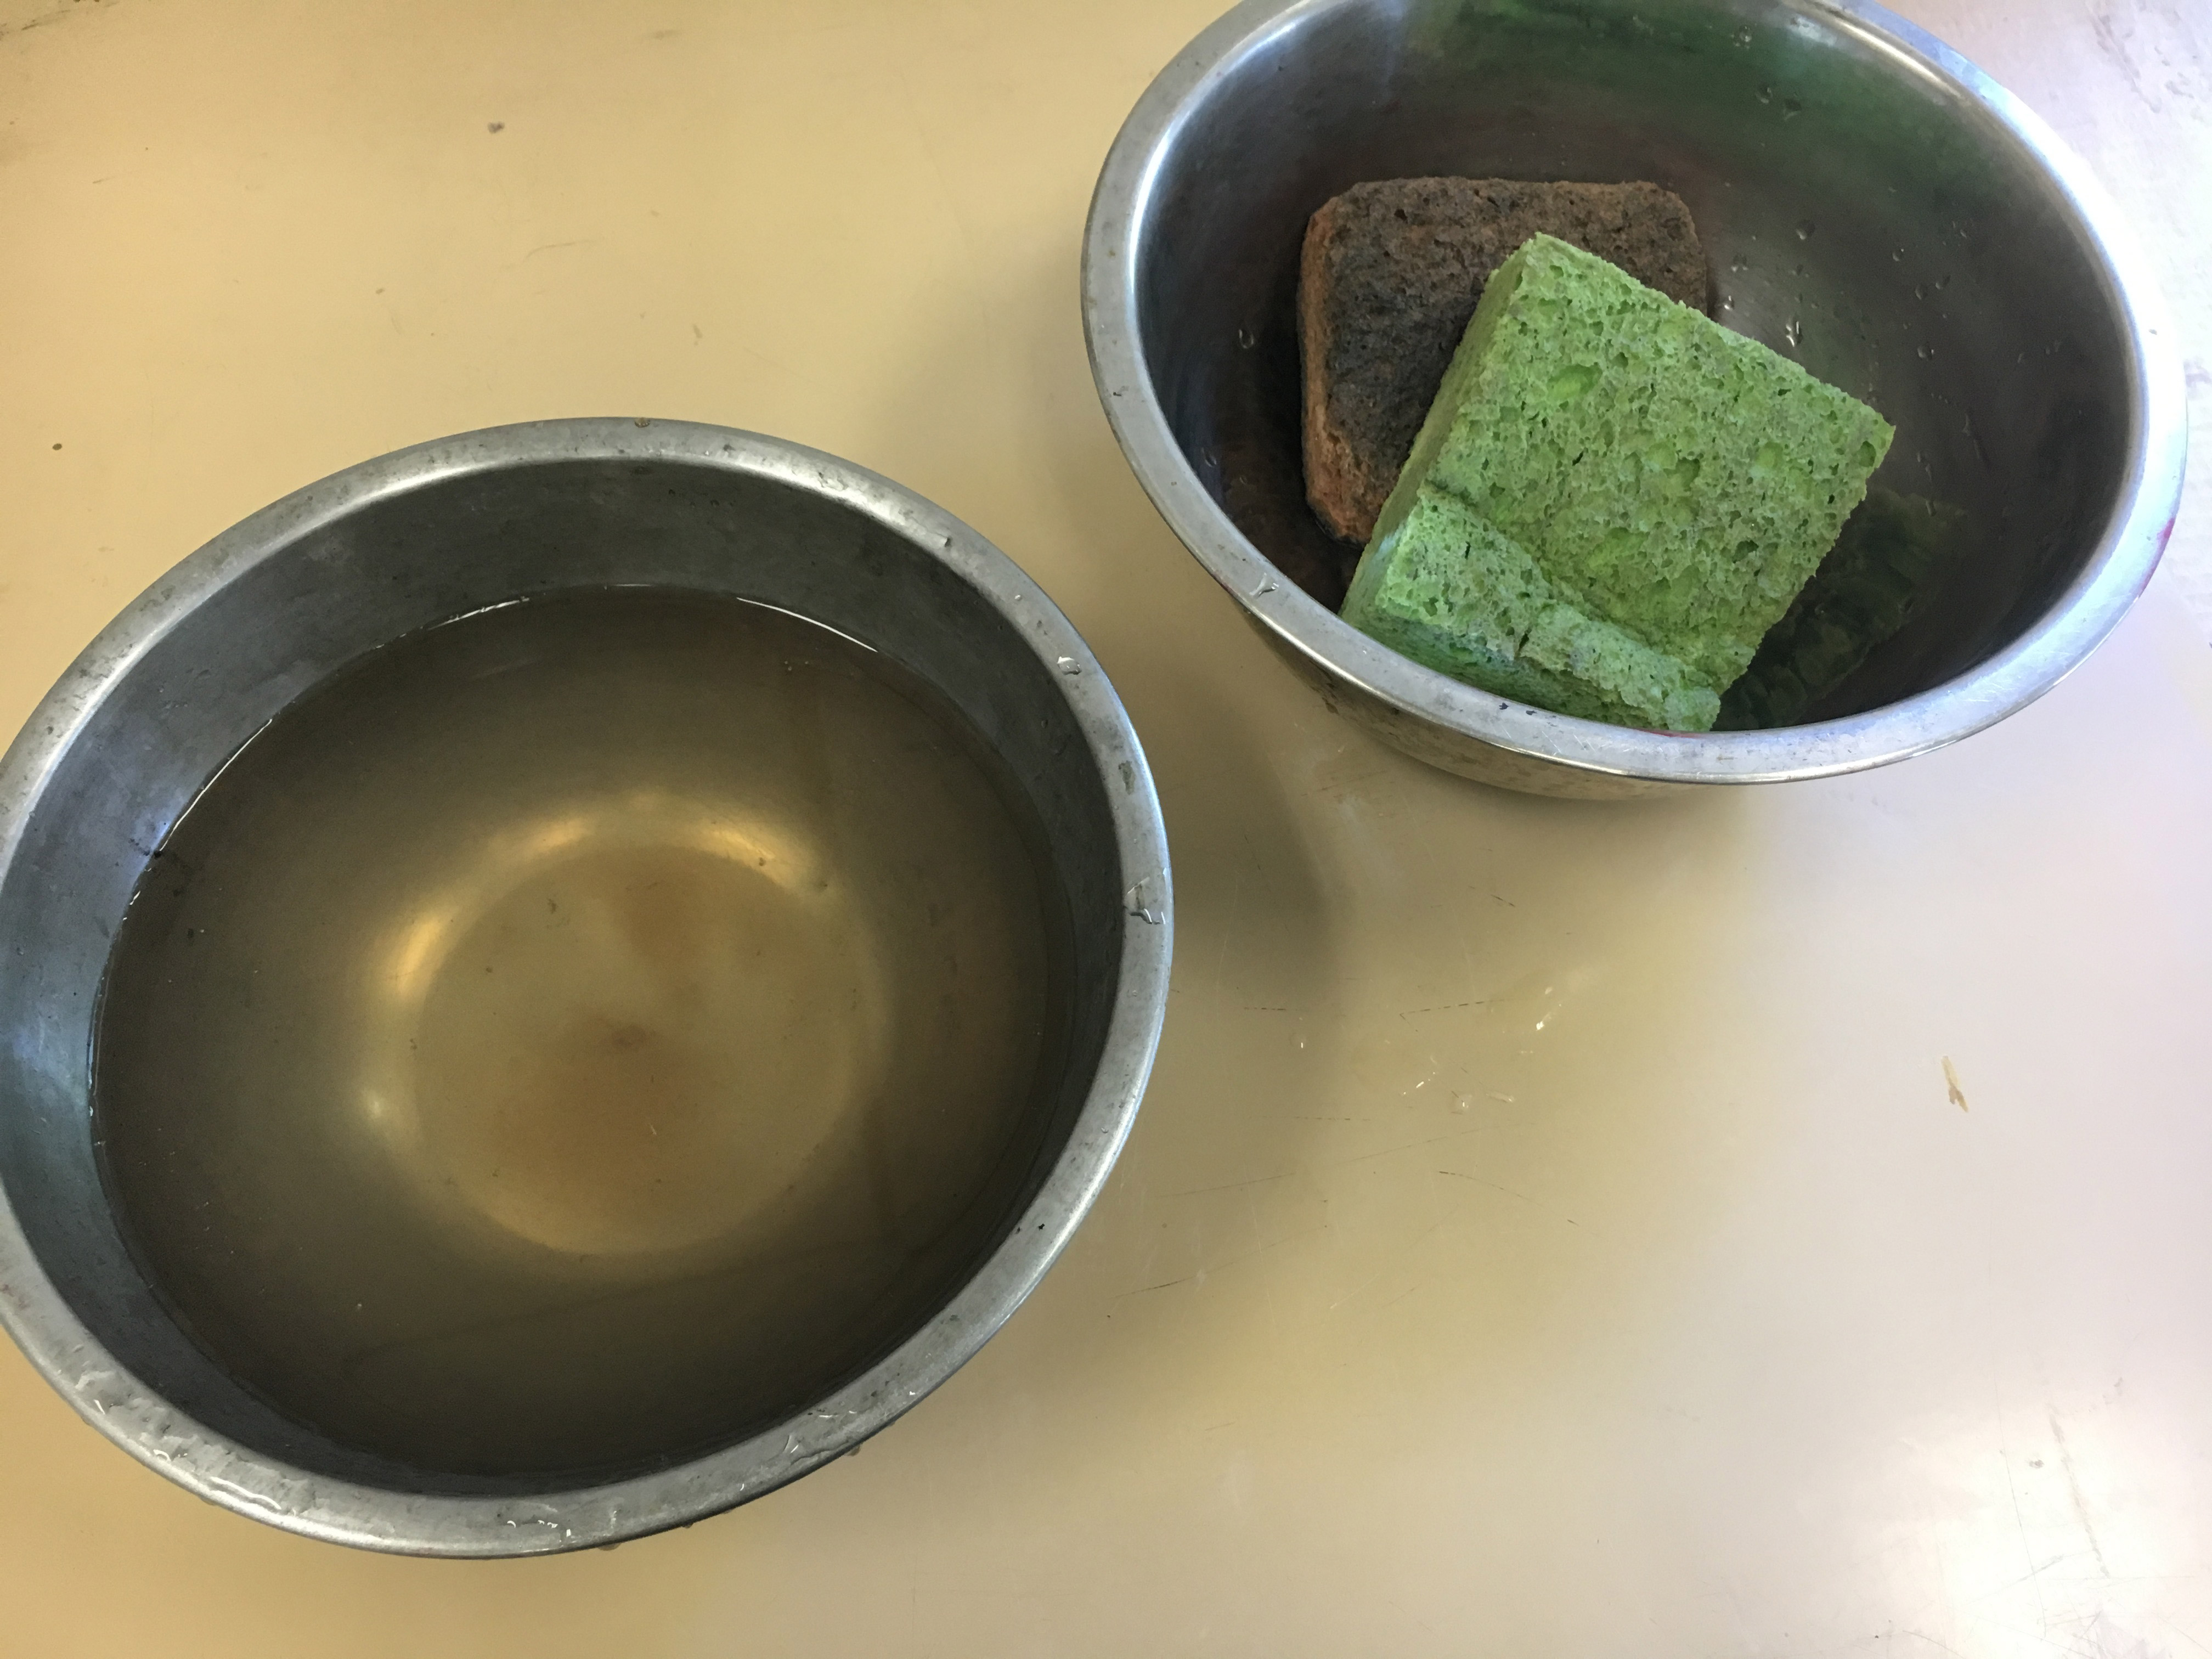
 Two dishes are prepared with a cellulose sponge. One with water and a splash of ‘junk gum’ (gum that has varying amounts of acid in it) are use to wet the stone. This slightly acidic mixture helps stabilize the stone (or keep it stable).
 Now we set up our press. This Krause press has two stops one on the side of the bed to set the starting point and a screw towards the end of the bed to set the stop point.

 I set a piece of newsprint over the stone and adjusted by sight. The scraper bar should be smaller than the stone to prevent grooves from forming in the leather.
The pressure is set by lowering the bar to ‘hand tight’ on the stone. Then the bar is lifted and tightened about 1/4 to a 1/2 turn.
Now that the ink, paper, and press are ready. It’s time to do the final preparation of the stone and start printing.
9. Wash out the ink with solvent, and buff in asphaltum again. This is important because the old ink has probably dried up on the stone.
I set a piece of newsprint over the stone and adjusted by sight. The scraper bar should be smaller than the stone to prevent grooves from forming in the leather.
The pressure is set by lowering the bar to ‘hand tight’ on the stone. Then the bar is lifted and tightened about 1/4 to a 1/2 turn.
Now that the ink, paper, and press are ready. It’s time to do the final preparation of the stone and start printing.
9. Wash out the ink with solvent, and buff in asphaltum again. This is important because the old ink has probably dried up on the stone.
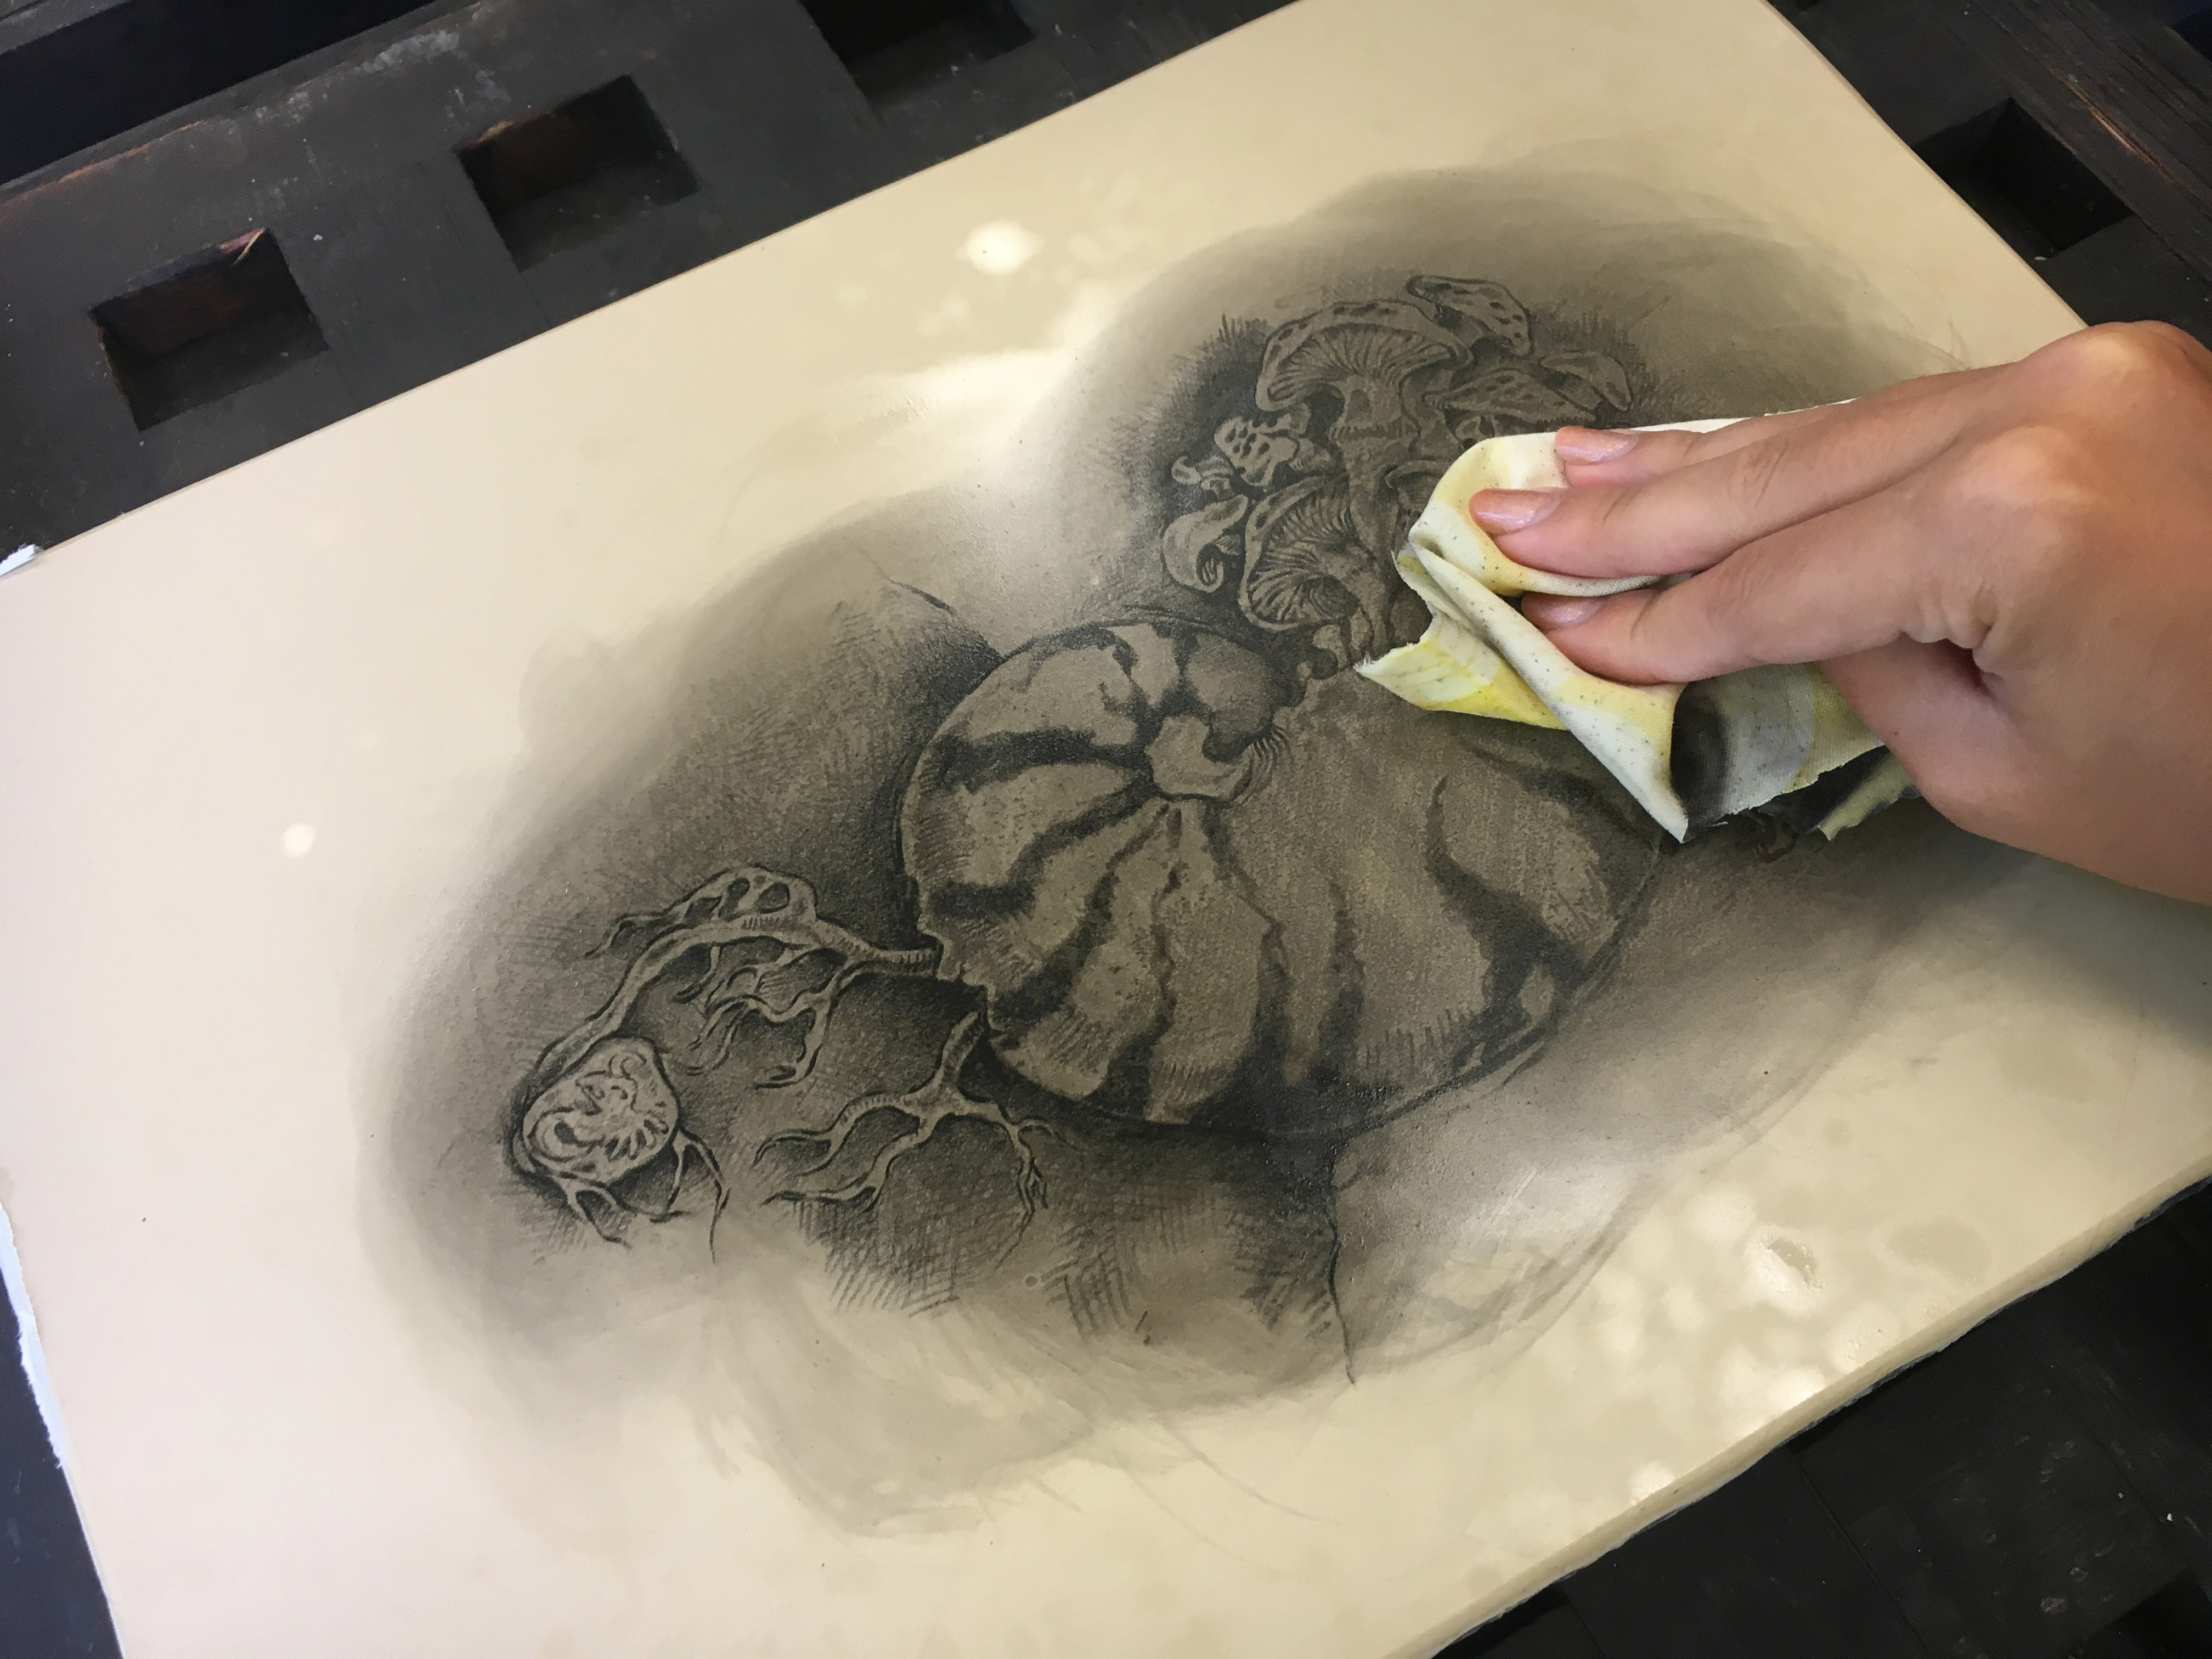
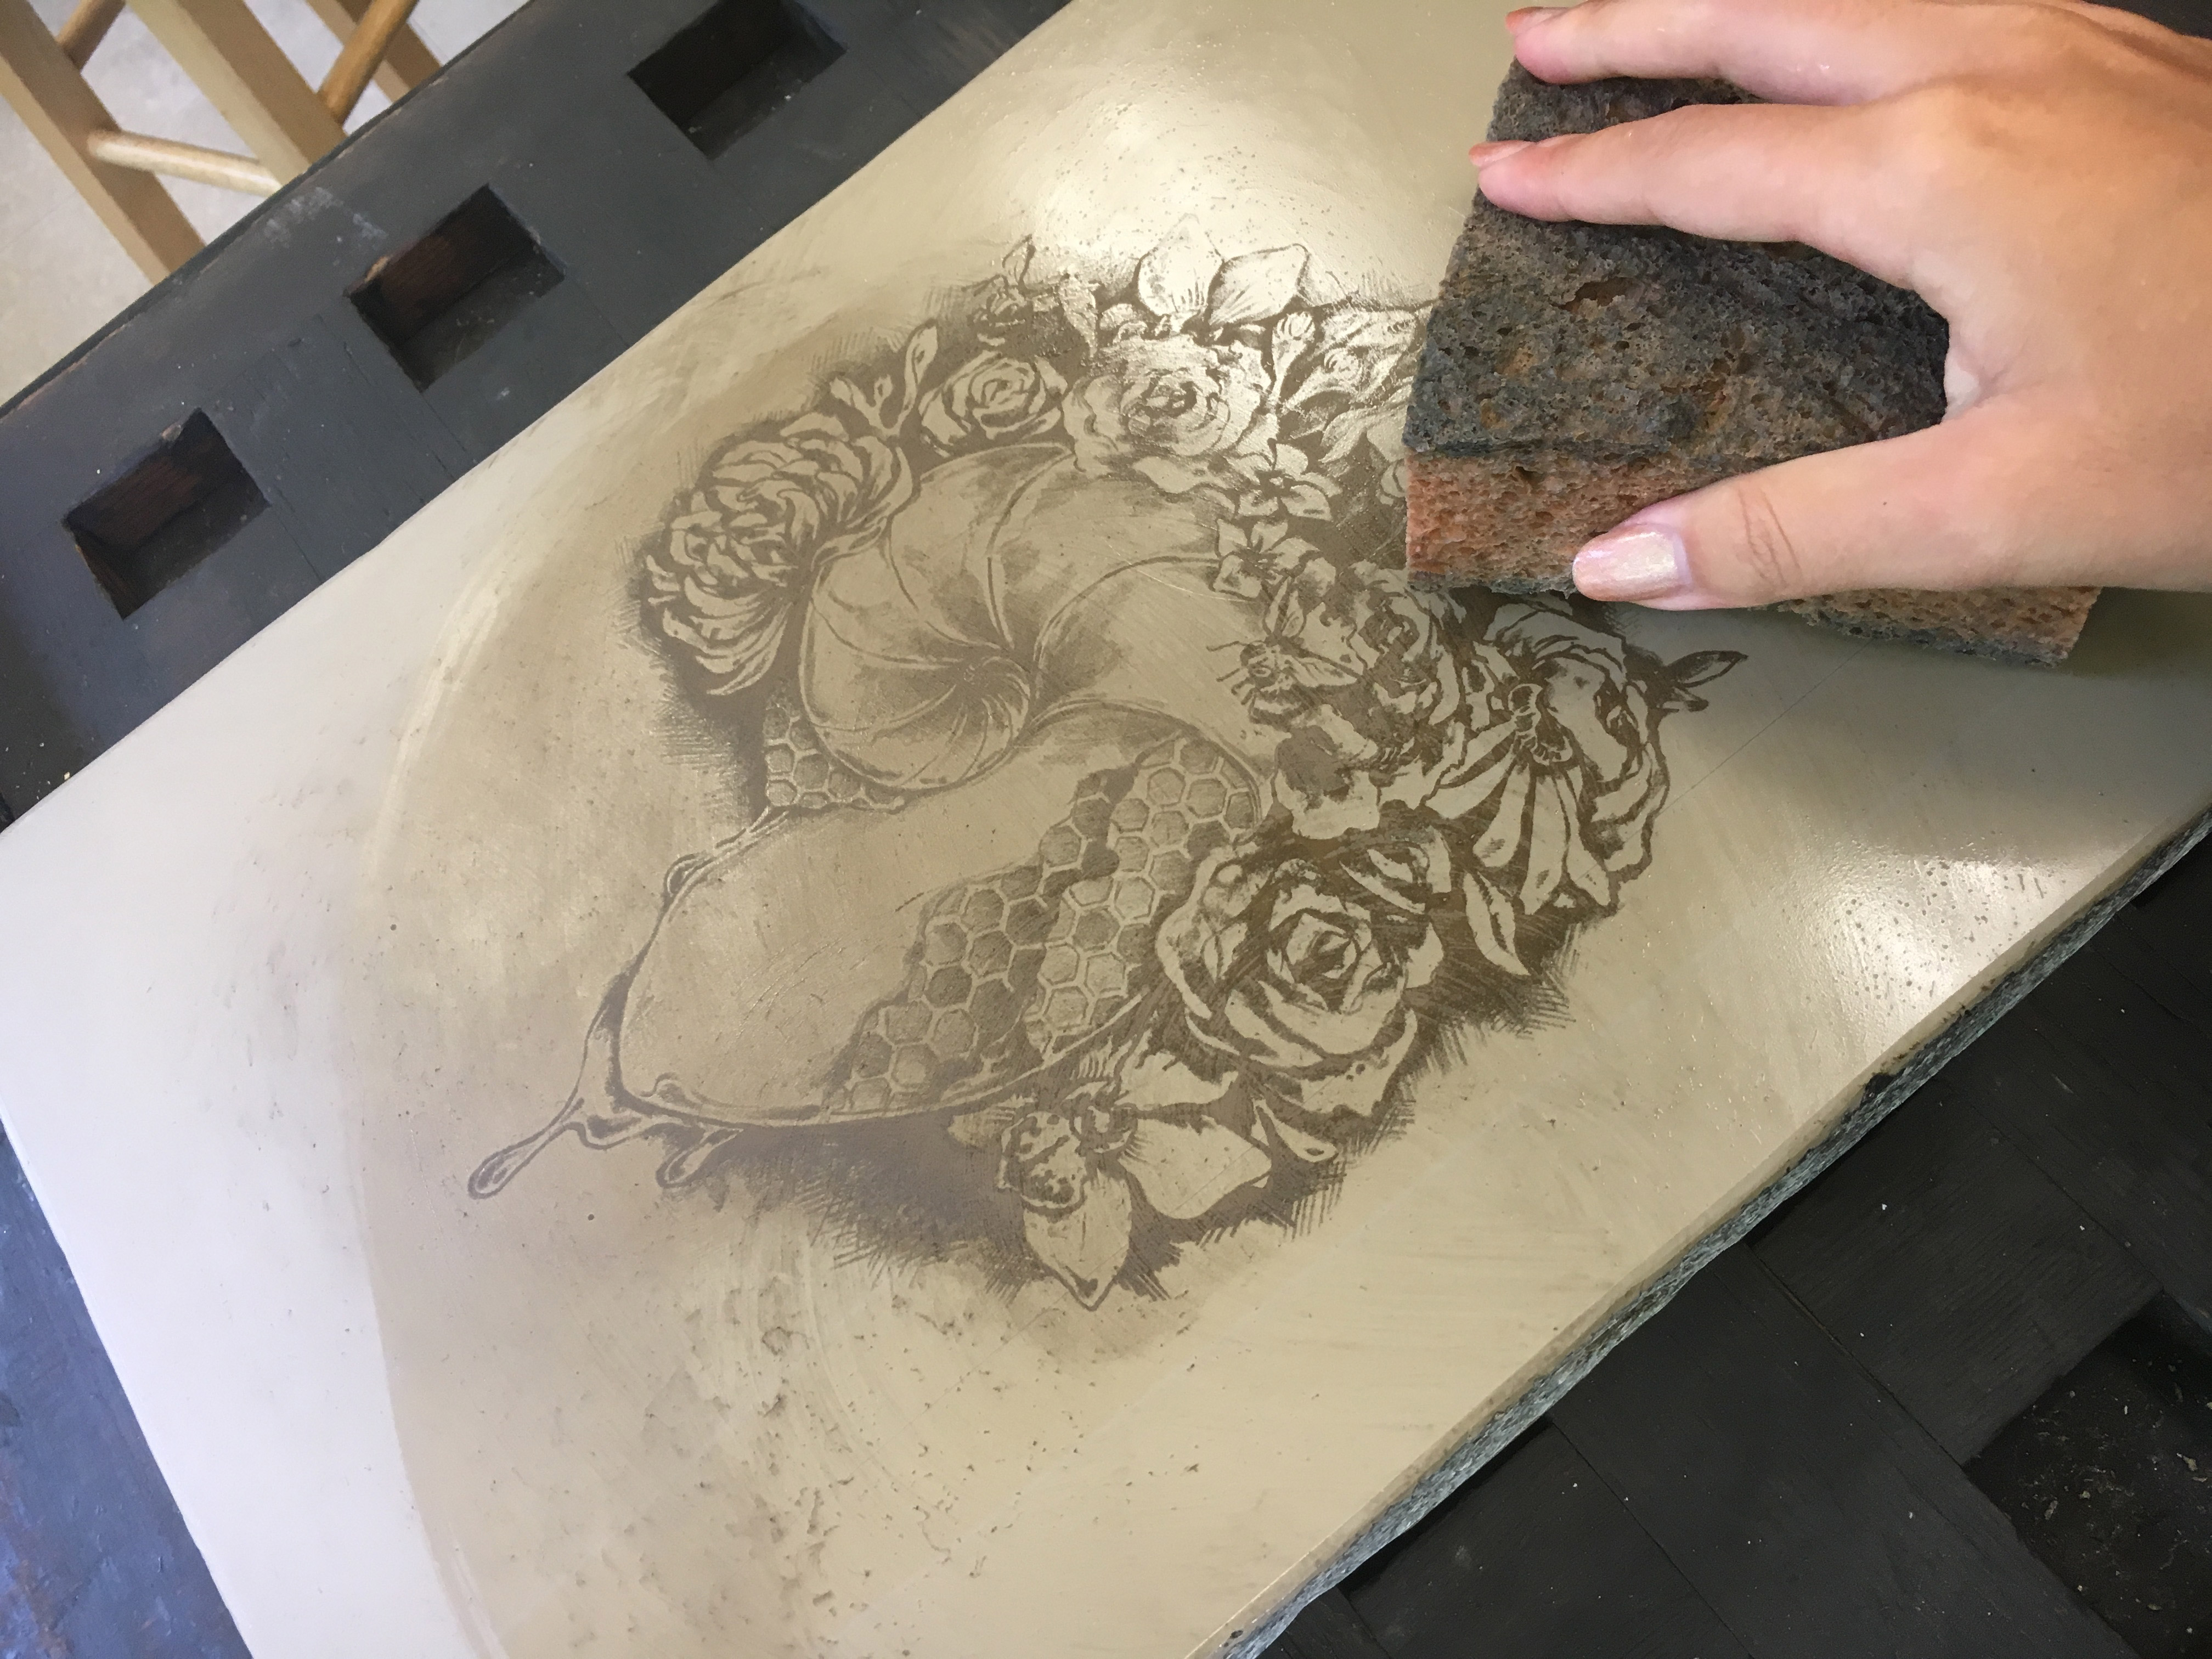 In the above image I have finished buffing in the asphaltum and now I am wiping away the gum from the stone with a damp sponge. It’s important to keep the stone wet. If it gets dry ink will go all over the place.
The stone is inked up using multiple passes.
Basically: Charge Roller, Damp Wipe Stone, Ink, Wipe away Scum and repeat as many times as necessary. The first prints should be light and build up after a few cycles of this. For this image it was a bit dark and only took three cycles of wipe/ink/wipe/ink/wipe/ink.
In the above image I have finished buffing in the asphaltum and now I am wiping away the gum from the stone with a damp sponge. It’s important to keep the stone wet. If it gets dry ink will go all over the place.
The stone is inked up using multiple passes.
Basically: Charge Roller, Damp Wipe Stone, Ink, Wipe away Scum and repeat as many times as necessary. The first prints should be light and build up after a few cycles of this. For this image it was a bit dark and only took three cycles of wipe/ink/wipe/ink/wipe/ink.
 Make sure to wipe the stone before you print to remove any scummy ink – the stone is a bit too wet below, but you get the idea.
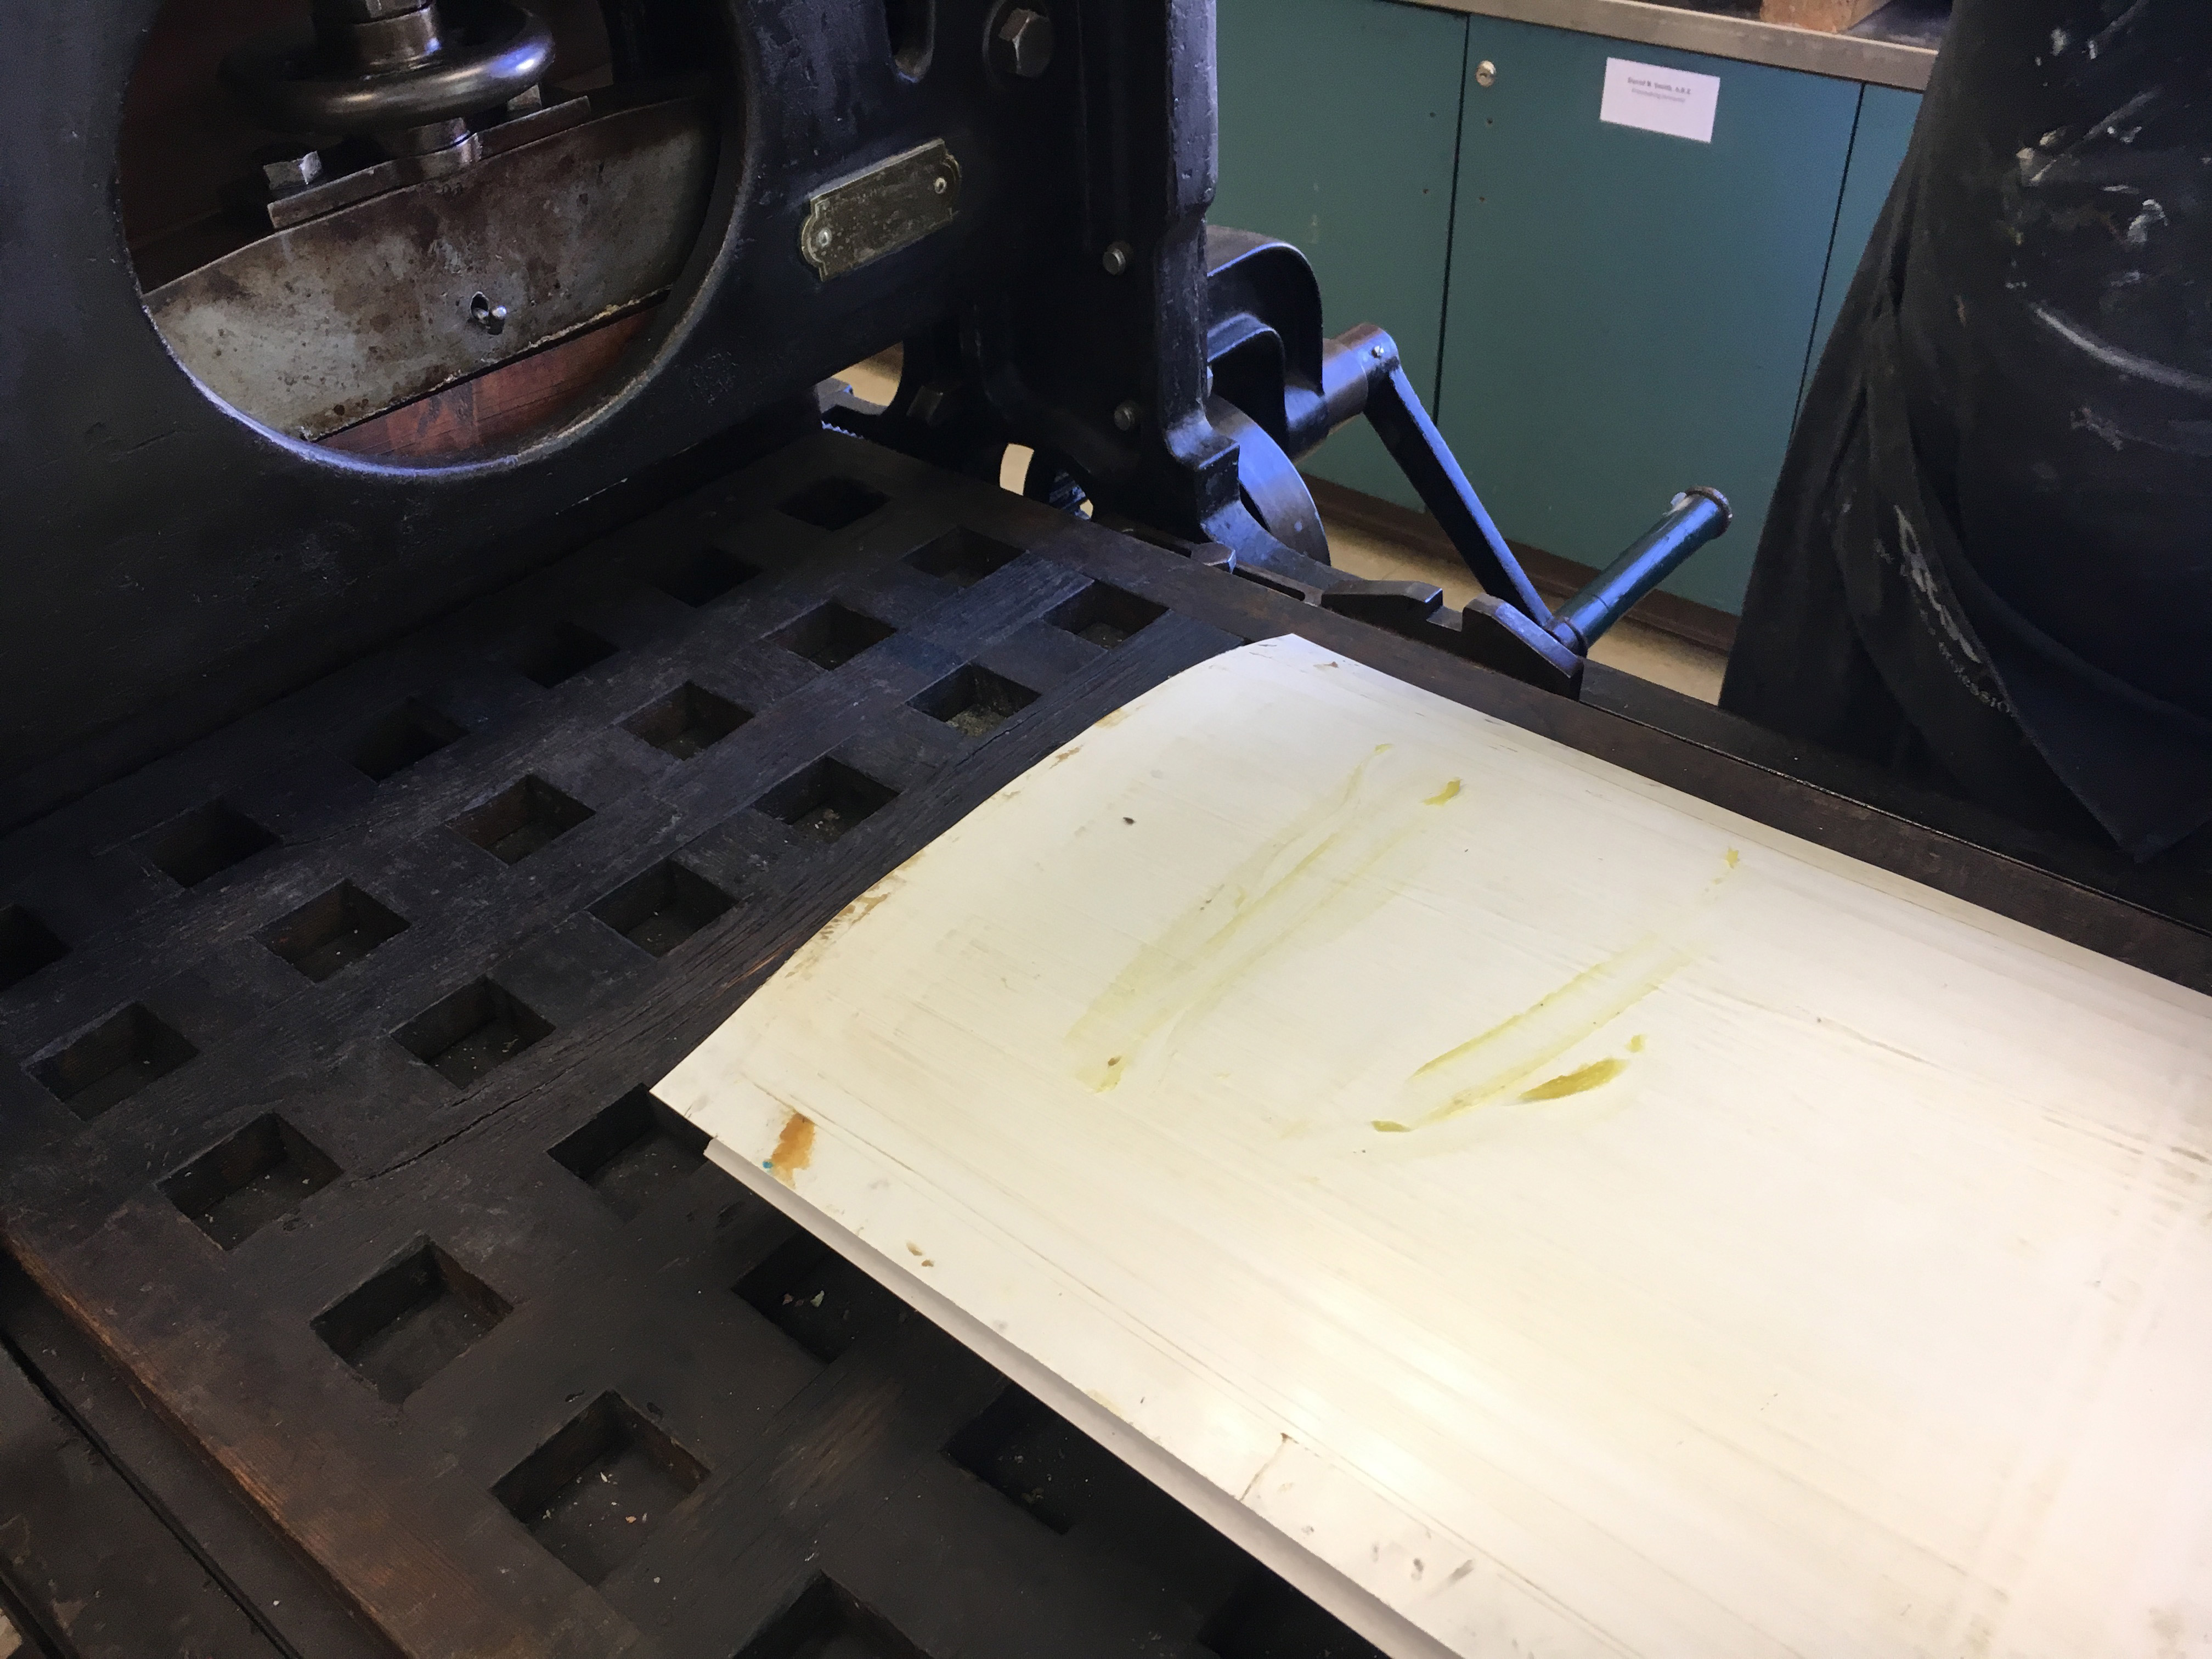
 Finally, after the stone is inked up, place your paper onto the stone, add three sheets of newsprint, and a sheet of greased tympan.
 Bring the press forward until it engages the stop
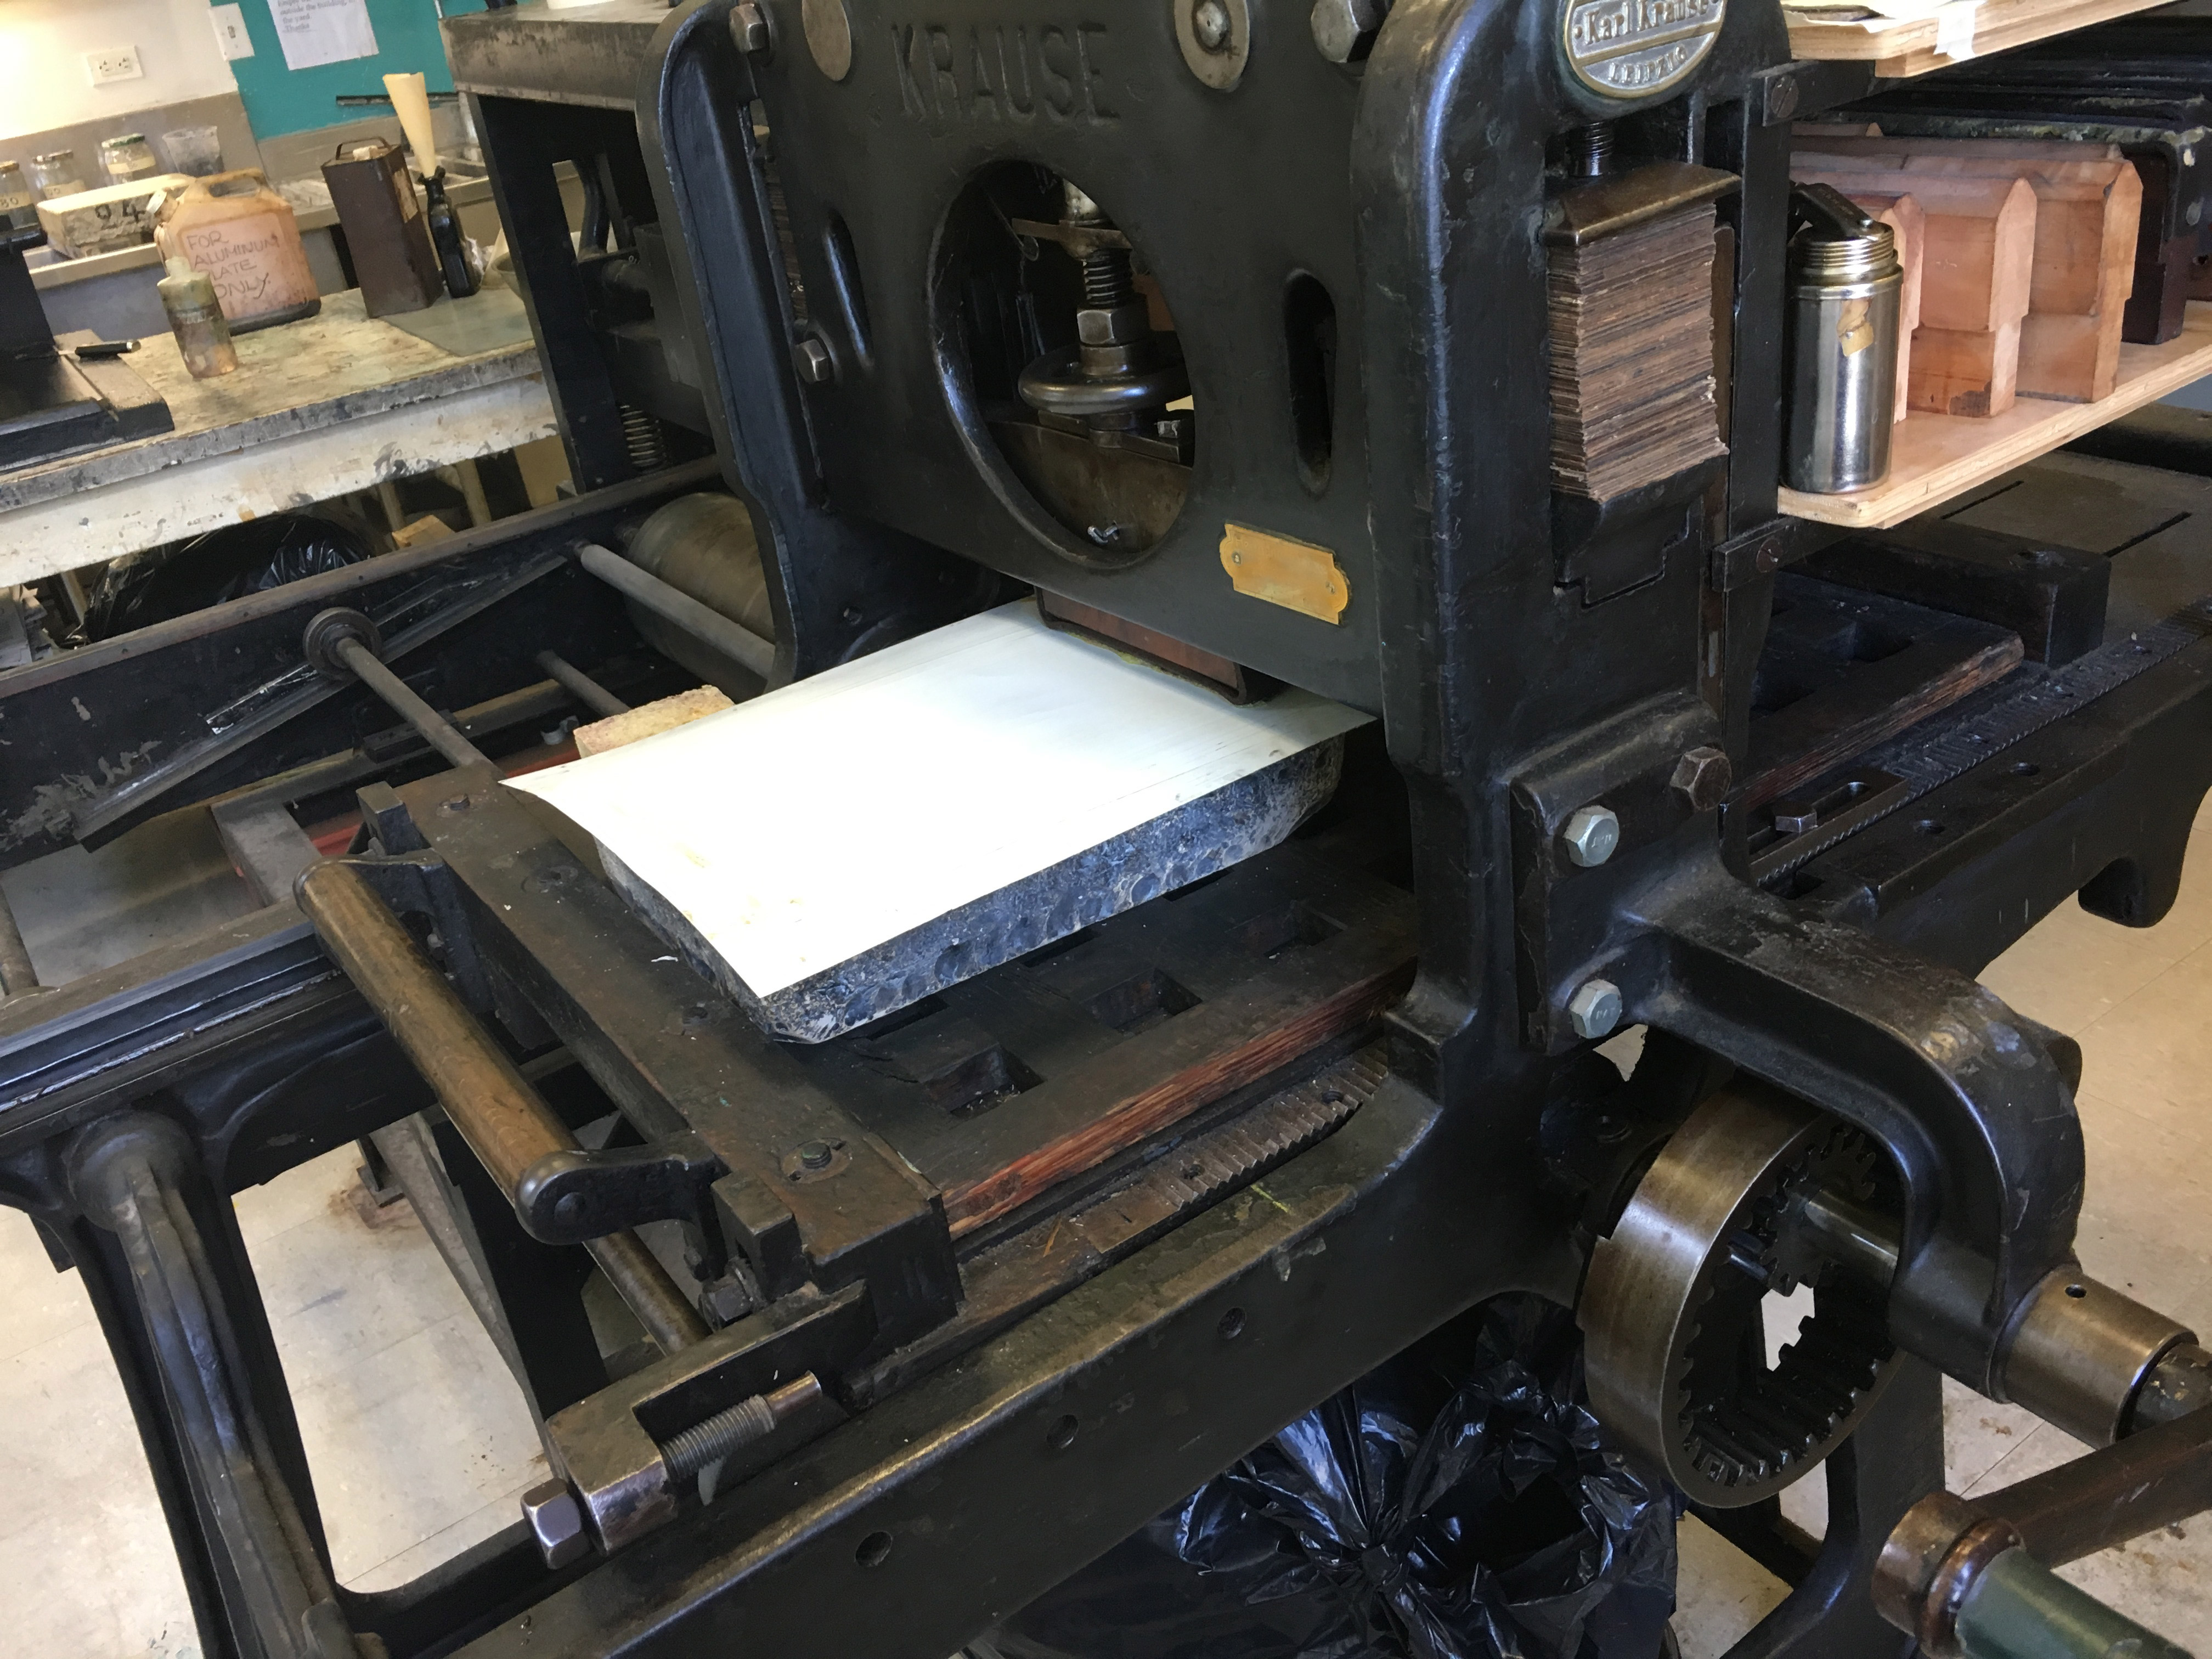 Bring down the scraper bar onto the stone, engage the handle into the gear, and crank the press until it reaching the pin stop (which you can see as a sort of screw towards the front right of the press bed.
 Lift the scraper bar, pull the bed back towards you and reveal your print.
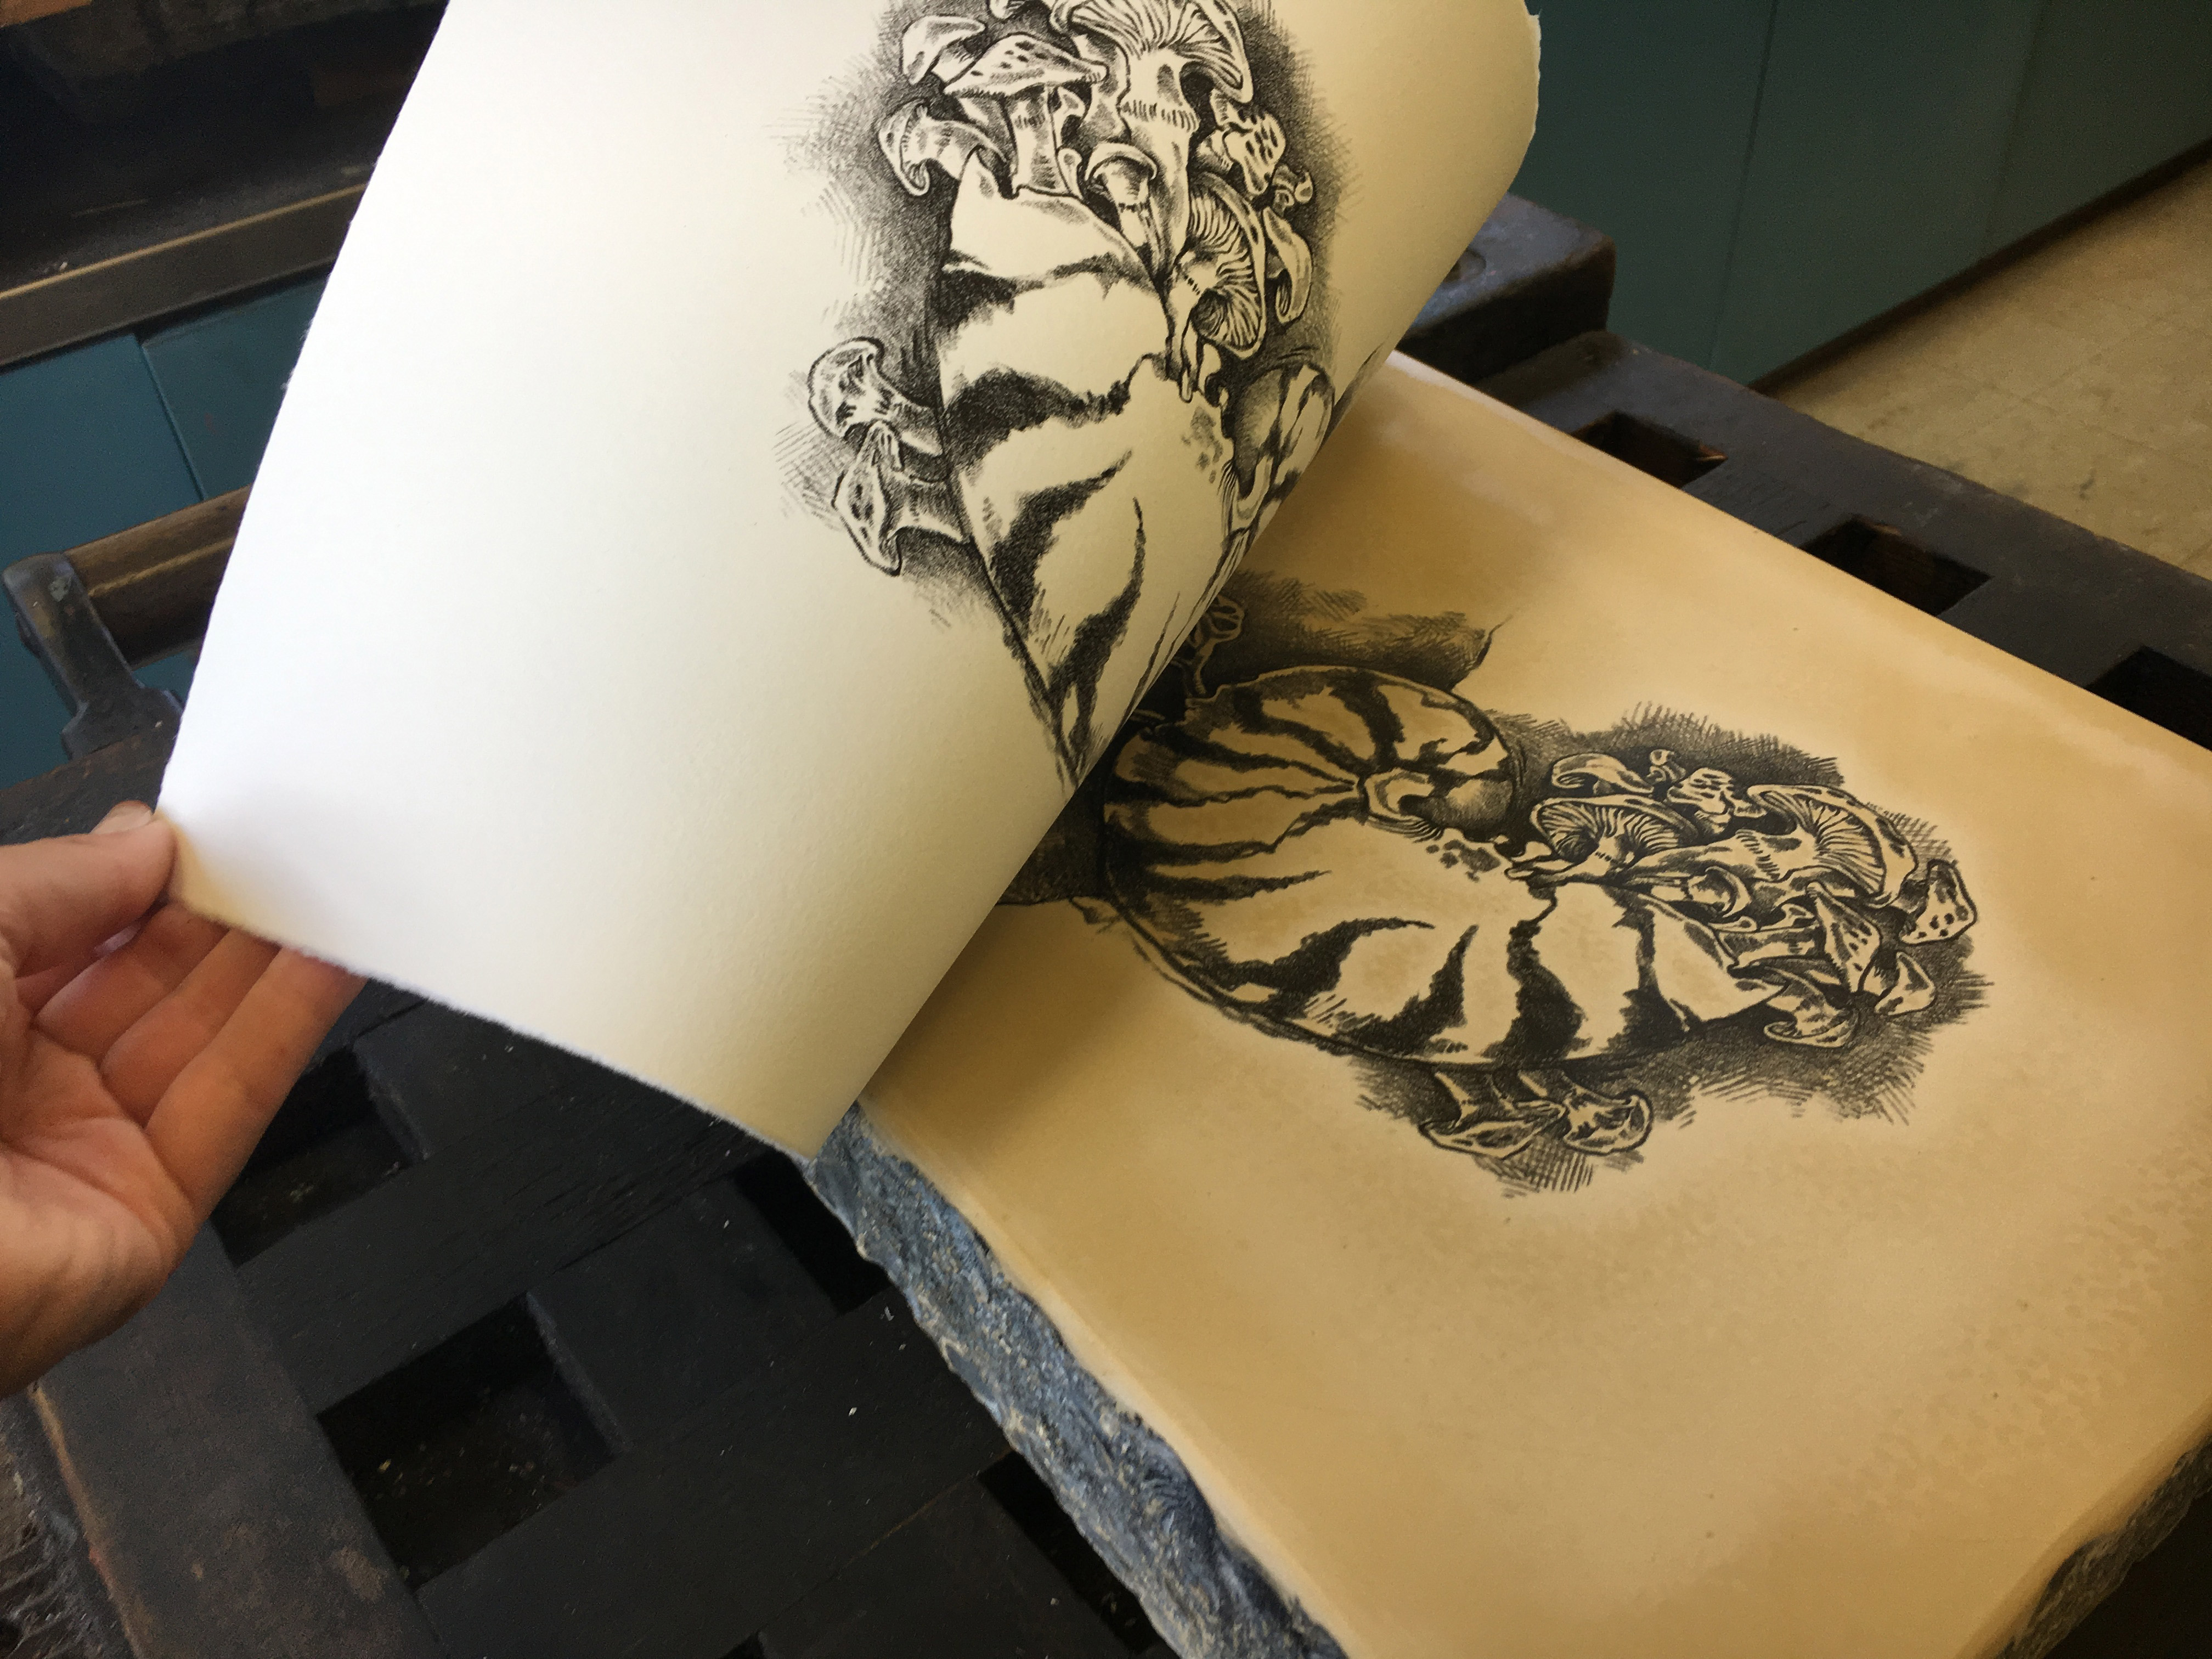
 You can see the paper has take up a lot of the water. Re-wipe the stone with your damp sponge. At this point you just repeat the inking and printing process. You adjust for images that are too light or too dark by adding more inking cycles or removing inking cycles. You can also roll faster to make the image lighter as it deposits less ink, or roll slower to lay down more ink and darken the image.
Here is the edition I was able to get in down in about two hours from setup to printing. If your image begins to get too dark, you must stop and re-etch. In either case when you are finished printing, Talc the wet ink, and buff in straight gum. Then cover your stone and put it away until next time.
You can see the paper has take up a lot of the water. Re-wipe the stone with your damp sponge. At this point you just repeat the inking and printing process. You adjust for images that are too light or too dark by adding more inking cycles or removing inking cycles. You can also roll faster to make the image lighter as it deposits less ink, or roll slower to lay down more ink and darken the image.
Here is the edition I was able to get in down in about two hours from setup to printing. If your image begins to get too dark, you must stop and re-etch. In either case when you are finished printing, Talc the wet ink, and buff in straight gum. Then cover your stone and put it away until next time.
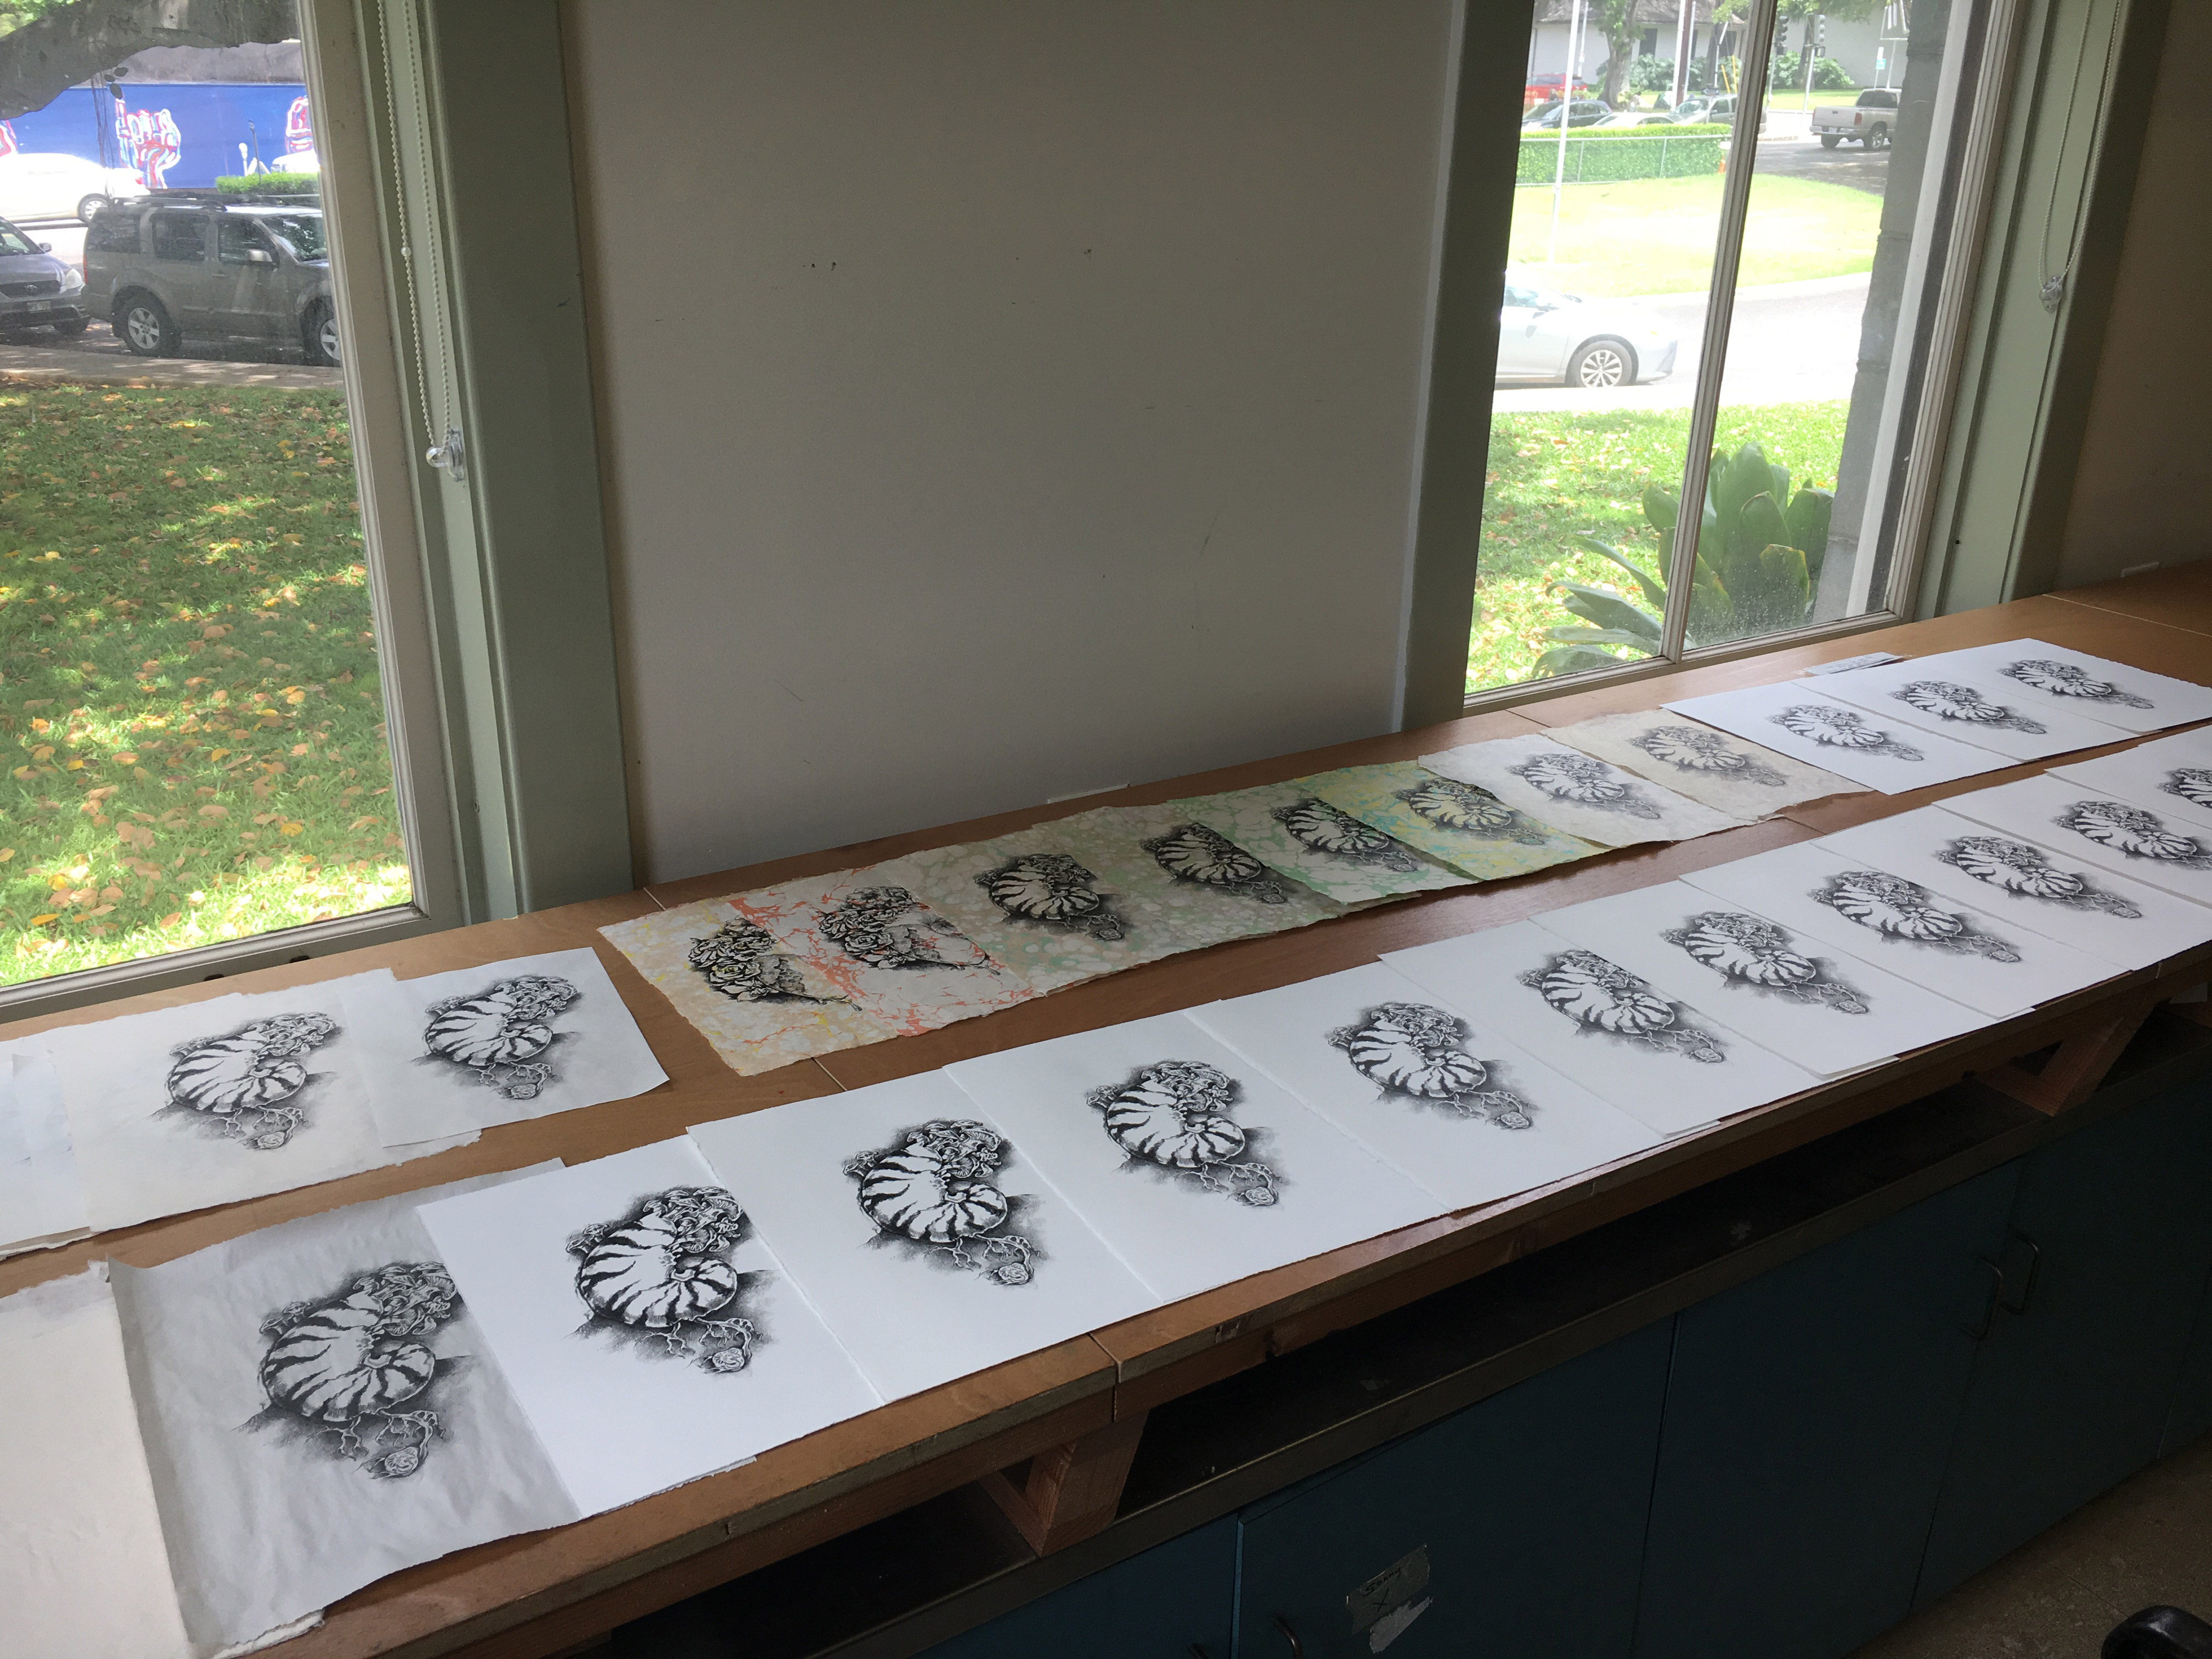 Here are a few pictures of the finished prints. I printed on all sorts of papers – from lightweight Japanese papers to heavier Reeves BFK.
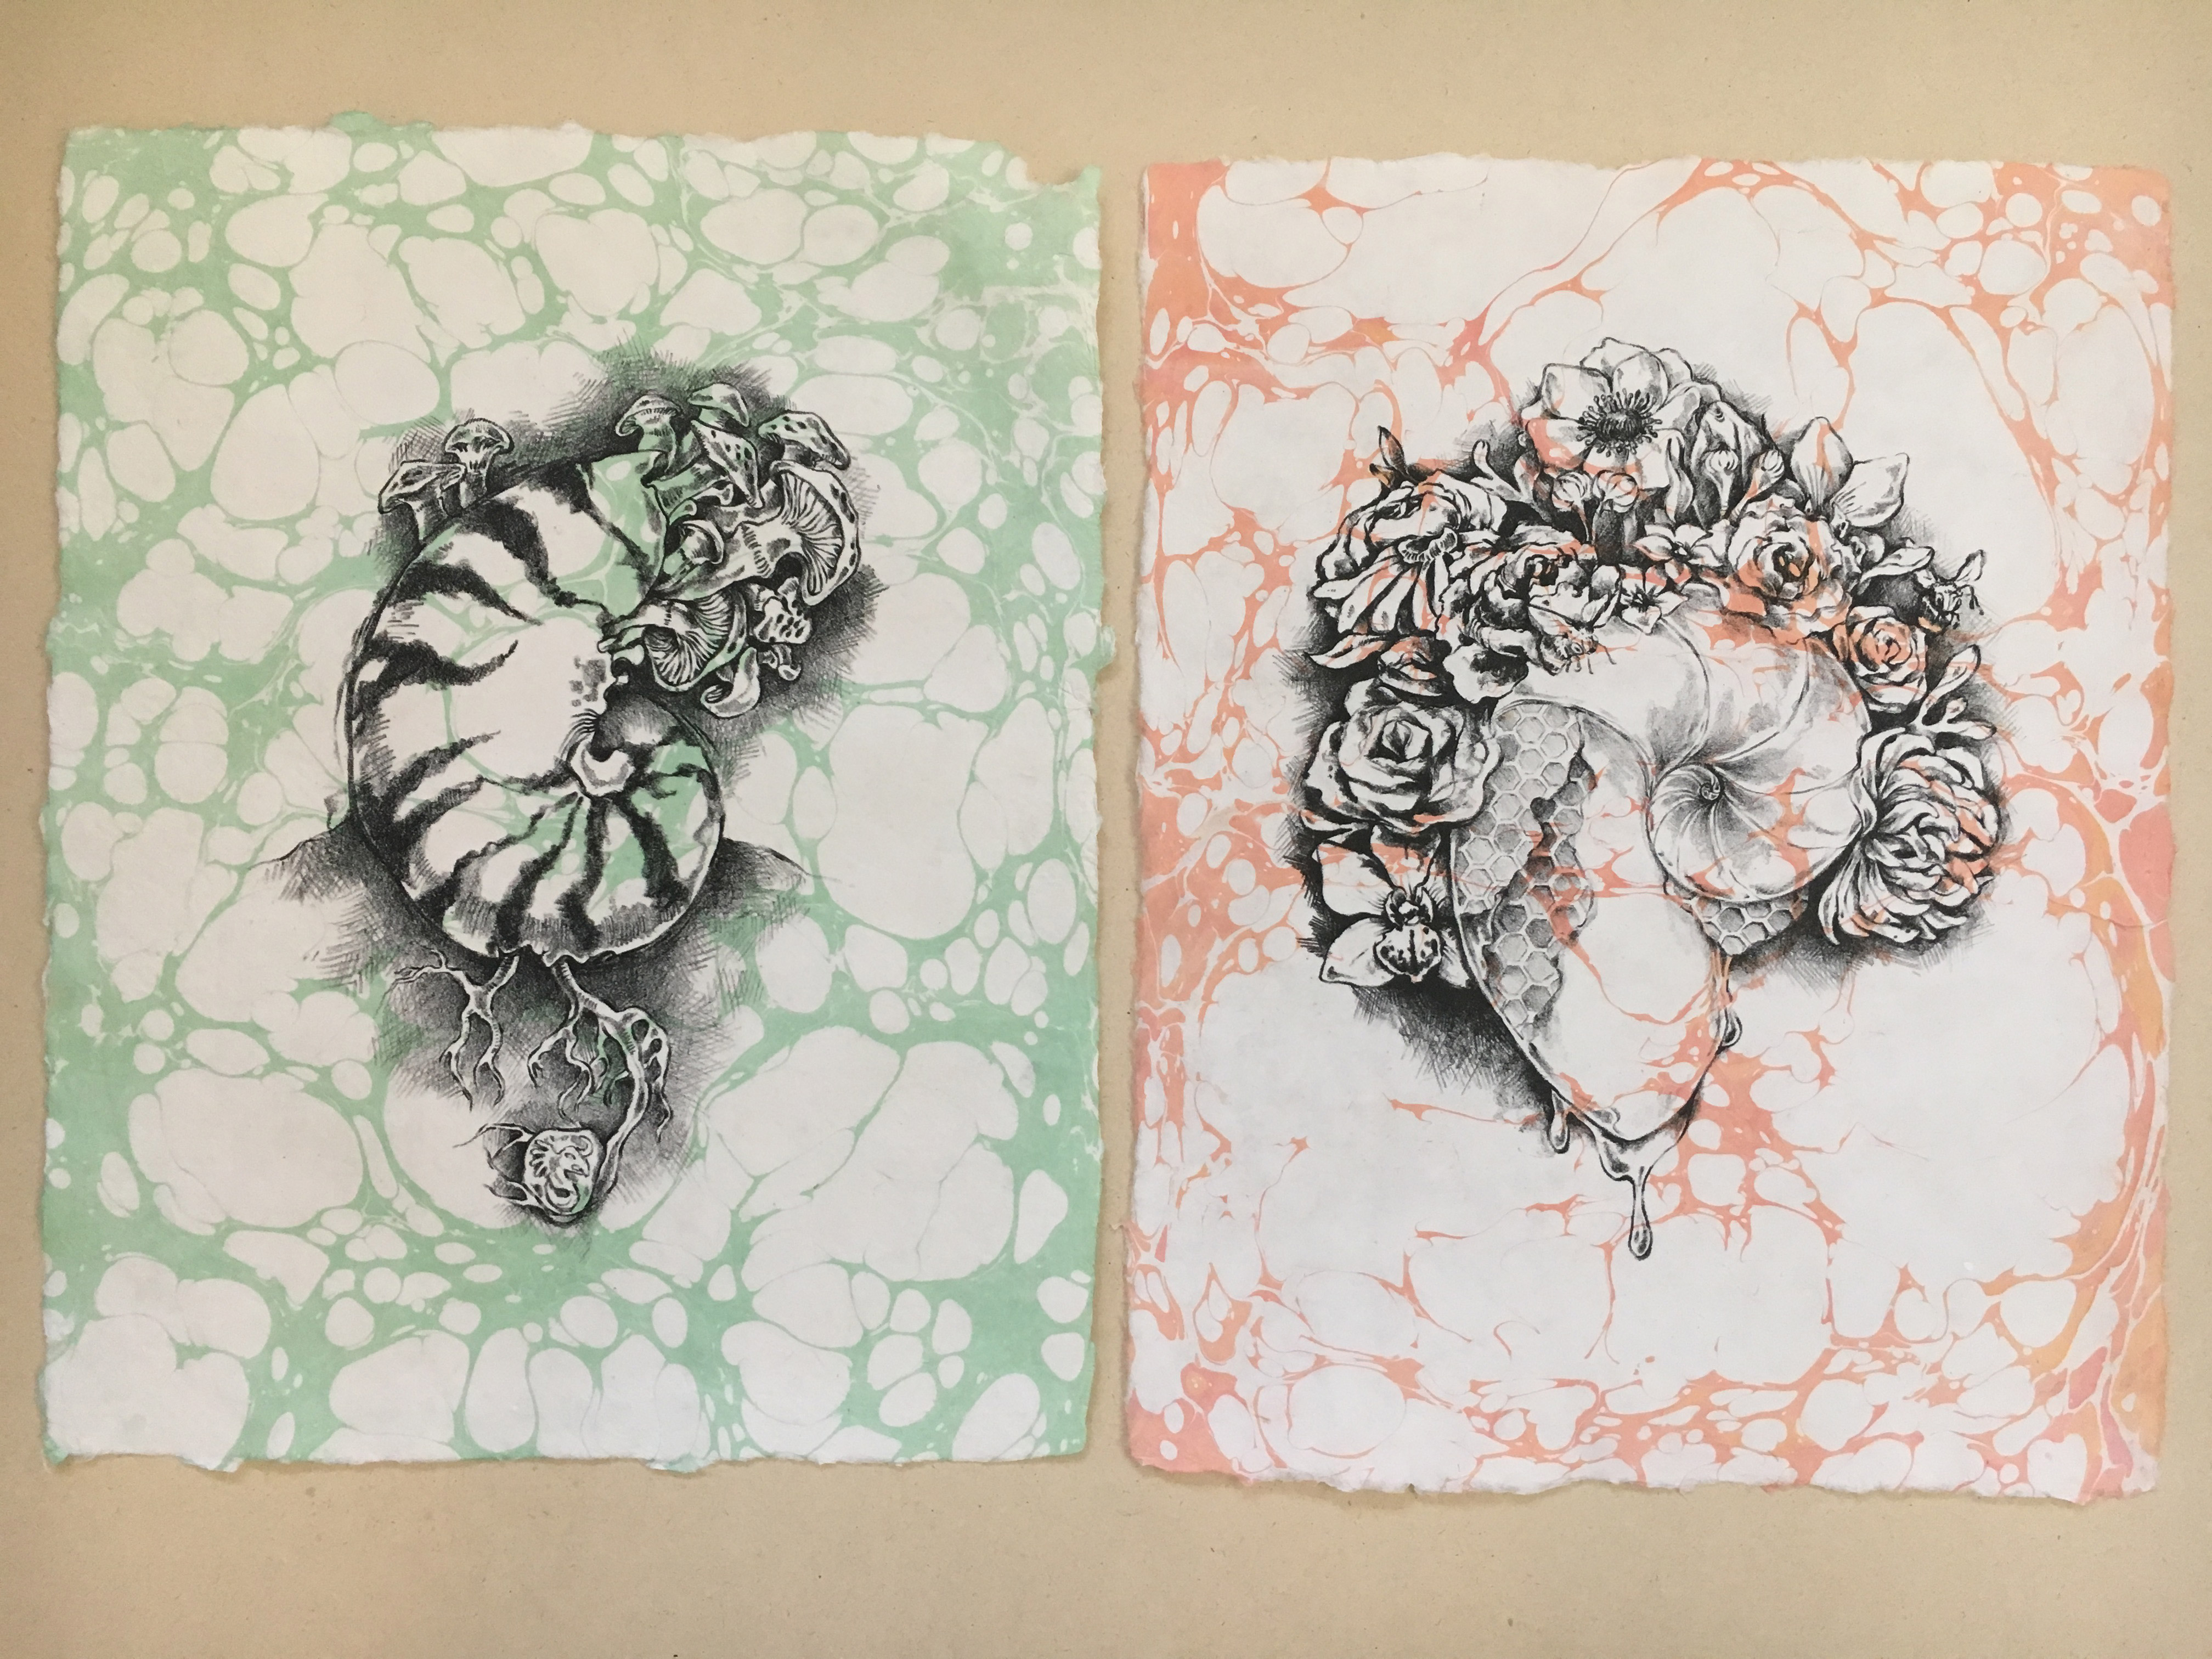

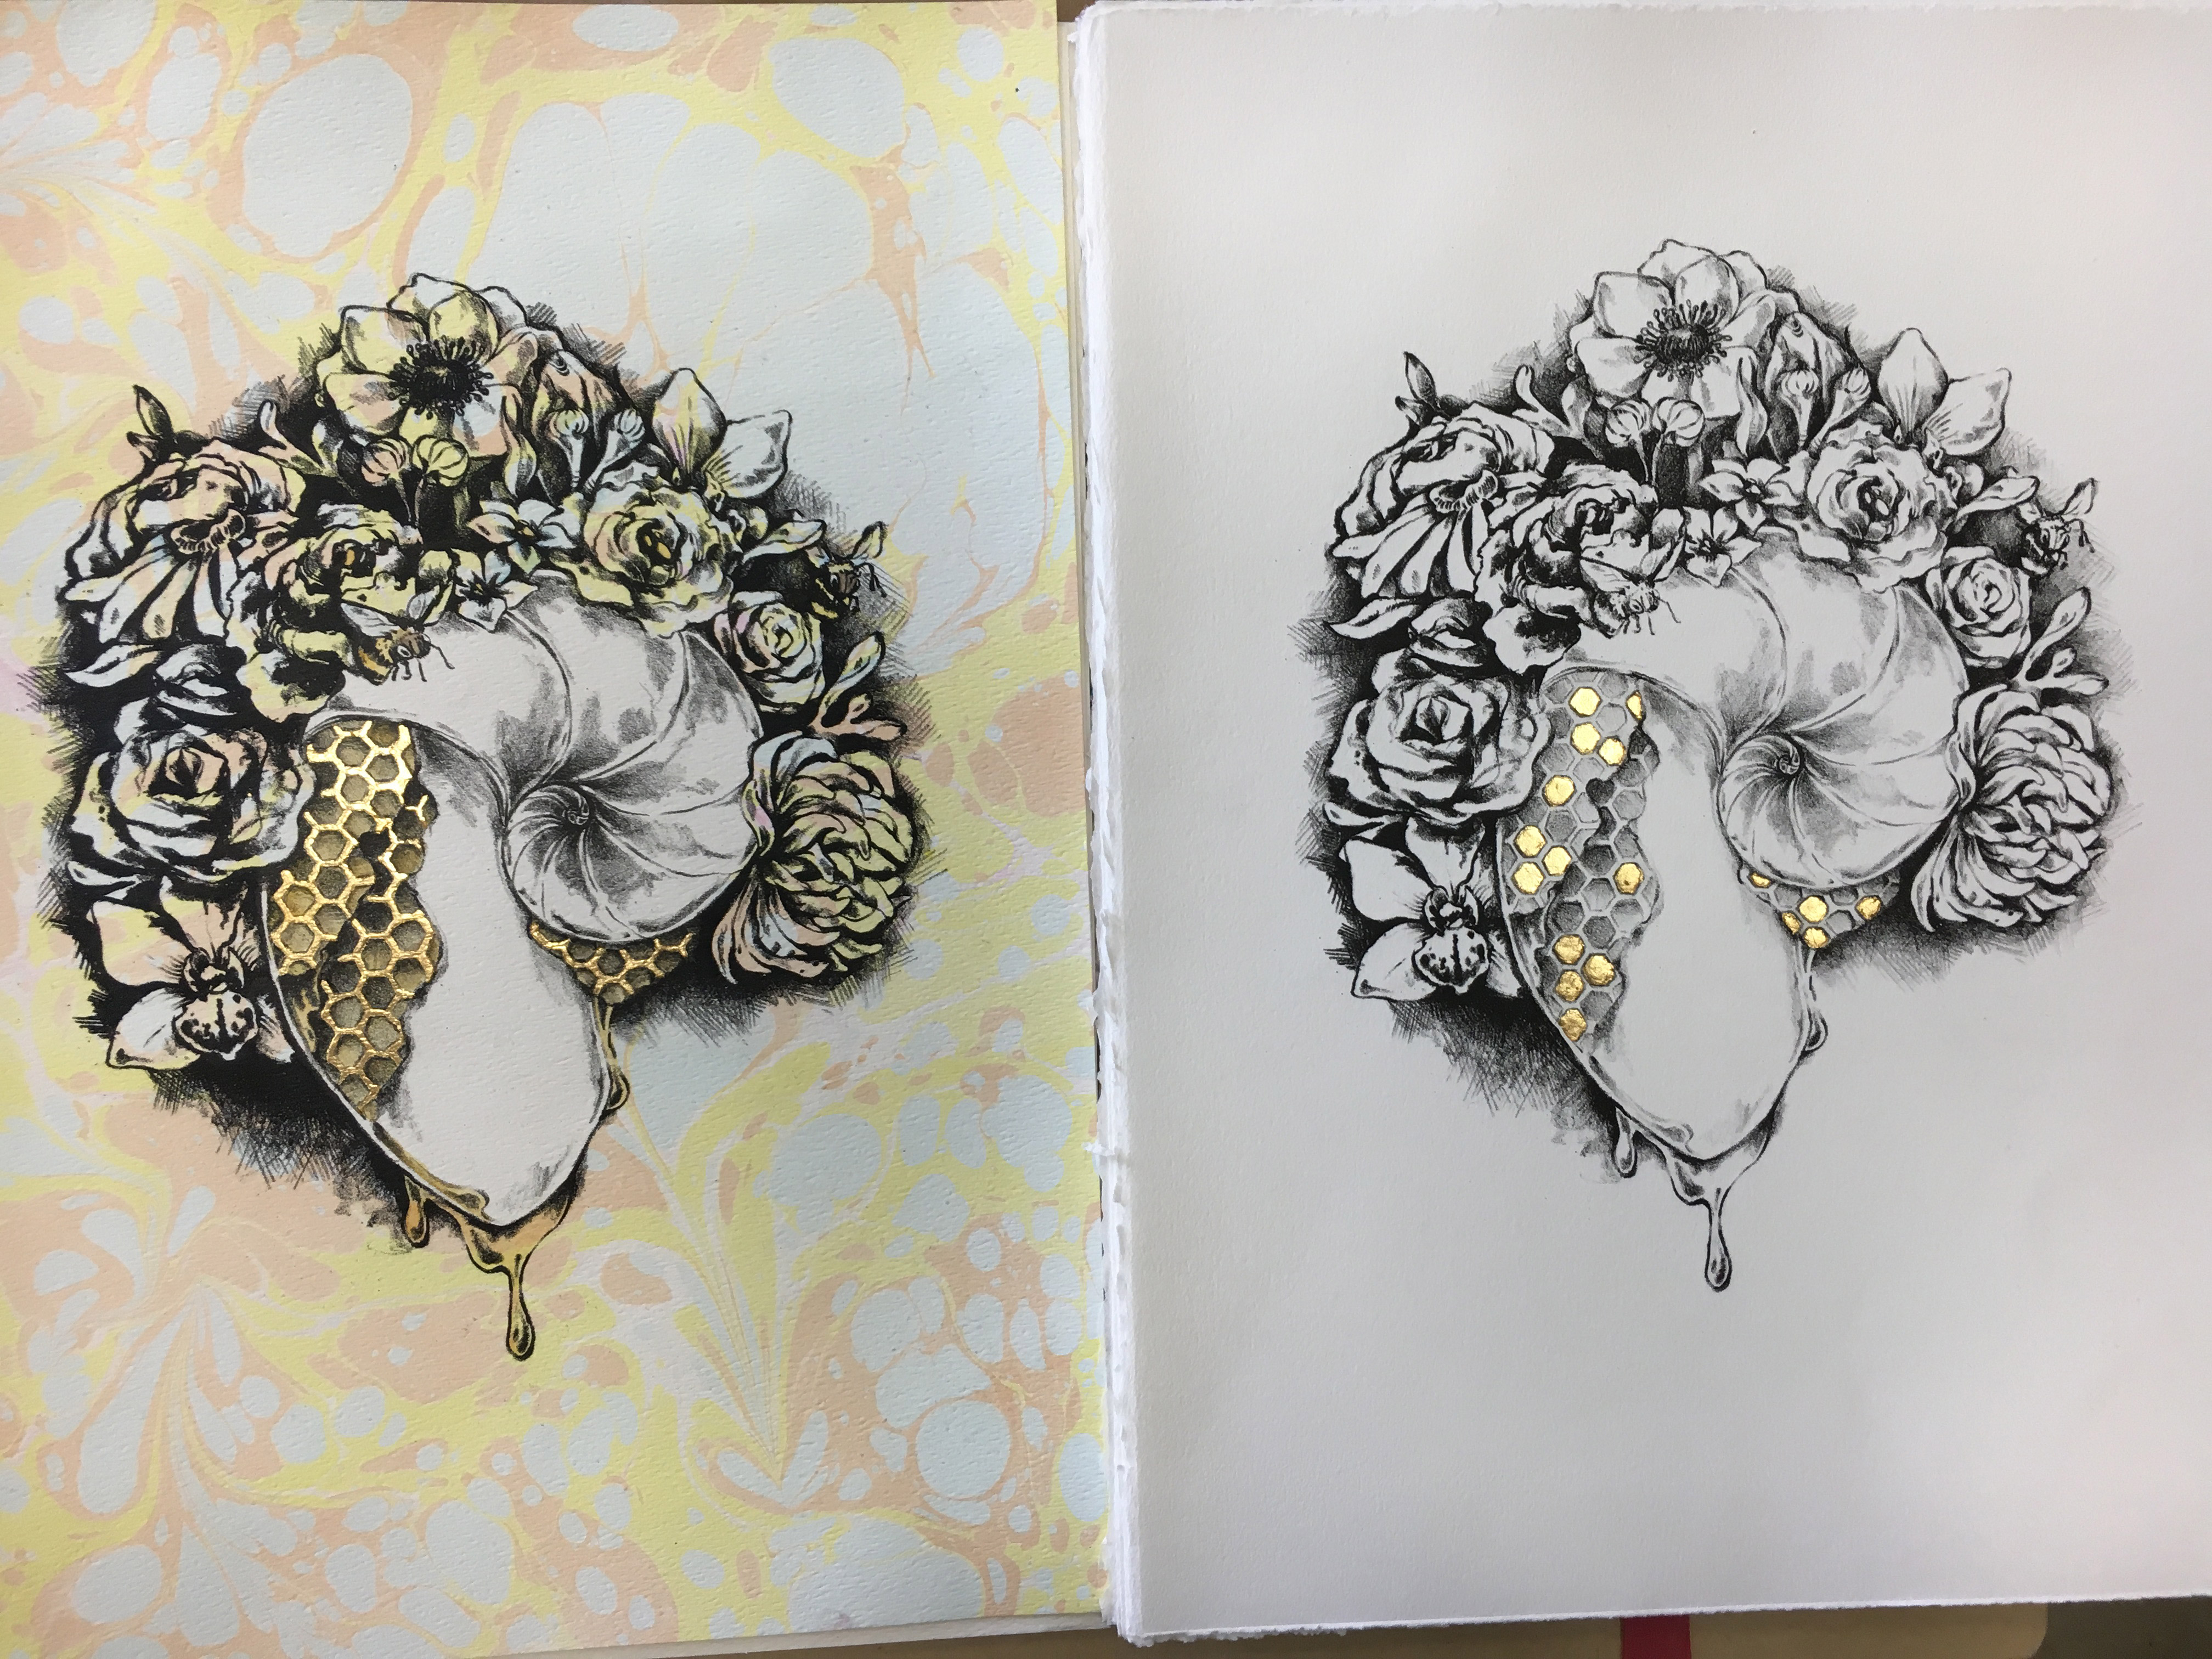
 I’ve over marbled a few and added gold leaf to some others. I’ve also hand colored a few in watercolor and with gold pigments. The thing I really love about lithography is how immediate and genuine the drawing is. It allows you to make a base image and try so many different things with it until you find just the right iteration.
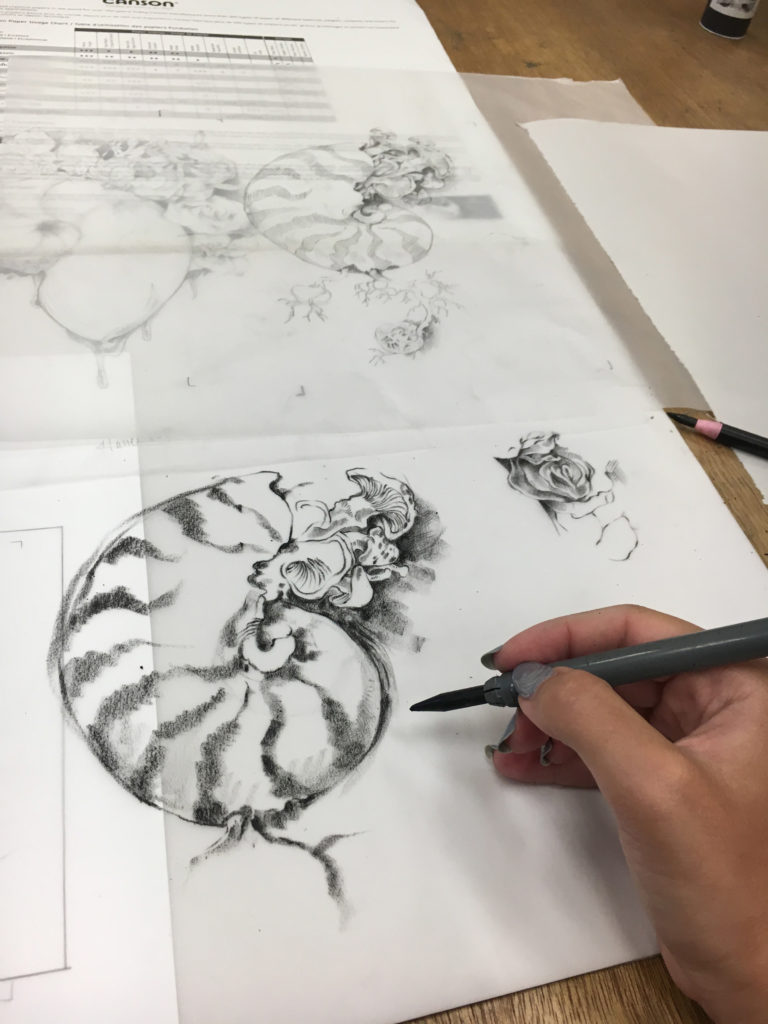
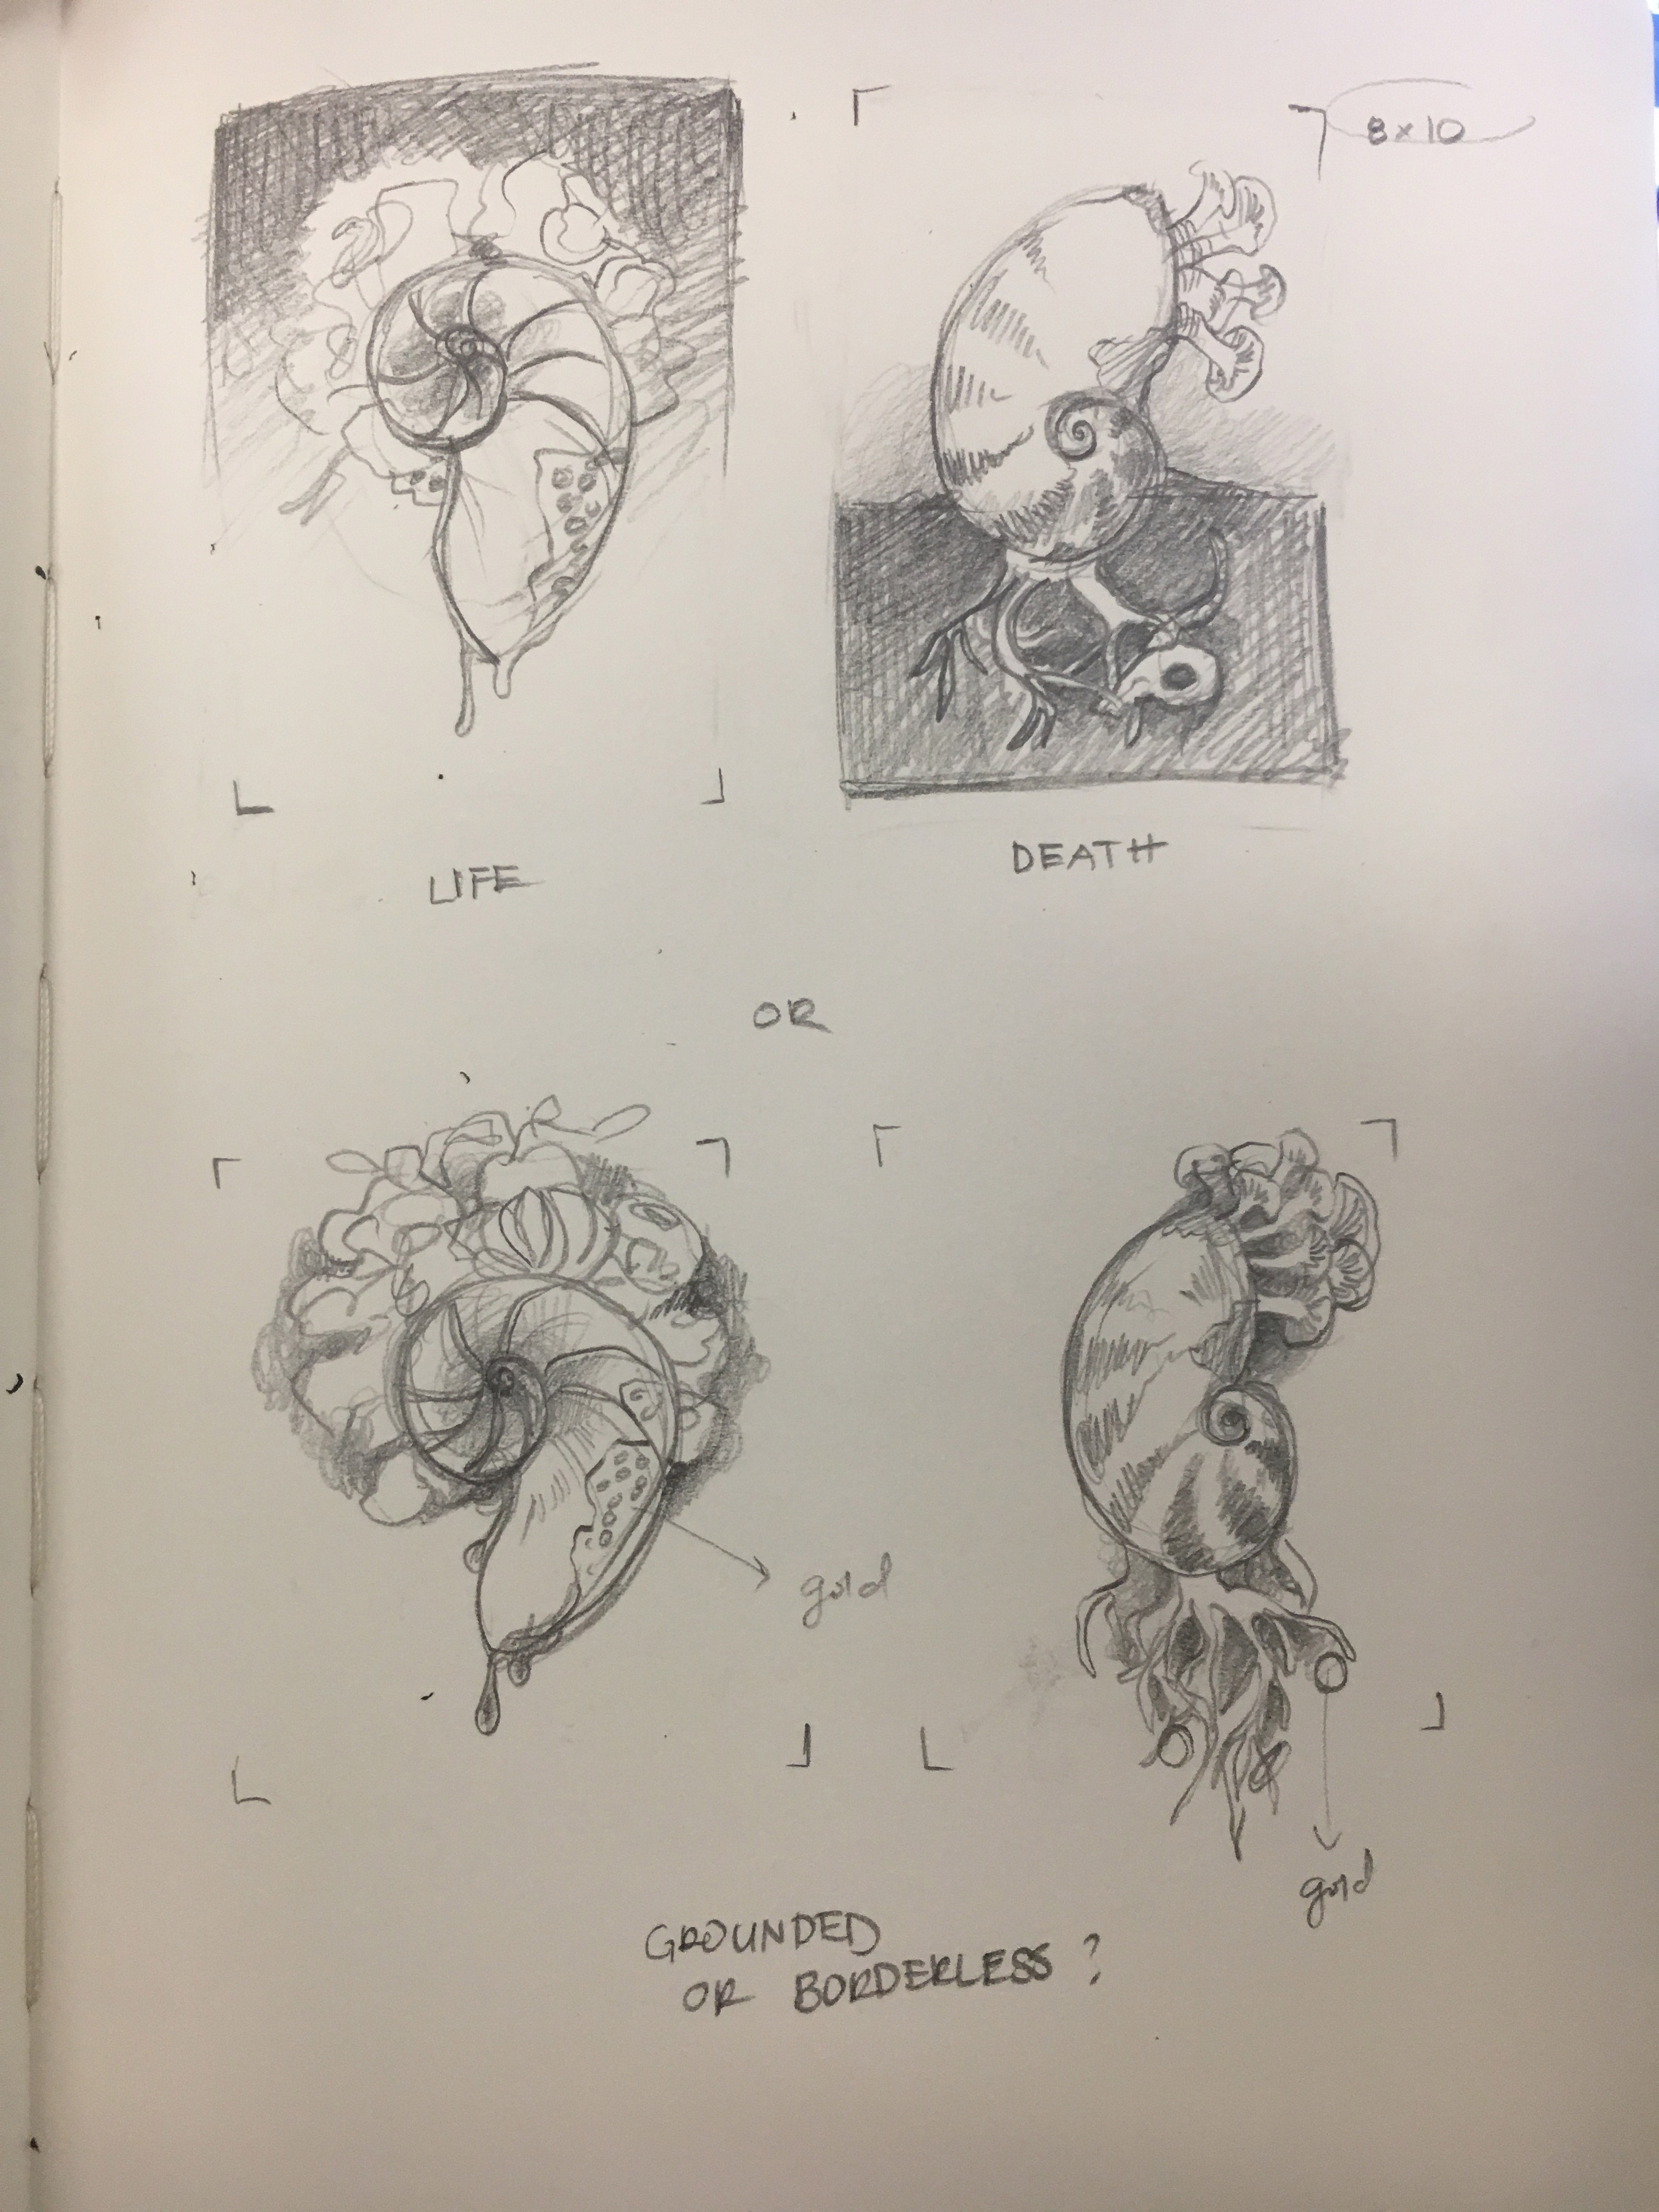
- First was the drawing and planning. My original sketches were a bit on the delicate side, so to feel out the drawing media better I re did the sketches using the litho crayons. Honestly, I’m not a big fan of them because of how crumbly they seem to be and how hard it is to keep a point, but I made due as best I could.

 2. While the drawing is being fleshed out, it’s time to prepare the stone. Yeah, this is not the most enjoyable part. First a stone is checked for its level using a straight edge. A slip of newsprint is held under the tear bar and tugged to determine there aren’t any low/high spots as it will slip out when there is a low area.
After the low spots are marked and the grinding pattern is established, grinding starts with a coarse grit.
Grinding is done in tight circles on a wet stone until the grit is worn down to a white foamy state.
The stone is then rinsed and checked again, until it is level and the previous lithograph is completely erased. This may take forever – especially for stubborn images, as if they aren’t fully erased they may show up in your prints. You can see one of the stubborn images I battled below.
Once everything is level and completely erased the stone is beveled with a file and polished with increasingly fine grits until it gets a pseudo glossy finish. Finally, it is dried, and ready for the drawing stage.
You can see the above stone already had a very nice bevel to it. At this stage handling the face of the stone must be completely avoided – any grease may show up once the image is etched.
3. Image transfer is done with a home made iron oxide tracing paper (iron oxide which will not etch is rubbed onto tracing paper to make a nice transfer sheet). The sketch is taped down to the stone (NOT ON THE FACE as tape adhesive may remain and print later), and the transfer paper is slipped beneath. Then some gentle pressure with a pen or pencil will transfer the line. I used a mechanical pencil with the lead retracted.
4. Now to one of the best parts of the process – drawing. Care is taken to keep skin away from the face of the stone with gloves and news print. Here I am drawing with a Dermatagraph Grease Pencil.
The grease pencil is sort of crumbly. After drawing is complete any stray bits are lightly scraped away with an X-acto knife.
5. Once the drawing is finished the greasy material is ‘set’ with a light buffing/dusting of Rosin (tan colored) and afterwards Talc (white colored).
6. Now comes the chemical part – which for me was the hardest part to remember. The lightest most delicate areas are painted in with straight Gum Arabic.
The next set of values is painted in with about an oz of gum mixed with a drop or two of acid. The values go up until you’ve reached the level needed – which depends on the drawing material itself and the darkness of the drawing. I won’t pretend to be an expert on determining this. There are lots of charts out there which detail it more accurately. I think this image went up to a 6 drop etch.
Finally, additional Gum Arabic is massaged into the stone for two to three minutes.
A barely damp sponge is blotted over the stone to remove excess gum. You can then buff the gum in tight with cheese cloth or strip it with newsprint (lay a sheet of newsprint onto the stone, rub the back, and then peel it back. We generally newsprint stripped twice.
The etch now has to cure for about 8 hours.
7. After the stone has cured. It’s time to do the second etch.
First the grease material is washed out with solvent. Currently, the gum is protecting the non image area so as long as no water touches it you will be fine removing the drawing material. I’m showing the second etch process on a different stone than shown above but it works the same.
After the image area is washed out, you buff in asphaltum. This creates a base for the ink to stick to.
Now we need to roll up the image to see how it takes ink. Sponge it down first – as shown in the image above it shouldn’t be soaking wet and glossy, but matte. It shouldn’t ink up too fast and generally will take a couple of passes.
If needed, you can buff out any dots/flecks or finger prints with a very fine grit and a pad. Wet the stone and be careful to not scrape into wanted image areas.
Finally, if it looks good, Rosin and Talc are dusted on again, etch (Gum Arabic or something stronger if needed) is re applied and buffed in (or stripped). Now we let it cure again for at least 8 hours – preferably overnight.
8. FINALLY, once all of that chemical stuff is done, it’s time to print. Paper is torn down and prepped and Ink is rolled up. Here we use a leather roller and some very stiff black ink. This stuff is so stiff I would probably have thrown it out not realizing it was still usable. Lithography uses the thinest film of ink of probably any print process and it uses stiffer ink than what would normally be used for letterpress or any relief process I have worked with.
Two dishes are prepared with a cellulose sponge. One with water and a splash of ‘junk gum’ (gum that has varying amounts of acid in it) are use to wet the stone. This slightly acidic mixture helps stabilize the stone (or keep it stable).
Now we set up our press. This Krause press has two stops one on the side of the bed to set the starting point and a screw towards the end of the bed to set the stop point.
I set a piece of newsprint over the stone and adjusted by sight. The scraper bar should be smaller than the stone to prevent grooves from forming in the leather.
The pressure is set by lowering the bar to ‘hand tight’ on the stone. Then the bar is lifted and tightened about 1/4 to a 1/2 turn.
Now that the ink, paper, and press are ready. It’s time to do the final preparation of the stone and start printing.
9. Wash out the ink with solvent, and buff in asphaltum again. This is important because the old ink has probably dried up on the stone.
In the above image I have finished buffing in the asphaltum and now I am wiping away the gum from the stone with a damp sponge. It’s important to keep the stone wet. If it gets dry ink will go all over the place.
The stone is inked up using multiple passes.
Basically: Charge Roller, Damp Wipe Stone, Ink, Wipe away Scum and repeat as many times as necessary. The first prints should be light and build up after a few cycles of this. For this image it was a bit dark and only took three cycles of wipe/ink/wipe/ink/wipe/ink.
Make sure to wipe the stone before you print to remove any scummy ink – the stone is a bit too wet below, but you get the idea.
Finally, after the stone is inked up, place your paper onto the stone, add three sheets of newsprint, and a sheet of greased tympan.
Bring the press forward until it engages the stop
Bring down the scraper bar onto the stone, engage the handle into the gear, and crank the press until it reaching the pin stop (which you can see as a sort of screw towards the front right of the press bed.
Lift the scraper bar, pull the bed back towards you and reveal your print.
You can see the paper has take up a lot of the water. Re-wipe the stone with your damp sponge. At this point you just repeat the inking and printing process. You adjust for images that are too light or too dark by adding more inking cycles or removing inking cycles. You can also roll faster to make the image lighter as it deposits less ink, or roll slower to lay down more ink and darken the image.
Here is the edition I was able to get in down in about two hours from setup to printing. If your image begins to get too dark, you must stop and re-etch. In either case when you are finished printing, Talc the wet ink, and buff in straight gum. Then cover your stone and put it away until next time.
Here are a few pictures of the finished prints. I printed on all sorts of papers – from lightweight Japanese papers to heavier Reeves BFK.
I’ve over marbled a few and added gold leaf to some others. I’ve also hand colored a few in watercolor and with gold pigments. The thing I really love about lithography is how immediate and genuine the drawing is. It allows you to make a base image and try so many different things with it until you find just the right iteration.
2. While the drawing is being fleshed out, it’s time to prepare the stone. Yeah, this is not the most enjoyable part. First a stone is checked for its level using a straight edge. A slip of newsprint is held under the tear bar and tugged to determine there aren’t any low/high spots as it will slip out when there is a low area.
After the low spots are marked and the grinding pattern is established, grinding starts with a coarse grit.
Grinding is done in tight circles on a wet stone until the grit is worn down to a white foamy state.
The stone is then rinsed and checked again, until it is level and the previous lithograph is completely erased. This may take forever – especially for stubborn images, as if they aren’t fully erased they may show up in your prints. You can see one of the stubborn images I battled below.
Once everything is level and completely erased the stone is beveled with a file and polished with increasingly fine grits until it gets a pseudo glossy finish. Finally, it is dried, and ready for the drawing stage.
You can see the above stone already had a very nice bevel to it. At this stage handling the face of the stone must be completely avoided – any grease may show up once the image is etched.
3. Image transfer is done with a home made iron oxide tracing paper (iron oxide which will not etch is rubbed onto tracing paper to make a nice transfer sheet). The sketch is taped down to the stone (NOT ON THE FACE as tape adhesive may remain and print later), and the transfer paper is slipped beneath. Then some gentle pressure with a pen or pencil will transfer the line. I used a mechanical pencil with the lead retracted.
4. Now to one of the best parts of the process – drawing. Care is taken to keep skin away from the face of the stone with gloves and news print. Here I am drawing with a Dermatagraph Grease Pencil.
The grease pencil is sort of crumbly. After drawing is complete any stray bits are lightly scraped away with an X-acto knife.
5. Once the drawing is finished the greasy material is ‘set’ with a light buffing/dusting of Rosin (tan colored) and afterwards Talc (white colored).
6. Now comes the chemical part – which for me was the hardest part to remember. The lightest most delicate areas are painted in with straight Gum Arabic.
The next set of values is painted in with about an oz of gum mixed with a drop or two of acid. The values go up until you’ve reached the level needed – which depends on the drawing material itself and the darkness of the drawing. I won’t pretend to be an expert on determining this. There are lots of charts out there which detail it more accurately. I think this image went up to a 6 drop etch.
Finally, additional Gum Arabic is massaged into the stone for two to three minutes.
A barely damp sponge is blotted over the stone to remove excess gum. You can then buff the gum in tight with cheese cloth or strip it with newsprint (lay a sheet of newsprint onto the stone, rub the back, and then peel it back. We generally newsprint stripped twice.
The etch now has to cure for about 8 hours.
7. After the stone has cured. It’s time to do the second etch.
First the grease material is washed out with solvent. Currently, the gum is protecting the non image area so as long as no water touches it you will be fine removing the drawing material. I’m showing the second etch process on a different stone than shown above but it works the same.
After the image area is washed out, you buff in asphaltum. This creates a base for the ink to stick to.
Now we need to roll up the image to see how it takes ink. Sponge it down first – as shown in the image above it shouldn’t be soaking wet and glossy, but matte. It shouldn’t ink up too fast and generally will take a couple of passes.
If needed, you can buff out any dots/flecks or finger prints with a very fine grit and a pad. Wet the stone and be careful to not scrape into wanted image areas.
Finally, if it looks good, Rosin and Talc are dusted on again, etch (Gum Arabic or something stronger if needed) is re applied and buffed in (or stripped). Now we let it cure again for at least 8 hours – preferably overnight.
8. FINALLY, once all of that chemical stuff is done, it’s time to print. Paper is torn down and prepped and Ink is rolled up. Here we use a leather roller and some very stiff black ink. This stuff is so stiff I would probably have thrown it out not realizing it was still usable. Lithography uses the thinest film of ink of probably any print process and it uses stiffer ink than what would normally be used for letterpress or any relief process I have worked with.
Two dishes are prepared with a cellulose sponge. One with water and a splash of ‘junk gum’ (gum that has varying amounts of acid in it) are use to wet the stone. This slightly acidic mixture helps stabilize the stone (or keep it stable).
Now we set up our press. This Krause press has two stops one on the side of the bed to set the starting point and a screw towards the end of the bed to set the stop point.
I set a piece of newsprint over the stone and adjusted by sight. The scraper bar should be smaller than the stone to prevent grooves from forming in the leather.
The pressure is set by lowering the bar to ‘hand tight’ on the stone. Then the bar is lifted and tightened about 1/4 to a 1/2 turn.
Now that the ink, paper, and press are ready. It’s time to do the final preparation of the stone and start printing.
9. Wash out the ink with solvent, and buff in asphaltum again. This is important because the old ink has probably dried up on the stone.
In the above image I have finished buffing in the asphaltum and now I am wiping away the gum from the stone with a damp sponge. It’s important to keep the stone wet. If it gets dry ink will go all over the place.
The stone is inked up using multiple passes.
Basically: Charge Roller, Damp Wipe Stone, Ink, Wipe away Scum and repeat as many times as necessary. The first prints should be light and build up after a few cycles of this. For this image it was a bit dark and only took three cycles of wipe/ink/wipe/ink/wipe/ink.
Make sure to wipe the stone before you print to remove any scummy ink – the stone is a bit too wet below, but you get the idea.
Finally, after the stone is inked up, place your paper onto the stone, add three sheets of newsprint, and a sheet of greased tympan.
Bring the press forward until it engages the stop
Bring down the scraper bar onto the stone, engage the handle into the gear, and crank the press until it reaching the pin stop (which you can see as a sort of screw towards the front right of the press bed.
Lift the scraper bar, pull the bed back towards you and reveal your print.
You can see the paper has take up a lot of the water. Re-wipe the stone with your damp sponge. At this point you just repeat the inking and printing process. You adjust for images that are too light or too dark by adding more inking cycles or removing inking cycles. You can also roll faster to make the image lighter as it deposits less ink, or roll slower to lay down more ink and darken the image.
Here is the edition I was able to get in down in about two hours from setup to printing. If your image begins to get too dark, you must stop and re-etch. In either case when you are finished printing, Talc the wet ink, and buff in straight gum. Then cover your stone and put it away until next time.
Here are a few pictures of the finished prints. I printed on all sorts of papers – from lightweight Japanese papers to heavier Reeves BFK.
I’ve over marbled a few and added gold leaf to some others. I’ve also hand colored a few in watercolor and with gold pigments. The thing I really love about lithography is how immediate and genuine the drawing is. It allows you to make a base image and try so many different things with it until you find just the right iteration.