
So I’ve been working on a bit of paper marbling and wanted to put a tutorial together for anyone interested in getting started in some Ebru style paper marbling.
I tried a variety of different types of paper and a few different pigments. I’m also going to offer concise notes on my recipes as I know each marbler does something a little different.
The video is now live, watch a supplementary video tutorial here.
PAPER:
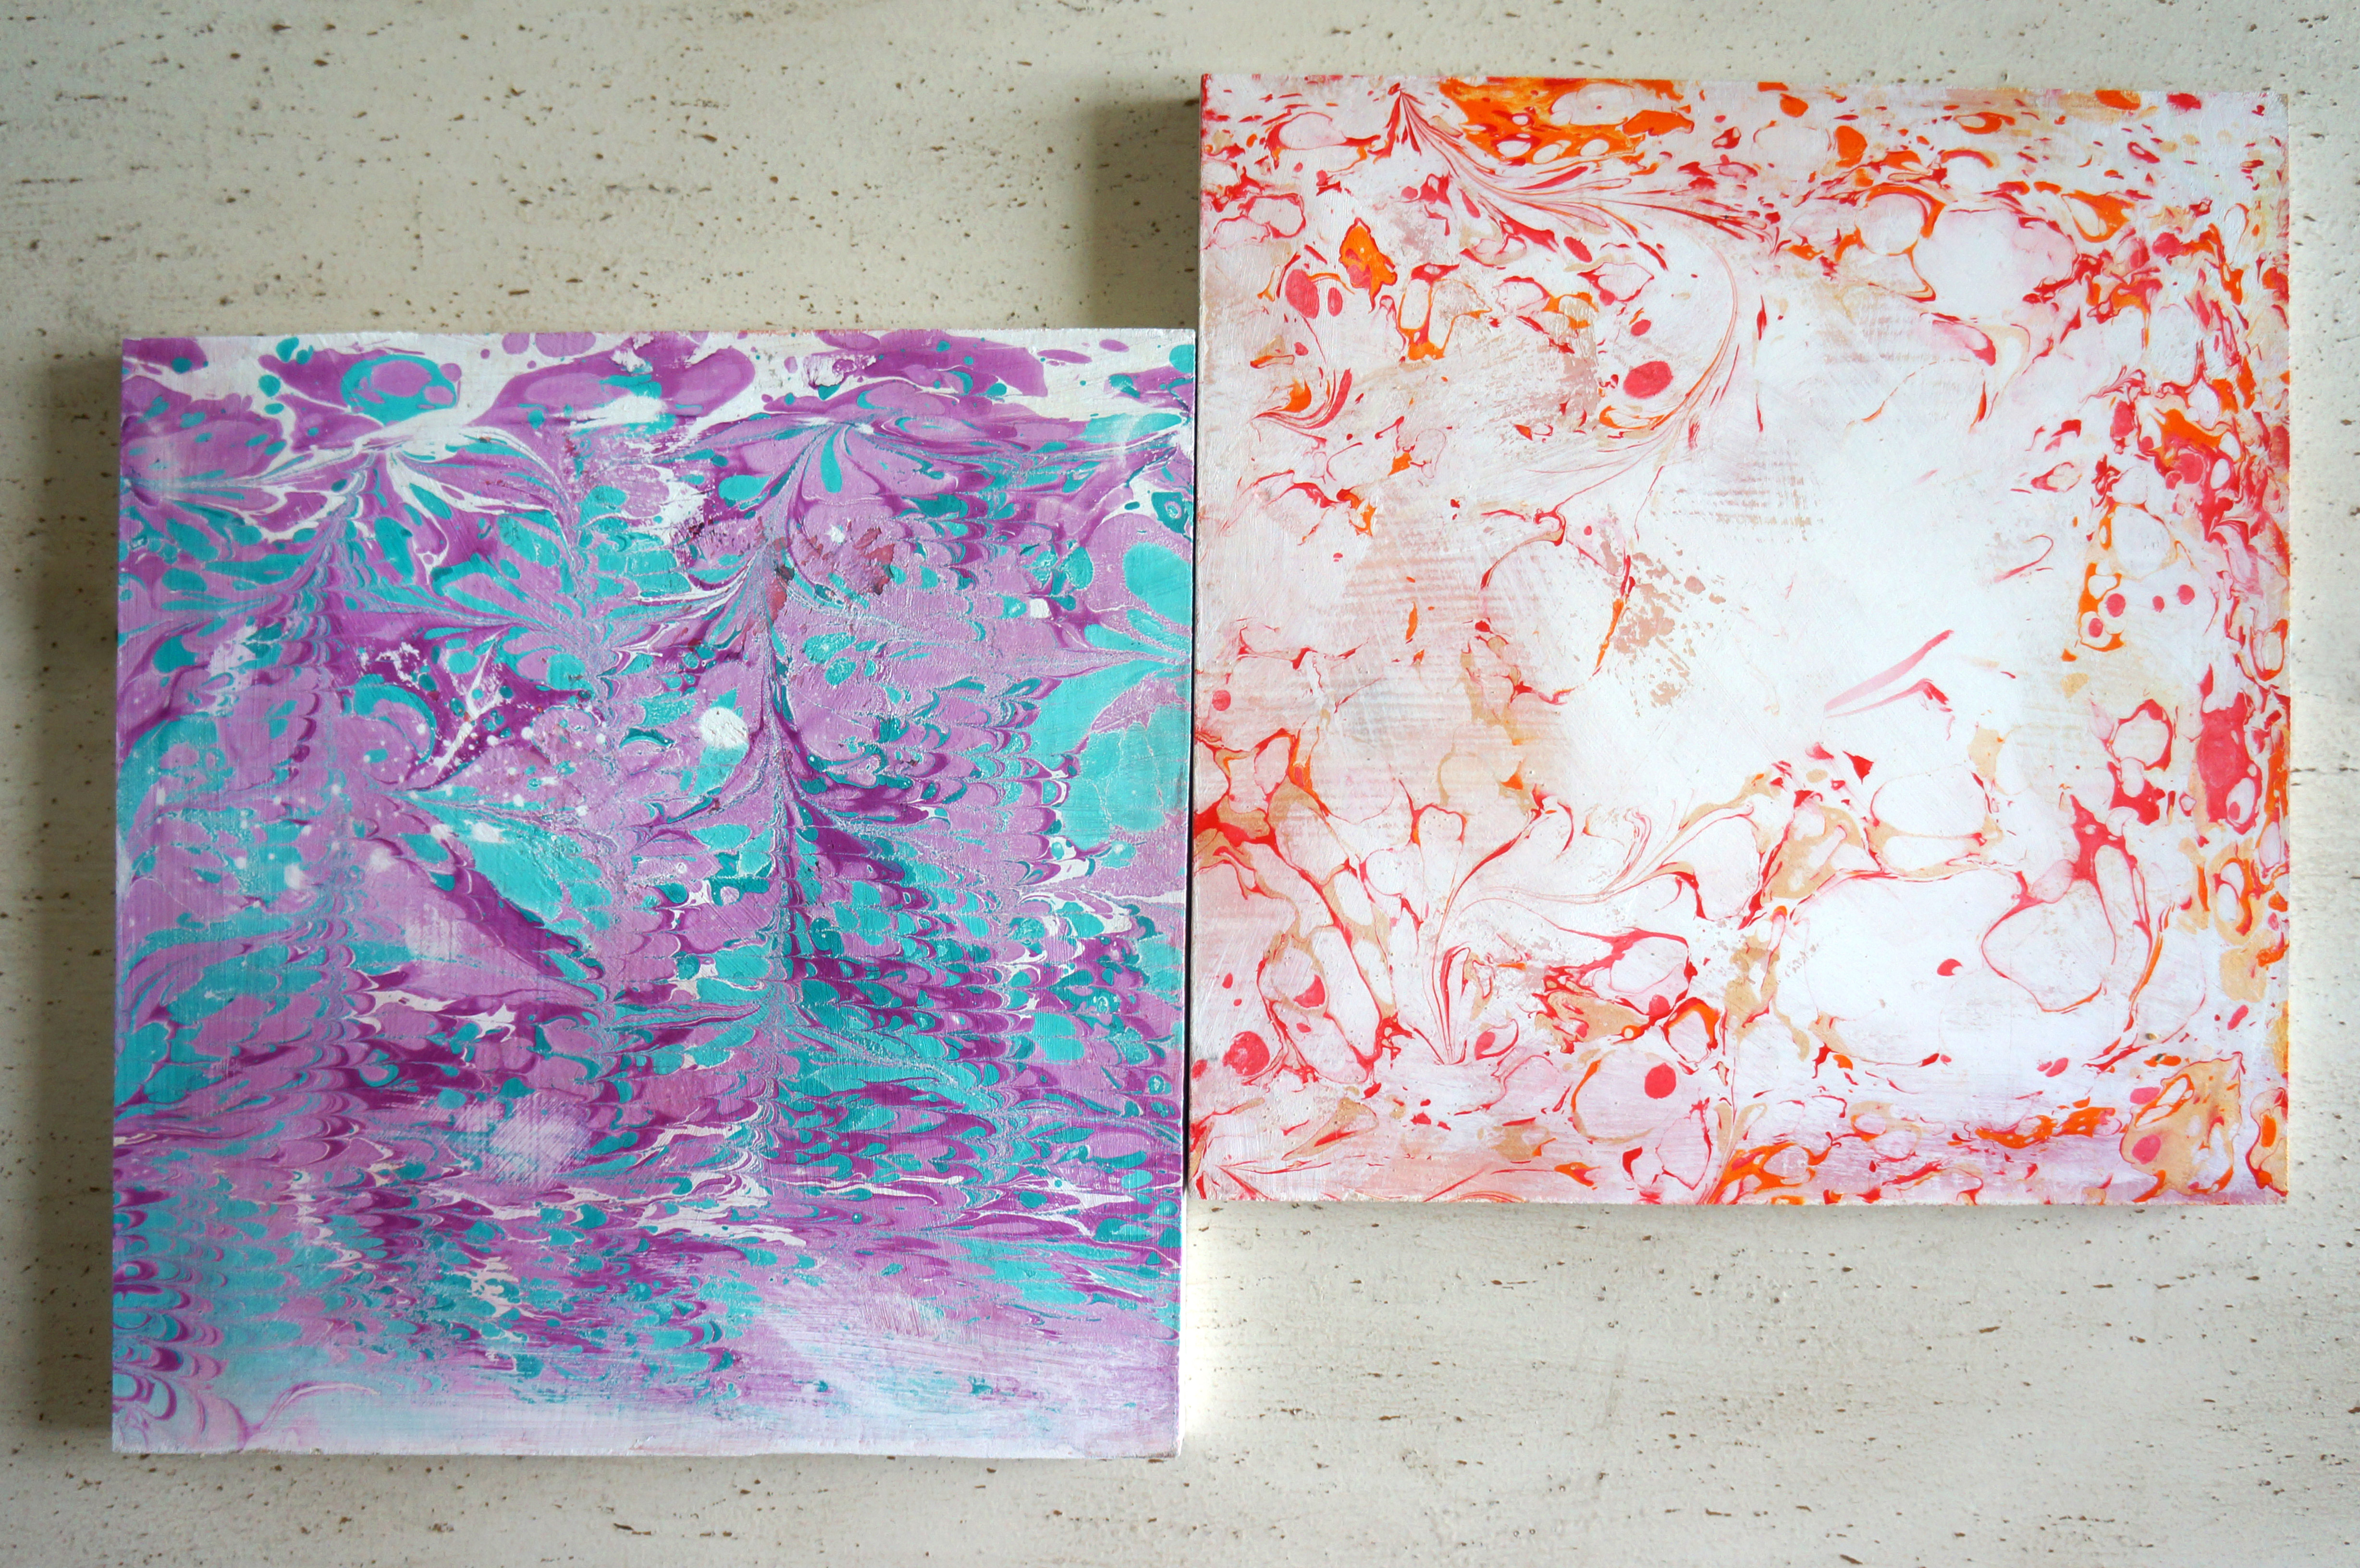
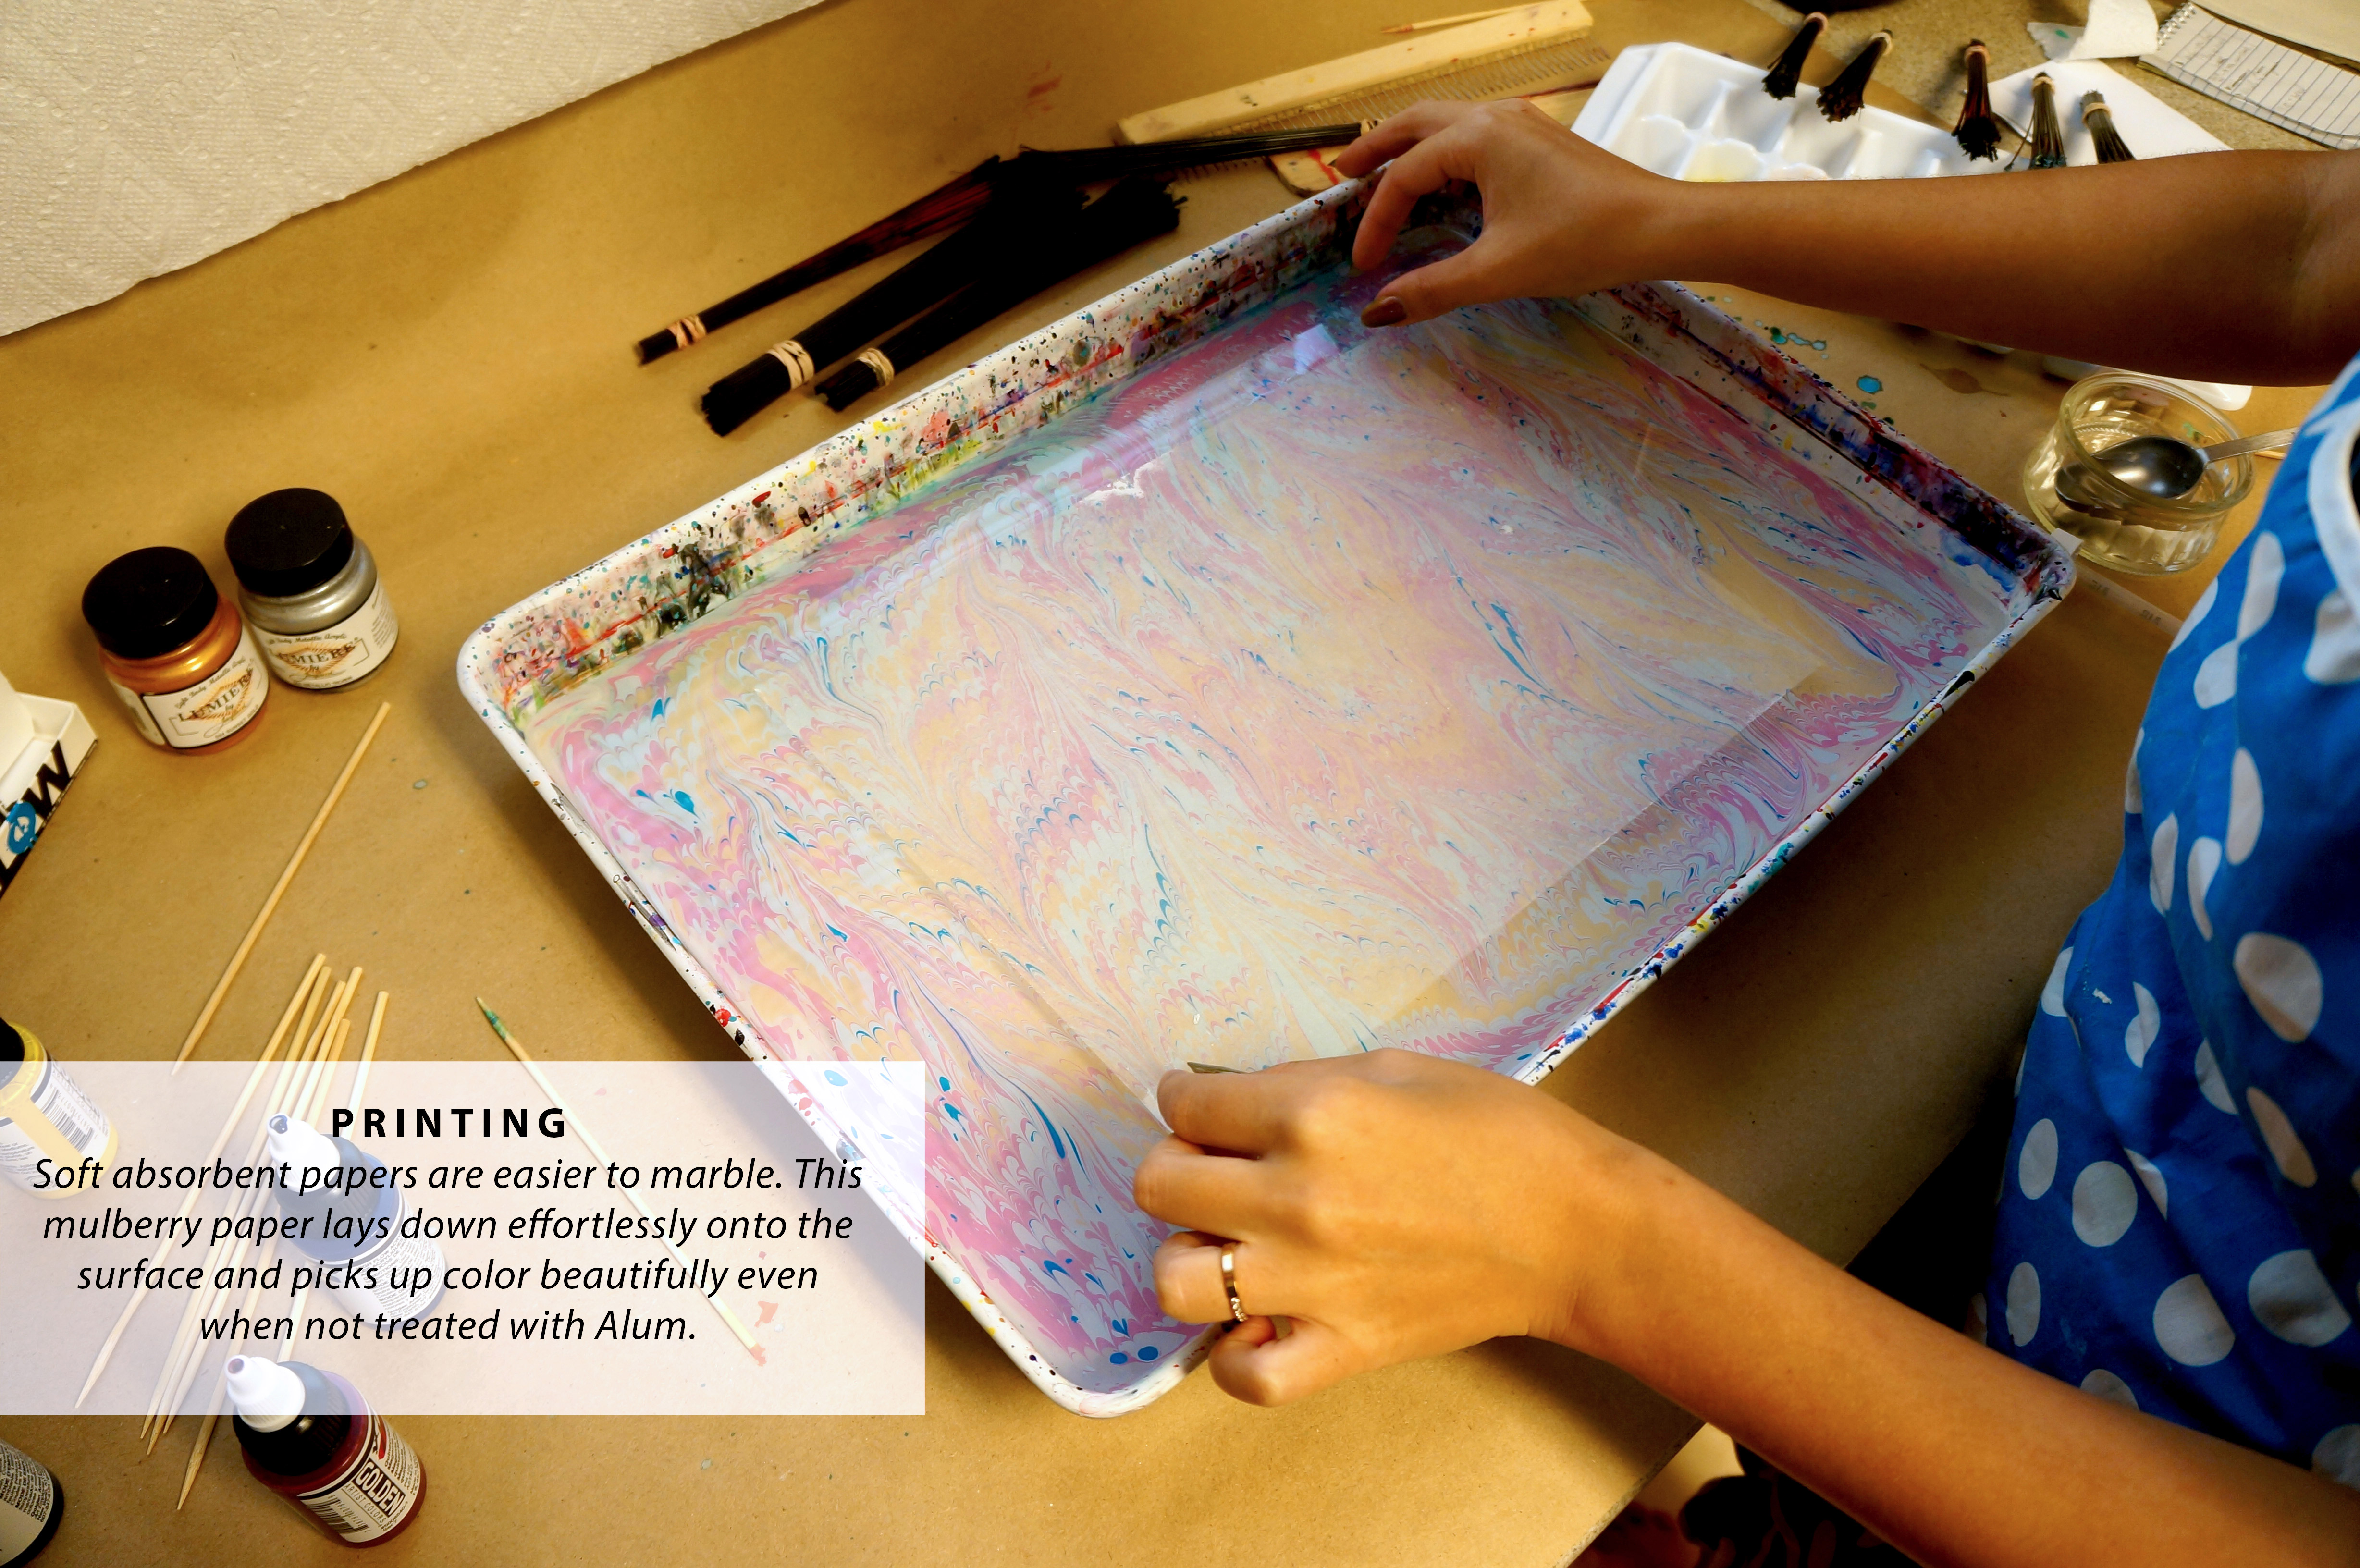
 I found that for me the absolutely best papers to marble were the Japanese papers. They were strong enough to stand up to being wet and they marbled well with and without Alum. I know many marblers use Textoprint and I have used it before but I enjoyed the Mulberry much more. Let’s start backwards with the results, then walk through the process.
Wood Board: Hard to marble. It worked better when I had a super thick (incorrectly mixed) size. The thick size would stick to the board and protect the acrylic as it dried – if you rinse or rub the wood you risk washing off the acrylic but if you let it fully dry it stays perfectly fine. You can see I rinsed or rubed some areas on the purple board – I just wanted to see how easily it came off before it was dry.
I found that for me the absolutely best papers to marble were the Japanese papers. They were strong enough to stand up to being wet and they marbled well with and without Alum. I know many marblers use Textoprint and I have used it before but I enjoyed the Mulberry much more. Let’s start backwards with the results, then walk through the process.
Wood Board: Hard to marble. It worked better when I had a super thick (incorrectly mixed) size. The thick size would stick to the board and protect the acrylic as it dried – if you rinse or rub the wood you risk washing off the acrylic but if you let it fully dry it stays perfectly fine. You can see I rinsed or rubed some areas on the purple board – I just wanted to see how easily it came off before it was dry.
 Drawing Paper/Cardstock: These print fine and are easy to handle as long as you don’t let them wrinkle. Thy really need to be pressed flat.
 Watercolor Paper: I used some basic cold press water color papers as well as some heavy weight stuff I didn’t know the name of. I like how bright the results are on the sized papers, but they are hard to lay down on the size because of how stiff they are. They also tend to wrinkle a bit and need to be flattened.

 Printmaking Paper: I liked this paper a lot although I didn’t print a lot of it. I believe I used Rives BFK. Printmaking papers generally don’t have much size and hold up to getting wet without crazy wrinkling. The lighter fuzzy areas on these papers are due to an issue with my size – and are not the fault of the paper itself.
 Handmade Paper: This is paper I made myself a few years ago. I believe it is cotton paper or Mulberry. It’s very soft and tears super easy when wet so it must be handled carefully. Likewise, it won’t hold up to Alum, but it didn’t need it.

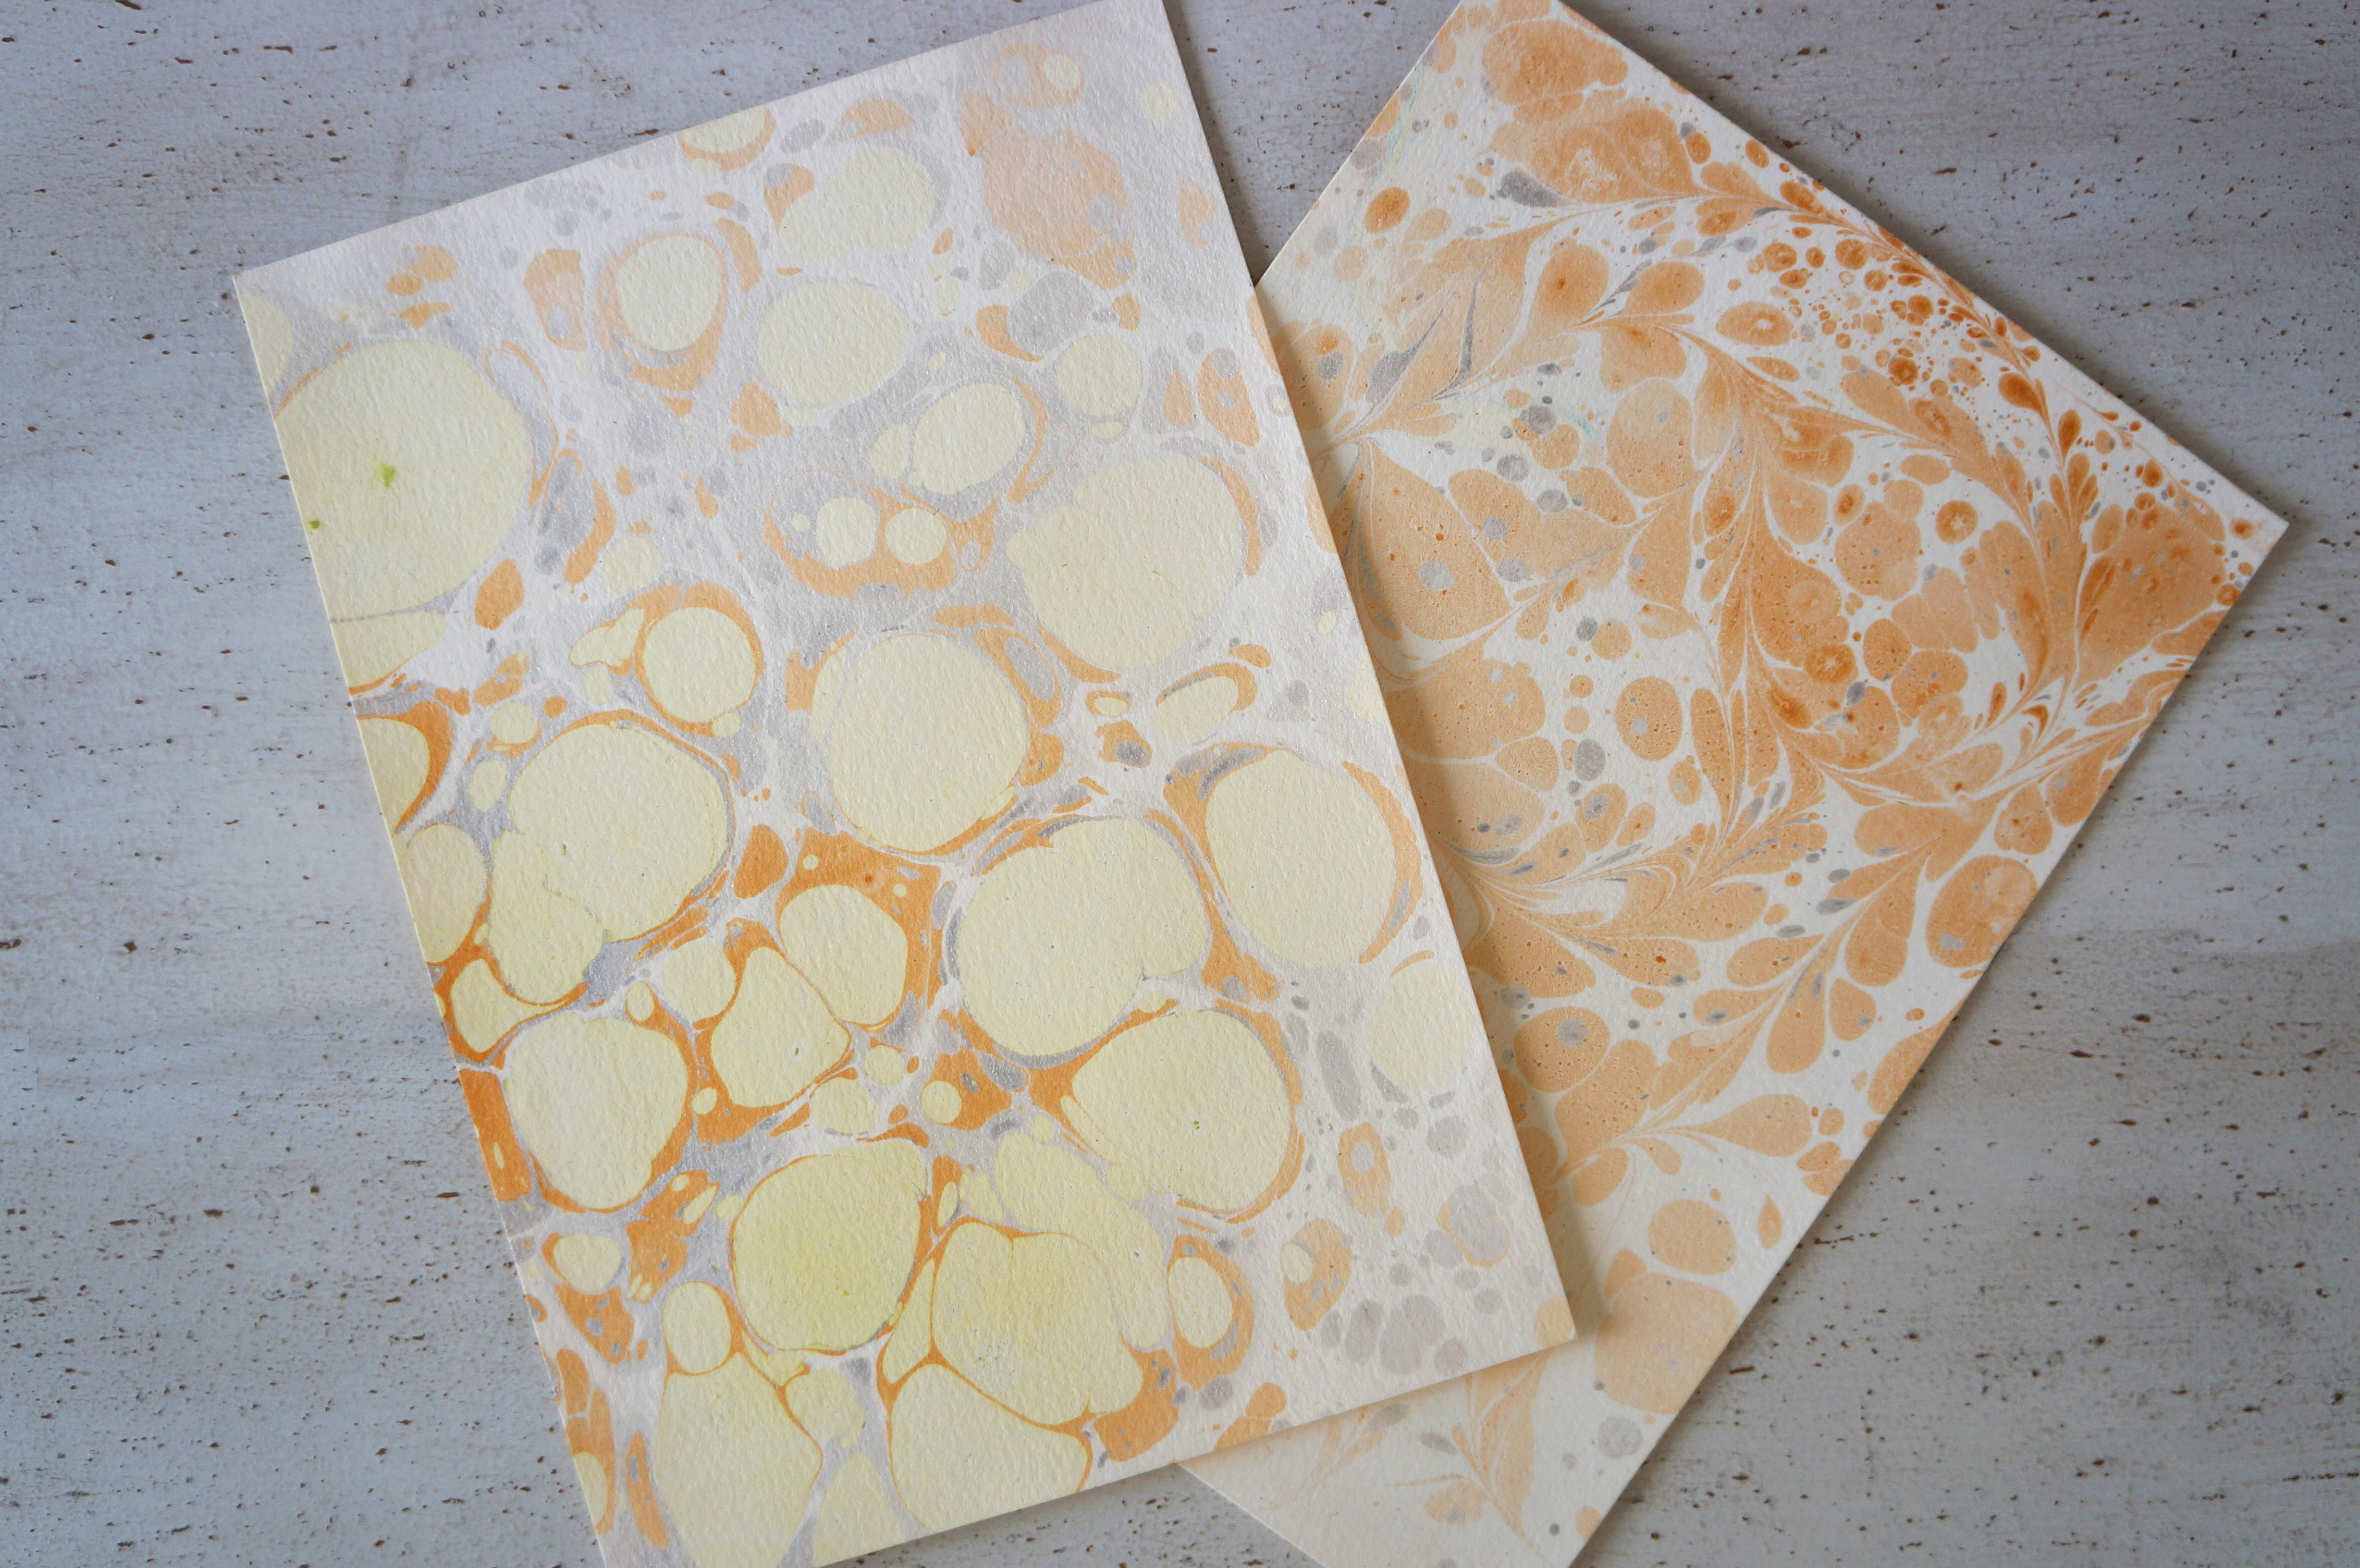
 Mulberry Paper: The best. Affordable, strong, easy to lay down without bubbles or wrinkles and it worked with and without Alum. The only disadvantage was the paper I have isn’t true white, so it’s not quite as bright as say the watercolor paper. This is what I purchased from Amazon.

 MATERIALS:
On to the materials. This was my setup.
MATERIALS:
On to the materials. This was my setup.
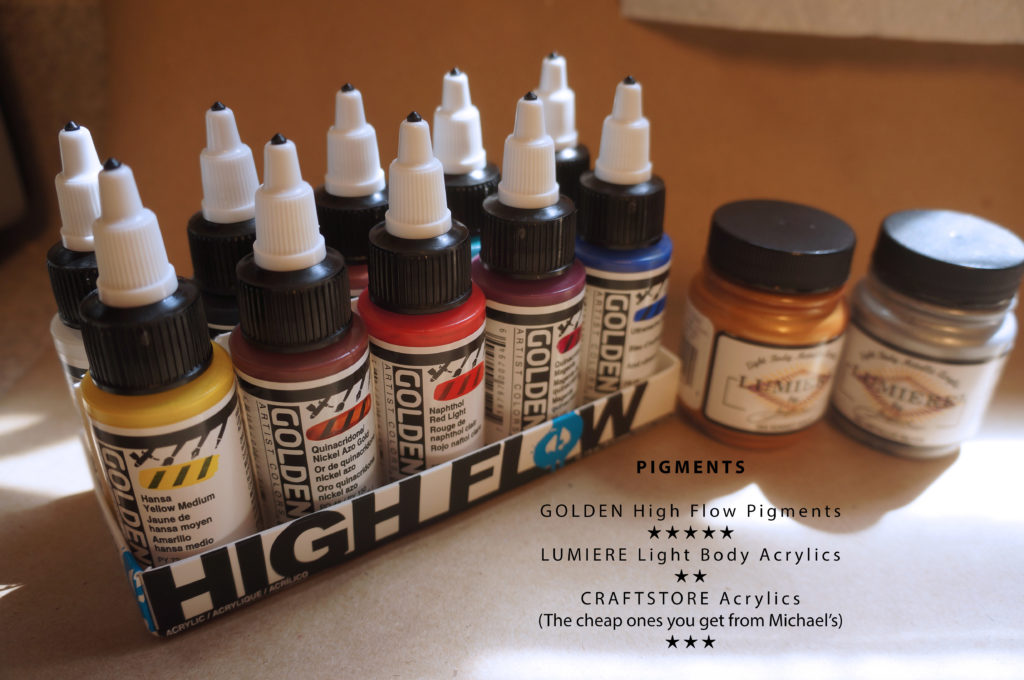
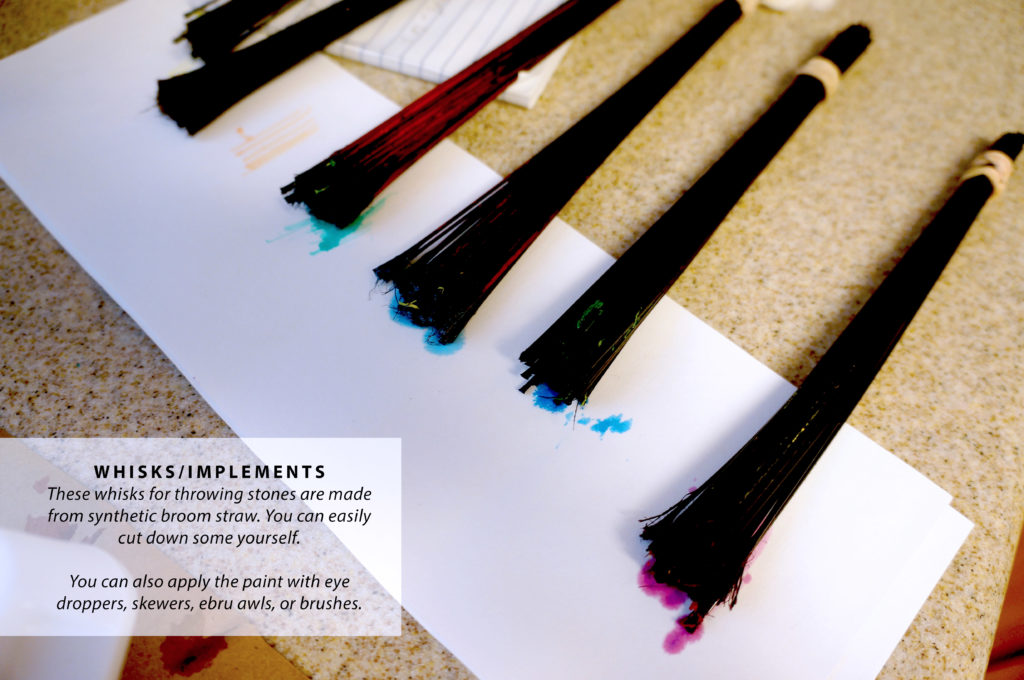
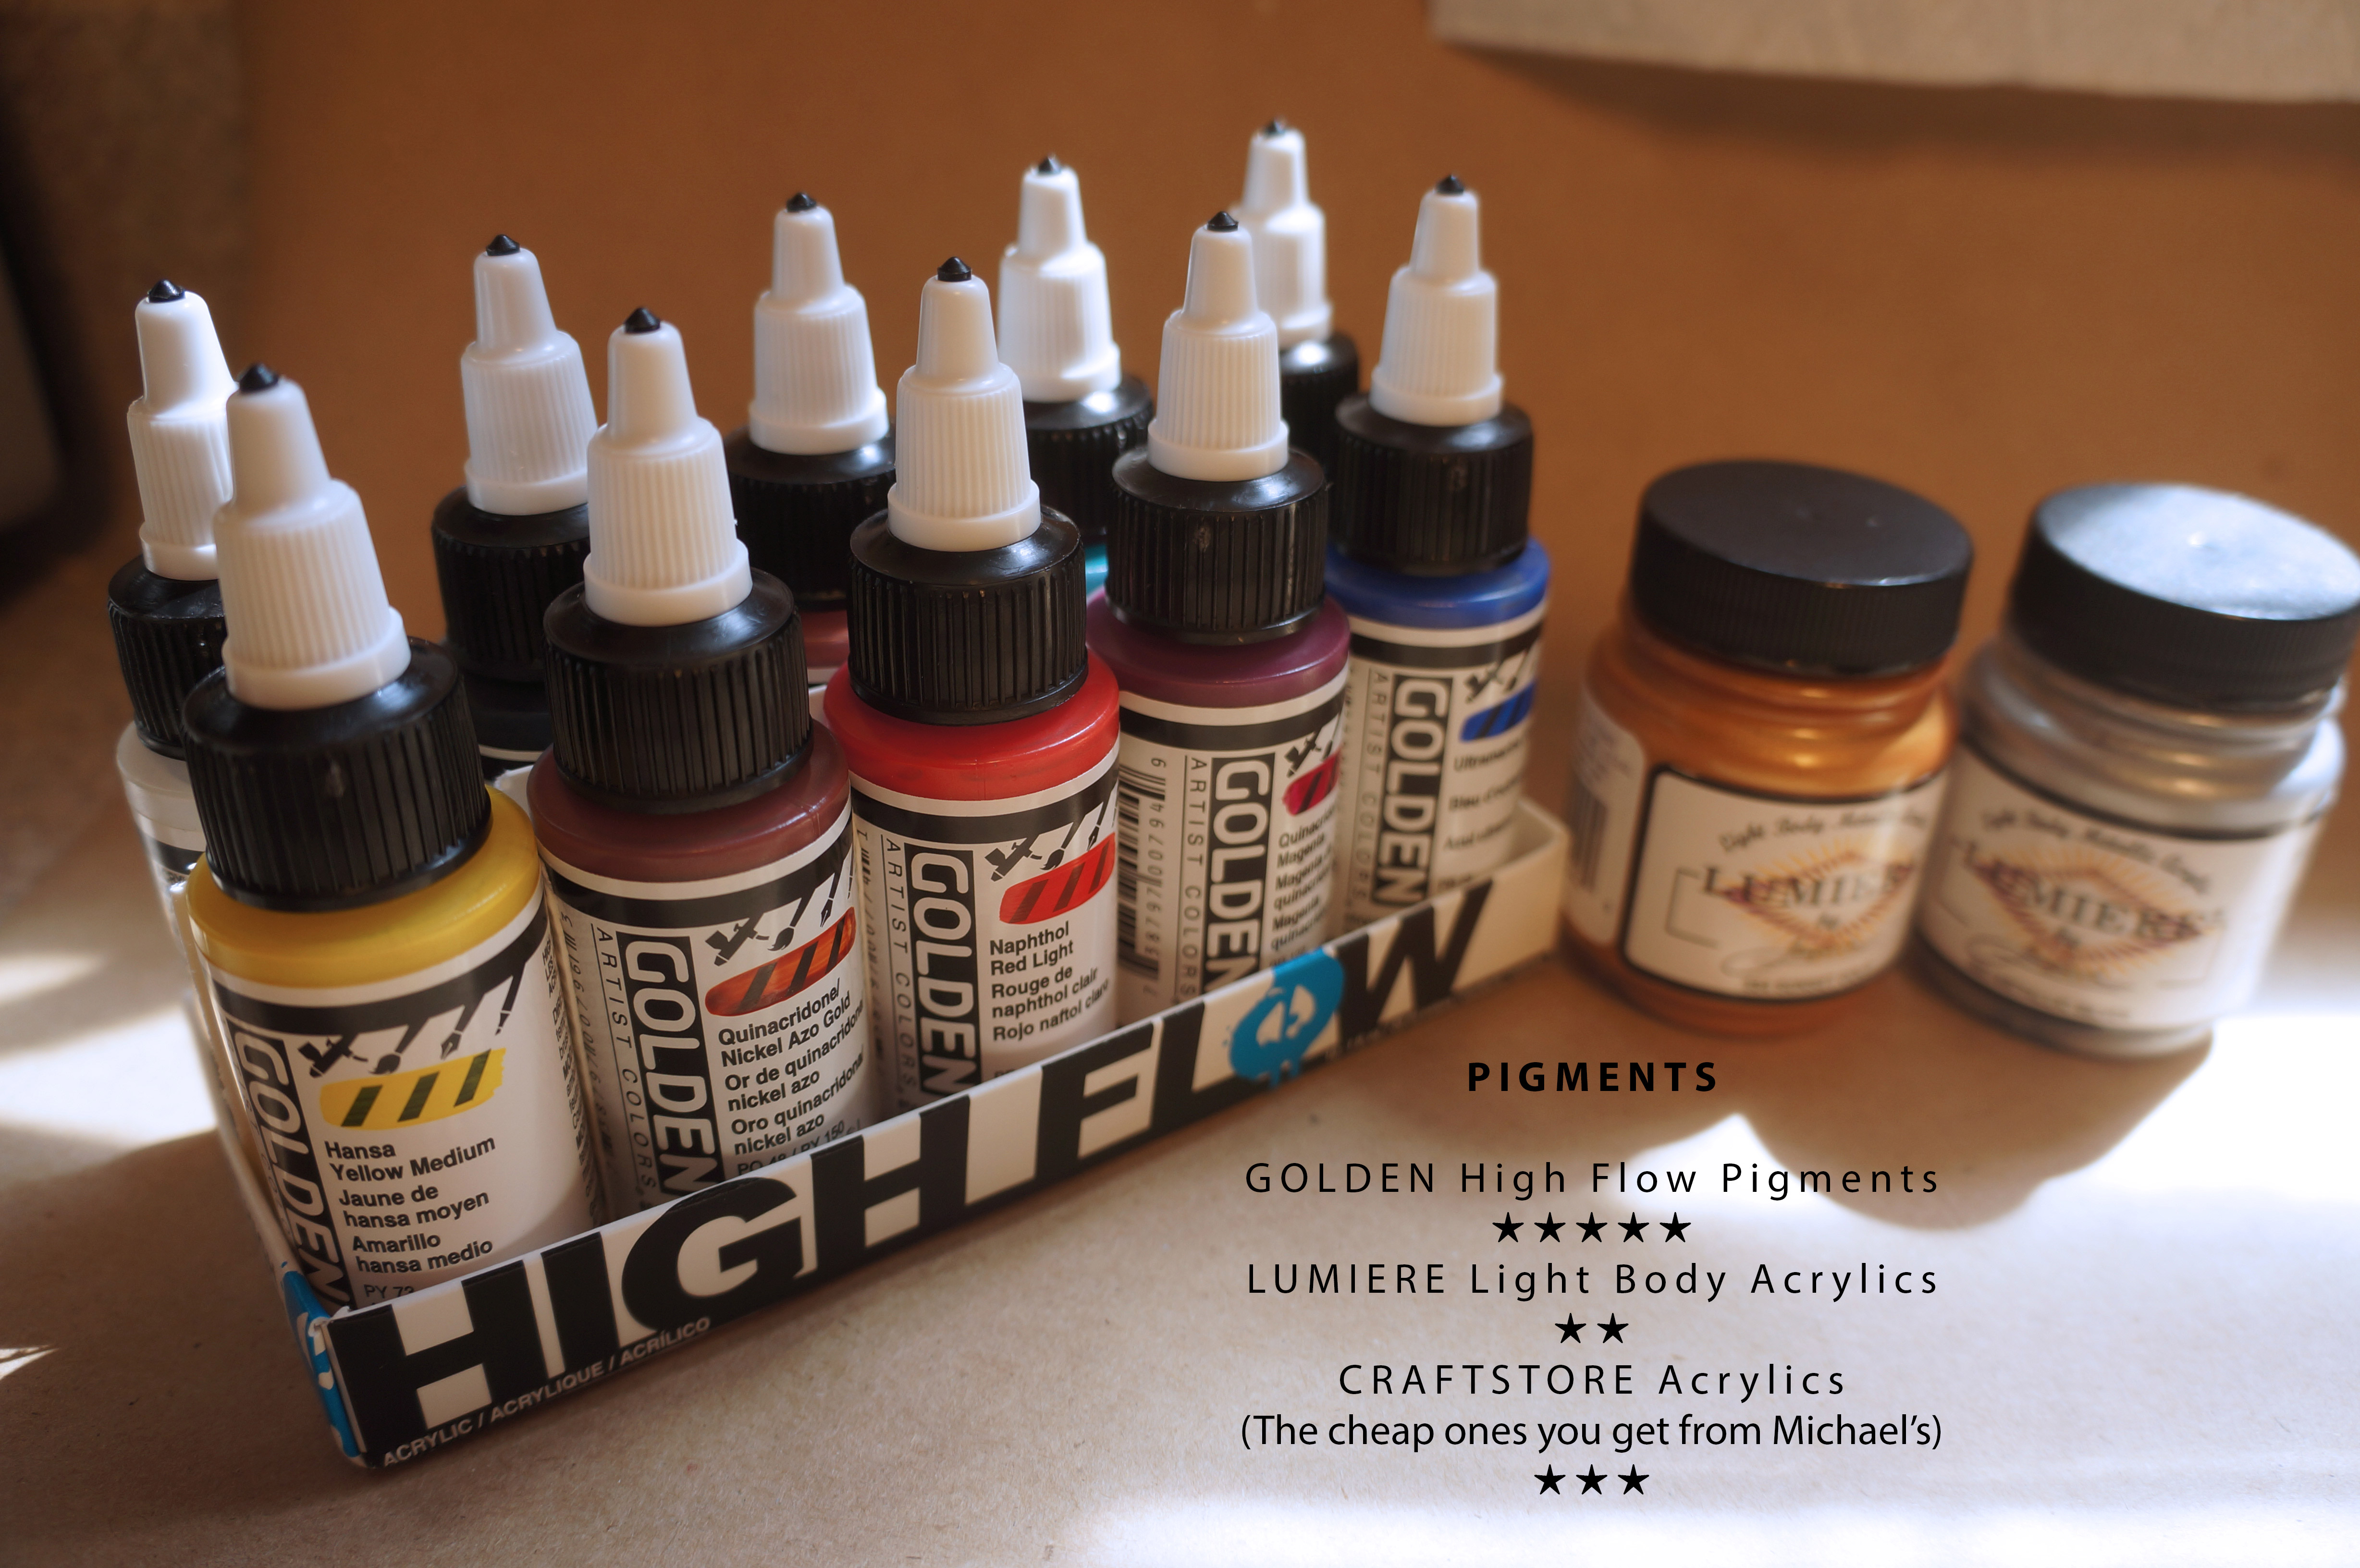
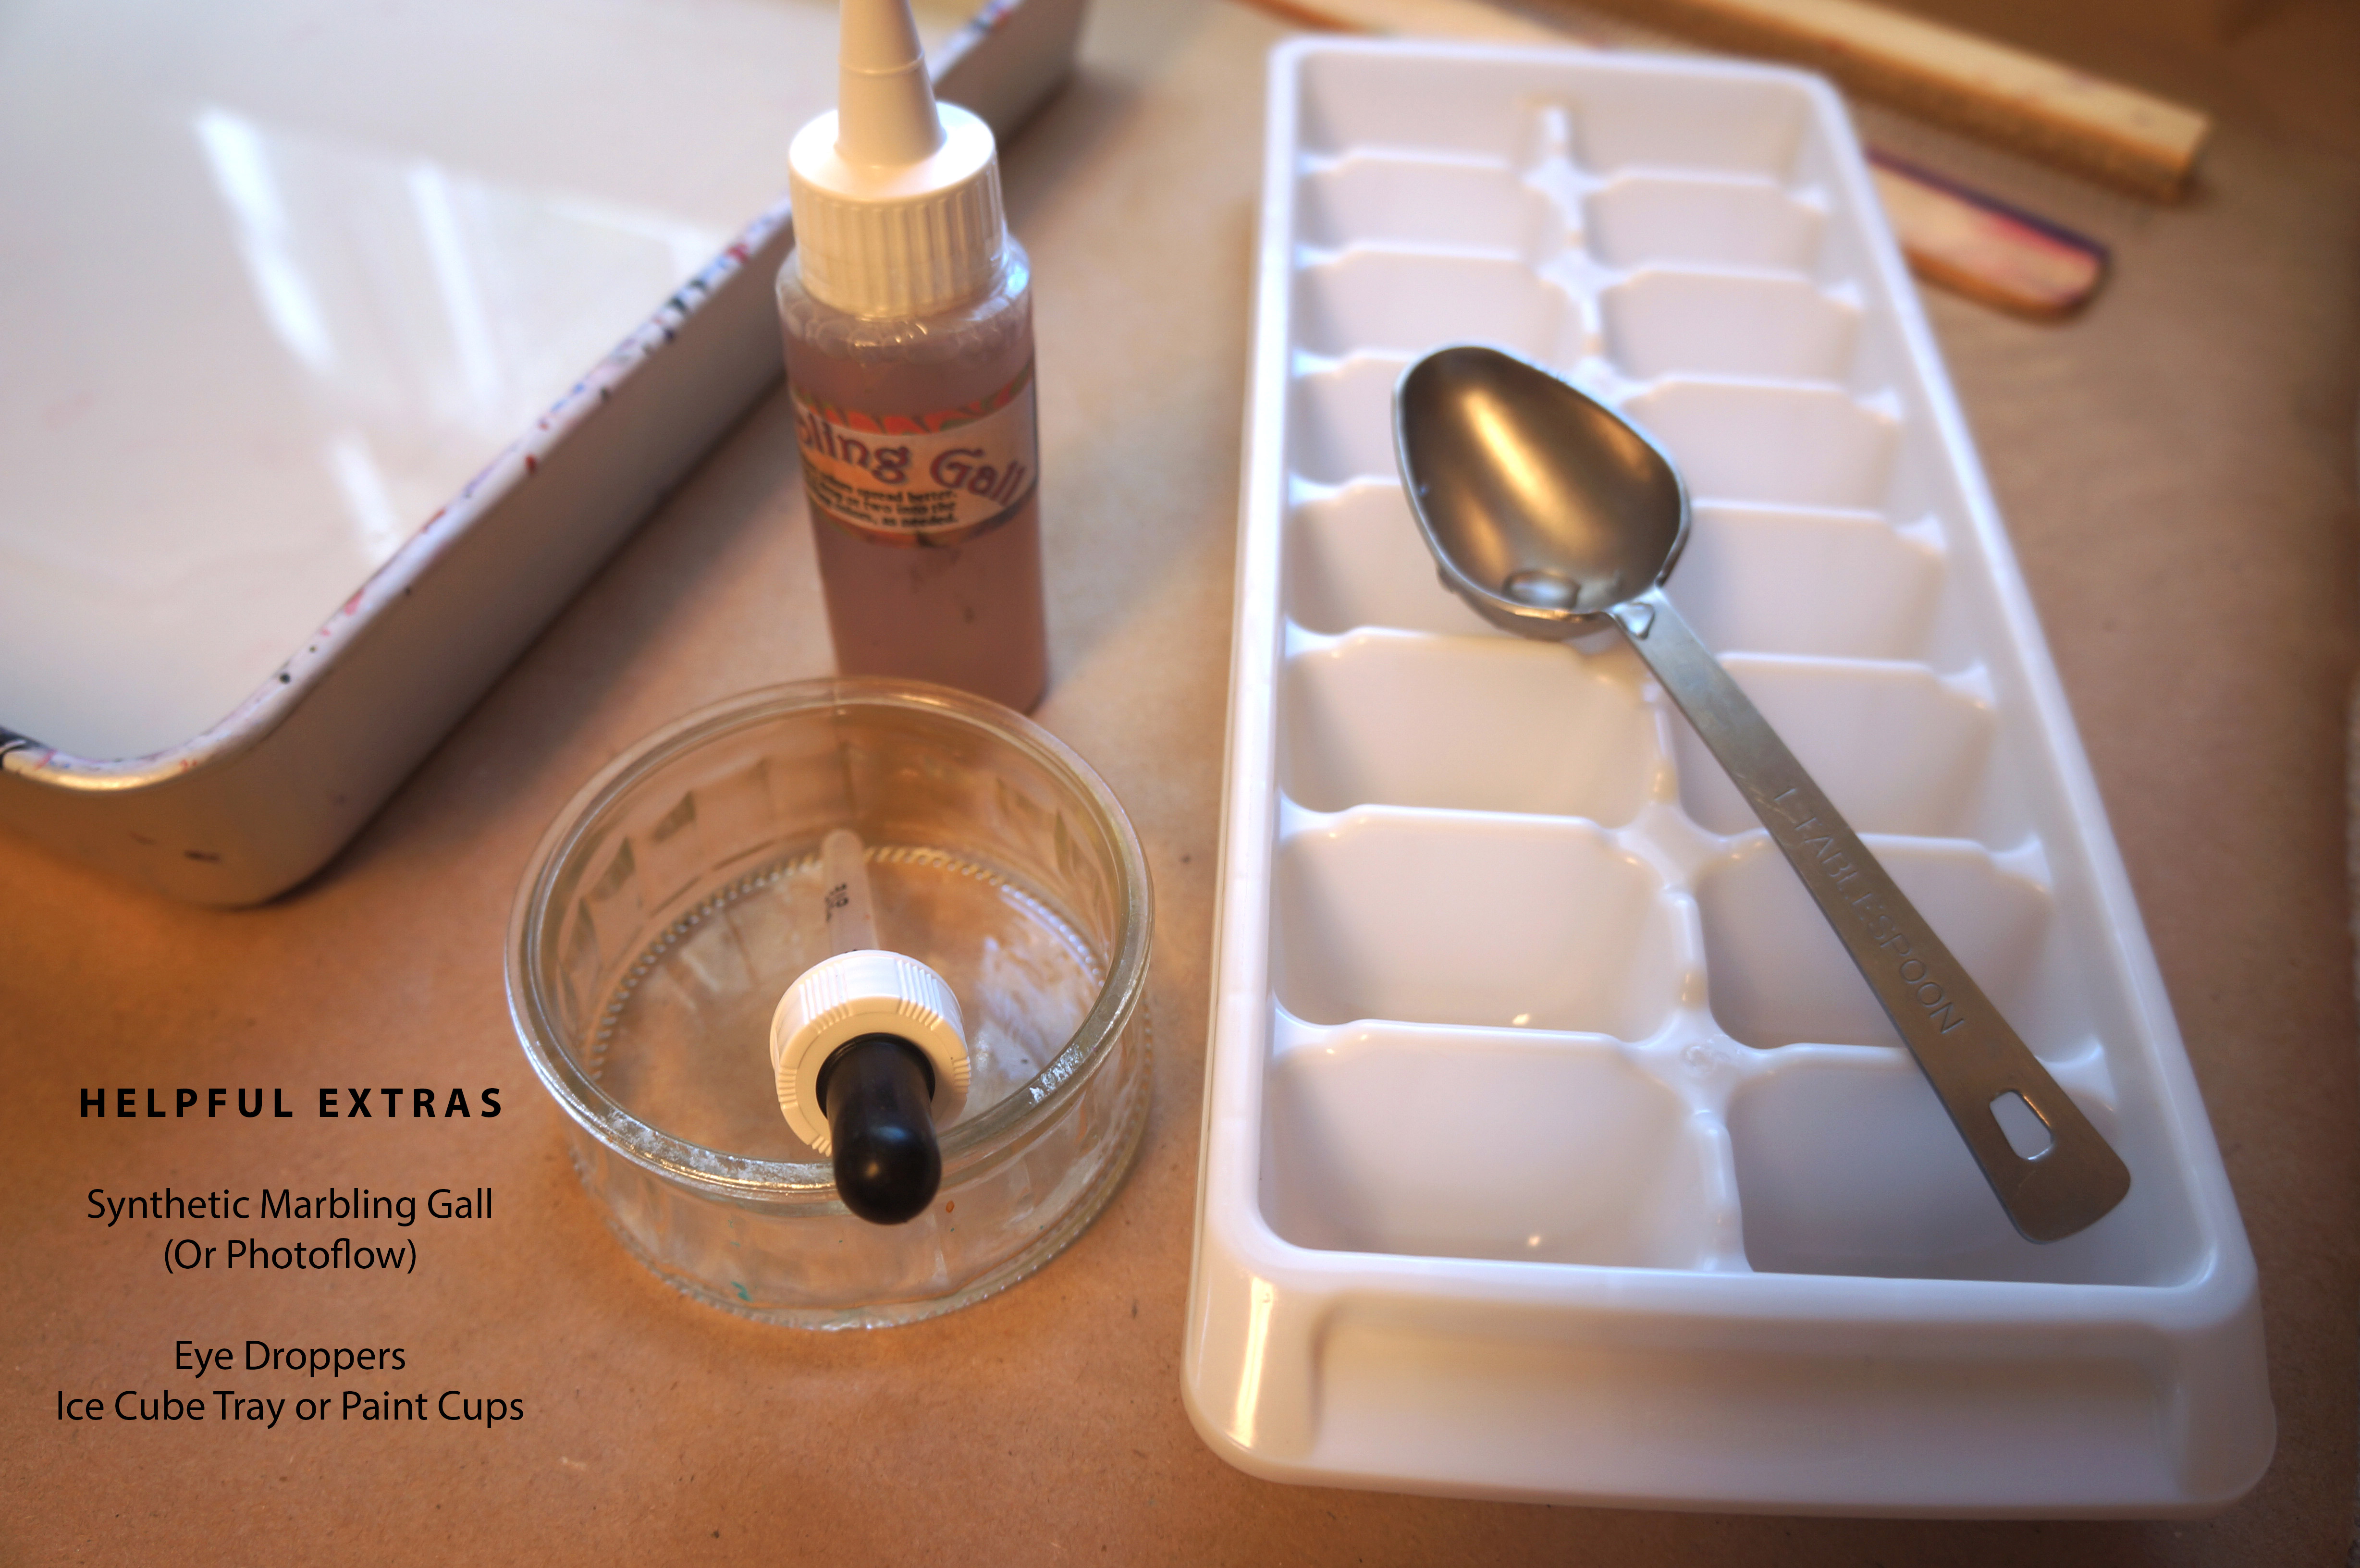
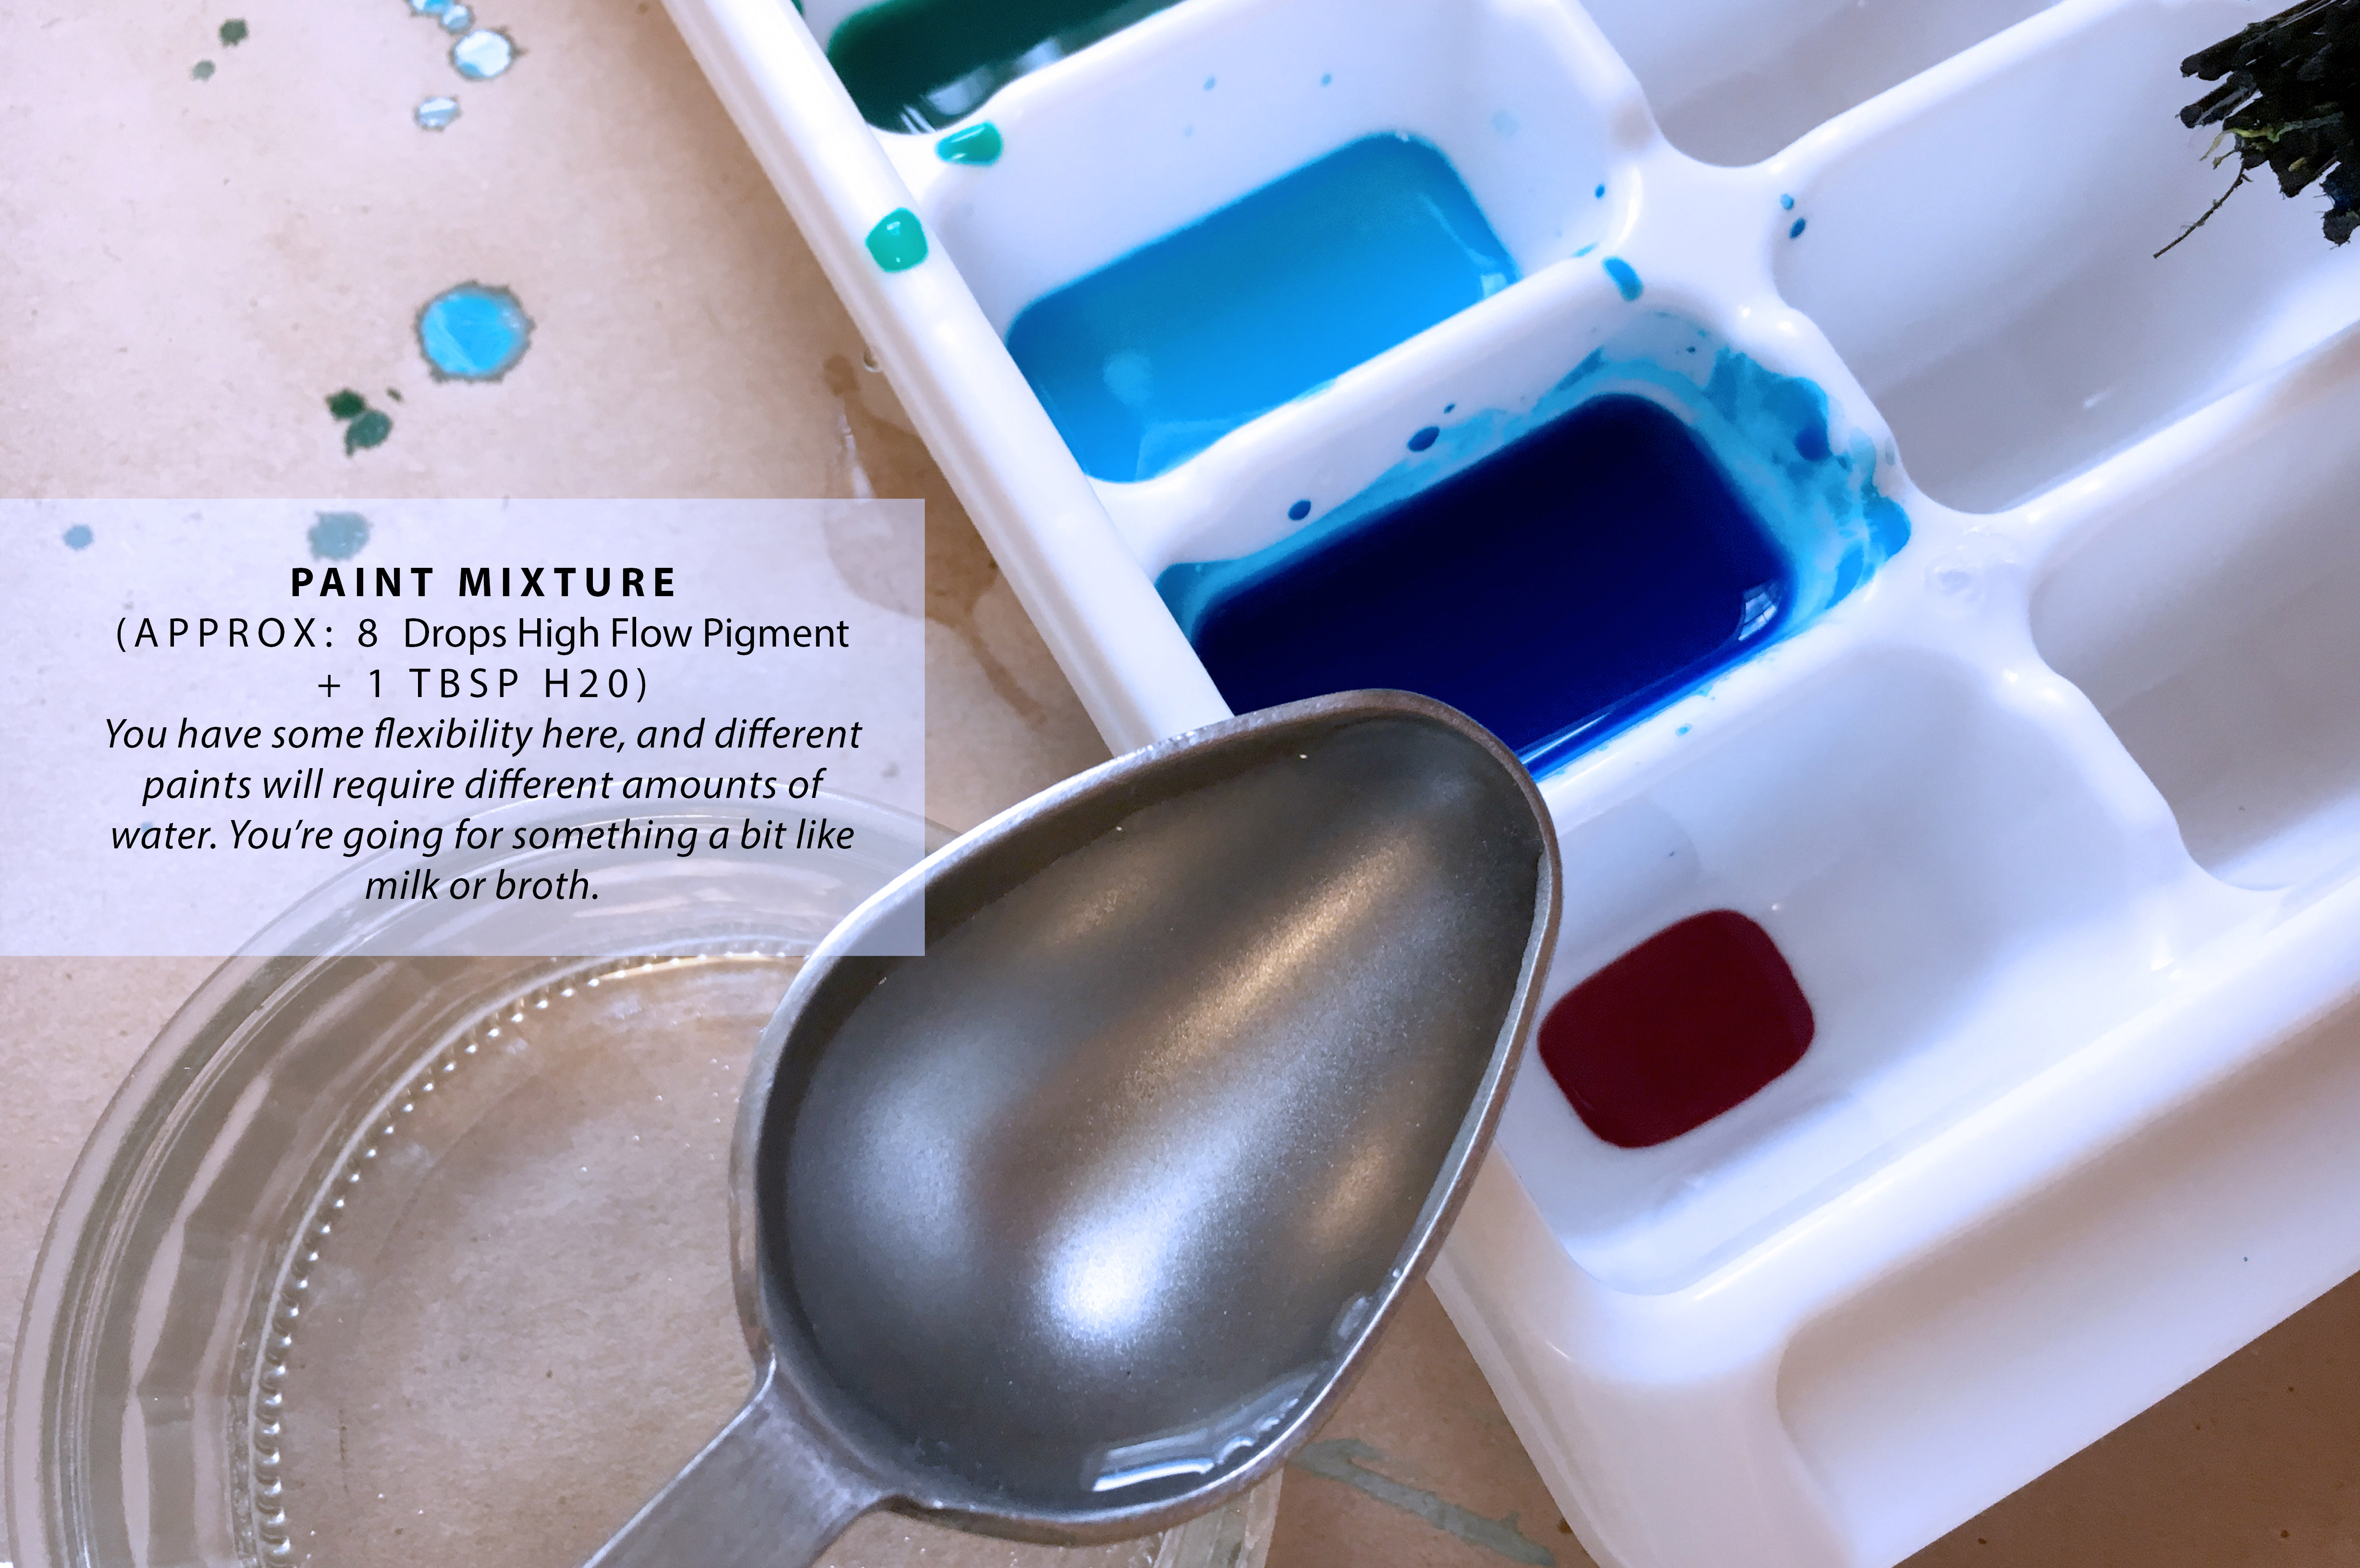
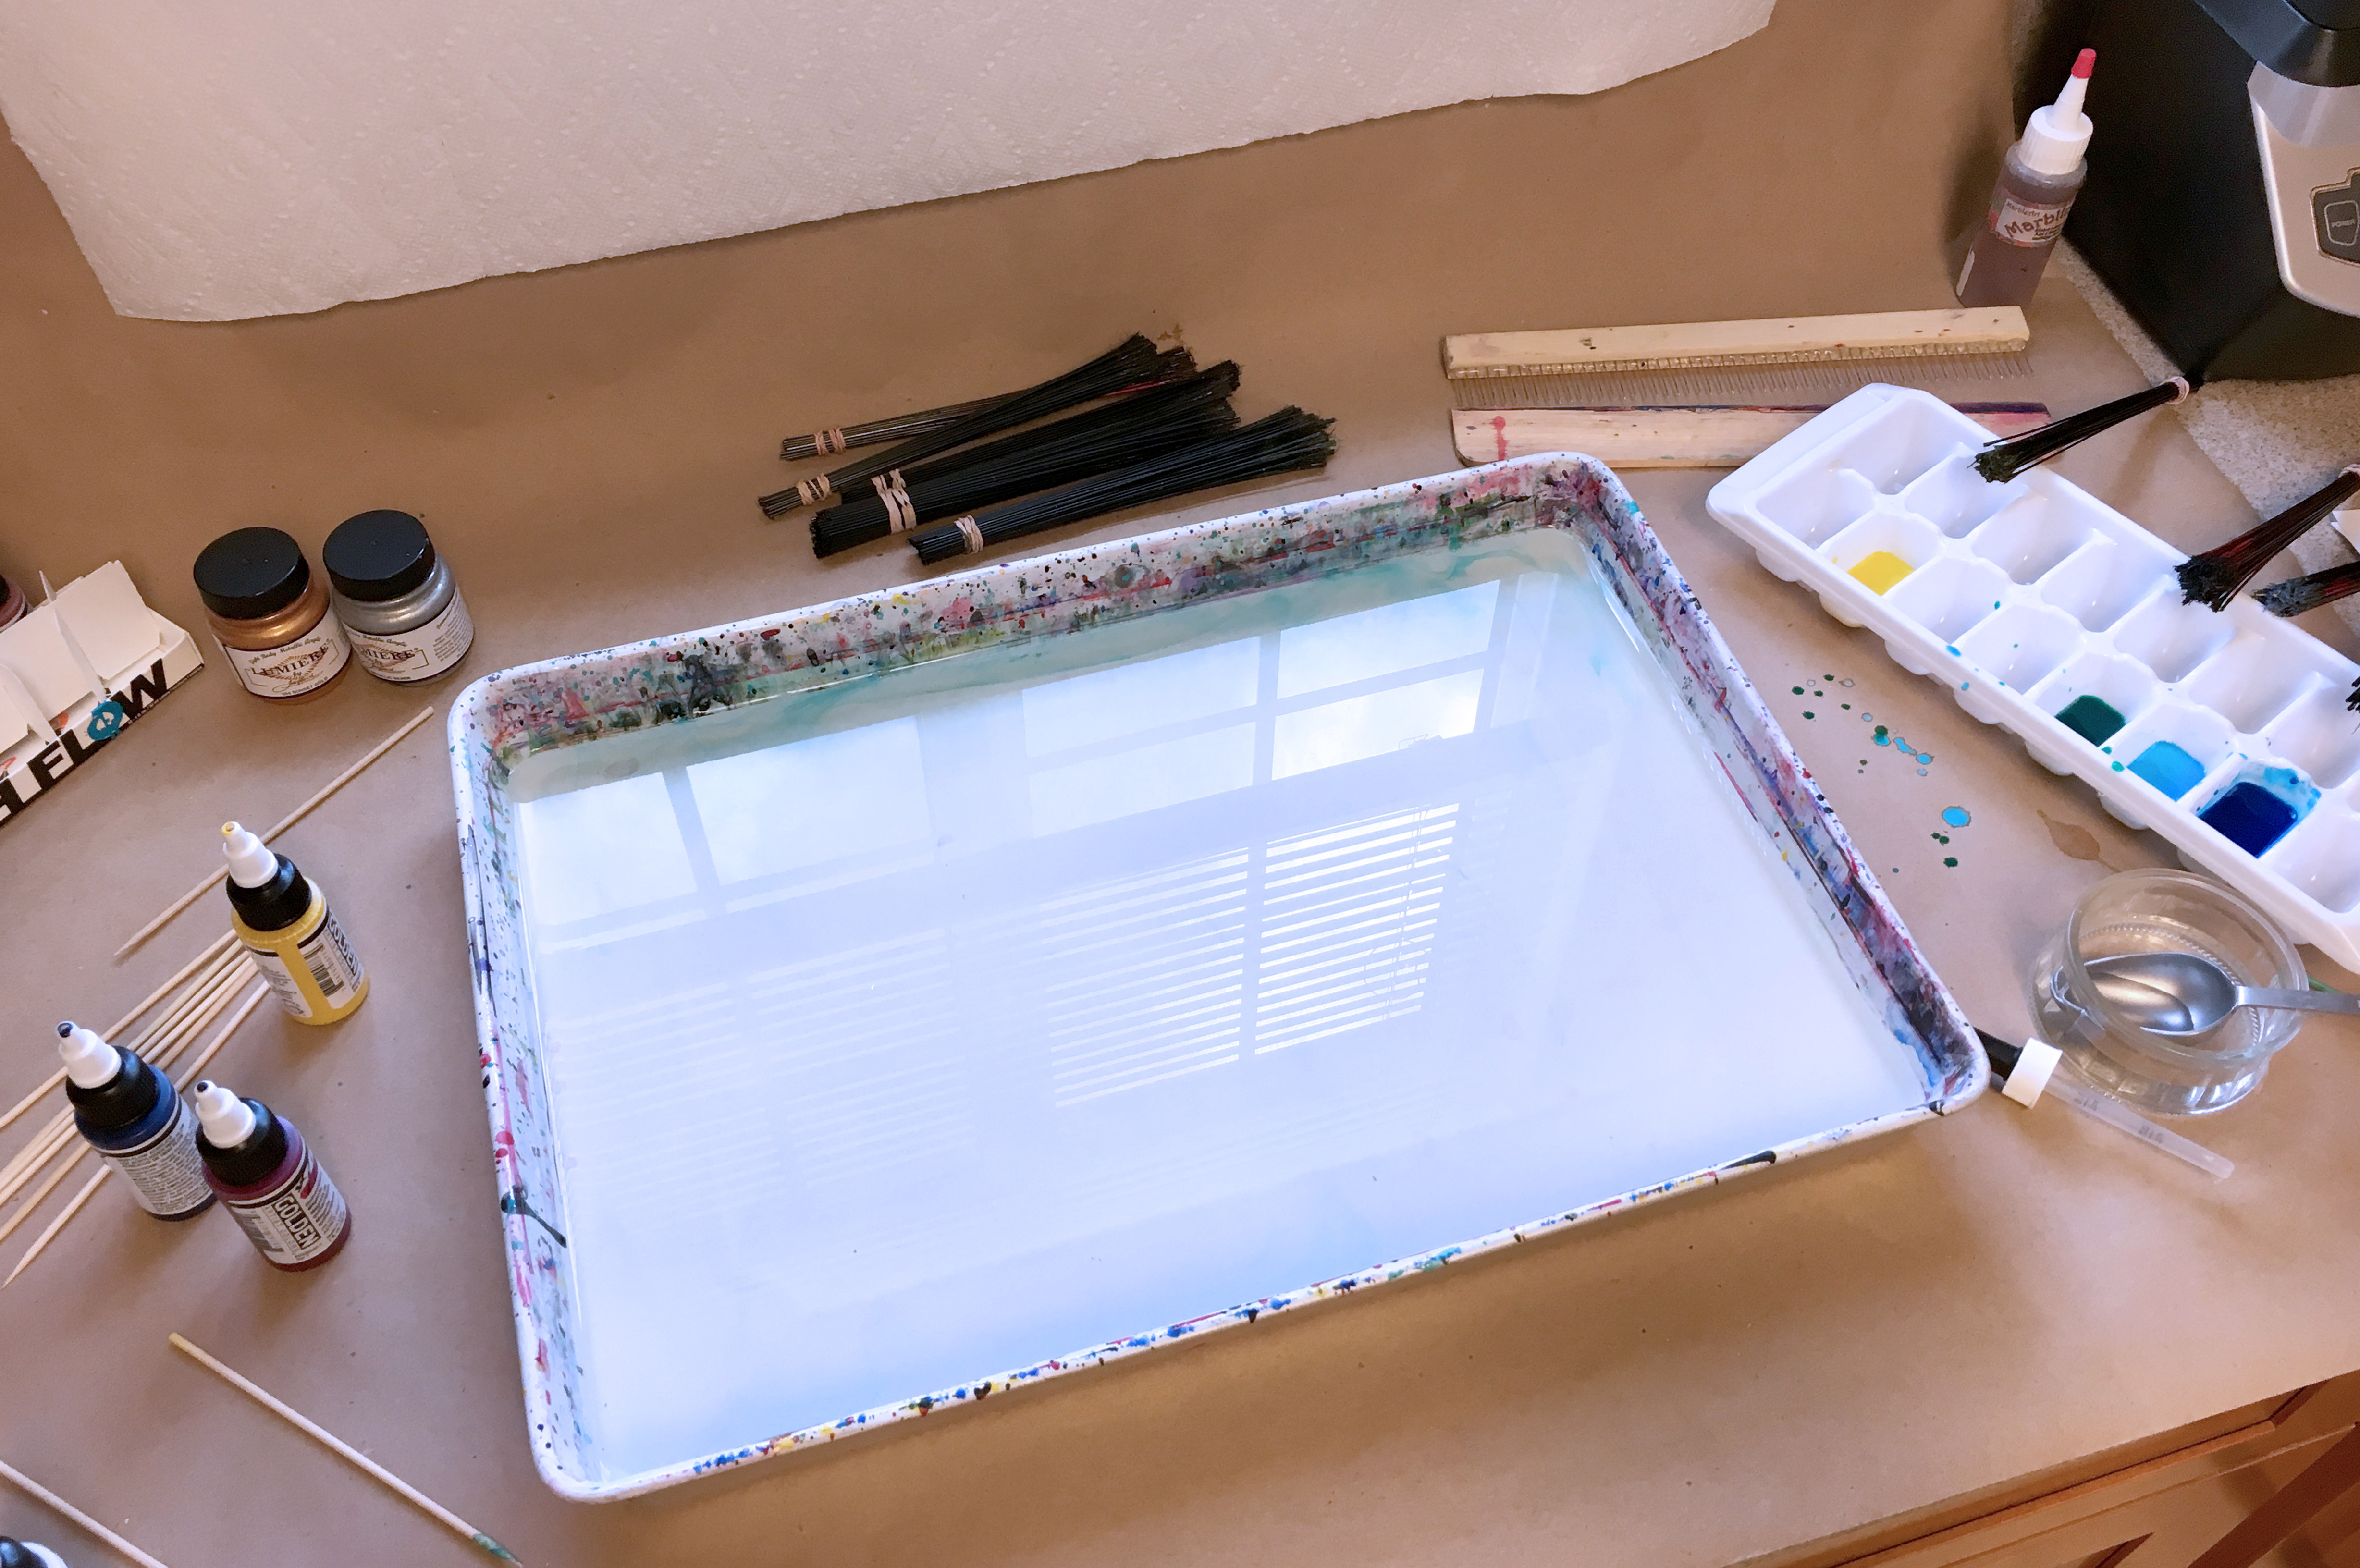 I had a basic baking tray that I spray painted white inside. This sort of helped me see the colors on the size better. I used synthetic broom whisks, an ice cube tray, so combs, skewers and eye droppers as well. For pigments I know many marblers love the High Flow Acrylics made by Golden so that’s what I used as well. These used to be called their airbrush line, but they changed the name because of of how many other uses they have – they’re great for marbling, calligraphy, airbrush, and pour painting.

 STEP ONE:
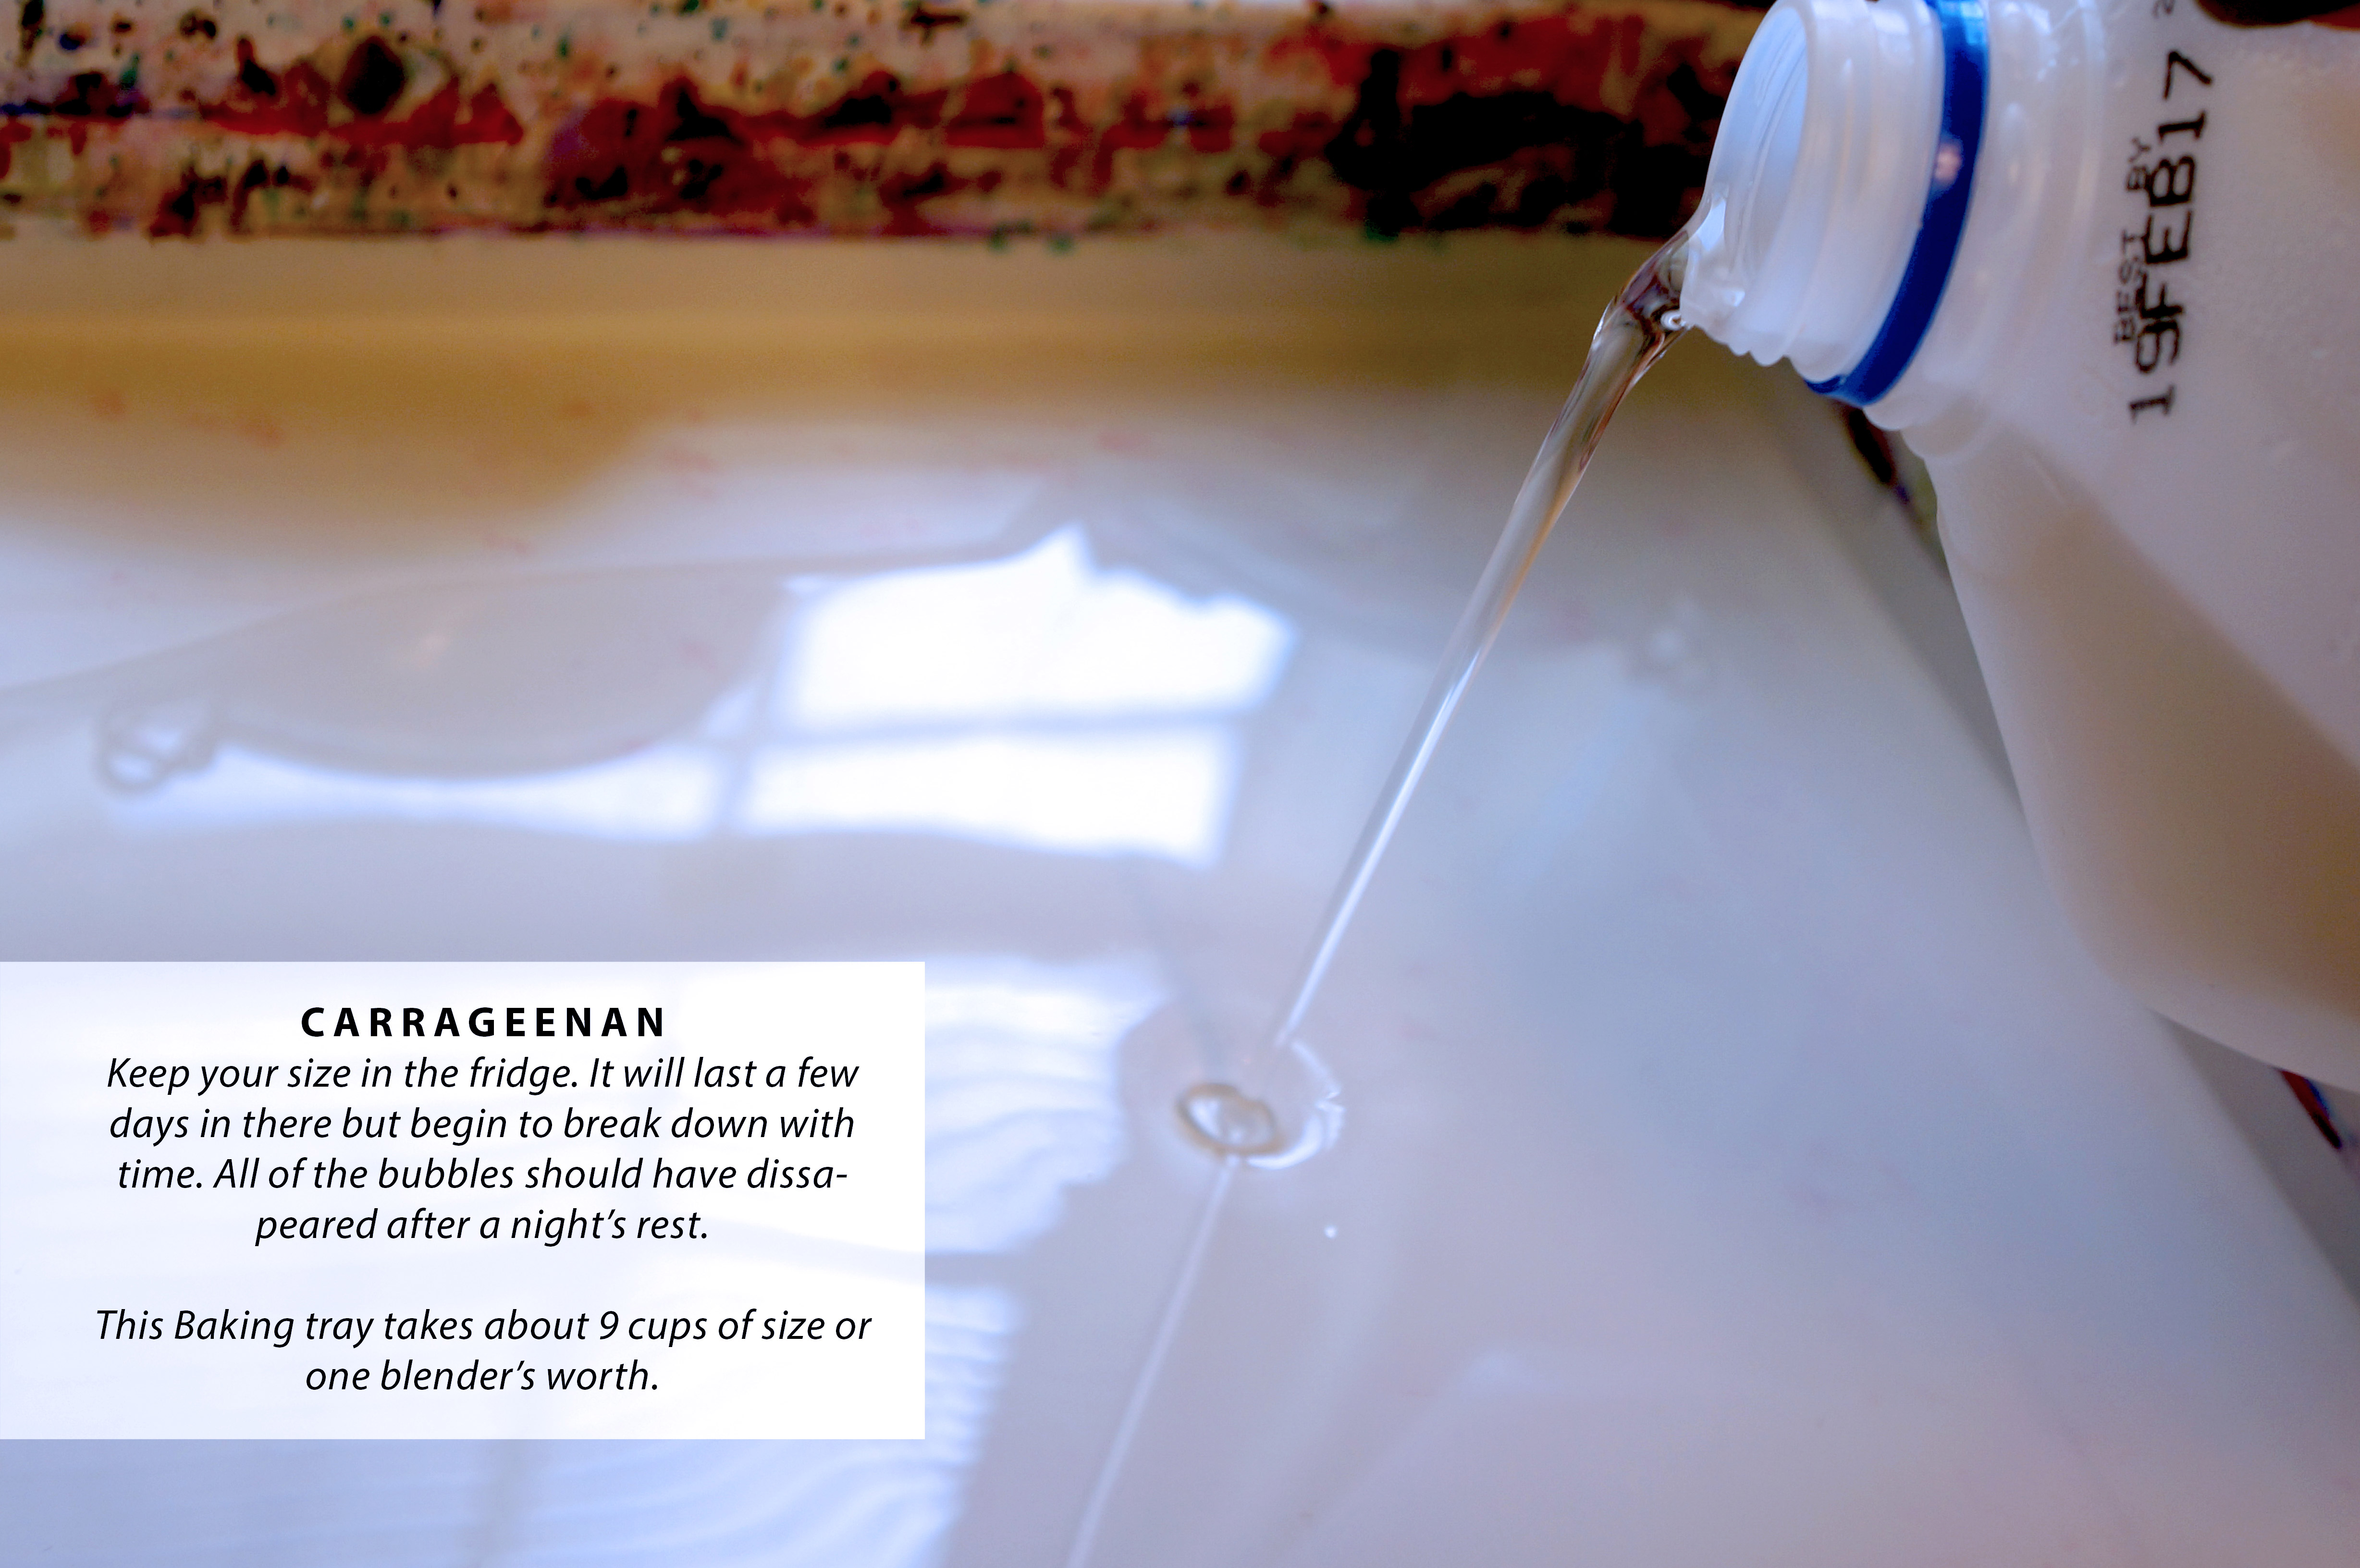
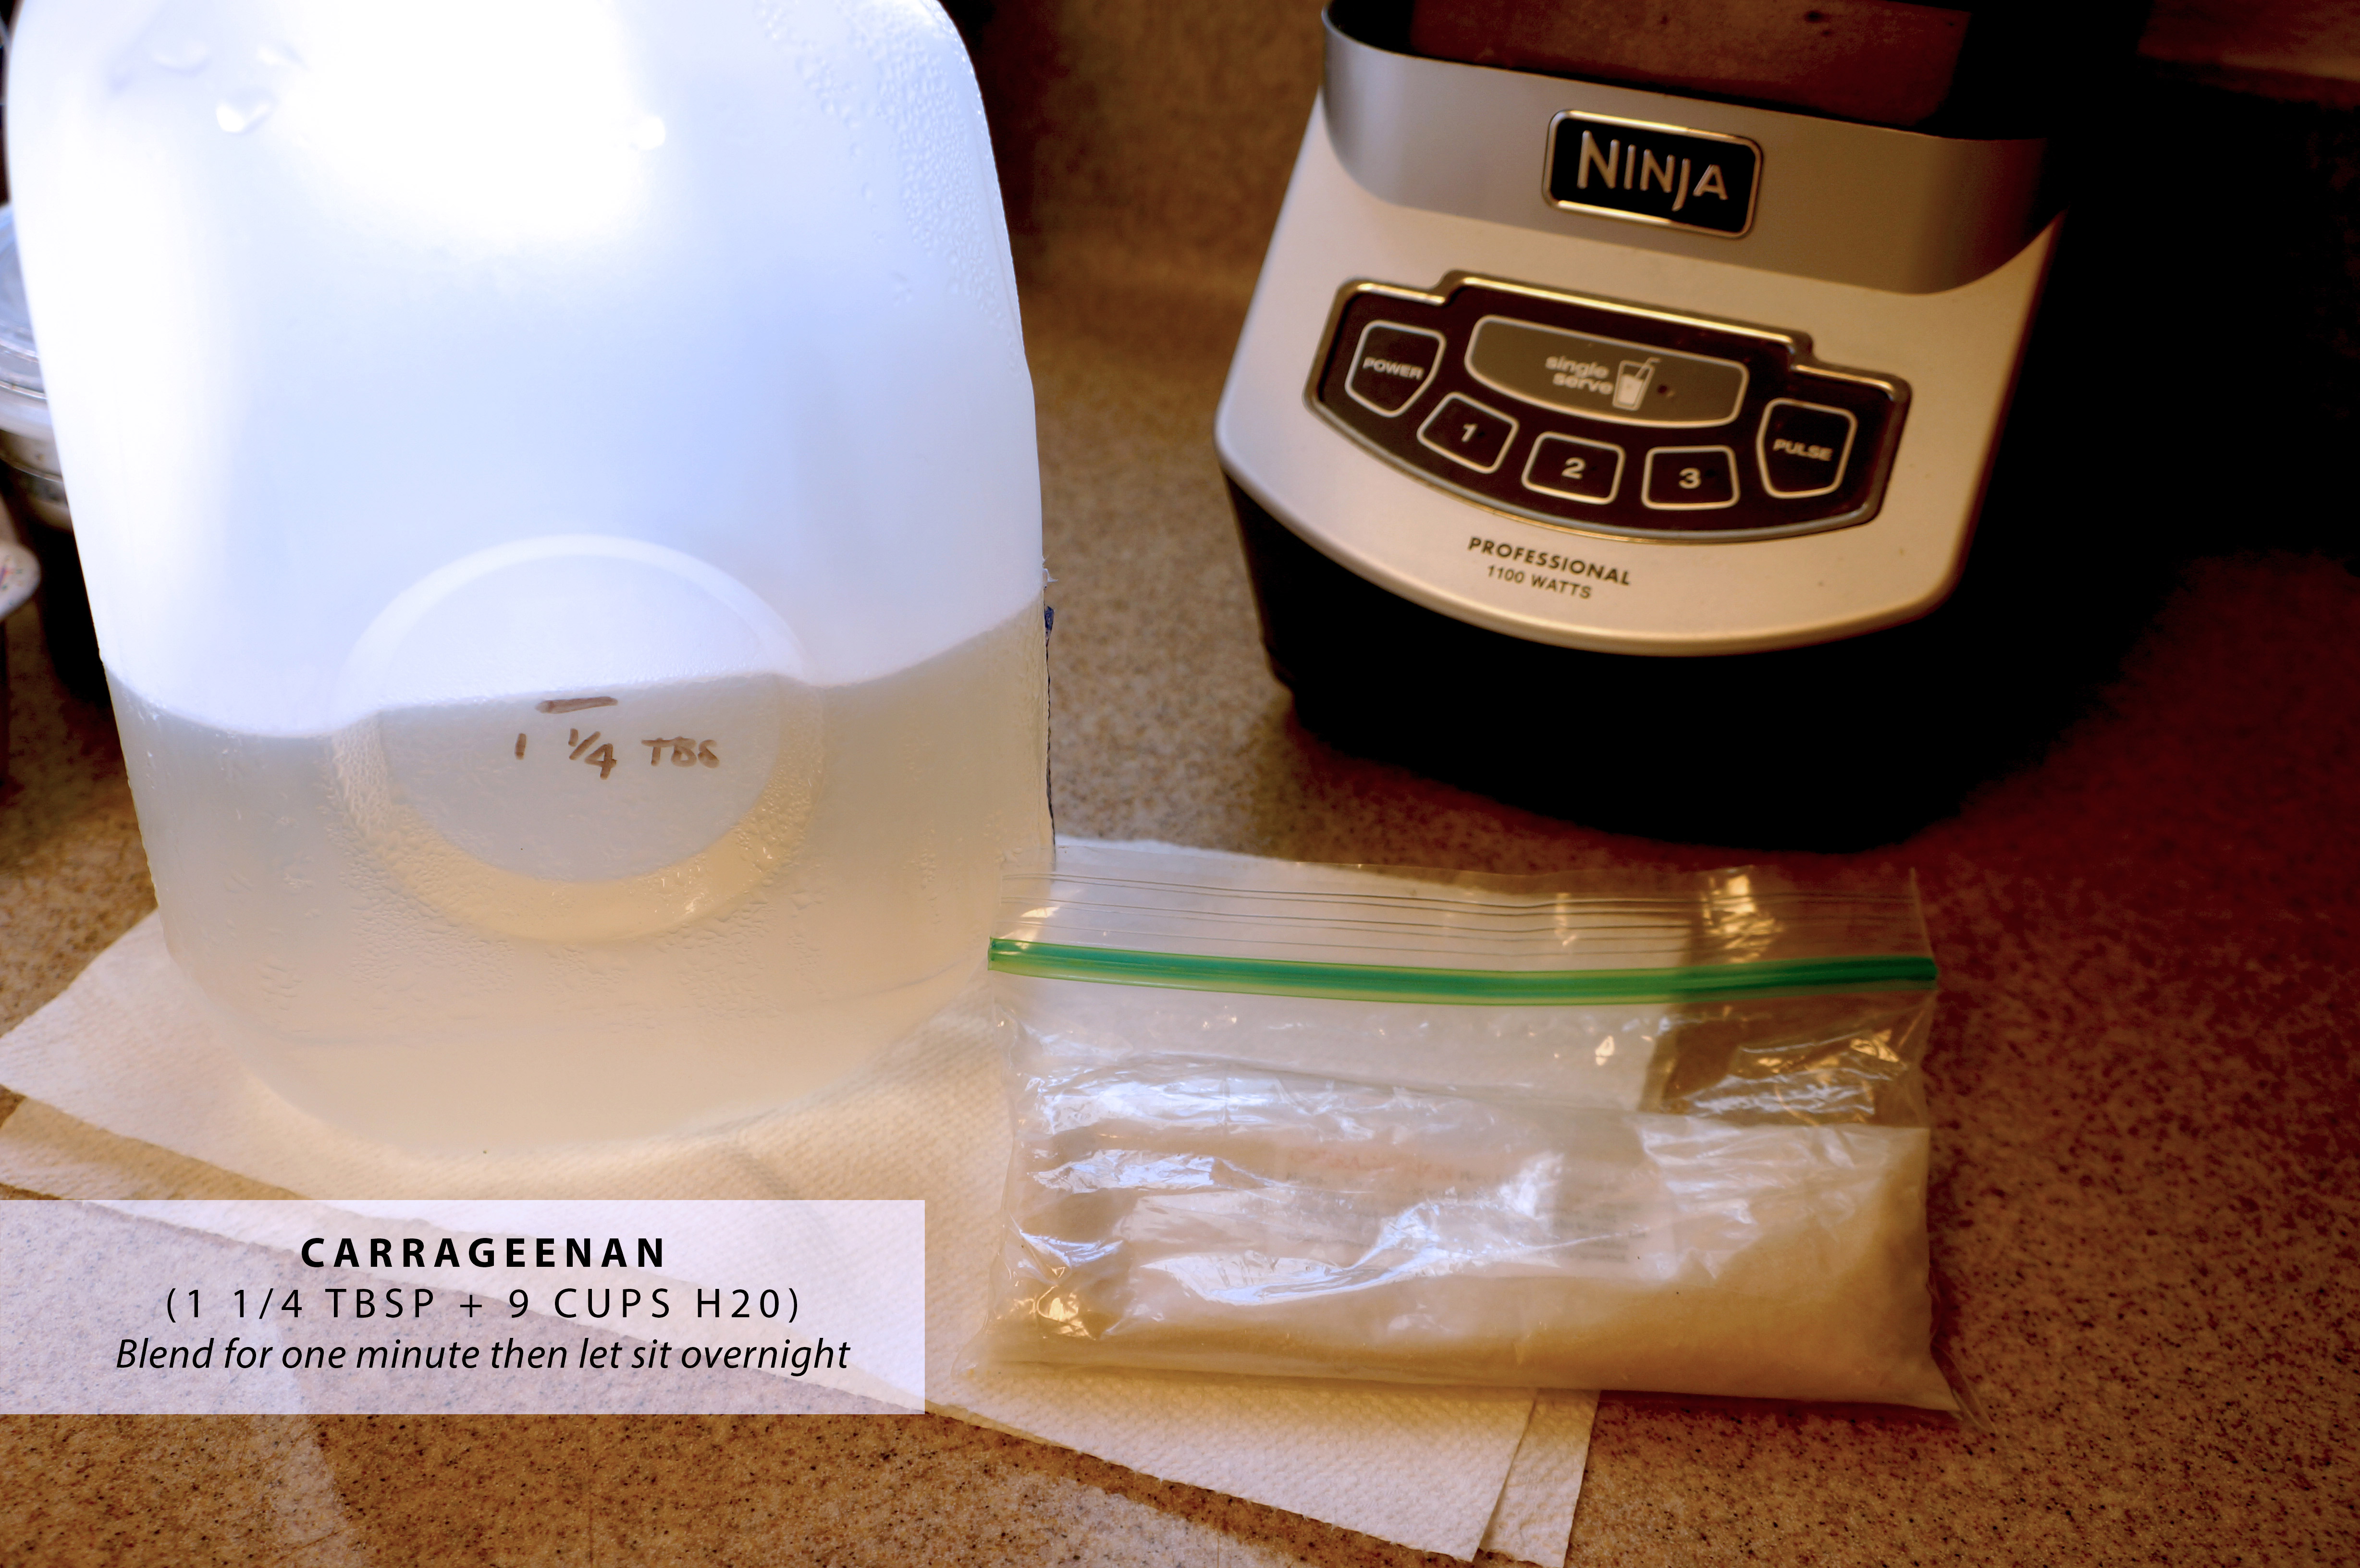 The absolute first thing you need to do after collecting all your materials is making the size as it’s best to let it sit overnight. I have never marbled with methylcellulose so I can’t tell you about that. For my baking tray I need 9 cups of size. Mix 1.25 TBSP of Carrageenan with 9 cups water and blend for 30 seconds to a minute. Then let it sit – either in the tray or better yet in a jug in the fridge.
STEP TWO:
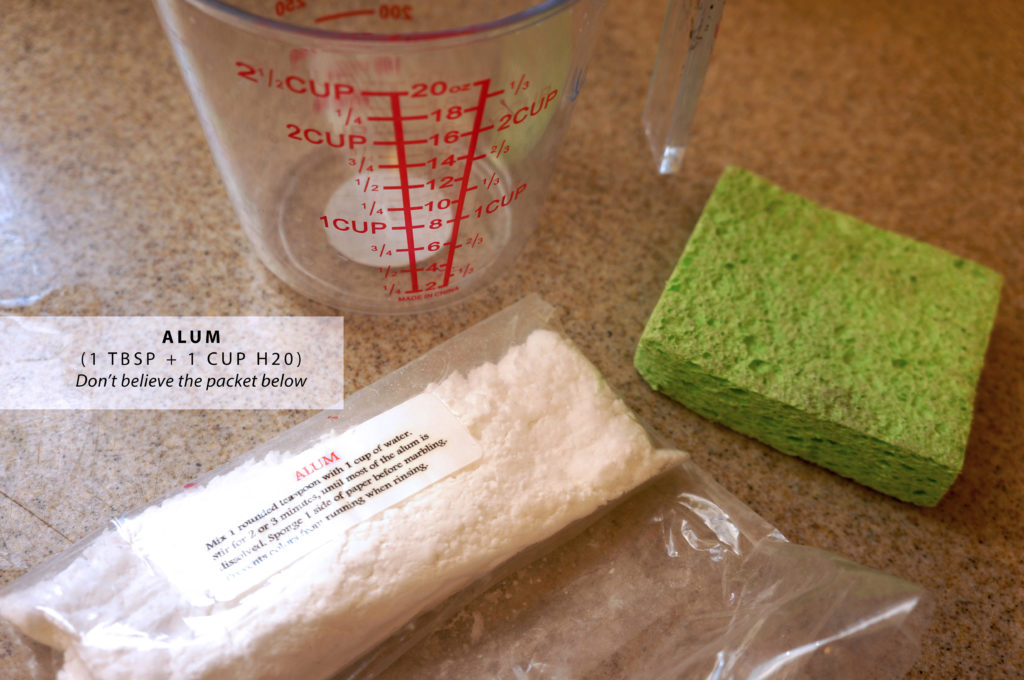
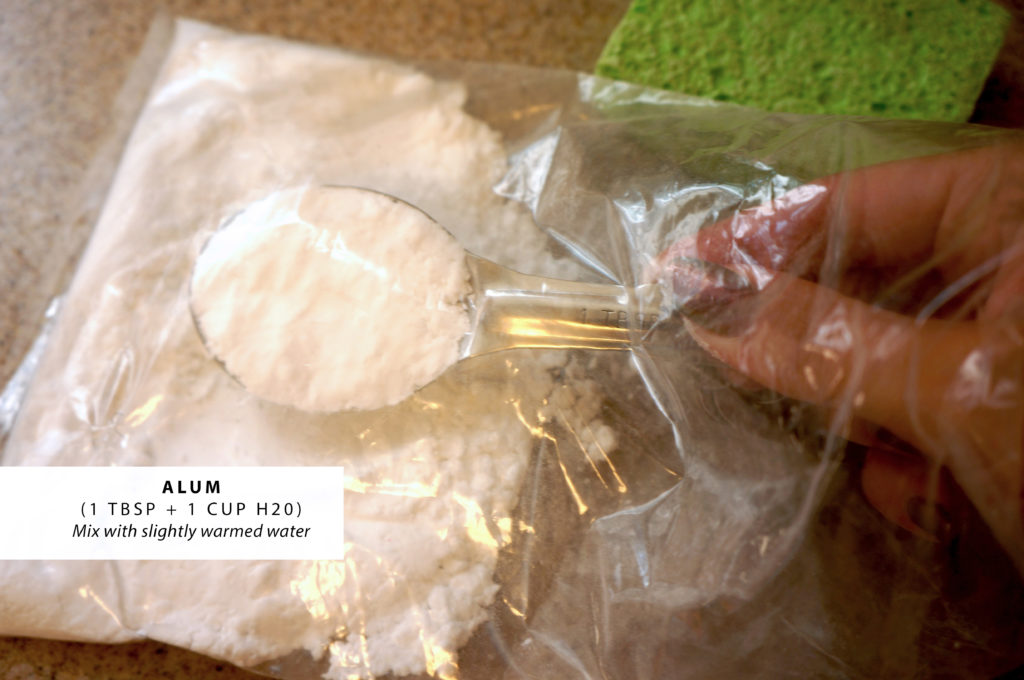
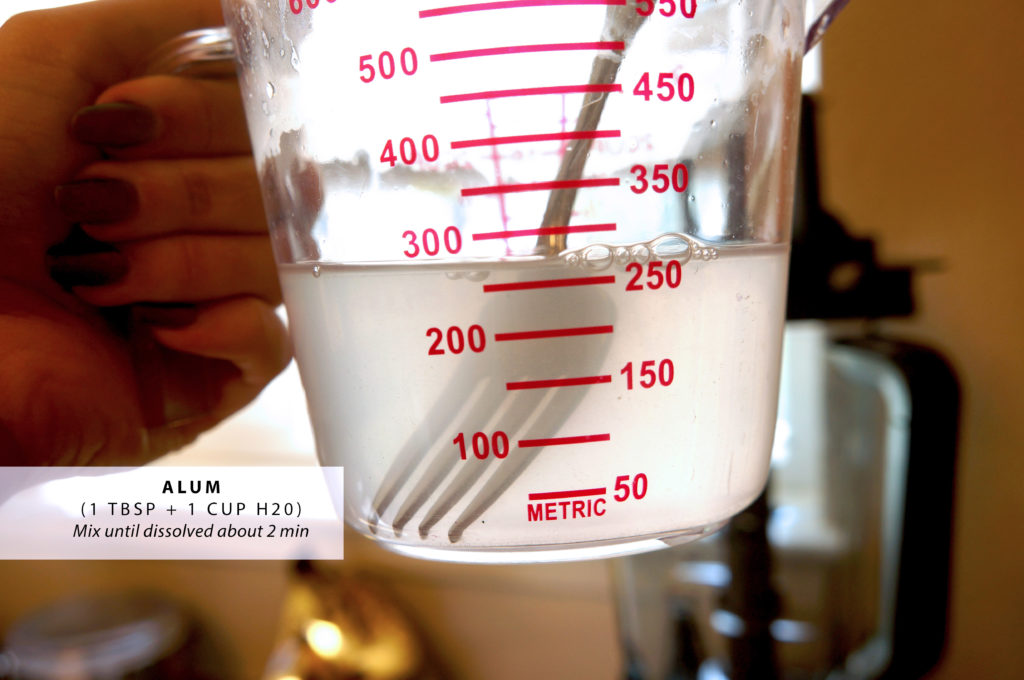
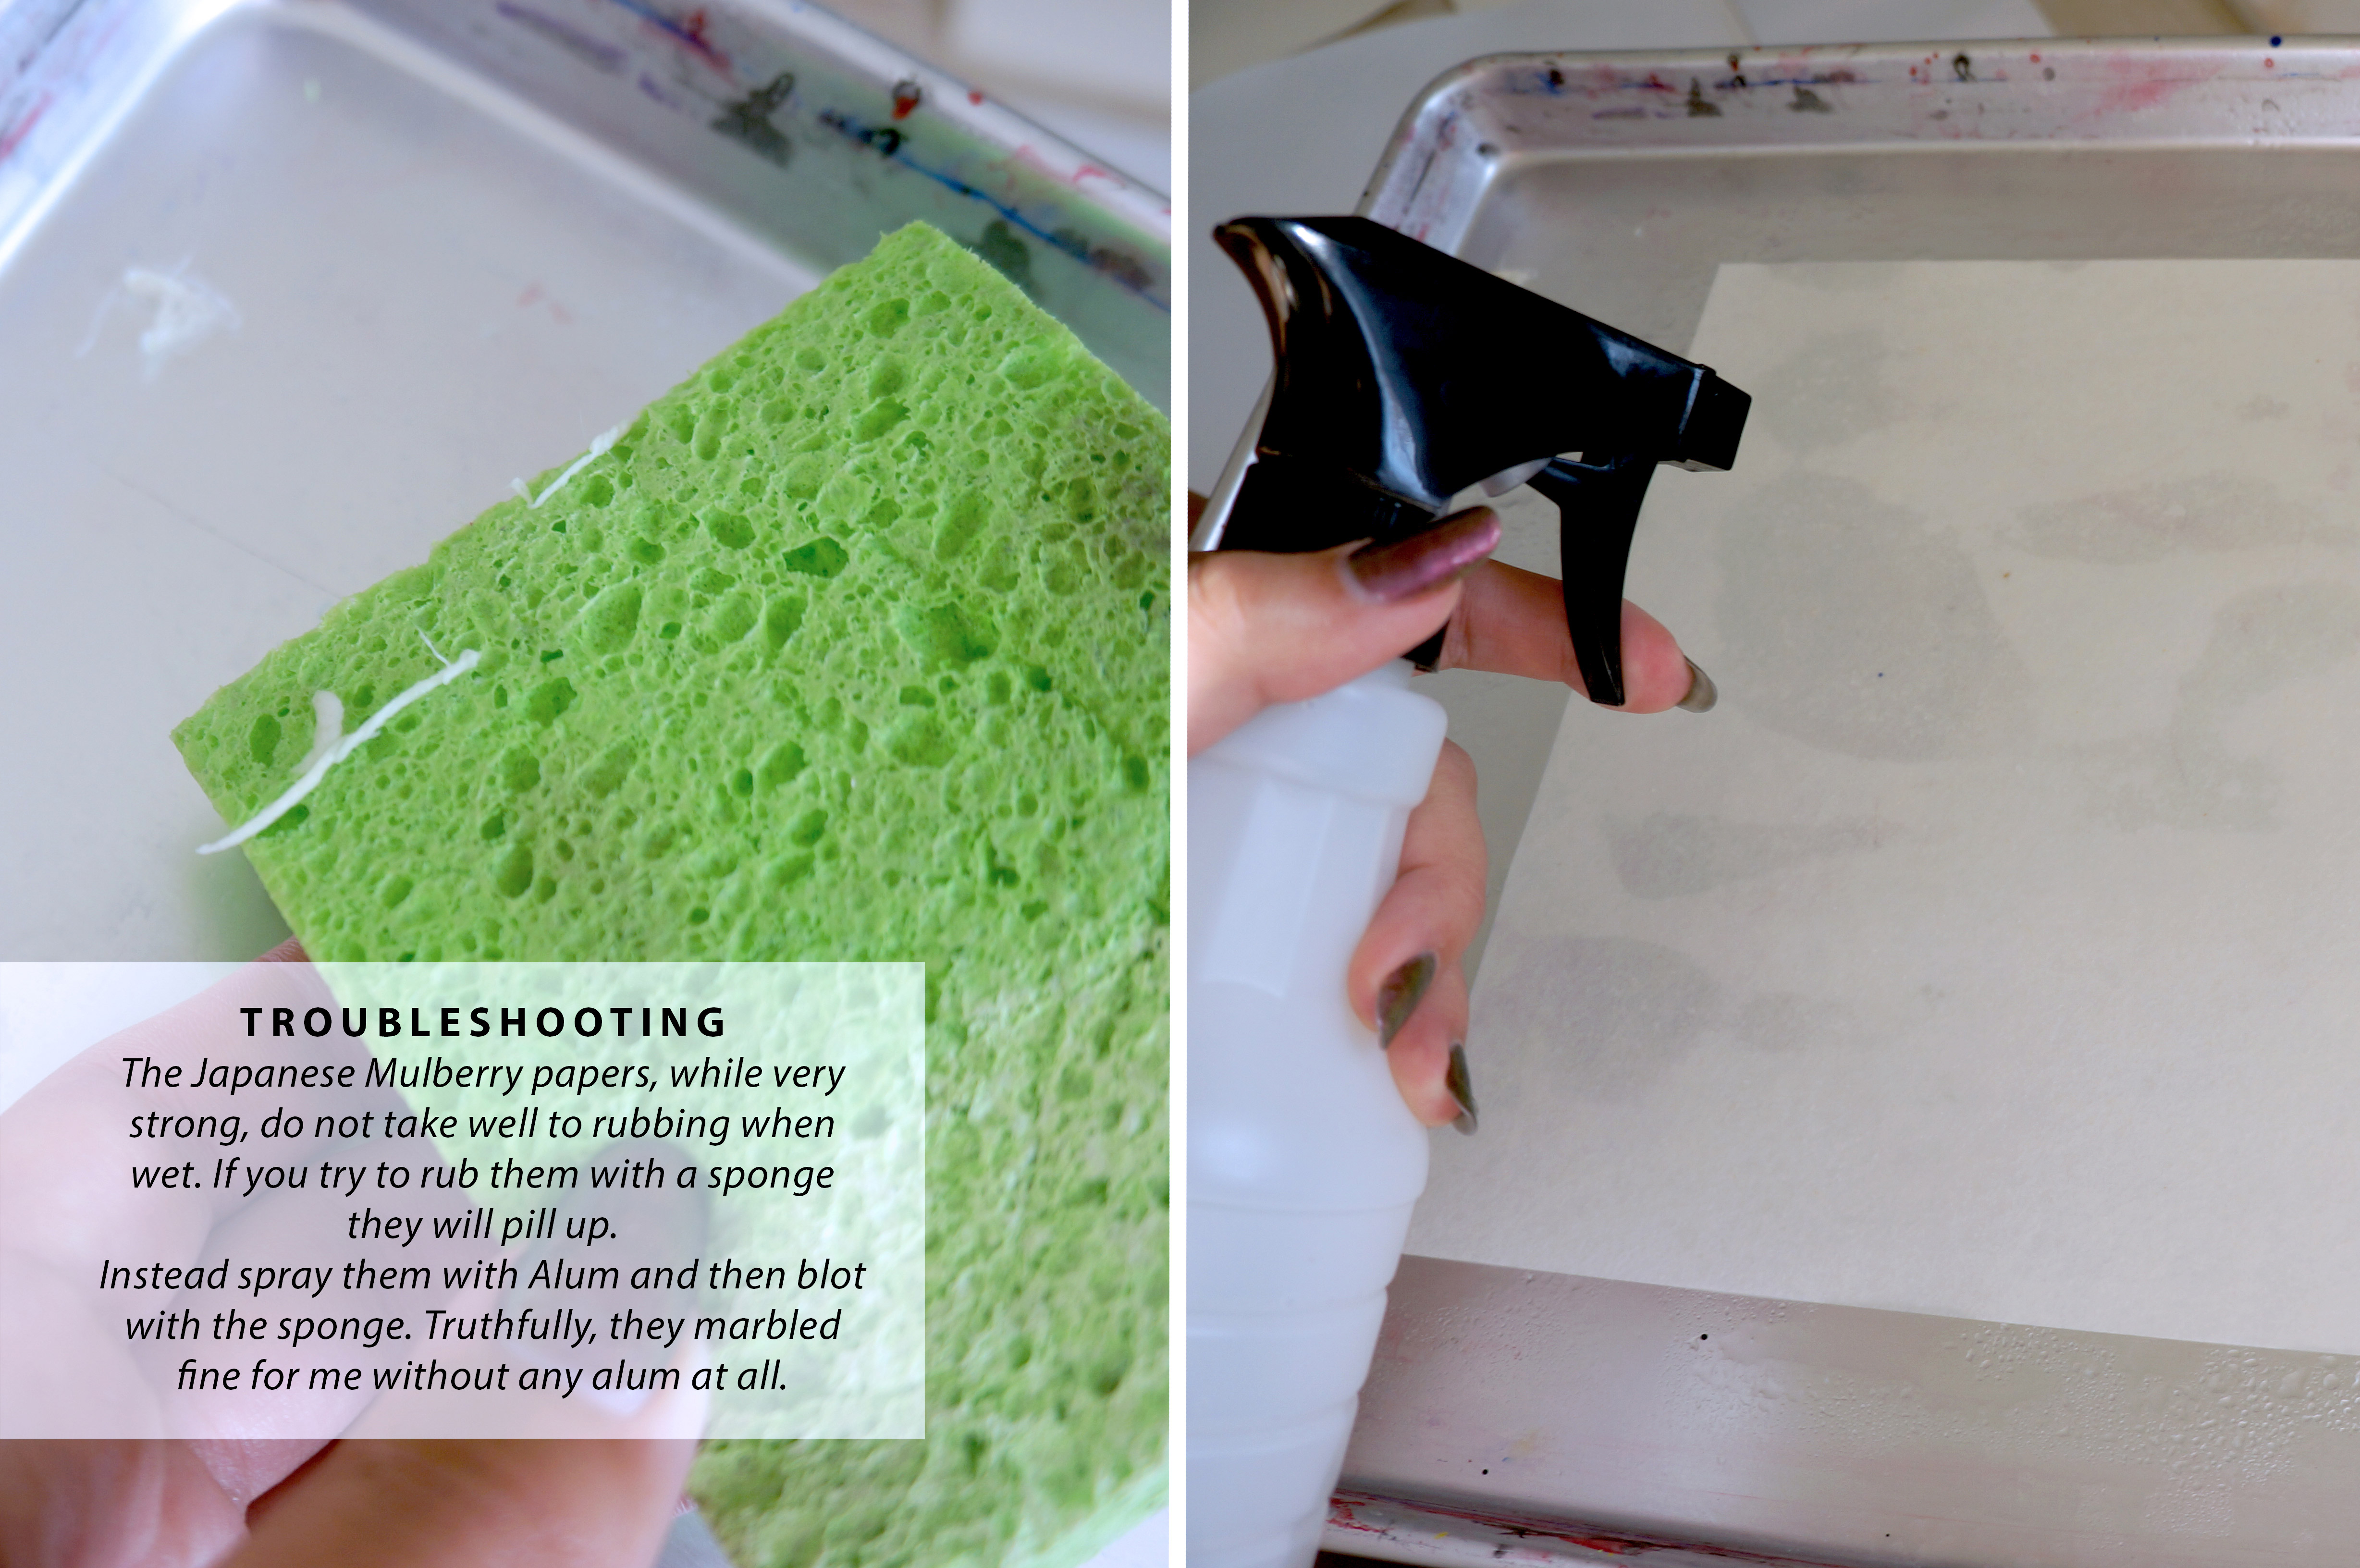
Prepare the Alum. Mix one TBSP Alum with one cup water. The instruction on my Alum said one teaspoon but that never worked for me and my colors always ran off in the rinse. Do not use pickling alum – it has additives that affect how it works, buy Alum specifically for marbling.
The absolute first thing you need to do after collecting all your materials is making the size as it’s best to let it sit overnight. I have never marbled with methylcellulose so I can’t tell you about that. For my baking tray I need 9 cups of size. Mix 1.25 TBSP of Carrageenan with 9 cups water and blend for 30 seconds to a minute. Then let it sit – either in the tray or better yet in a jug in the fridge.
STEP TWO:
Prepare the Alum. Mix one TBSP Alum with one cup water. The instruction on my Alum said one teaspoon but that never worked for me and my colors always ran off in the rinse. Do not use pickling alum – it has additives that affect how it works, buy Alum specifically for marbling.
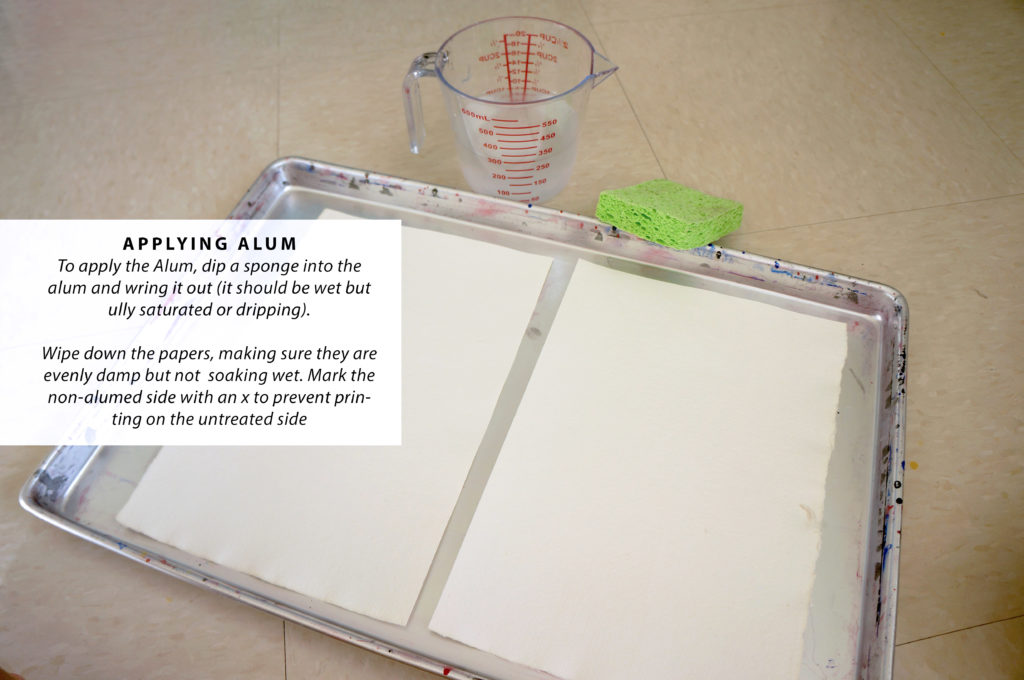
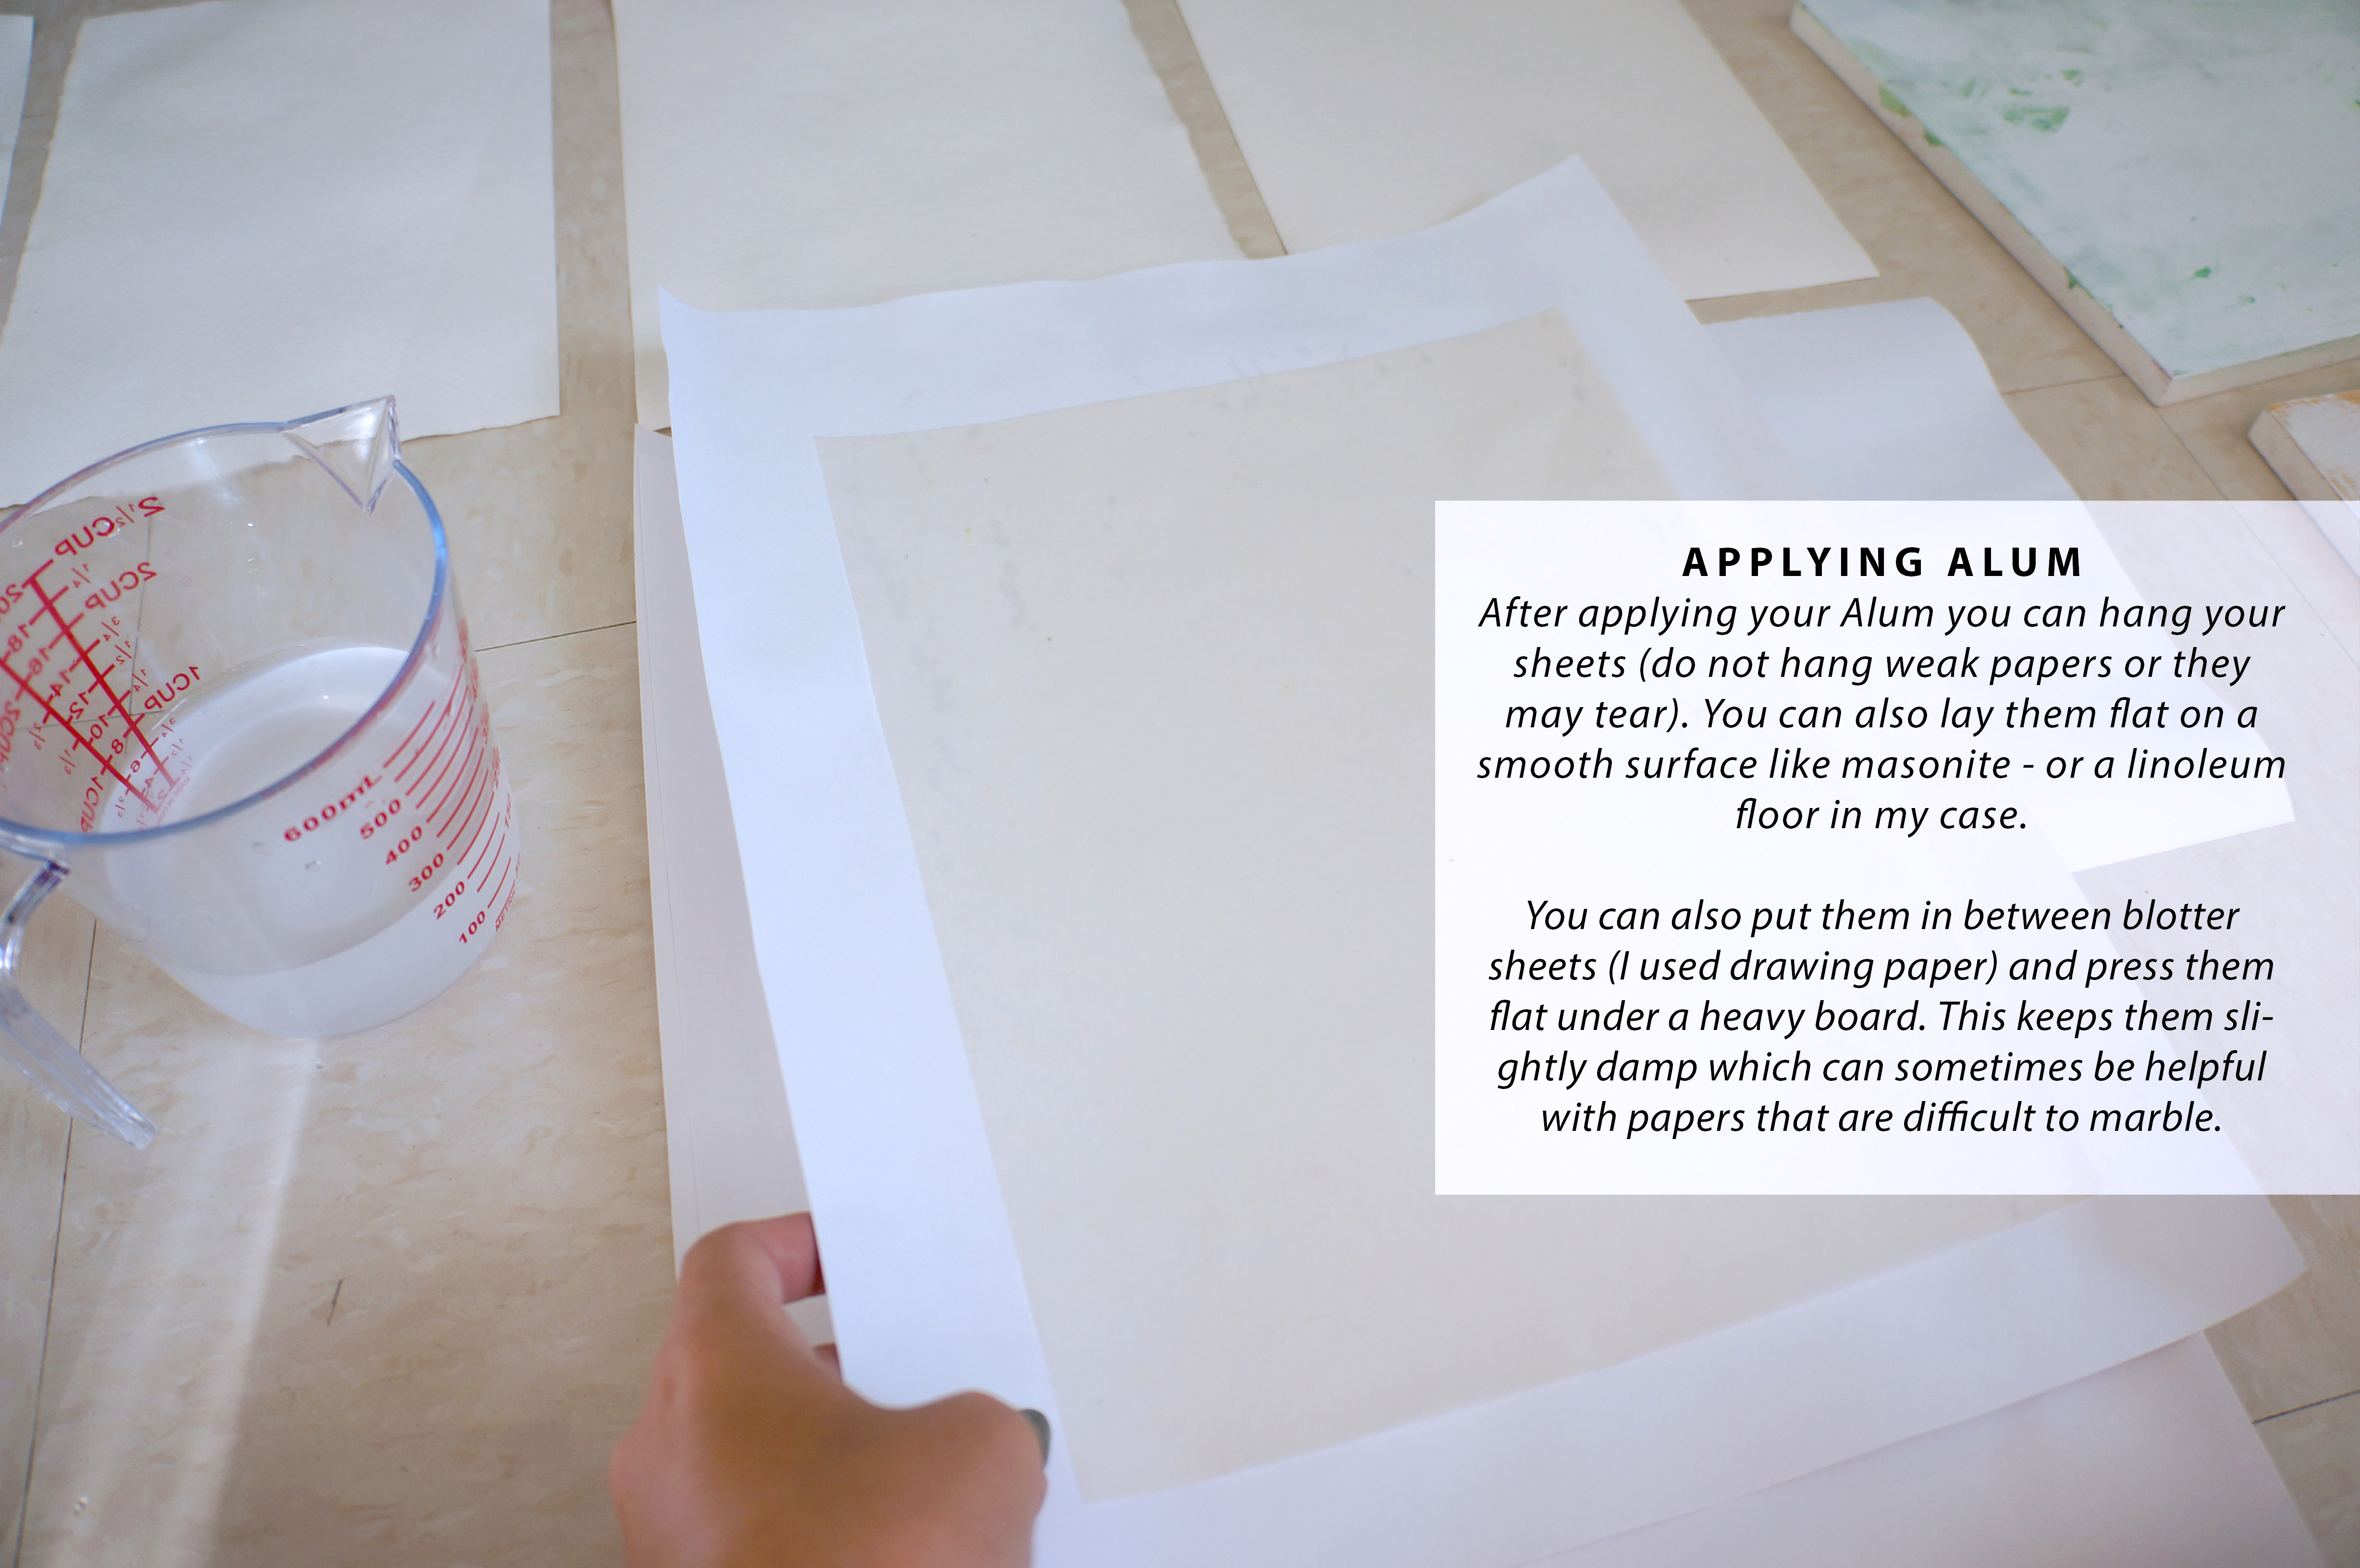
 Apply the Alum using a sponge. I set my papers on another baking sheet to sponge them and I mark the back of my sheets with a pencil ‘x’ so I don’t forget which side has been treated.

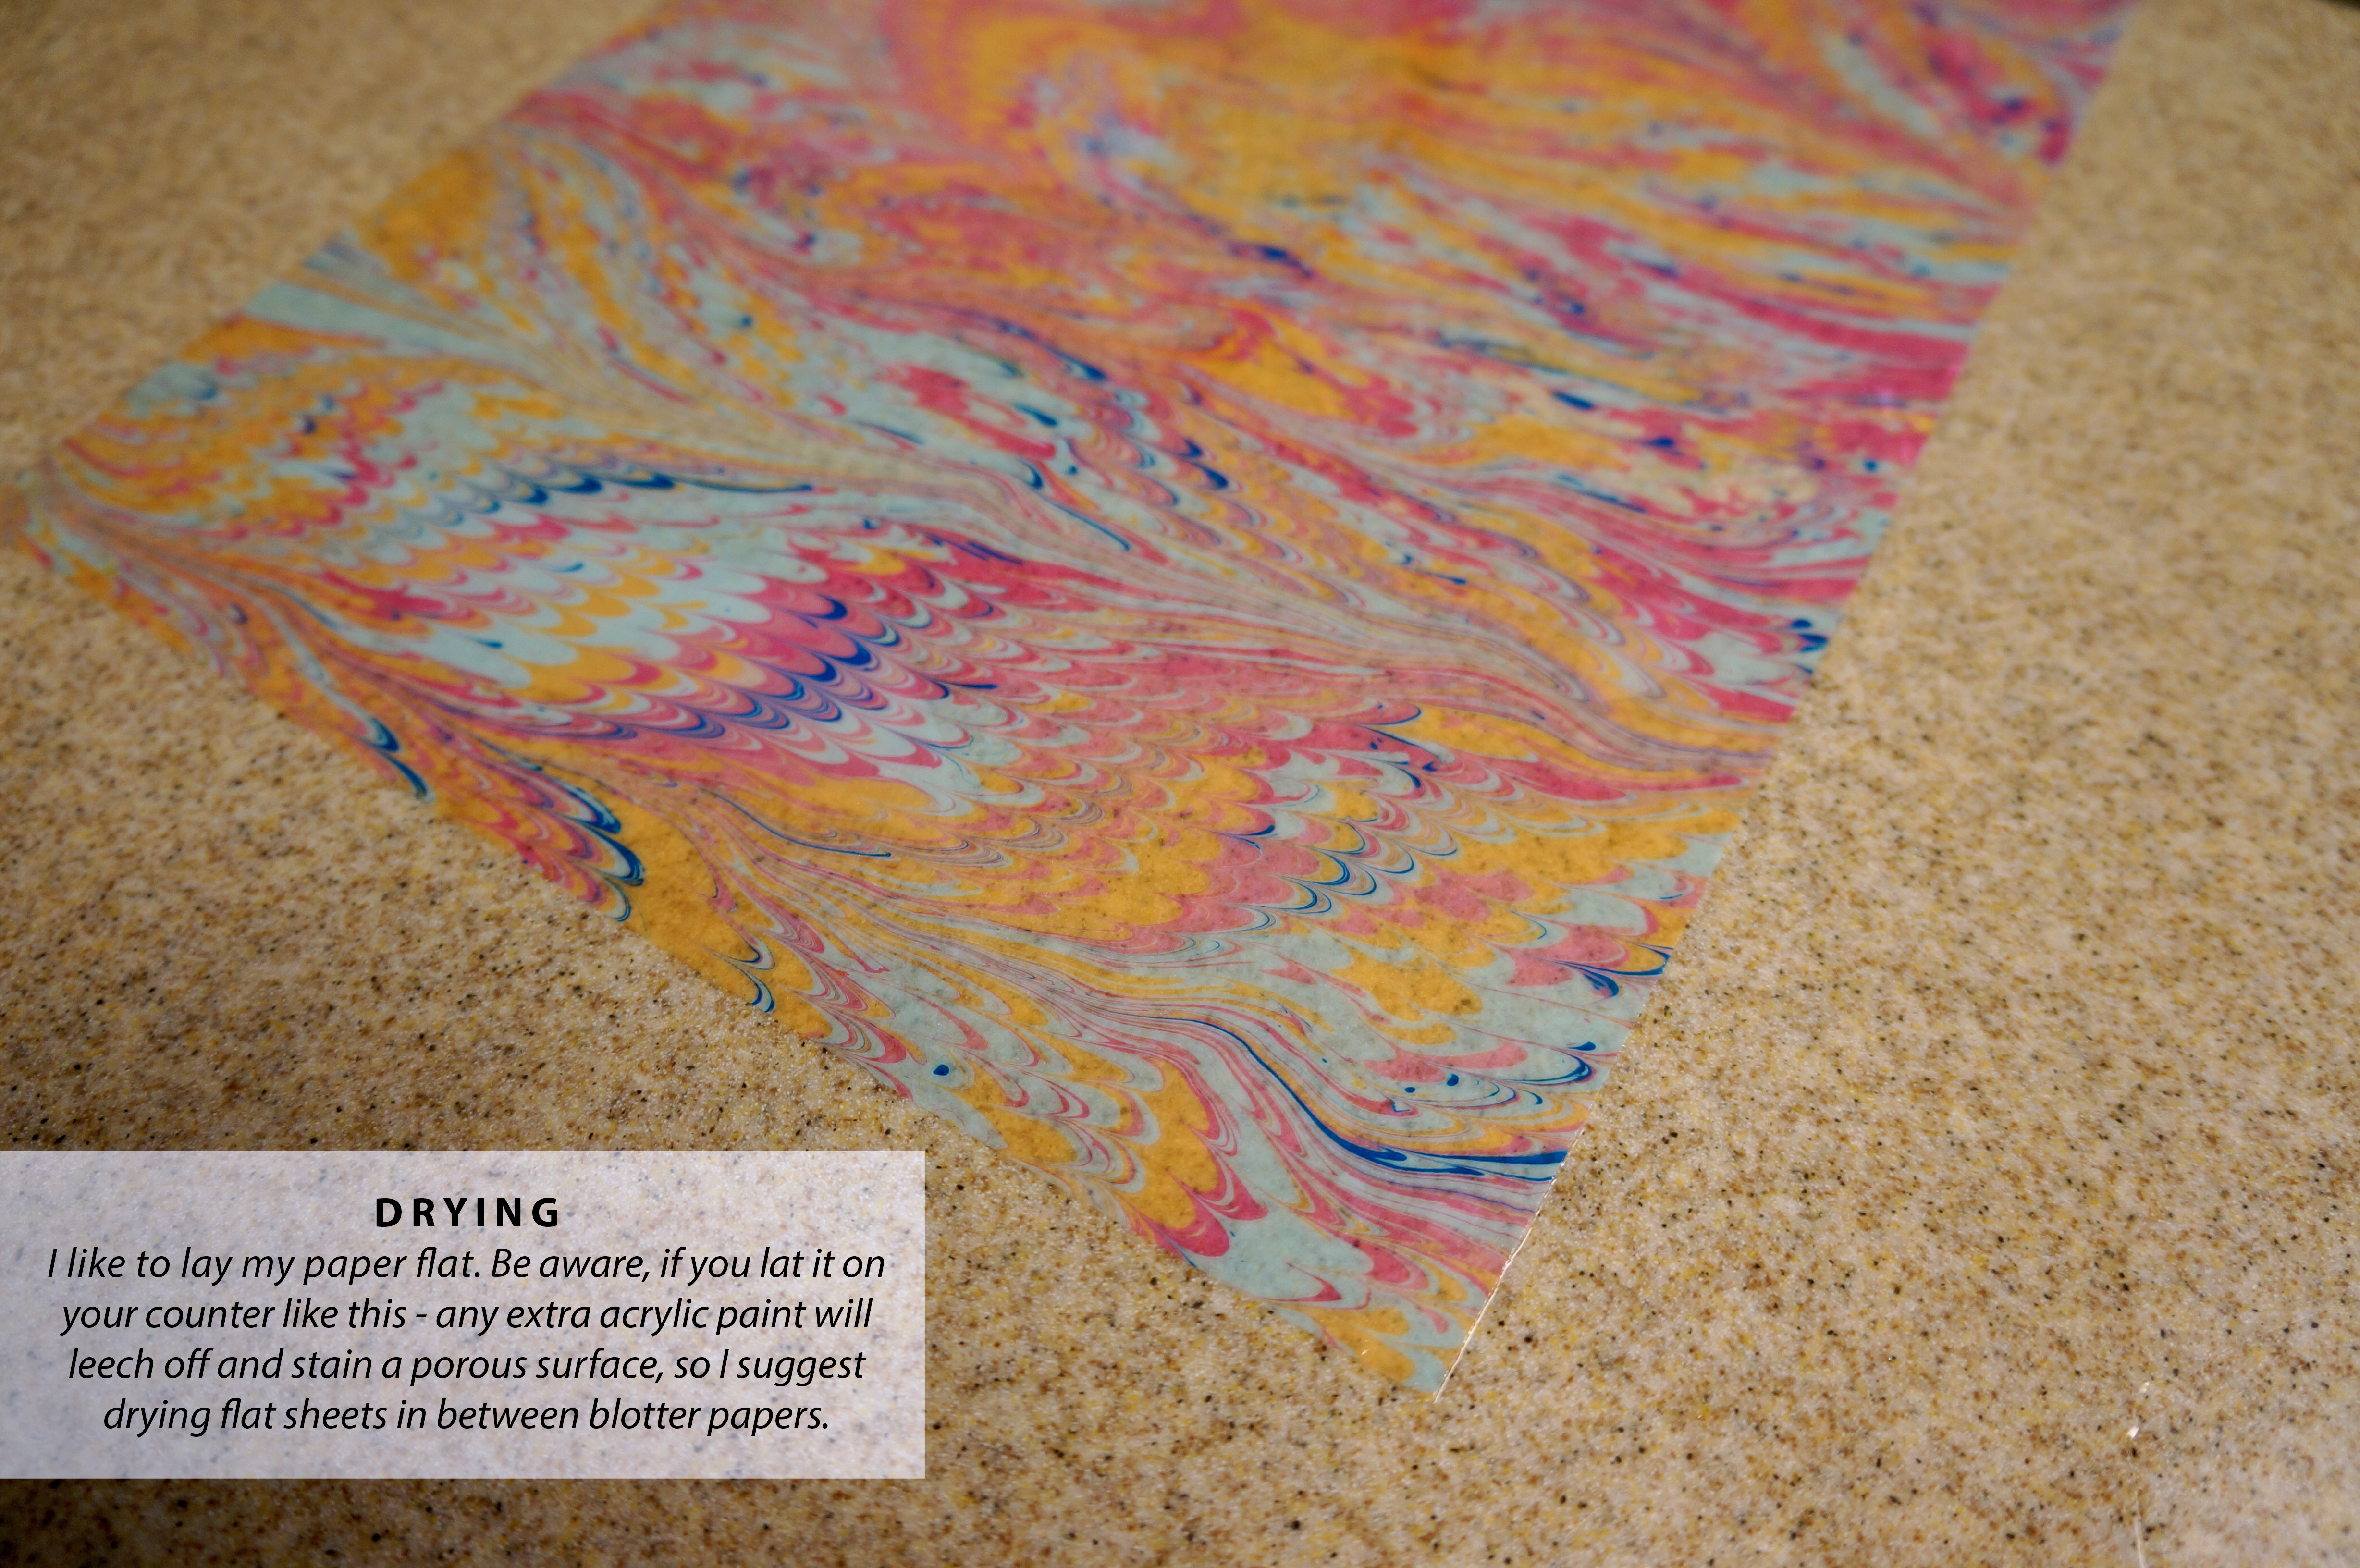
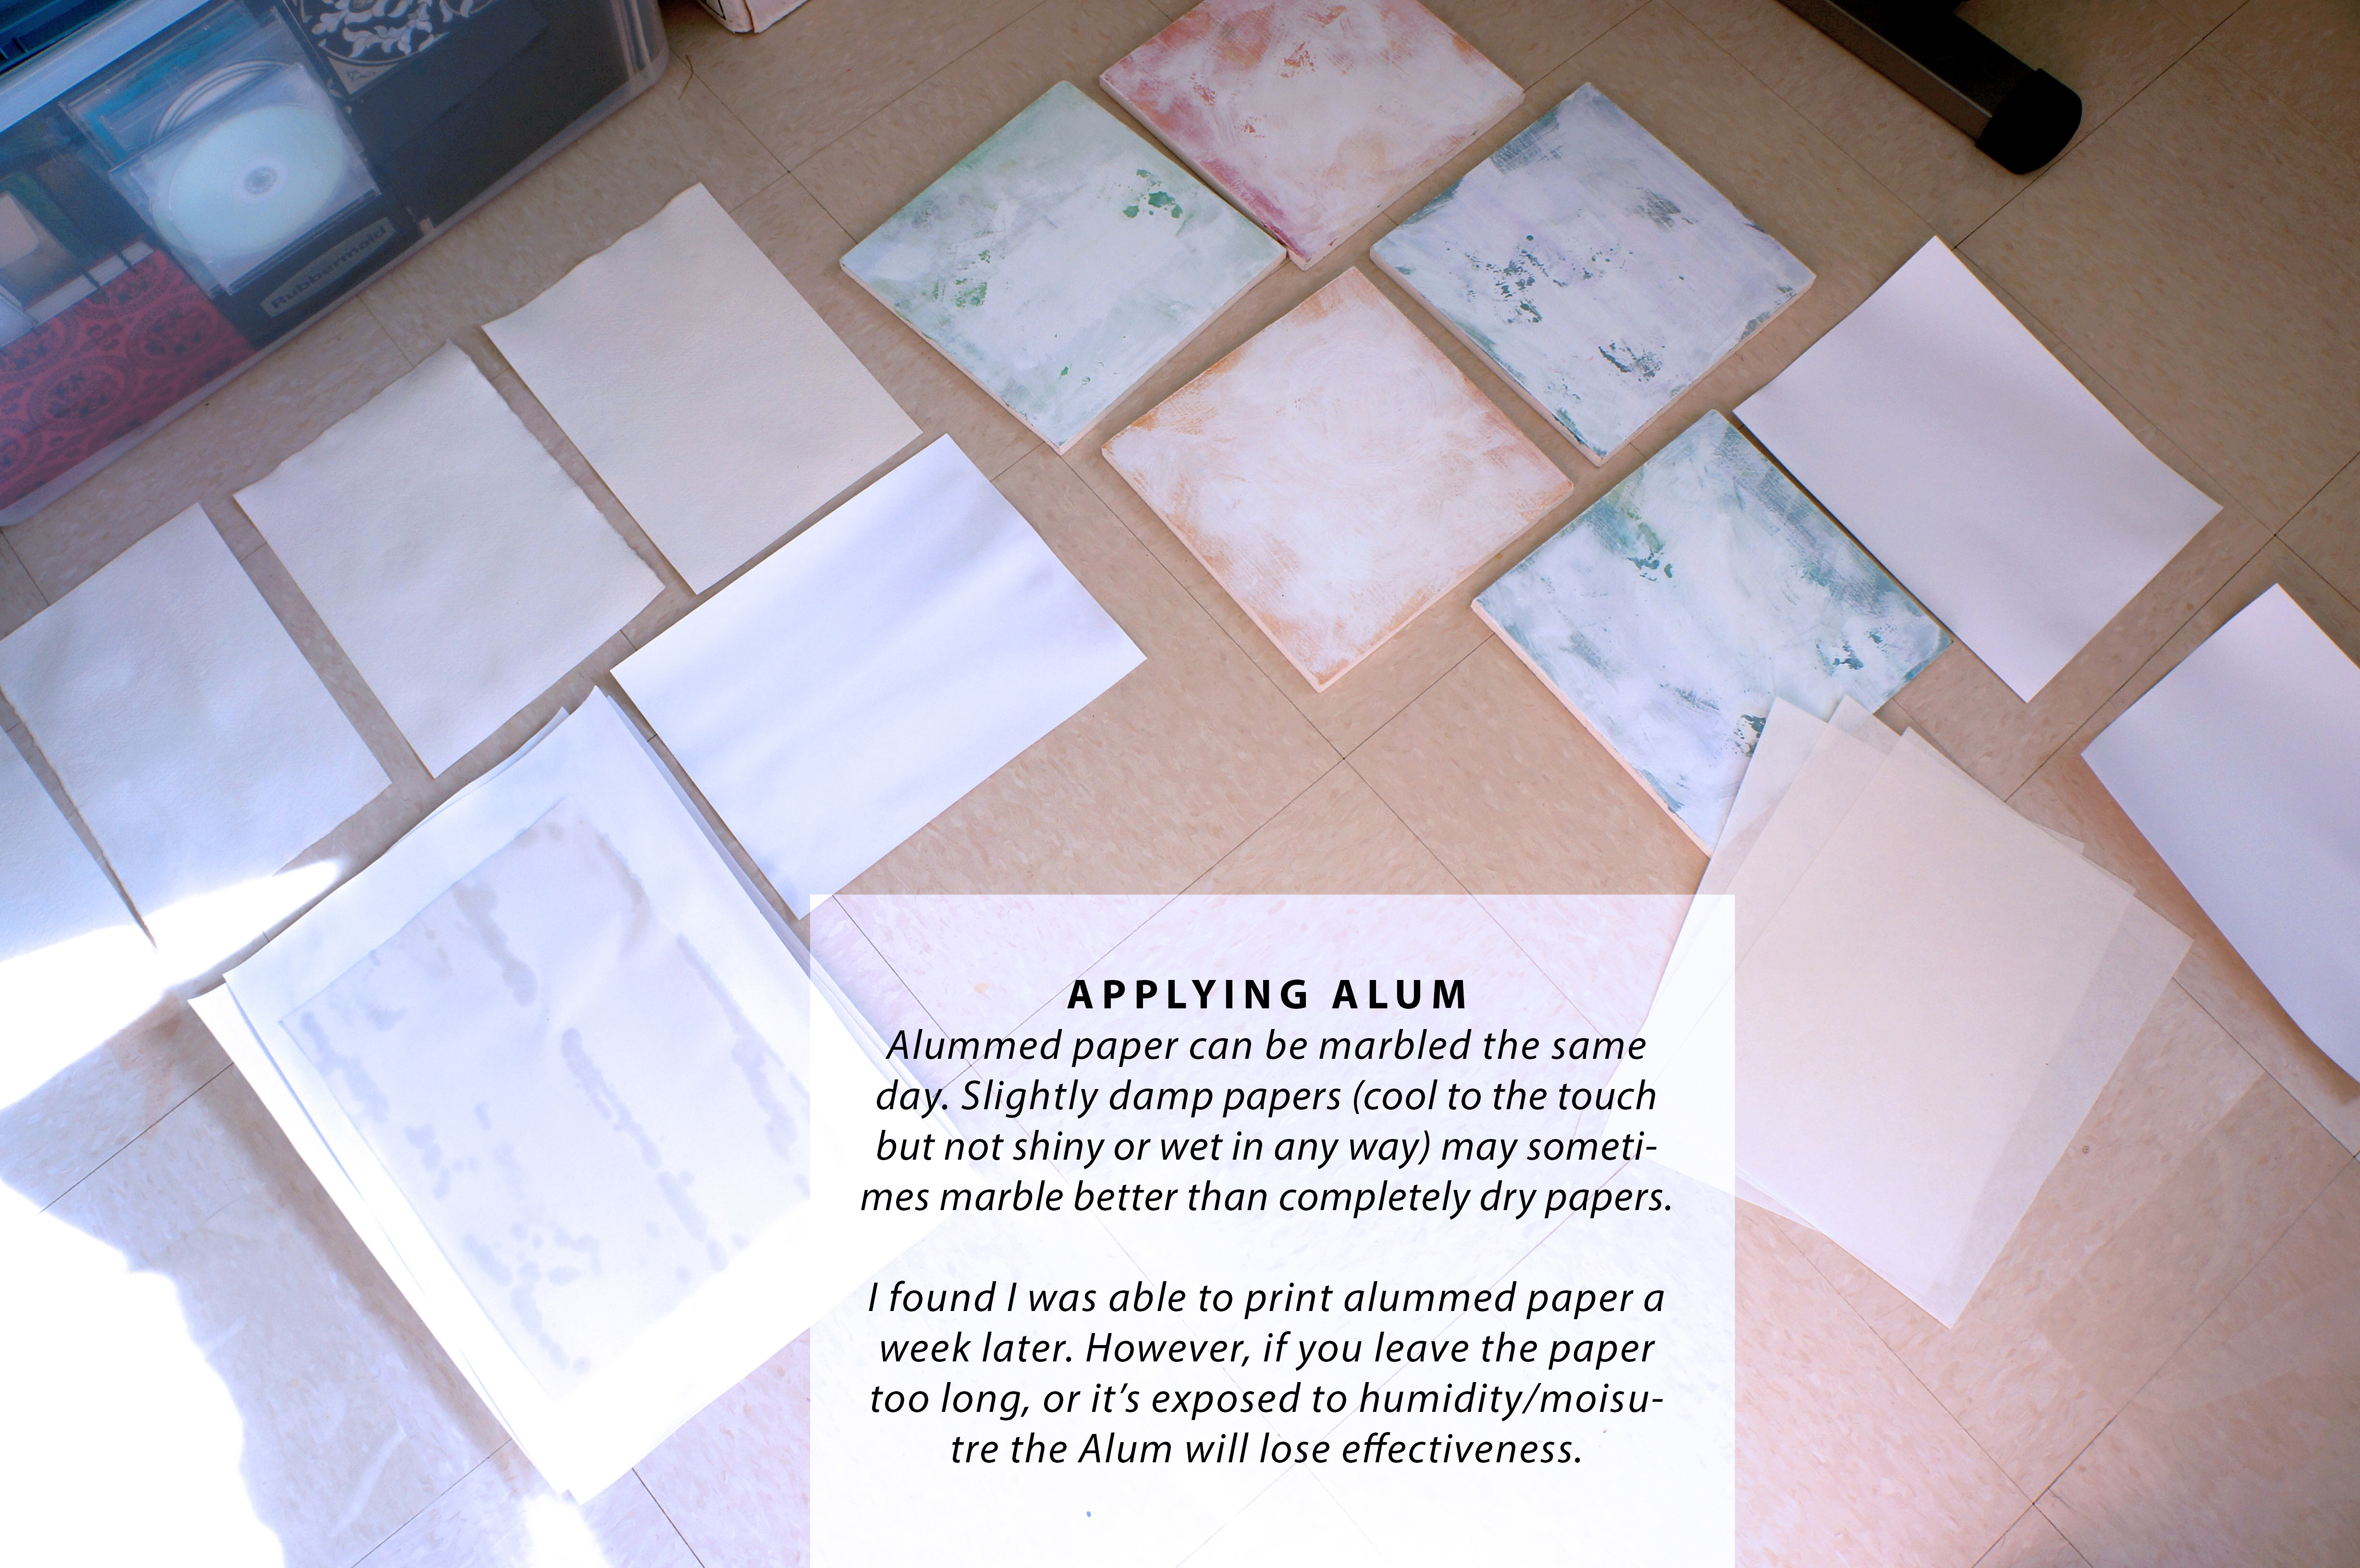
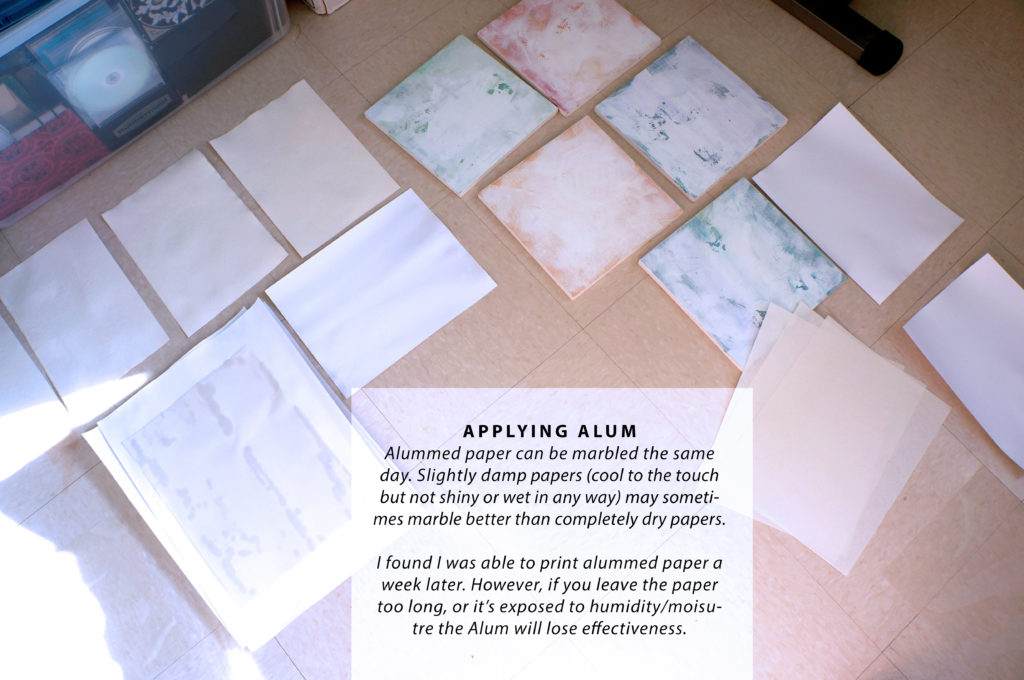 You can set your sheets in between blotter sheets. Lie them flat or hang them if they’re strong enough. You can flatten them after or during the process of drying. You can alum sheets the morning you plan to marble or a day or two before. I’ve used papers that were alumed a week before but most people don’t recommend it. Be aware that moisture and humidity deactivate the alum over time.
IMPORTANT NOTE: Thin papers or textured papers may pill – instead of wiping the size on, you can spray and blot it.
You can set your sheets in between blotter sheets. Lie them flat or hang them if they’re strong enough. You can flatten them after or during the process of drying. You can alum sheets the morning you plan to marble or a day or two before. I’ve used papers that were alumed a week before but most people don’t recommend it. Be aware that moisture and humidity deactivate the alum over time.
IMPORTANT NOTE: Thin papers or textured papers may pill – instead of wiping the size on, you can spray and blot it.
 STEP THREE:
Time to set everything up. Grab all your materials, lay down any protective sheets on your table (or kitchen counter in my case) and go grab your size from the fridge. Get your set up ready and pour your size into your tray. I let it sit for a bit to warm up; I’m not sure if that makes a difference or not, but I used to time to go grab all my papers and set everything up. The carrageenan should free of bubbles by now, but you can skim off a few if any pop up.
STEP THREE:
Time to set everything up. Grab all your materials, lay down any protective sheets on your table (or kitchen counter in my case) and go grab your size from the fridge. Get your set up ready and pour your size into your tray. I let it sit for a bit to warm up; I’m not sure if that makes a difference or not, but I used to time to go grab all my papers and set everything up. The carrageenan should free of bubbles by now, but you can skim off a few if any pop up.
 Now we need mix our colors. For this tutorial I used only Golden High Flow Acrylics as it meant the fewest variables. Most people say don’t mix brands as they have different properties and might react weird on the size. I didn’t have an issue with this in previous tests, but then again I’m not looking for perfection so it’s just something to keep in mind.

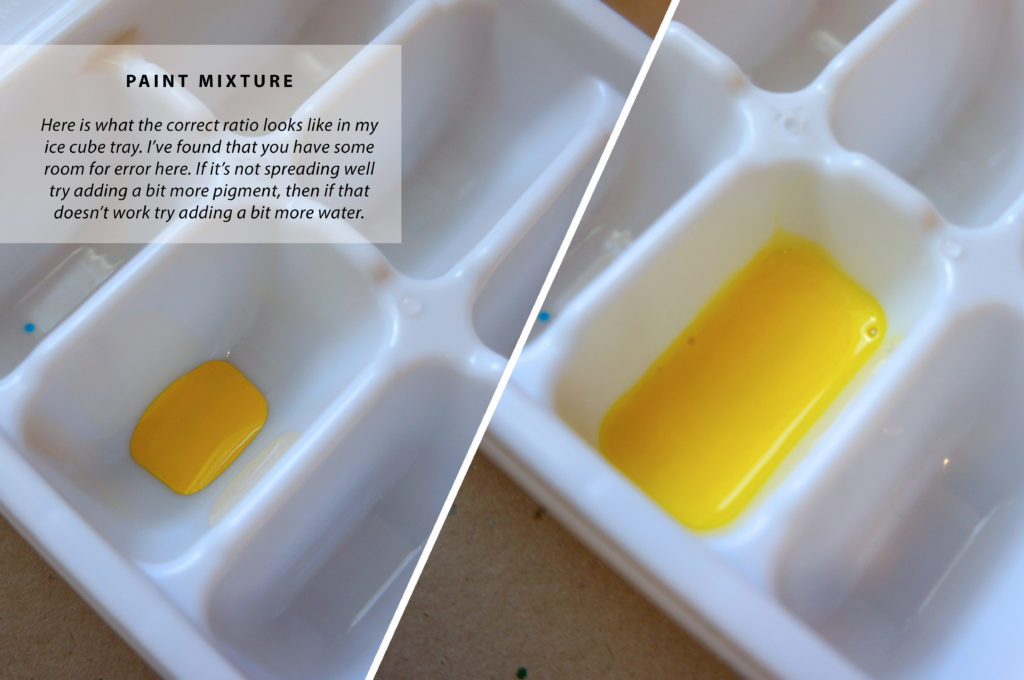
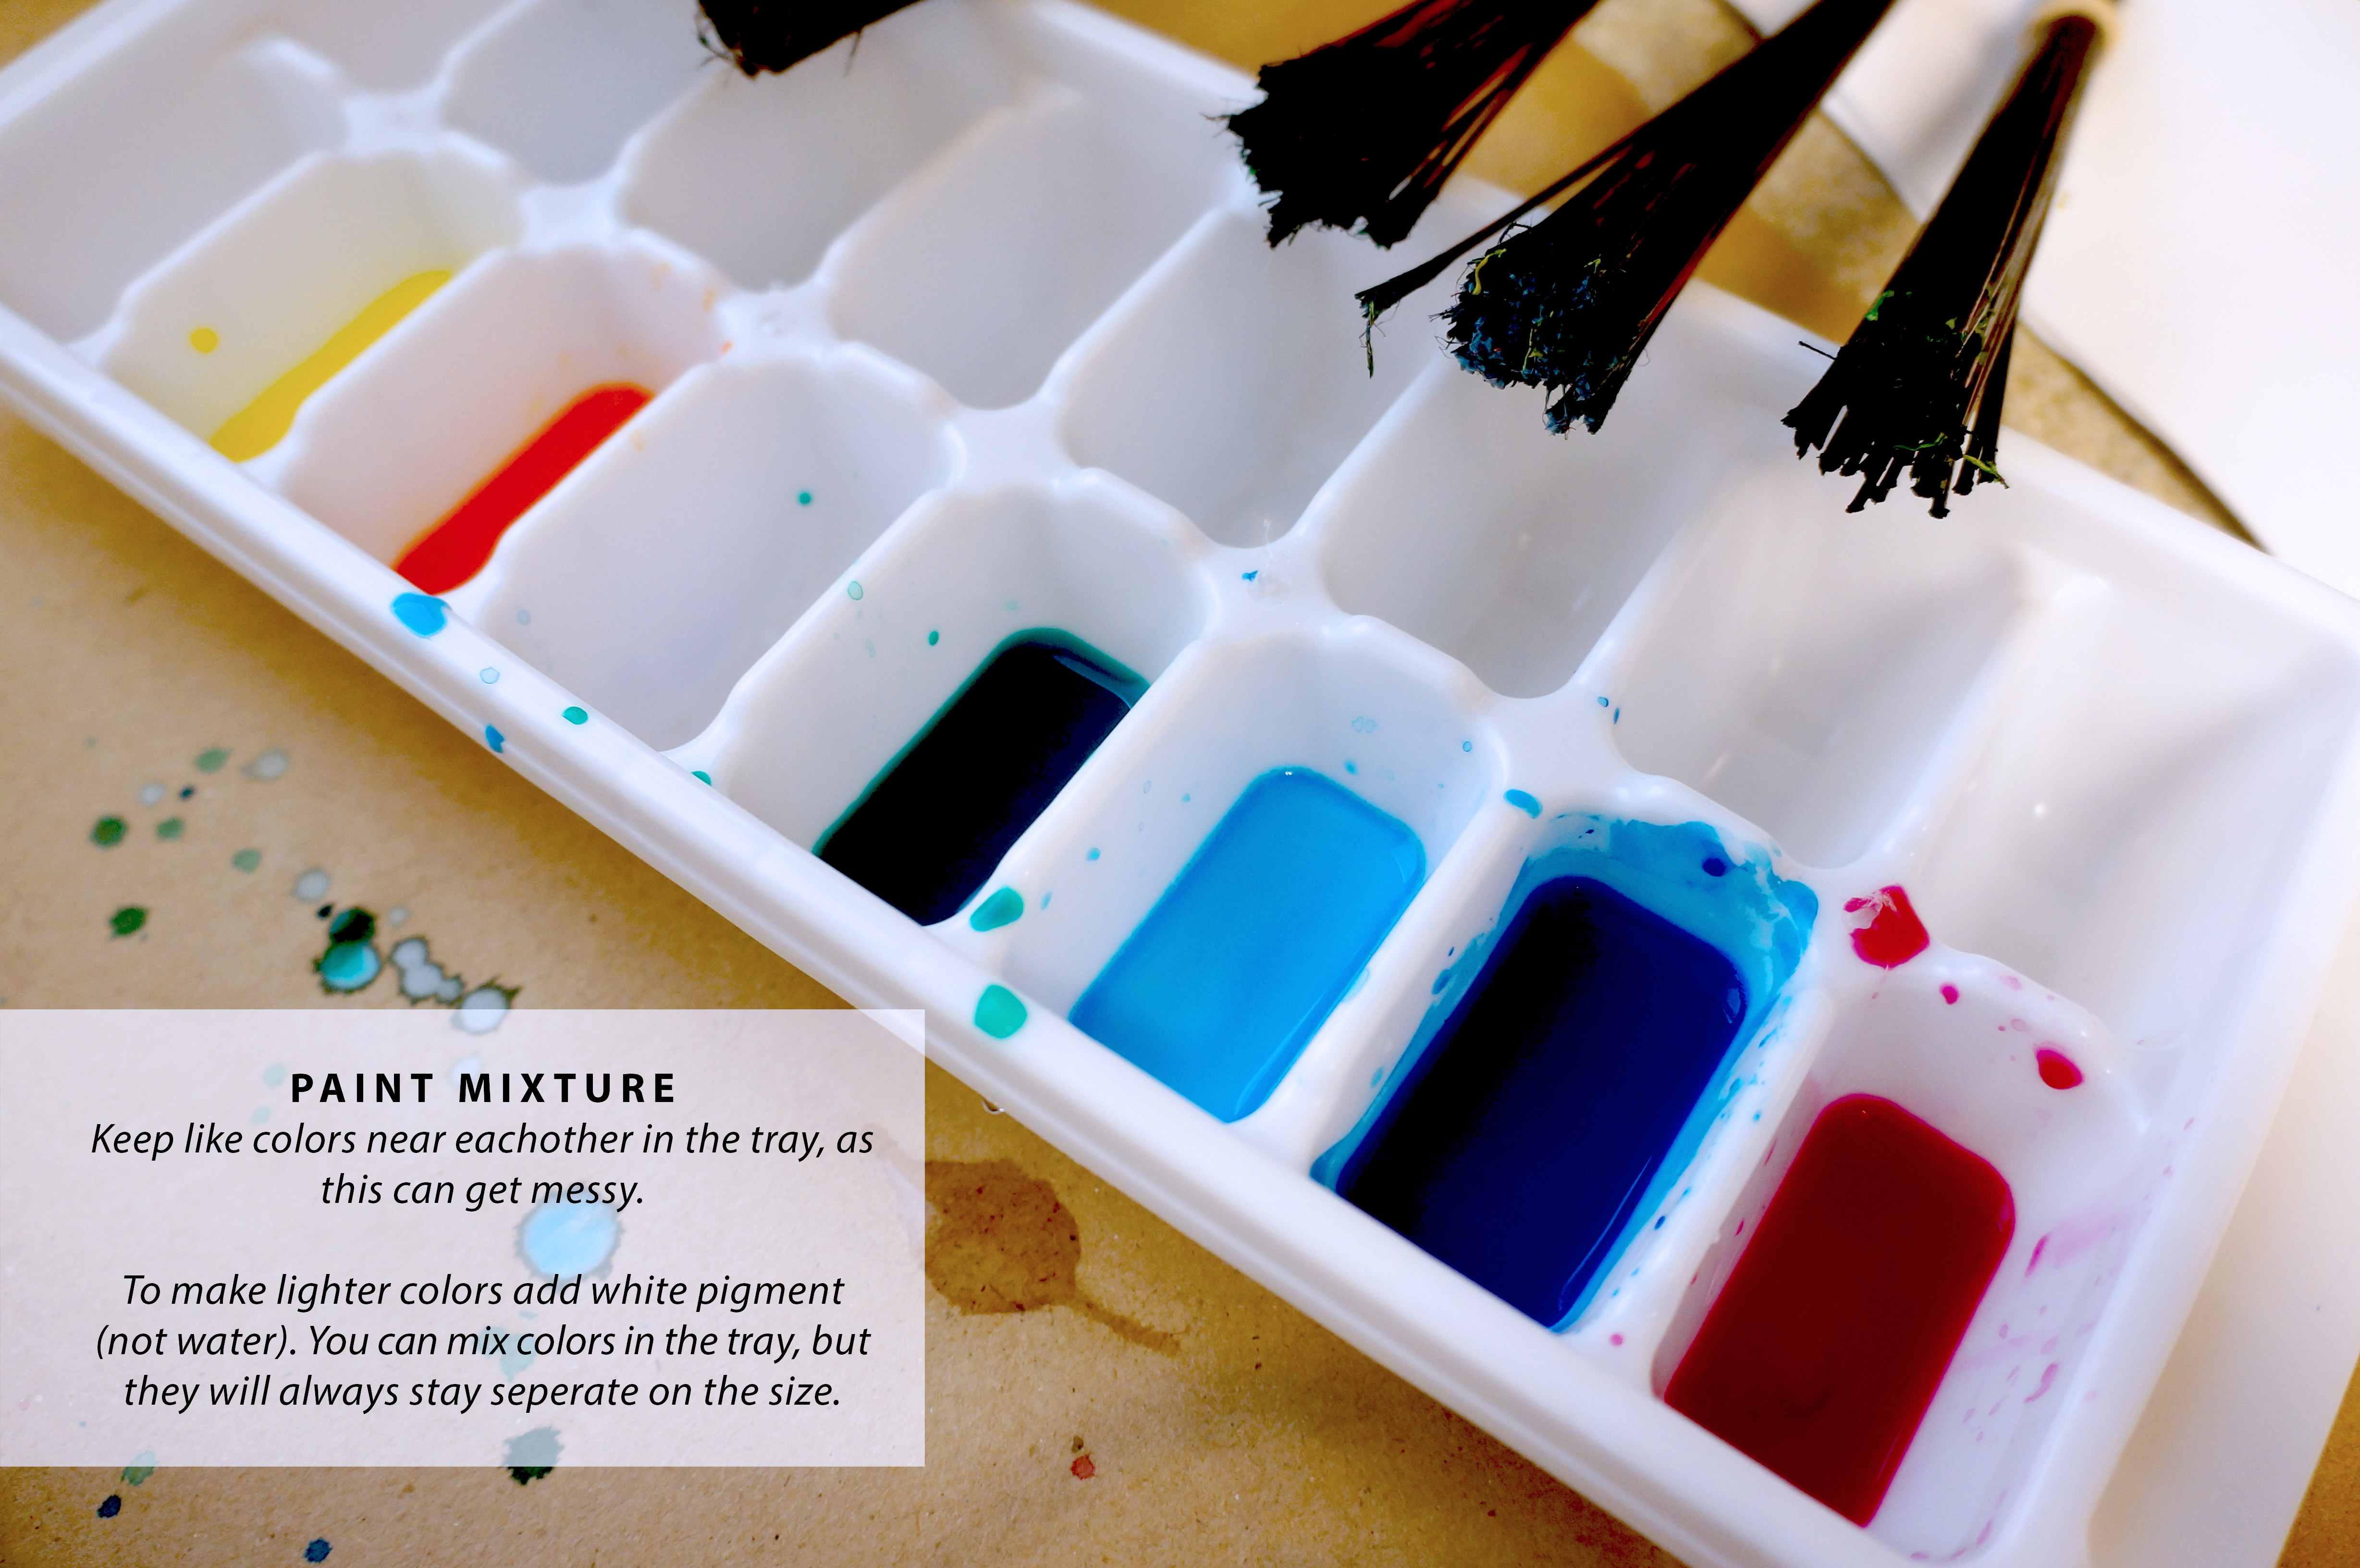
 I feel color mixing is the place where you really need to find what is right for you. I’ve included a few guesstimates of what I was doing to mix my colors but you will need to adjust to get the right flow and color intensity depending on what you use. Remember, colors can be mixed in your palette but they will not mix on the size.
I did not need to add gall to my paints as the High Flow acrylics spread beautifully, but some thicker metallic pigments or other brands might require it.
STEP FOUR:
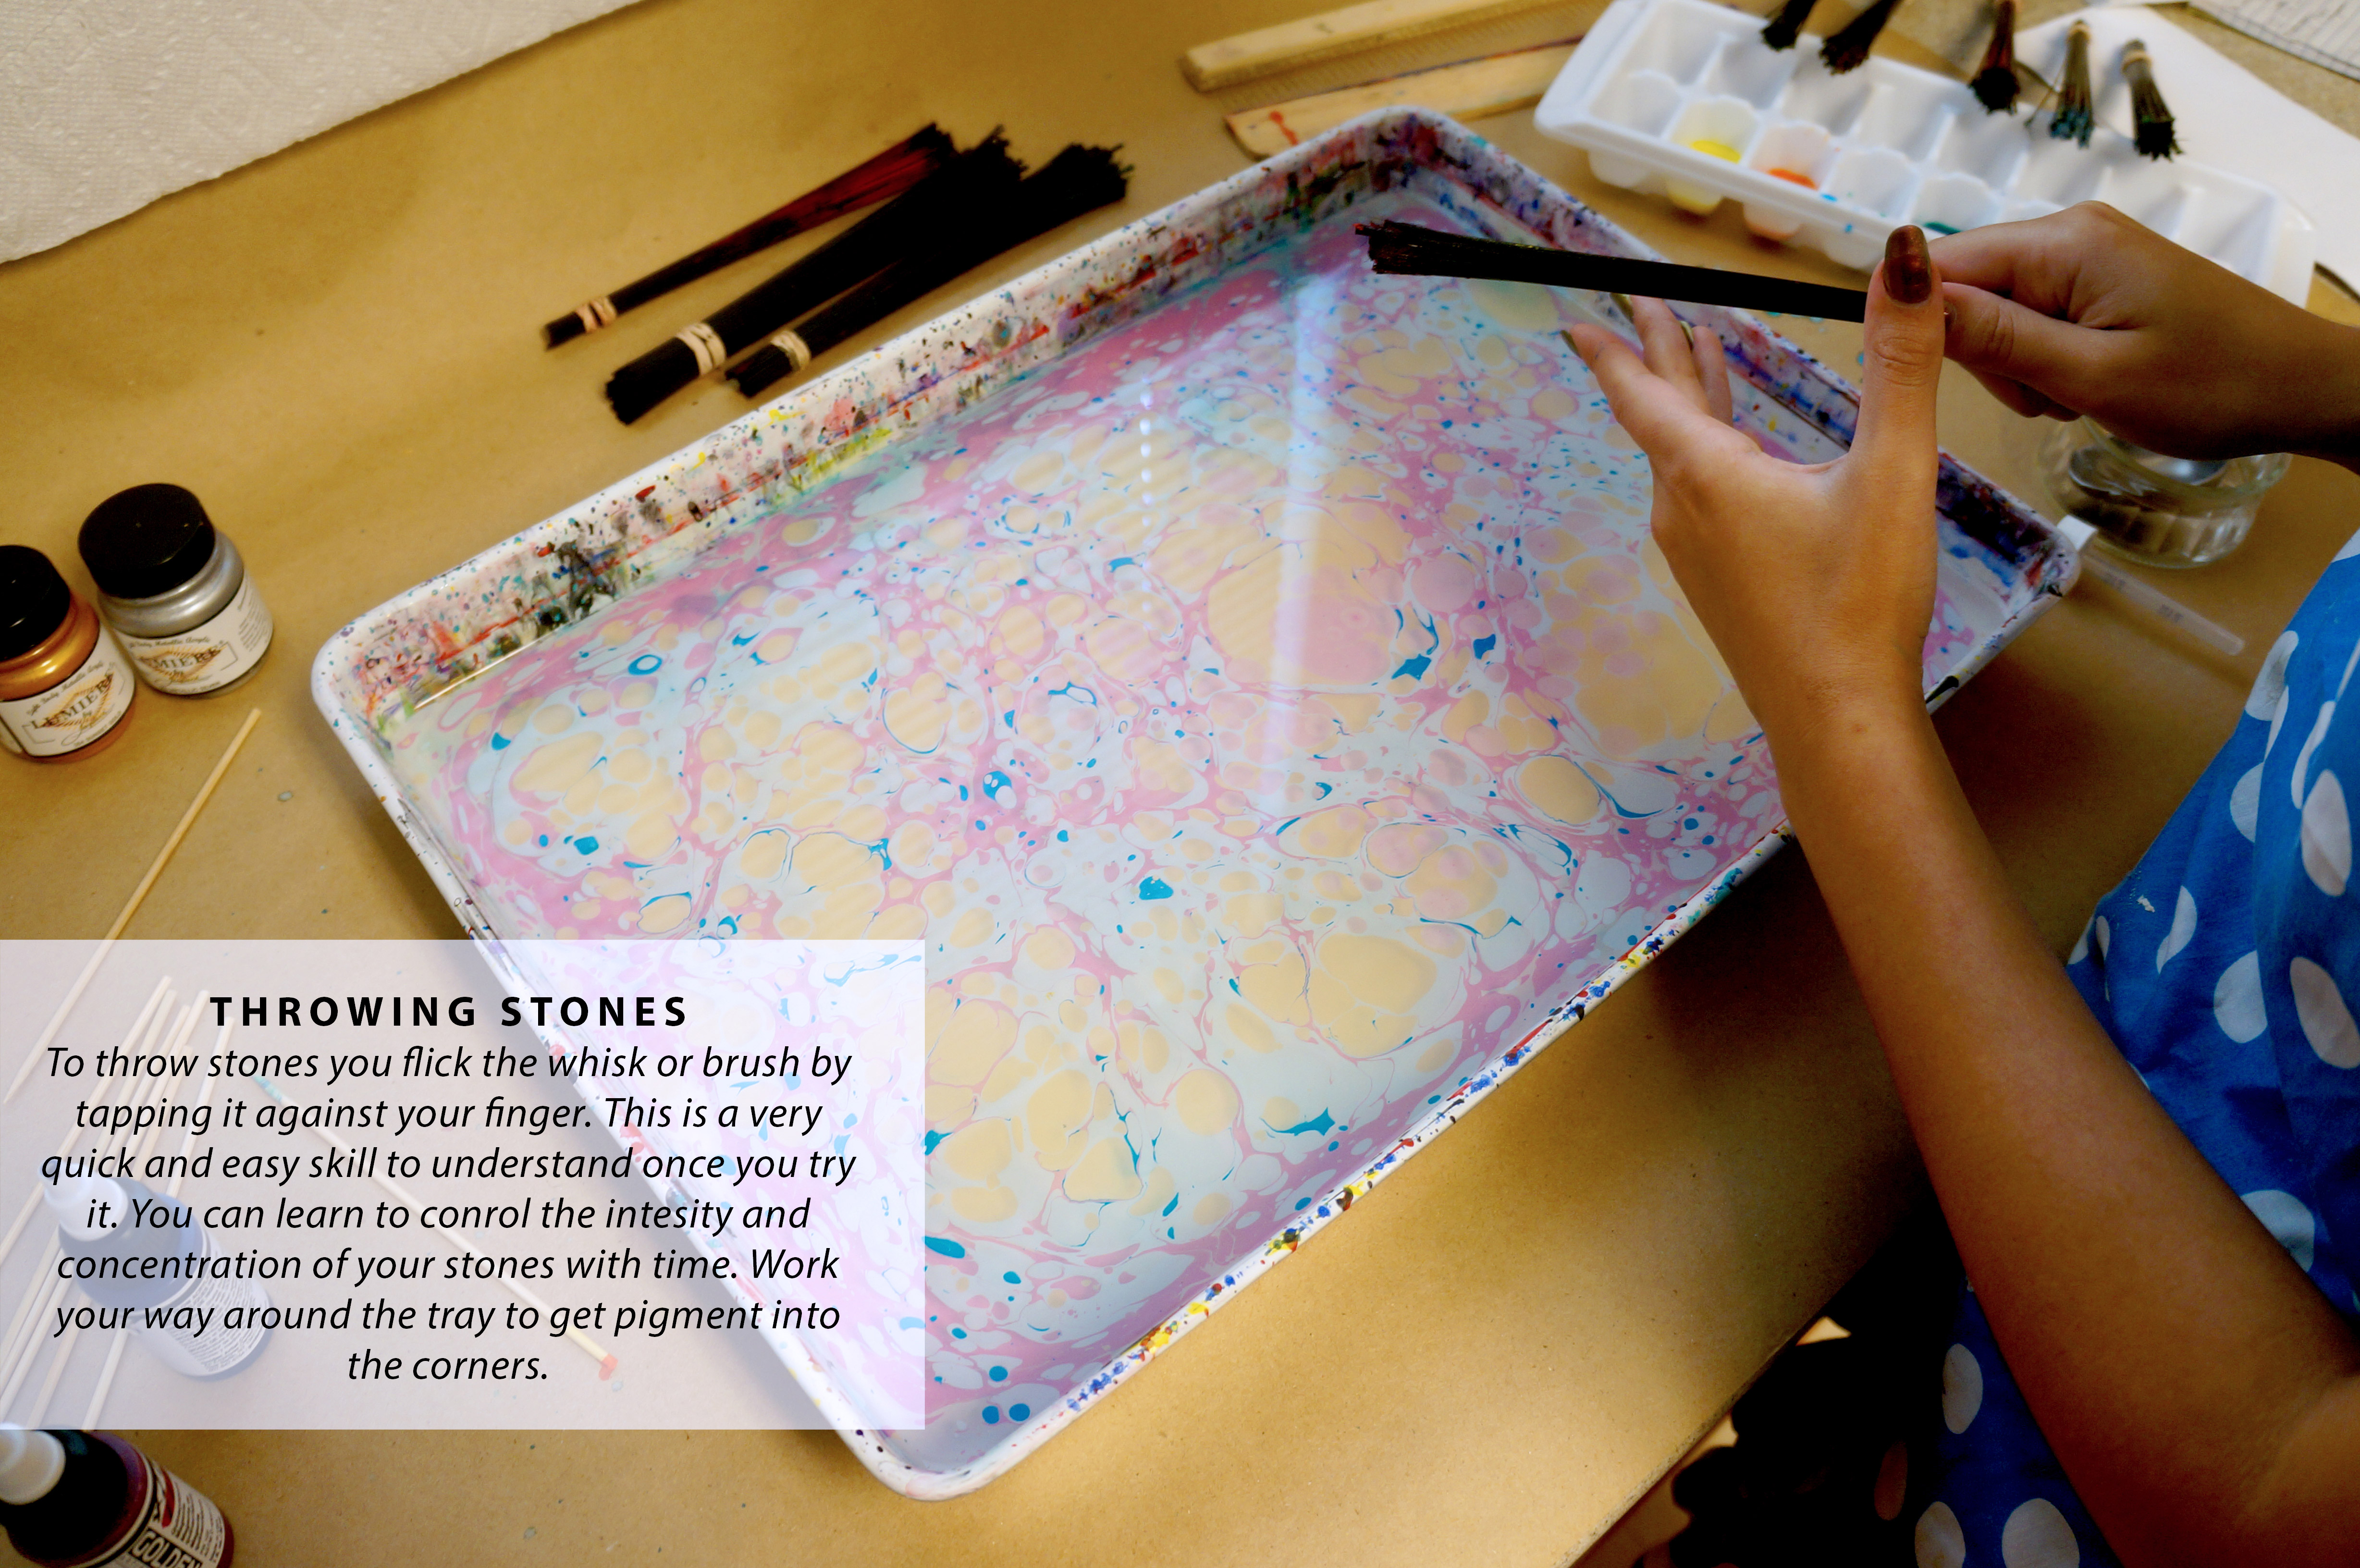
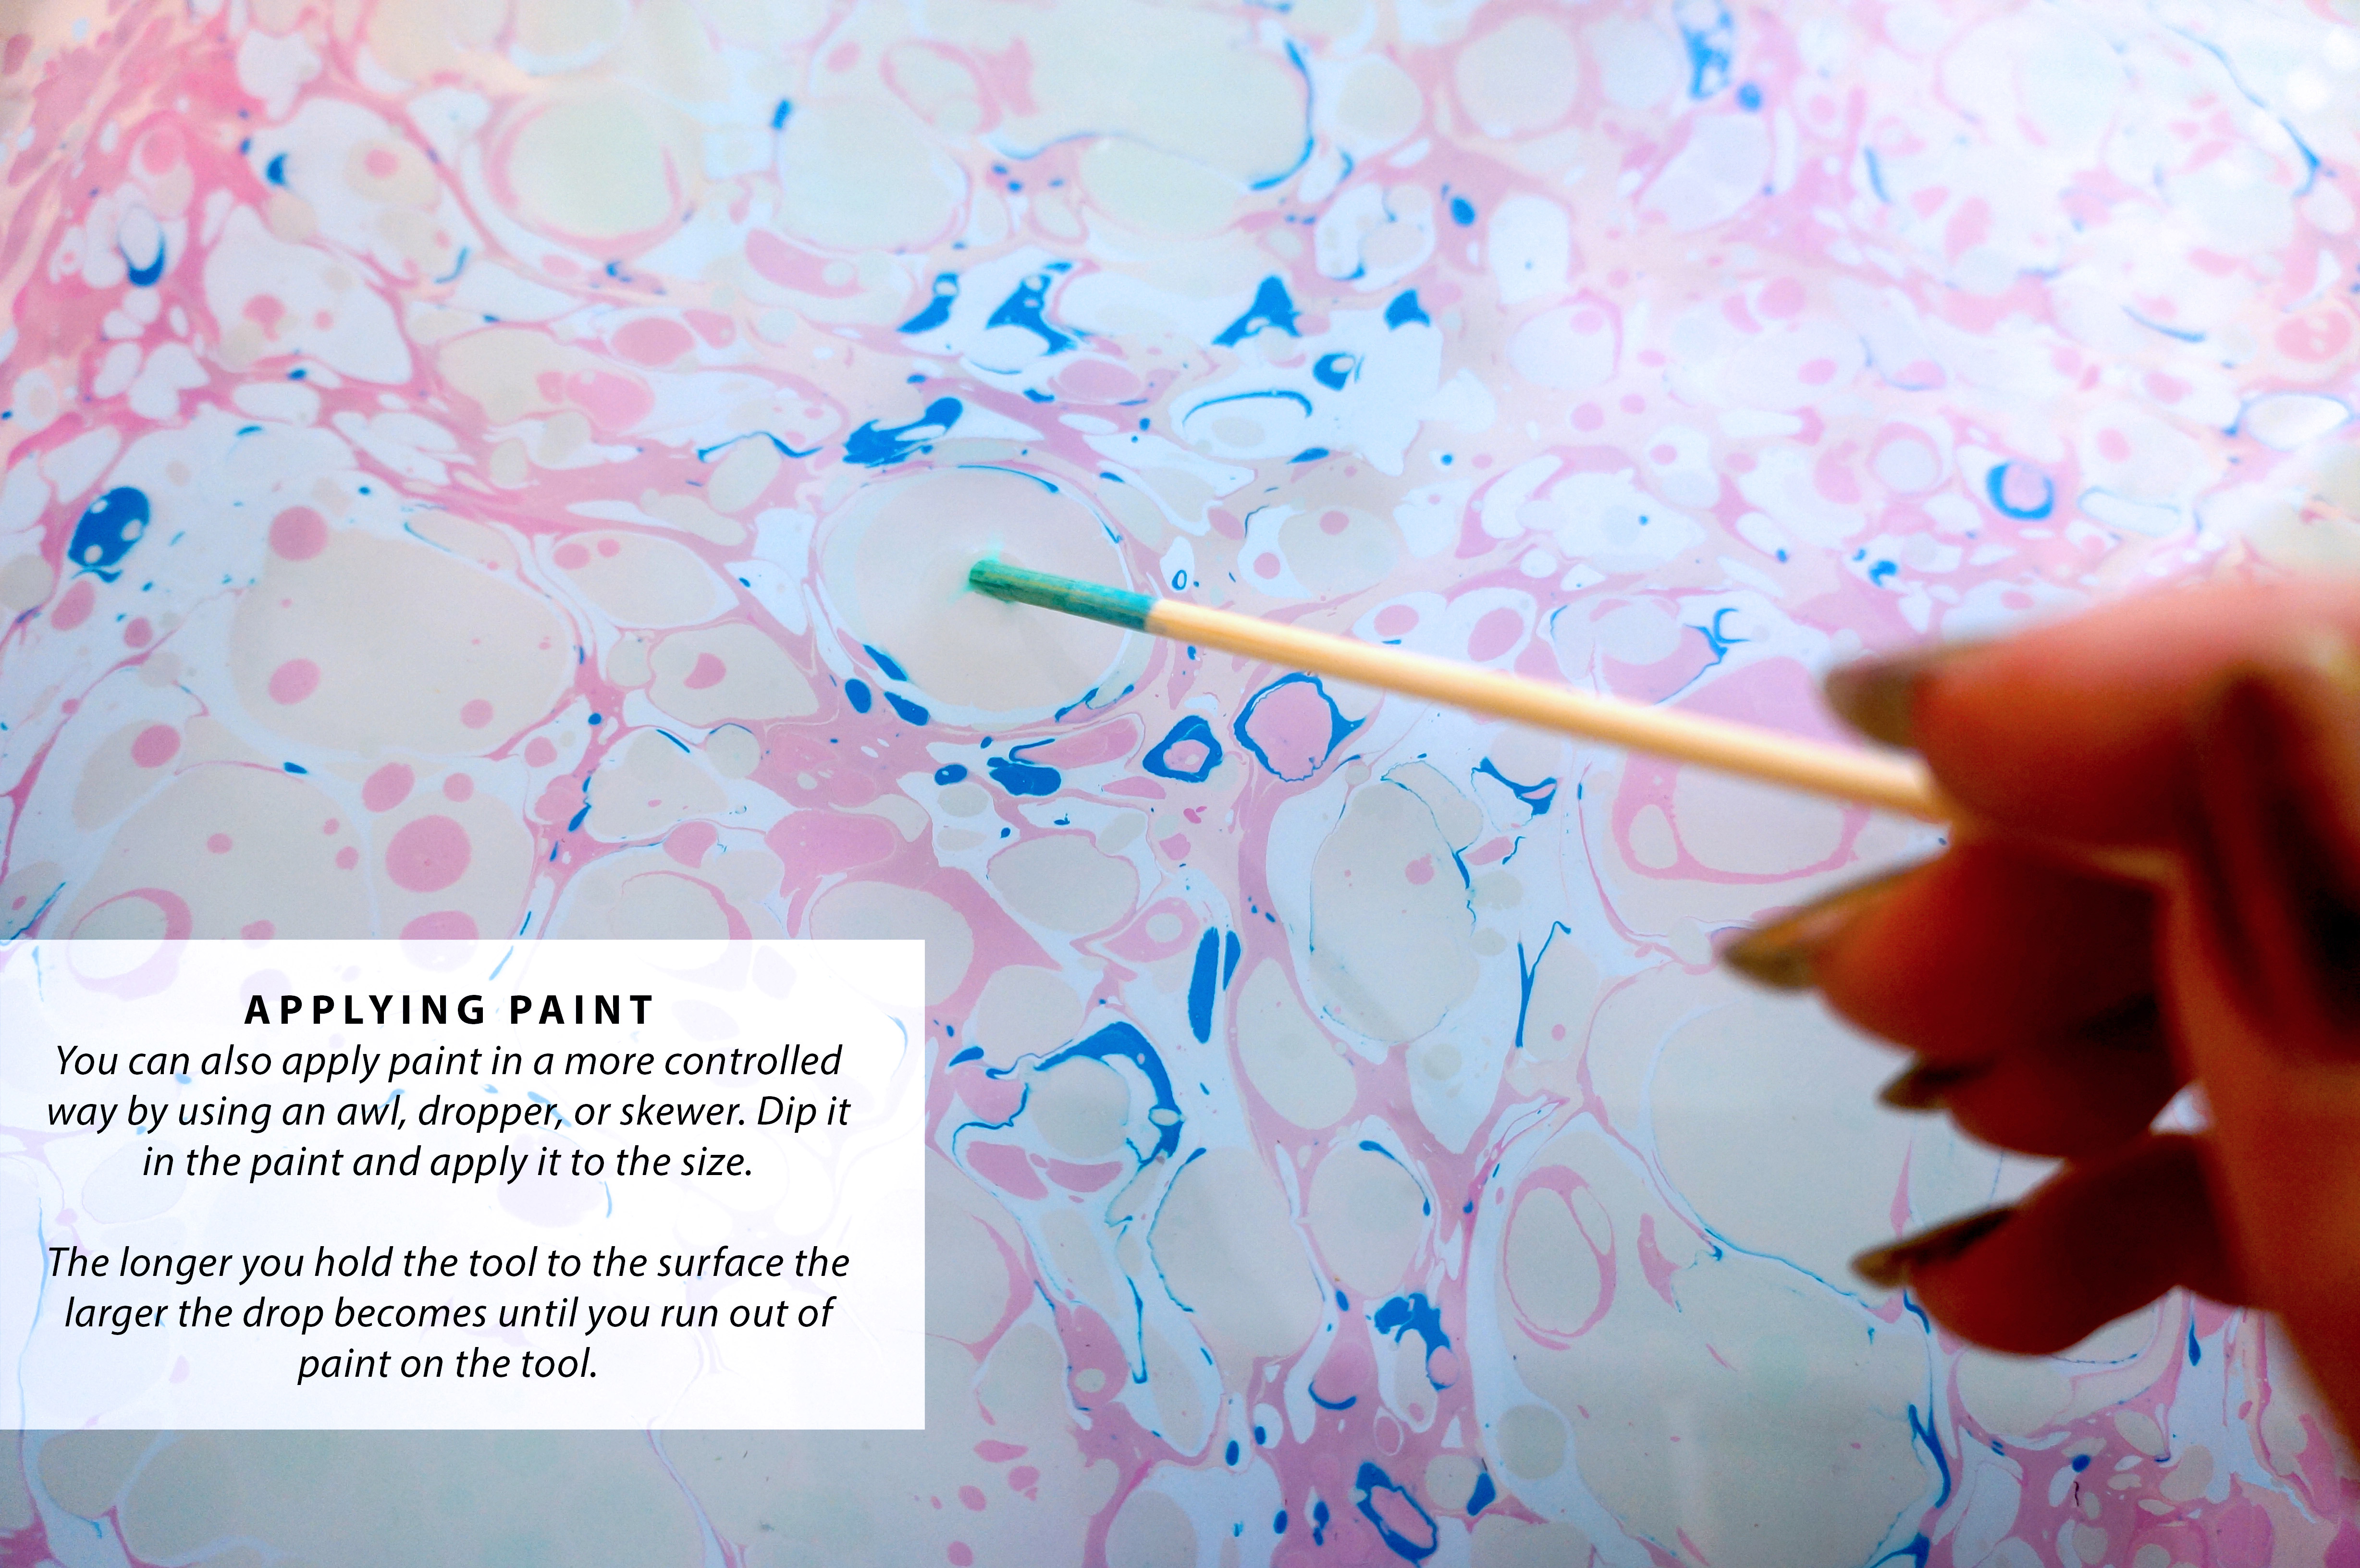
Begin making your patterns. You can be as methodical or spontaneous as you like with this. You can lay even rows of dots or as I prefer – throw stones. One note – Black should generally applied first or it will turn our grey.
I feel color mixing is the place where you really need to find what is right for you. I’ve included a few guesstimates of what I was doing to mix my colors but you will need to adjust to get the right flow and color intensity depending on what you use. Remember, colors can be mixed in your palette but they will not mix on the size.
I did not need to add gall to my paints as the High Flow acrylics spread beautifully, but some thicker metallic pigments or other brands might require it.
STEP FOUR:
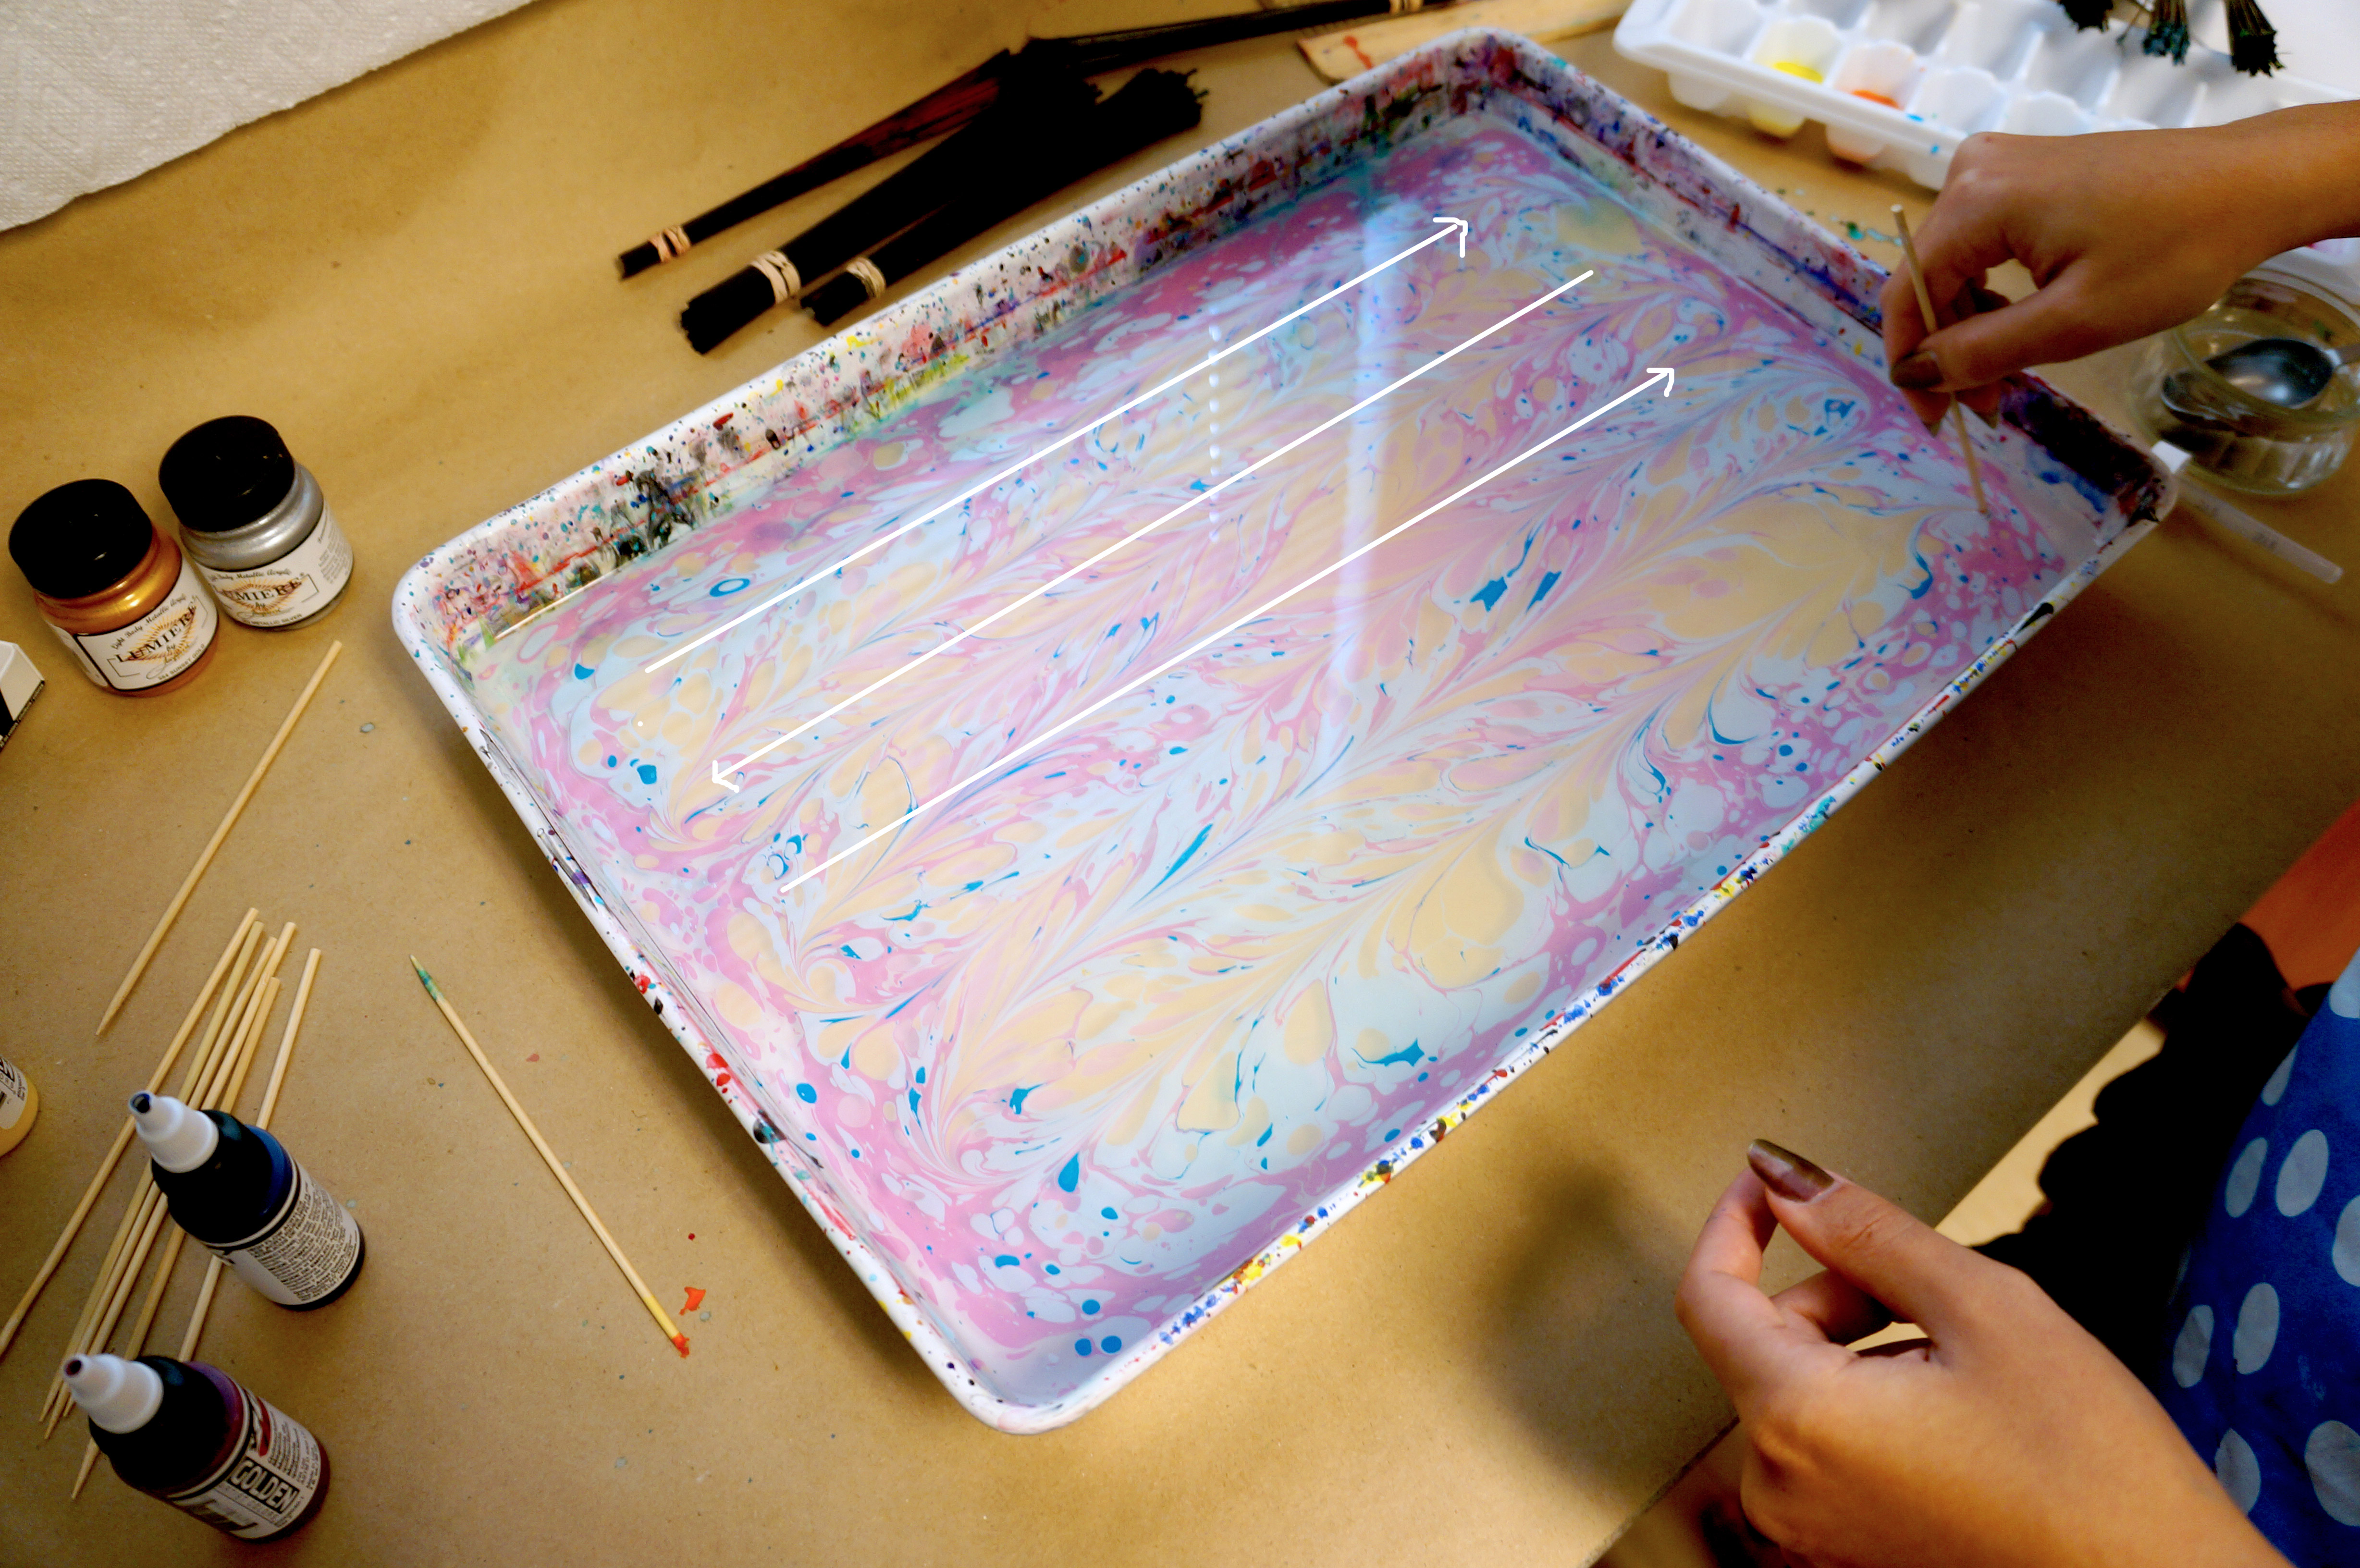
Begin making your patterns. You can be as methodical or spontaneous as you like with this. You can lay even rows of dots or as I prefer – throw stones. One note – Black should generally applied first or it will turn our grey.

 You can print now or you can comb in patterns.


 STEP FIVE:
Time to print. Remember you must work pretty quickly – you don’t have hours to make your patterns or the acrylic will start to dry and sort of break up or shatter. At most I think you have 10-30 minutes. I usually spent about 6-8 minutes to lay my colors and make a print.
STEP FIVE:
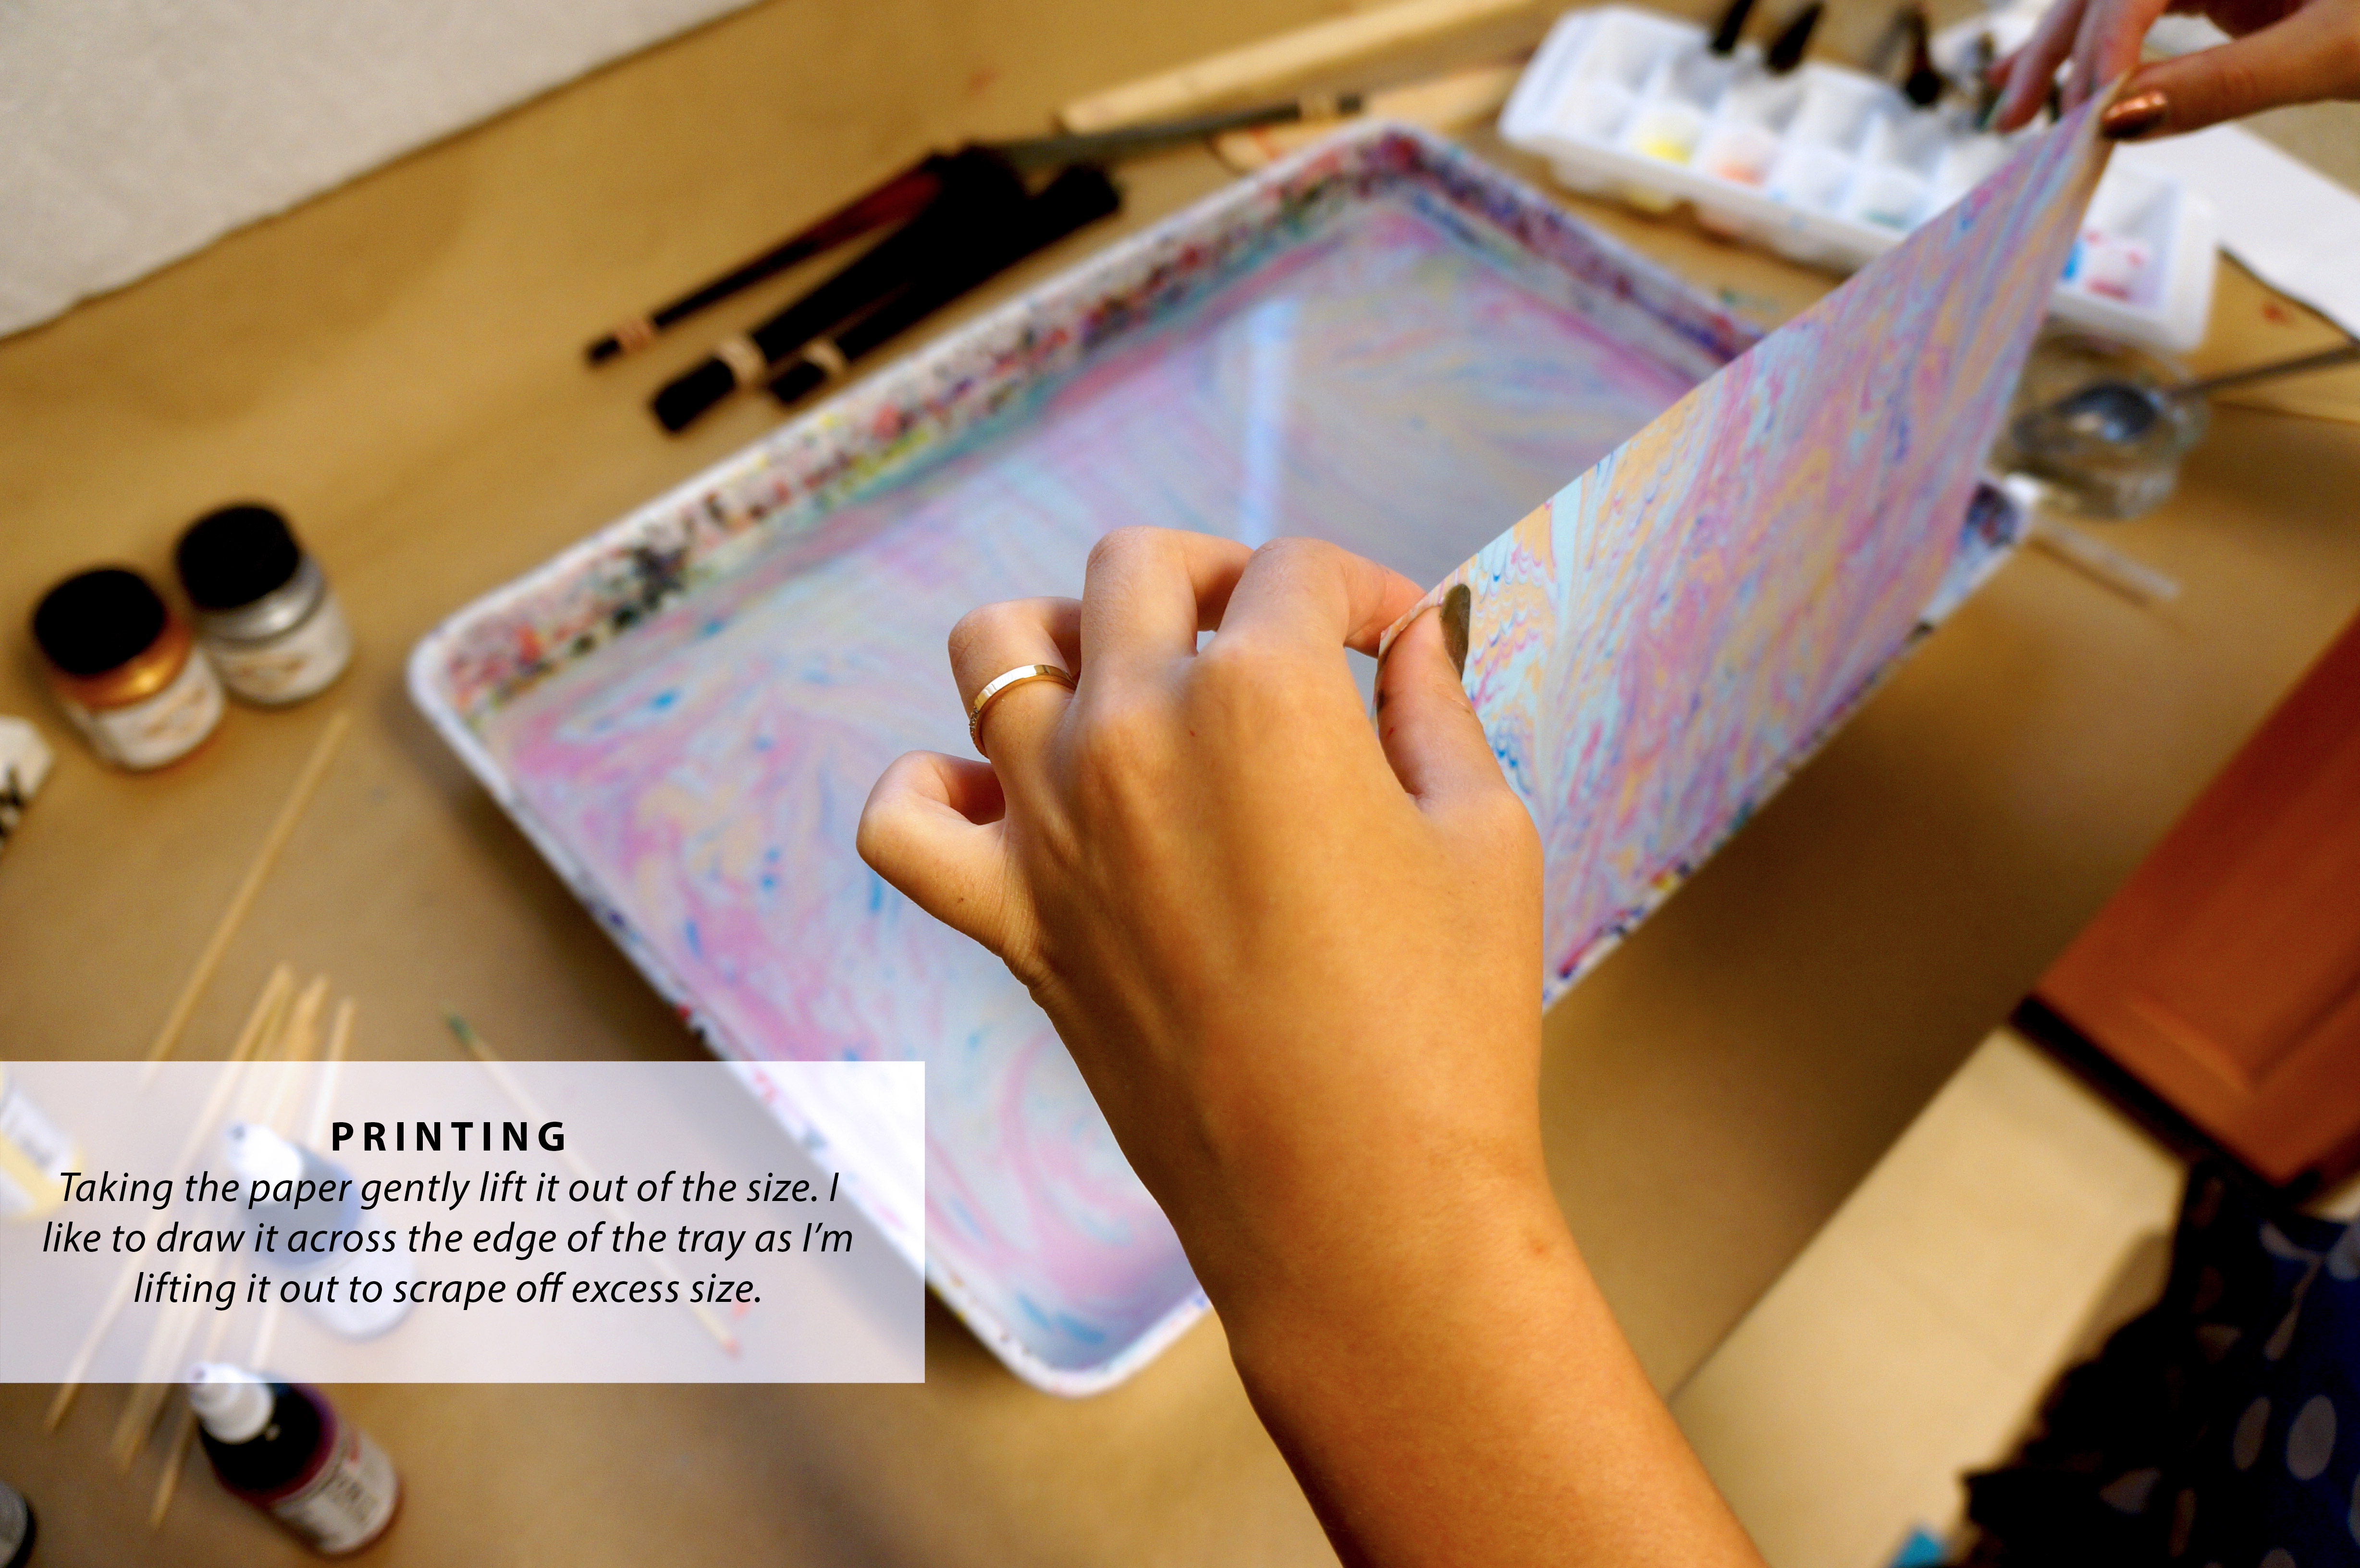
Time to print. Remember you must work pretty quickly – you don’t have hours to make your patterns or the acrylic will start to dry and sort of break up or shatter. At most I think you have 10-30 minutes. I usually spent about 6-8 minutes to lay my colors and make a print.


 STEP SIX:
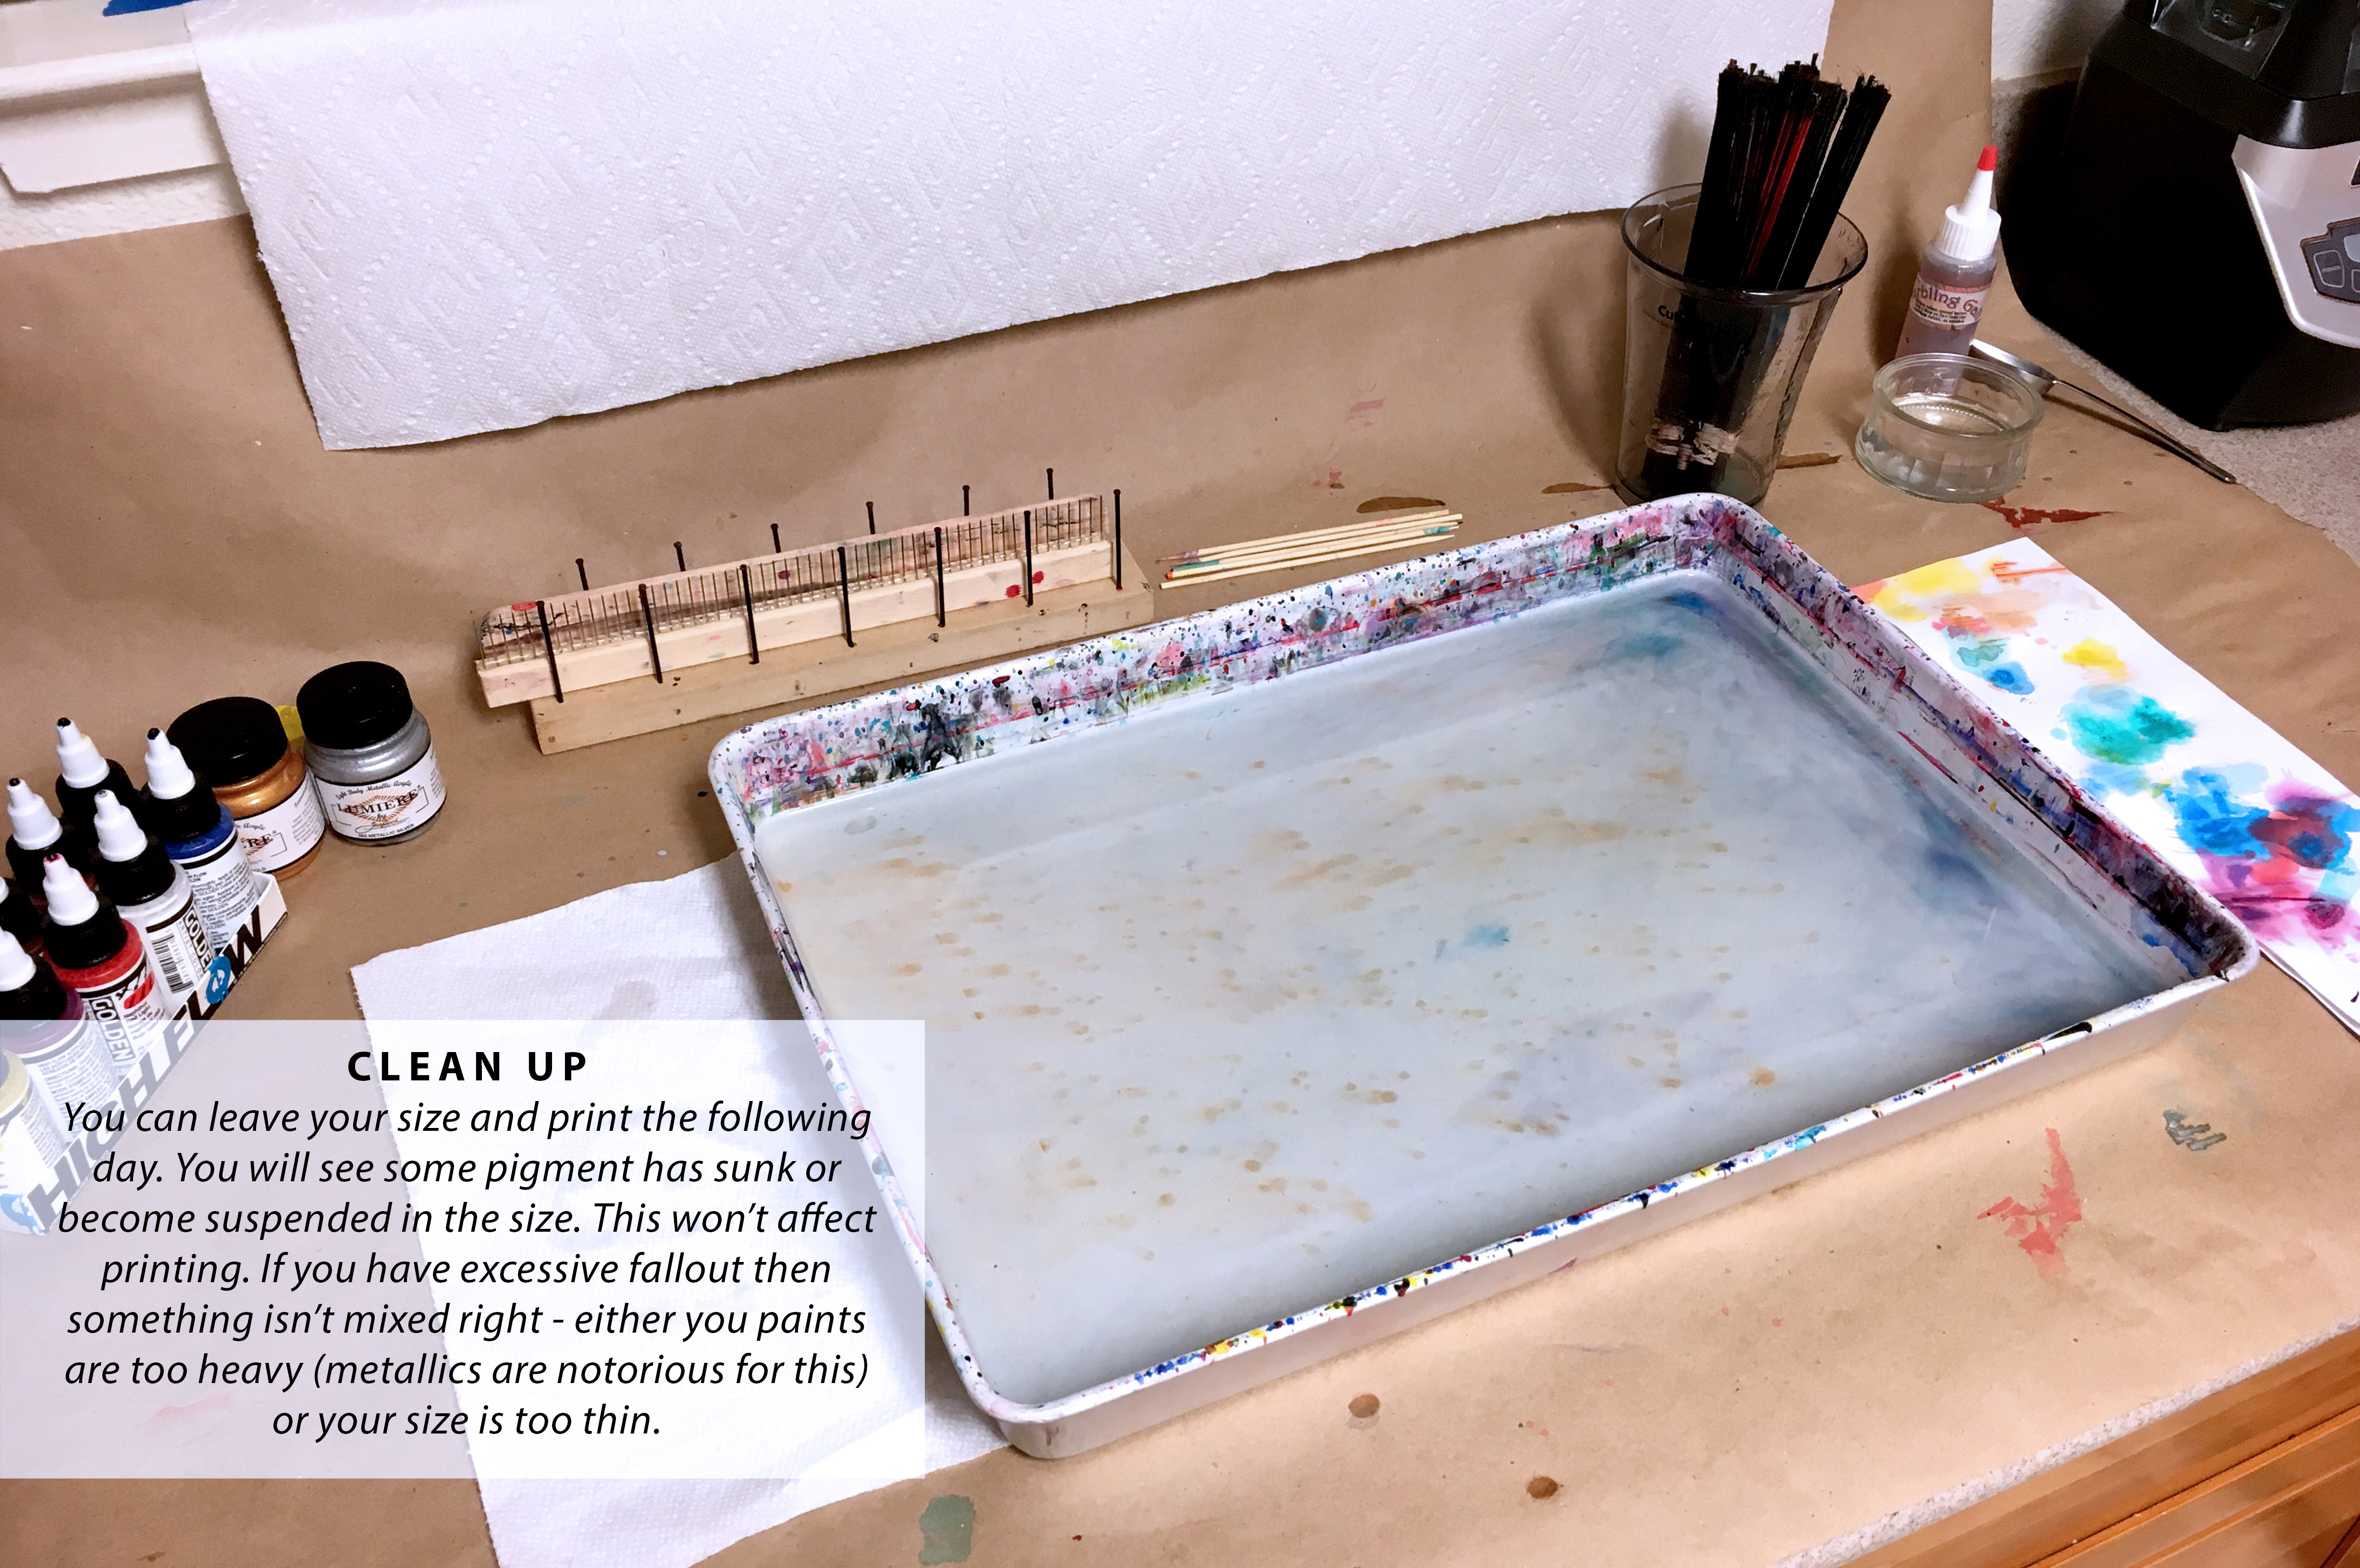
Clean your size. You need to skim off any remaining colors from the surface of the size so it will be ready for the next print. Many people say that the size begins to work a bit better after your first few prints – so don’t worry about a slightly dirty size as long as the ‘dirt’ is underneath the surface.
STEP SIX:
Clean your size. You need to skim off any remaining colors from the surface of the size so it will be ready for the next print. Many people say that the size begins to work a bit better after your first few prints – so don’t worry about a slightly dirty size as long as the ‘dirt’ is underneath the surface.

 TROUBLESHOOTING:
 MISPRINTS:
This print has all the bad stuff in it – the lighter areas (like stripes) are hesitation marks from not laying down the paper in one smooth motion. The giant white spot (and the smaller one SE of it) are air bubbles. These issues happen more often with thick papers as they are harder to lay down on the size.
MISPRINTS:
This print has all the bad stuff in it – the lighter areas (like stripes) are hesitation marks from not laying down the paper in one smooth motion. The giant white spot (and the smaller one SE of it) are air bubbles. These issues happen more often with thick papers as they are harder to lay down on the size.
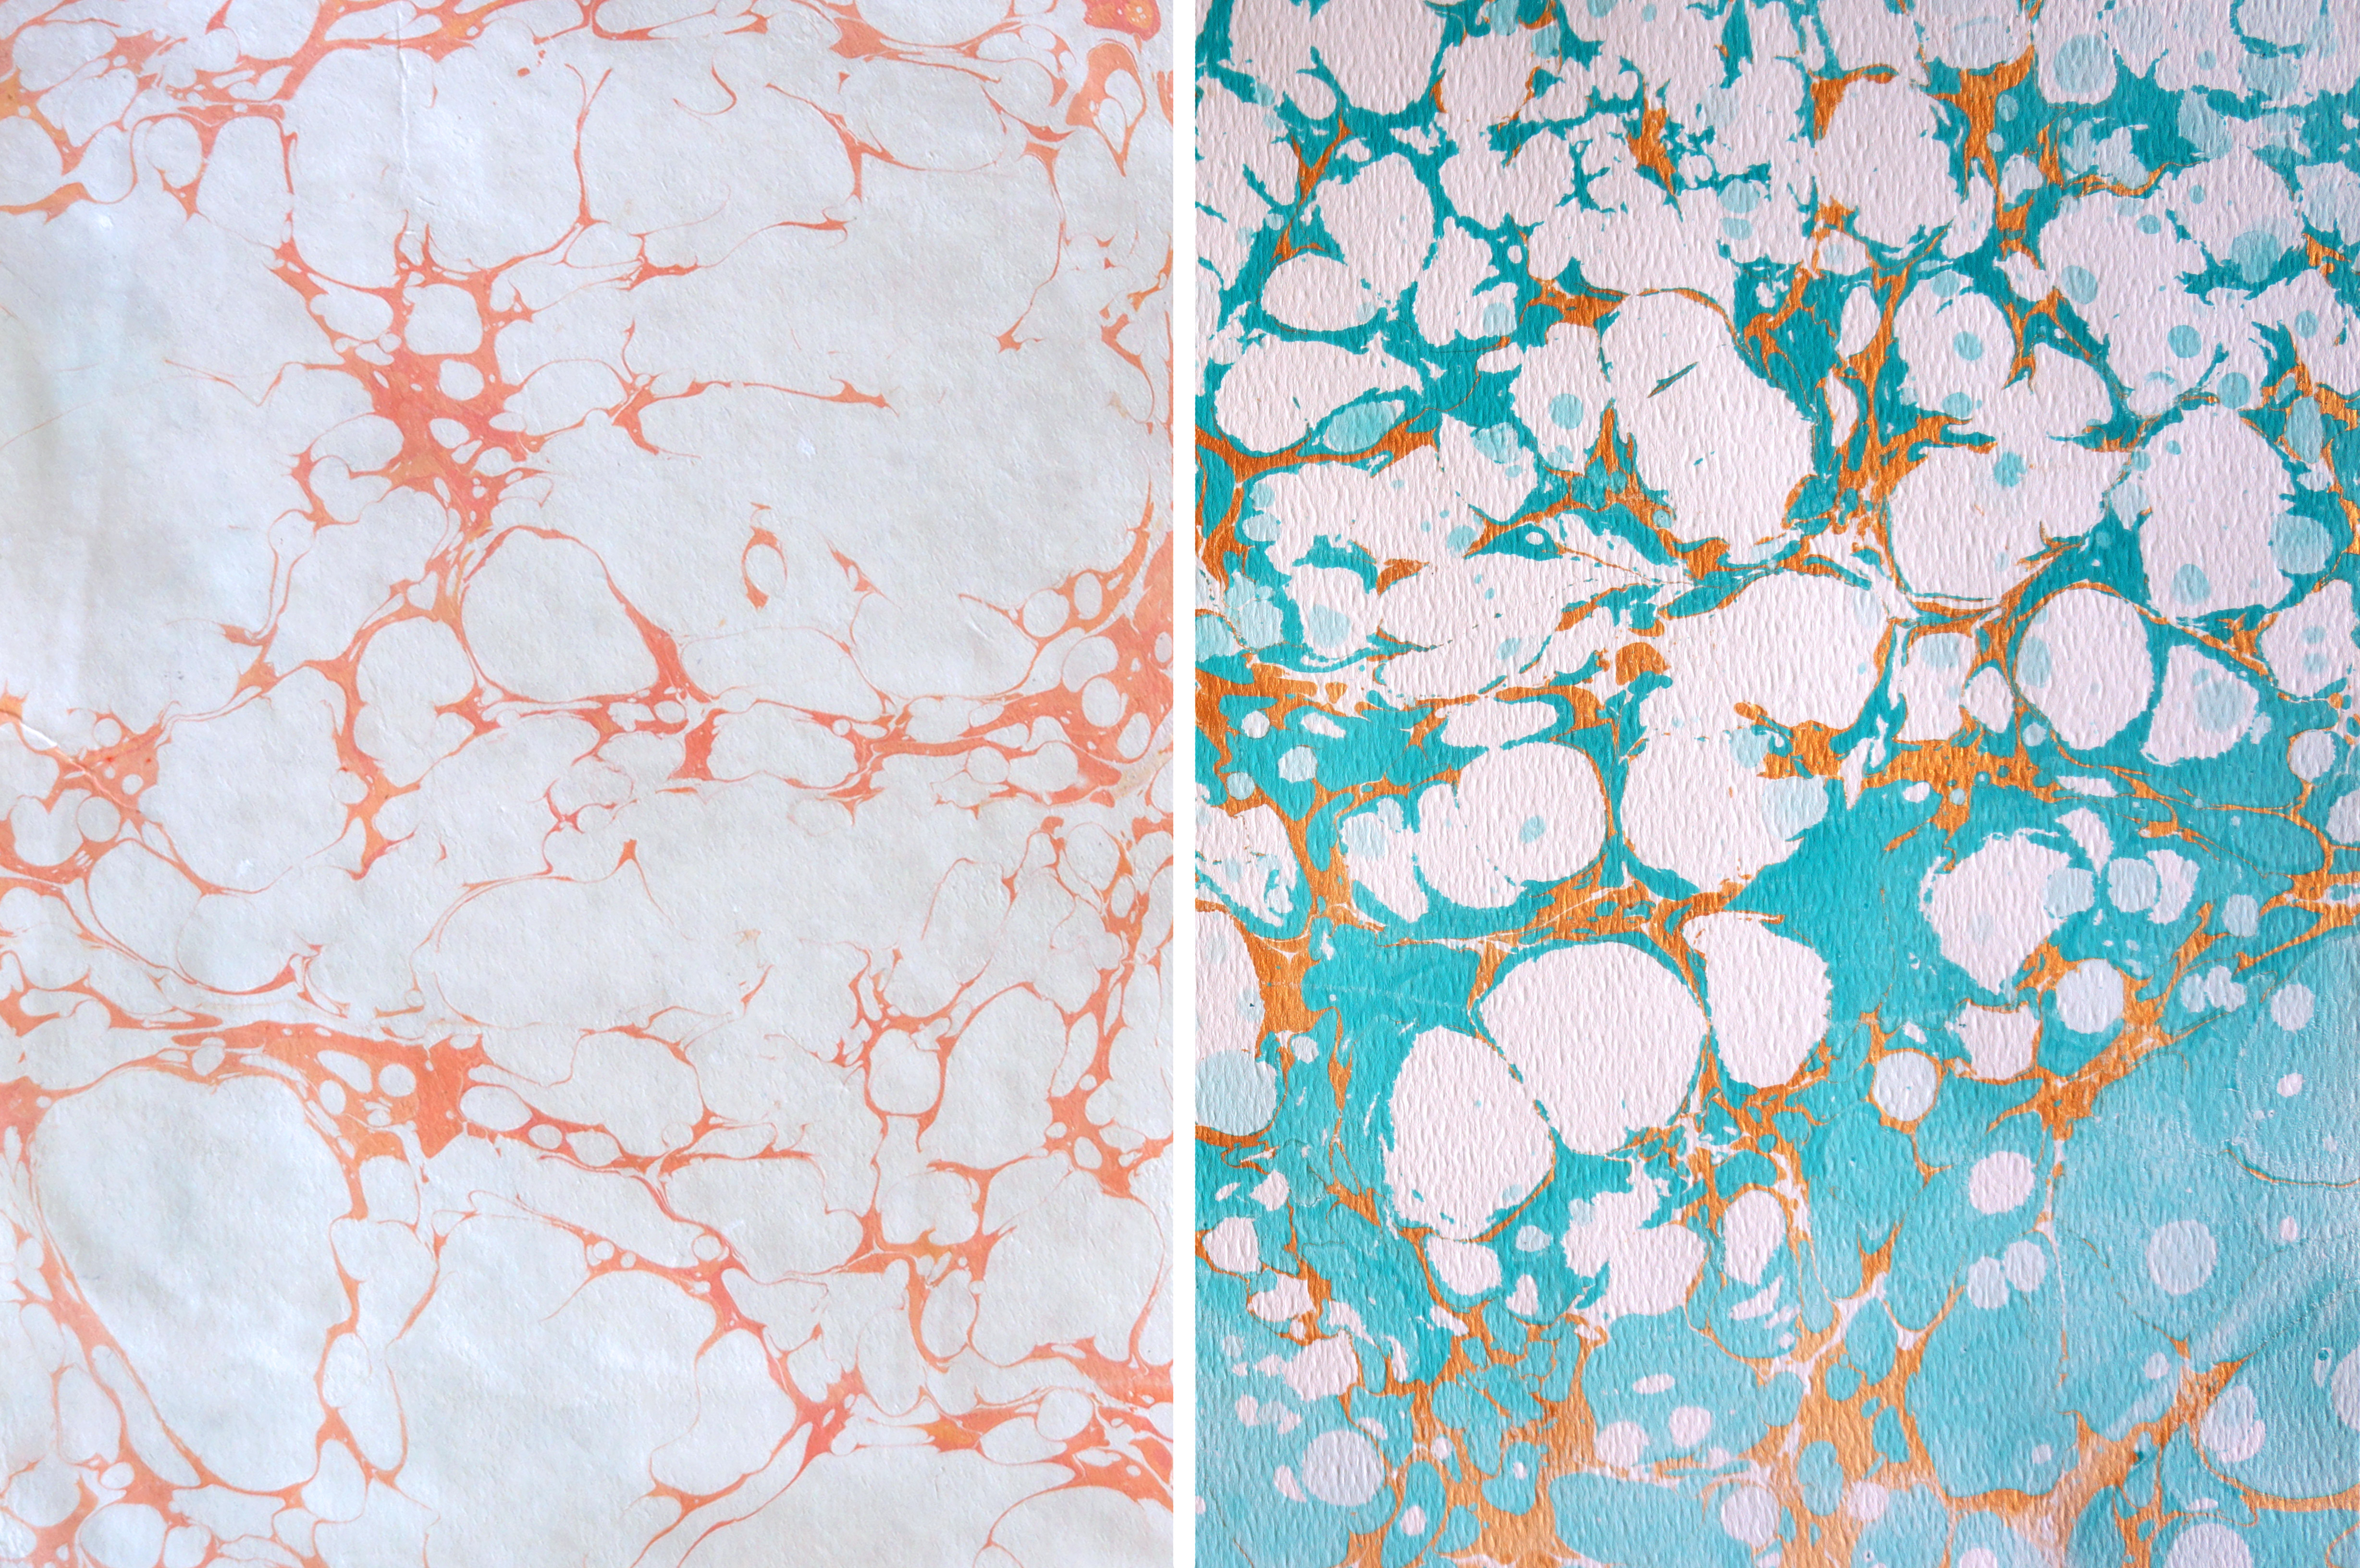 OPEN PATTERNS/ ITALIAN VEIN:
If you want to make open areas – like those shown above you can apply some water mixed with photoflow (synthetic gall) or just apply white paint (if your paper is white you won’t see the white pigment). In the left example I threw stones with white paint (properly diluted of course), and on the right I used a photoflow/water. I would avoid doing Italian vein patterns like those above (IF using gall) until the end as the gall can begin to contaminate the size and needs to be well skimmed. If using white paint contamination isn’t a problem as it skims just like the other pigments.
OPEN PATTERNS/ ITALIAN VEIN:
If you want to make open areas – like those shown above you can apply some water mixed with photoflow (synthetic gall) or just apply white paint (if your paper is white you won’t see the white pigment). In the left example I threw stones with white paint (properly diluted of course), and on the right I used a photoflow/water. I would avoid doing Italian vein patterns like those above (IF using gall) until the end as the gall can begin to contaminate the size and needs to be well skimmed. If using white paint contamination isn’t a problem as it skims just like the other pigments.
 BAD OVERPRINT:
Above you will see evidence of a failed over-marbling (barely visible in the center as a pinkish smear). The issue here was I tried to print the second design while the first design was still wet with size so the pigment couldn’t come in contact with the paper and ‘stick’. I had only let the first design sit for a few minutes. If you want to marble a design over another marbled design let it fully dry. It may need to have Alum reapplied as well.
UGLY PRINTS:
The first experiments from a couple weeks ago turned out pretty poorly due to me making my size too thick (oddly this made marbling the wood easier and held heavy pigments like the metallics better). The thick size meant colors did not spread well, and I had faded looking areas where pigment wouldn’t flow. The fix was just to draw over top of the bad prints. Obviously, the’d be useless for book binding, but they can be a fun base for mixed media work. I may play around with using thicker size to achieve certain effects.
BAD OVERPRINT:
Above you will see evidence of a failed over-marbling (barely visible in the center as a pinkish smear). The issue here was I tried to print the second design while the first design was still wet with size so the pigment couldn’t come in contact with the paper and ‘stick’. I had only let the first design sit for a few minutes. If you want to marble a design over another marbled design let it fully dry. It may need to have Alum reapplied as well.
UGLY PRINTS:
The first experiments from a couple weeks ago turned out pretty poorly due to me making my size too thick (oddly this made marbling the wood easier and held heavy pigments like the metallics better). The thick size meant colors did not spread well, and I had faded looking areas where pigment wouldn’t flow. The fix was just to draw over top of the bad prints. Obviously, the’d be useless for book binding, but they can be a fun base for mixed media work. I may play around with using thicker size to achieve certain effects.
I found that for me the absolutely best papers to marble were the Japanese papers. They were strong enough to stand up to being wet and they marbled well with and without Alum. I know many marblers use Textoprint and I have used it before but I enjoyed the Mulberry much more. Let’s start backwards with the results, then walk through the process.
Wood Board: Hard to marble. It worked better when I had a super thick (incorrectly mixed) size. The thick size would stick to the board and protect the acrylic as it dried – if you rinse or rub the wood you risk washing off the acrylic but if you let it fully dry it stays perfectly fine. You can see I rinsed or rubed some areas on the purple board – I just wanted to see how easily it came off before it was dry.
Drawing Paper/Cardstock: These print fine and are easy to handle as long as you don’t let them wrinkle. Thy really need to be pressed flat.
Watercolor Paper: I used some basic cold press water color papers as well as some heavy weight stuff I didn’t know the name of. I like how bright the results are on the sized papers, but they are hard to lay down on the size because of how stiff they are. They also tend to wrinkle a bit and need to be flattened.
Printmaking Paper: I liked this paper a lot although I didn’t print a lot of it. I believe I used Rives BFK. Printmaking papers generally don’t have much size and hold up to getting wet without crazy wrinkling. The lighter fuzzy areas on these papers are due to an issue with my size – and are not the fault of the paper itself.
Handmade Paper: This is paper I made myself a few years ago. I believe it is cotton paper or Mulberry. It’s very soft and tears super easy when wet so it must be handled carefully. Likewise, it won’t hold up to Alum, but it didn’t need it.
Mulberry Paper: The best. Affordable, strong, easy to lay down without bubbles or wrinkles and it worked with and without Alum. The only disadvantage was the paper I have isn’t true white, so it’s not quite as bright as say the watercolor paper. This is what I purchased from Amazon.
MATERIALS:
On to the materials. This was my setup.
I had a basic baking tray that I spray painted white inside. This sort of helped me see the colors on the size better. I used synthetic broom whisks, an ice cube tray, so combs, skewers and eye droppers as well. For pigments I know many marblers love the High Flow Acrylics made by Golden so that’s what I used as well. These used to be called their airbrush line, but they changed the name because of of how many other uses they have – they’re great for marbling, calligraphy, airbrush, and pour painting.
 STEP ONE:
The absolute first thing you need to do after collecting all your materials is making the size as it’s best to let it sit overnight. I have never marbled with methylcellulose so I can’t tell you about that. For my baking tray I need 9 cups of size. Mix 1.25 TBSP of Carrageenan with 9 cups water and blend for 30 seconds to a minute. Then let it sit – either in the tray or better yet in a jug in the fridge.
STEP TWO:
Prepare the Alum. Mix one TBSP Alum with one cup water. The instruction on my Alum said one teaspoon but that never worked for me and my colors always ran off in the rinse. Do not use pickling alum – it has additives that affect how it works, buy Alum specifically for marbling.
STEP ONE:
The absolute first thing you need to do after collecting all your materials is making the size as it’s best to let it sit overnight. I have never marbled with methylcellulose so I can’t tell you about that. For my baking tray I need 9 cups of size. Mix 1.25 TBSP of Carrageenan with 9 cups water and blend for 30 seconds to a minute. Then let it sit – either in the tray or better yet in a jug in the fridge.
STEP TWO:
Prepare the Alum. Mix one TBSP Alum with one cup water. The instruction on my Alum said one teaspoon but that never worked for me and my colors always ran off in the rinse. Do not use pickling alum – it has additives that affect how it works, buy Alum specifically for marbling.


 Apply the Alum using a sponge. I set my papers on another baking sheet to sponge them and I mark the back of my sheets with a pencil ‘x’ so I don’t forget which side has been treated.

 You can set your sheets in between blotter sheets. Lie them flat or hang them if they’re strong enough. You can flatten them after or during the process of drying. You can alum sheets the morning you plan to marble or a day or two before. I’ve used papers that were alumed a week before but most people don’t recommend it. Be aware that moisture and humidity deactivate the alum over time.
IMPORTANT NOTE: Thin papers or textured papers may pill – instead of wiping the size on, you can spray and blot it.
STEP THREE:
Time to set everything up. Grab all your materials, lay down any protective sheets on your table (or kitchen counter in my case) and go grab your size from the fridge. Get your set up ready and pour your size into your tray. I let it sit for a bit to warm up; I’m not sure if that makes a difference or not, but I used to time to go grab all my papers and set everything up. The carrageenan should free of bubbles by now, but you can skim off a few if any pop up.
Now we need mix our colors. For this tutorial I used only Golden High Flow Acrylics as it meant the fewest variables. Most people say don’t mix brands as they have different properties and might react weird on the size. I didn’t have an issue with this in previous tests, but then again I’m not looking for perfection so it’s just something to keep in mind.
You can set your sheets in between blotter sheets. Lie them flat or hang them if they’re strong enough. You can flatten them after or during the process of drying. You can alum sheets the morning you plan to marble or a day or two before. I’ve used papers that were alumed a week before but most people don’t recommend it. Be aware that moisture and humidity deactivate the alum over time.
IMPORTANT NOTE: Thin papers or textured papers may pill – instead of wiping the size on, you can spray and blot it.
STEP THREE:
Time to set everything up. Grab all your materials, lay down any protective sheets on your table (or kitchen counter in my case) and go grab your size from the fridge. Get your set up ready and pour your size into your tray. I let it sit for a bit to warm up; I’m not sure if that makes a difference or not, but I used to time to go grab all my papers and set everything up. The carrageenan should free of bubbles by now, but you can skim off a few if any pop up.
Now we need mix our colors. For this tutorial I used only Golden High Flow Acrylics as it meant the fewest variables. Most people say don’t mix brands as they have different properties and might react weird on the size. I didn’t have an issue with this in previous tests, but then again I’m not looking for perfection so it’s just something to keep in mind.

 I feel color mixing is the place where you really need to find what is right for you. I’ve included a few guesstimates of what I was doing to mix my colors but you will need to adjust to get the right flow and color intensity depending on what you use. Remember, colors can be mixed in your palette but they will not mix on the size.
I did not need to add gall to my paints as the High Flow acrylics spread beautifully, but some thicker metallic pigments or other brands might require it.
STEP FOUR:
Begin making your patterns. You can be as methodical or spontaneous as you like with this. You can lay even rows of dots or as I prefer – throw stones. One note – Black should generally applied first or it will turn our grey.
You can print now or you can comb in patterns.
STEP FIVE:
Time to print. Remember you must work pretty quickly – you don’t have hours to make your patterns or the acrylic will start to dry and sort of break up or shatter. At most I think you have 10-30 minutes. I usually spent about 6-8 minutes to lay my colors and make a print.
STEP SIX:
Clean your size. You need to skim off any remaining colors from the surface of the size so it will be ready for the next print. Many people say that the size begins to work a bit better after your first few prints – so don’t worry about a slightly dirty size as long as the ‘dirt’ is underneath the surface.
TROUBLESHOOTING:
MISPRINTS:
This print has all the bad stuff in it – the lighter areas (like stripes) are hesitation marks from not laying down the paper in one smooth motion. The giant white spot (and the smaller one SE of it) are air bubbles. These issues happen more often with thick papers as they are harder to lay down on the size.
OPEN PATTERNS/ ITALIAN VEIN:
If you want to make open areas – like those shown above you can apply some water mixed with photoflow (synthetic gall) or just apply white paint (if your paper is white you won’t see the white pigment). In the left example I threw stones with white paint (properly diluted of course), and on the right I used a photoflow/water. I would avoid doing Italian vein patterns like those above (IF using gall) until the end as the gall can begin to contaminate the size and needs to be well skimmed. If using white paint contamination isn’t a problem as it skims just like the other pigments.
BAD OVERPRINT:
Above you will see evidence of a failed over-marbling (barely visible in the center as a pinkish smear). The issue here was I tried to print the second design while the first design was still wet with size so the pigment couldn’t come in contact with the paper and ‘stick’. I had only let the first design sit for a few minutes. If you want to marble a design over another marbled design let it fully dry. It may need to have Alum reapplied as well.
UGLY PRINTS:
The first experiments from a couple weeks ago turned out pretty poorly due to me making my size too thick (oddly this made marbling the wood easier and held heavy pigments like the metallics better). The thick size meant colors did not spread well, and I had faded looking areas where pigment wouldn’t flow. The fix was just to draw over top of the bad prints. Obviously, the’d be useless for book binding, but they can be a fun base for mixed media work. I may play around with using thicker size to achieve certain effects.
I feel color mixing is the place where you really need to find what is right for you. I’ve included a few guesstimates of what I was doing to mix my colors but you will need to adjust to get the right flow and color intensity depending on what you use. Remember, colors can be mixed in your palette but they will not mix on the size.
I did not need to add gall to my paints as the High Flow acrylics spread beautifully, but some thicker metallic pigments or other brands might require it.
STEP FOUR:
Begin making your patterns. You can be as methodical or spontaneous as you like with this. You can lay even rows of dots or as I prefer – throw stones. One note – Black should generally applied first or it will turn our grey.
You can print now or you can comb in patterns.
STEP FIVE:
Time to print. Remember you must work pretty quickly – you don’t have hours to make your patterns or the acrylic will start to dry and sort of break up or shatter. At most I think you have 10-30 minutes. I usually spent about 6-8 minutes to lay my colors and make a print.
STEP SIX:
Clean your size. You need to skim off any remaining colors from the surface of the size so it will be ready for the next print. Many people say that the size begins to work a bit better after your first few prints – so don’t worry about a slightly dirty size as long as the ‘dirt’ is underneath the surface.
TROUBLESHOOTING:
MISPRINTS:
This print has all the bad stuff in it – the lighter areas (like stripes) are hesitation marks from not laying down the paper in one smooth motion. The giant white spot (and the smaller one SE of it) are air bubbles. These issues happen more often with thick papers as they are harder to lay down on the size.
OPEN PATTERNS/ ITALIAN VEIN:
If you want to make open areas – like those shown above you can apply some water mixed with photoflow (synthetic gall) or just apply white paint (if your paper is white you won’t see the white pigment). In the left example I threw stones with white paint (properly diluted of course), and on the right I used a photoflow/water. I would avoid doing Italian vein patterns like those above (IF using gall) until the end as the gall can begin to contaminate the size and needs to be well skimmed. If using white paint contamination isn’t a problem as it skims just like the other pigments.
BAD OVERPRINT:
Above you will see evidence of a failed over-marbling (barely visible in the center as a pinkish smear). The issue here was I tried to print the second design while the first design was still wet with size so the pigment couldn’t come in contact with the paper and ‘stick’. I had only let the first design sit for a few minutes. If you want to marble a design over another marbled design let it fully dry. It may need to have Alum reapplied as well.
UGLY PRINTS:
The first experiments from a couple weeks ago turned out pretty poorly due to me making my size too thick (oddly this made marbling the wood easier and held heavy pigments like the metallics better). The thick size meant colors did not spread well, and I had faded looking areas where pigment wouldn’t flow. The fix was just to draw over top of the bad prints. Obviously, the’d be useless for book binding, but they can be a fun base for mixed media work. I may play around with using thicker size to achieve certain effects.

Thank you for the video and this!
12/18/17
I’ll subscribe to your YT. Mine is ytjndallas.
Hi Danielle…. thanks for the tutorial. I just thought I would mention that you said you were using Golden Fluid Acrylics in the video, but I could see you meant Golden High Flow. I was looking for a video about the latter and nearly flicked to the next video until I noticed the dropper top of the bottle is for High Flow. cheers Naomi
You’re right! I do use both sometimes but often get my wires crossed on which one is which. I’ll correct it.
Pingback: Marbling Resources: tags, marblers, blogs, videos, and articles - a glance in
Do you absolutely need to rinse off your paper after marbling? I am trying to plan a paper marbling activity that hundreds of people could do: I’d use the mulberry paper since I wouldn’t need to alum (thank you for that info- it’s going to save a lot of time) but we wouldn’t have a sink nearby. Thanks again!
I find with the mulberry you can probably get away without rinsing but not rinsing usually will leave a filmy coat on on the paper.
Excellent
I’m using this great info to do paper marbling with eight kids next week. I really appreciate it. If you happen to have a suggestion for student-level paint to try, I’d be interested. We did this two years ago and had great results the second time, but I’m liking your color palettes a lot here.
My piece looked perfect coming out is the size, but when I rinsed it with water it turned into an epic failure! The colors ran and faded! I’m going to try without rinsing. Can I just blot it with paper towels? Or just lie it flat to fry? Help! Please!
This has to do with the sizing on the paper. Paper that doesn’t absorb the pigment needs to be treated with Alum. I just prefer to work with mulberry papers which don’t require it.
Great tutorial! I really enjoyed your thought process & how well you conveyed information to beginners. Thanks for sharing.