
Making a Jig Part IV | One off/Odd Items
Project Overview:
If you’re trying to figure out how to correctly align your items for cutting or engraving without a camera (or without using it if you have one) I suggest you go through my making a Jig Series.
Making a Jig Part 1 – The basics of a re-usable jig
Making a Jig Part 2 – Making a re-usable jig tips and tricks
Making a Jig Part 3 – “Print and Cut” style jigs
Making a Jig Part 4 – Odd/One Off Items (This post!)
There are a lot of techniques and foundational principles to making a jig in those posts which will help you. This part 4 post will discuss particularly thick or oddly shaped items that aren’t easy to make a jig for. The challenge with larger items (for the Glowforge anyway) is that you need to remove the crumb tray. This makes it hard to use one of the previous techniques. Typically to make a simple jig you would do one of the following things;
- When making a lot of one item – Pin a sheet of cardboard onto the tray, cut holes for your items, place them in, and then engrave (lining up to the cut out guides in your interface, not using your camera)
- When correcting or fixing something you already made (or just engraving one smaller item) – Place a sheet of paper on your crumb tray with magnets. Score an outline for your object or basic bounding box. Place item in and then engrave/cut
- When trying to align your cut to a design/print – raise/secure a piece of paper to the height of your intended material surface, cut out the design’s shape lines from you paper. Place your item underneath to align the design to the cut holes. Move paper out of the way and then cut/engrave.
However when you need to engrave a one off item that doesn’t allow you to use the crumb tray how do you get it aligned without trusting the camera? That’s what this post will cover.
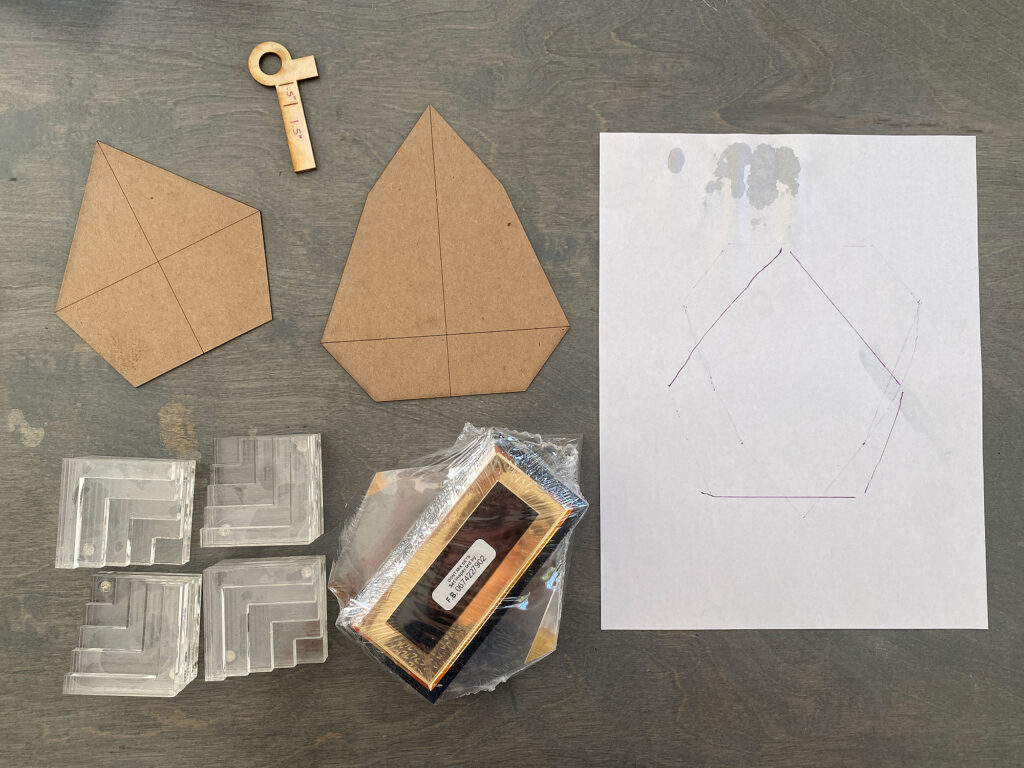
MATERIALS OVERVIEW
For this technique you just need a thin sheet of chipboard and a flat board, and some items to raise up your new surface if the item isn’t high enough. For objects that are rounded you’ll need to use masking vs the chipboard
- Piece of chipboard
- Focus Heigh Ruler (download my free one!)
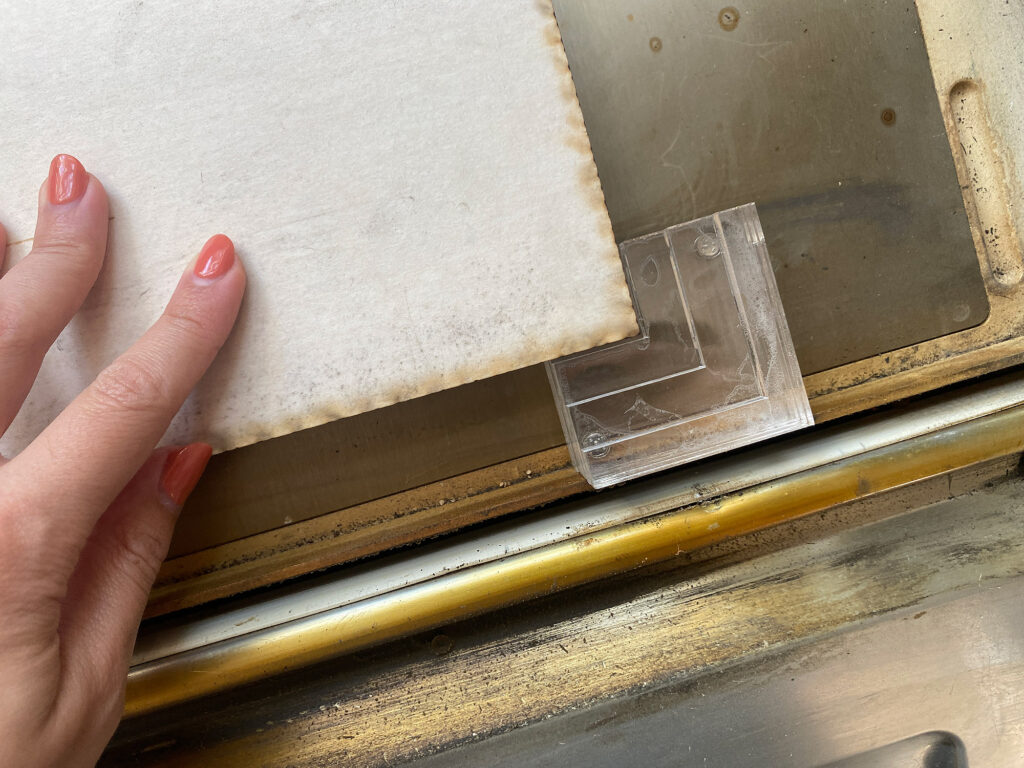
- Risers (I made my own, but you can use scraps or buy some 3d printed ones)
- A flat board to put your object on
- A sheet of paper to trace your object on
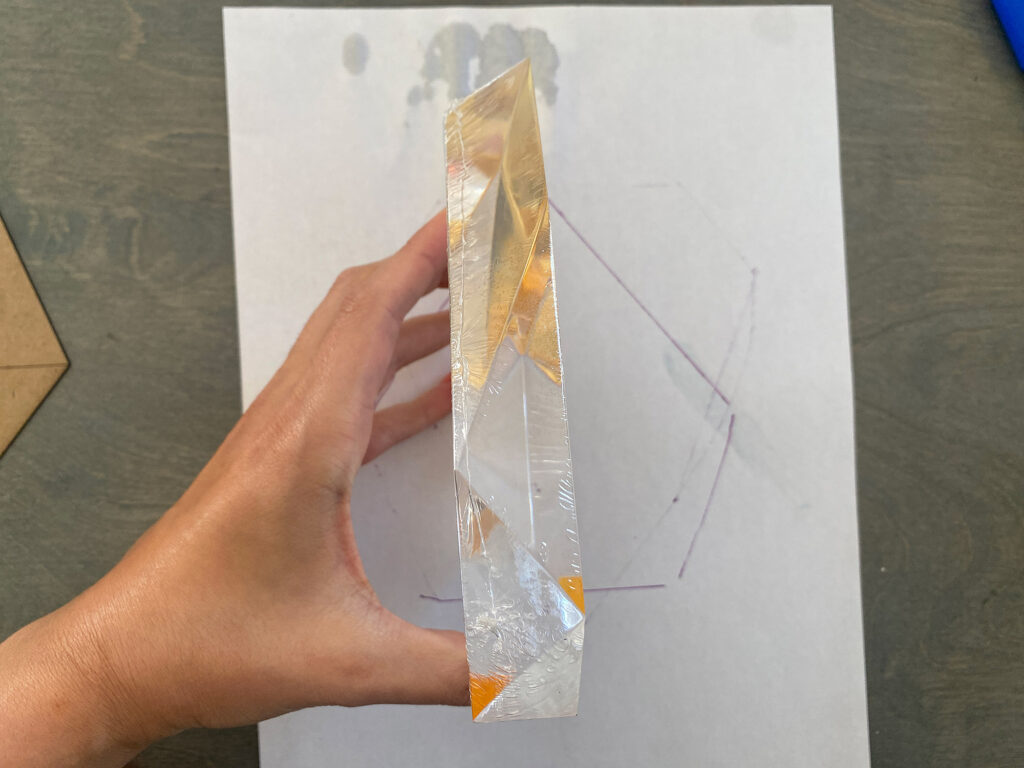
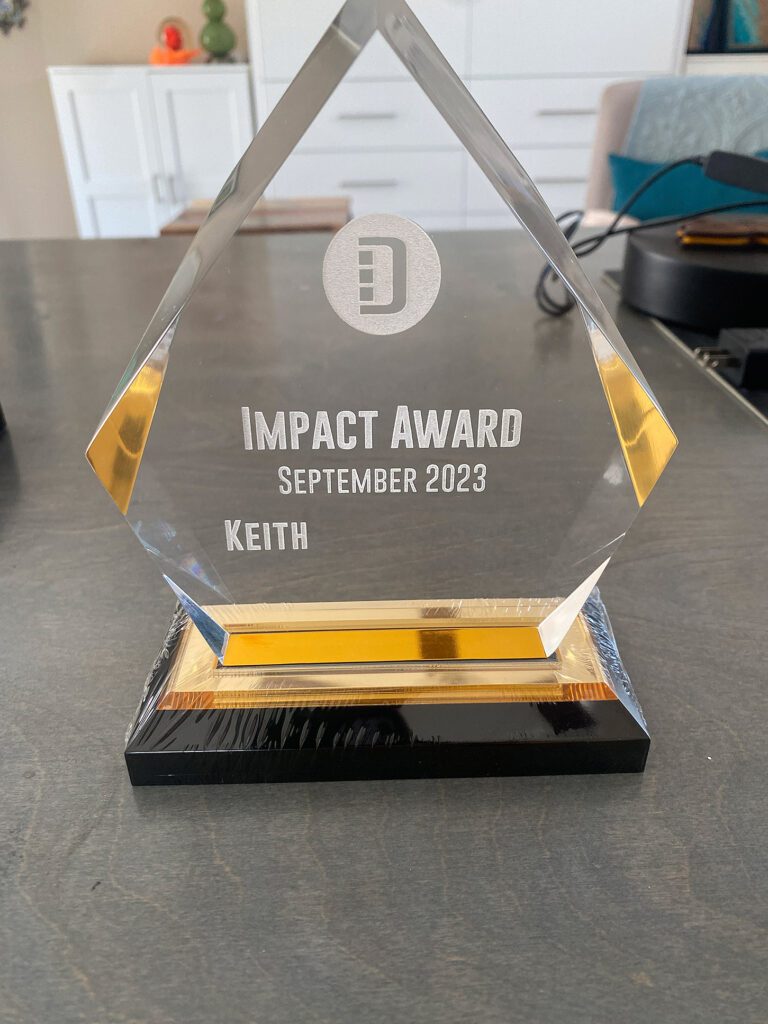
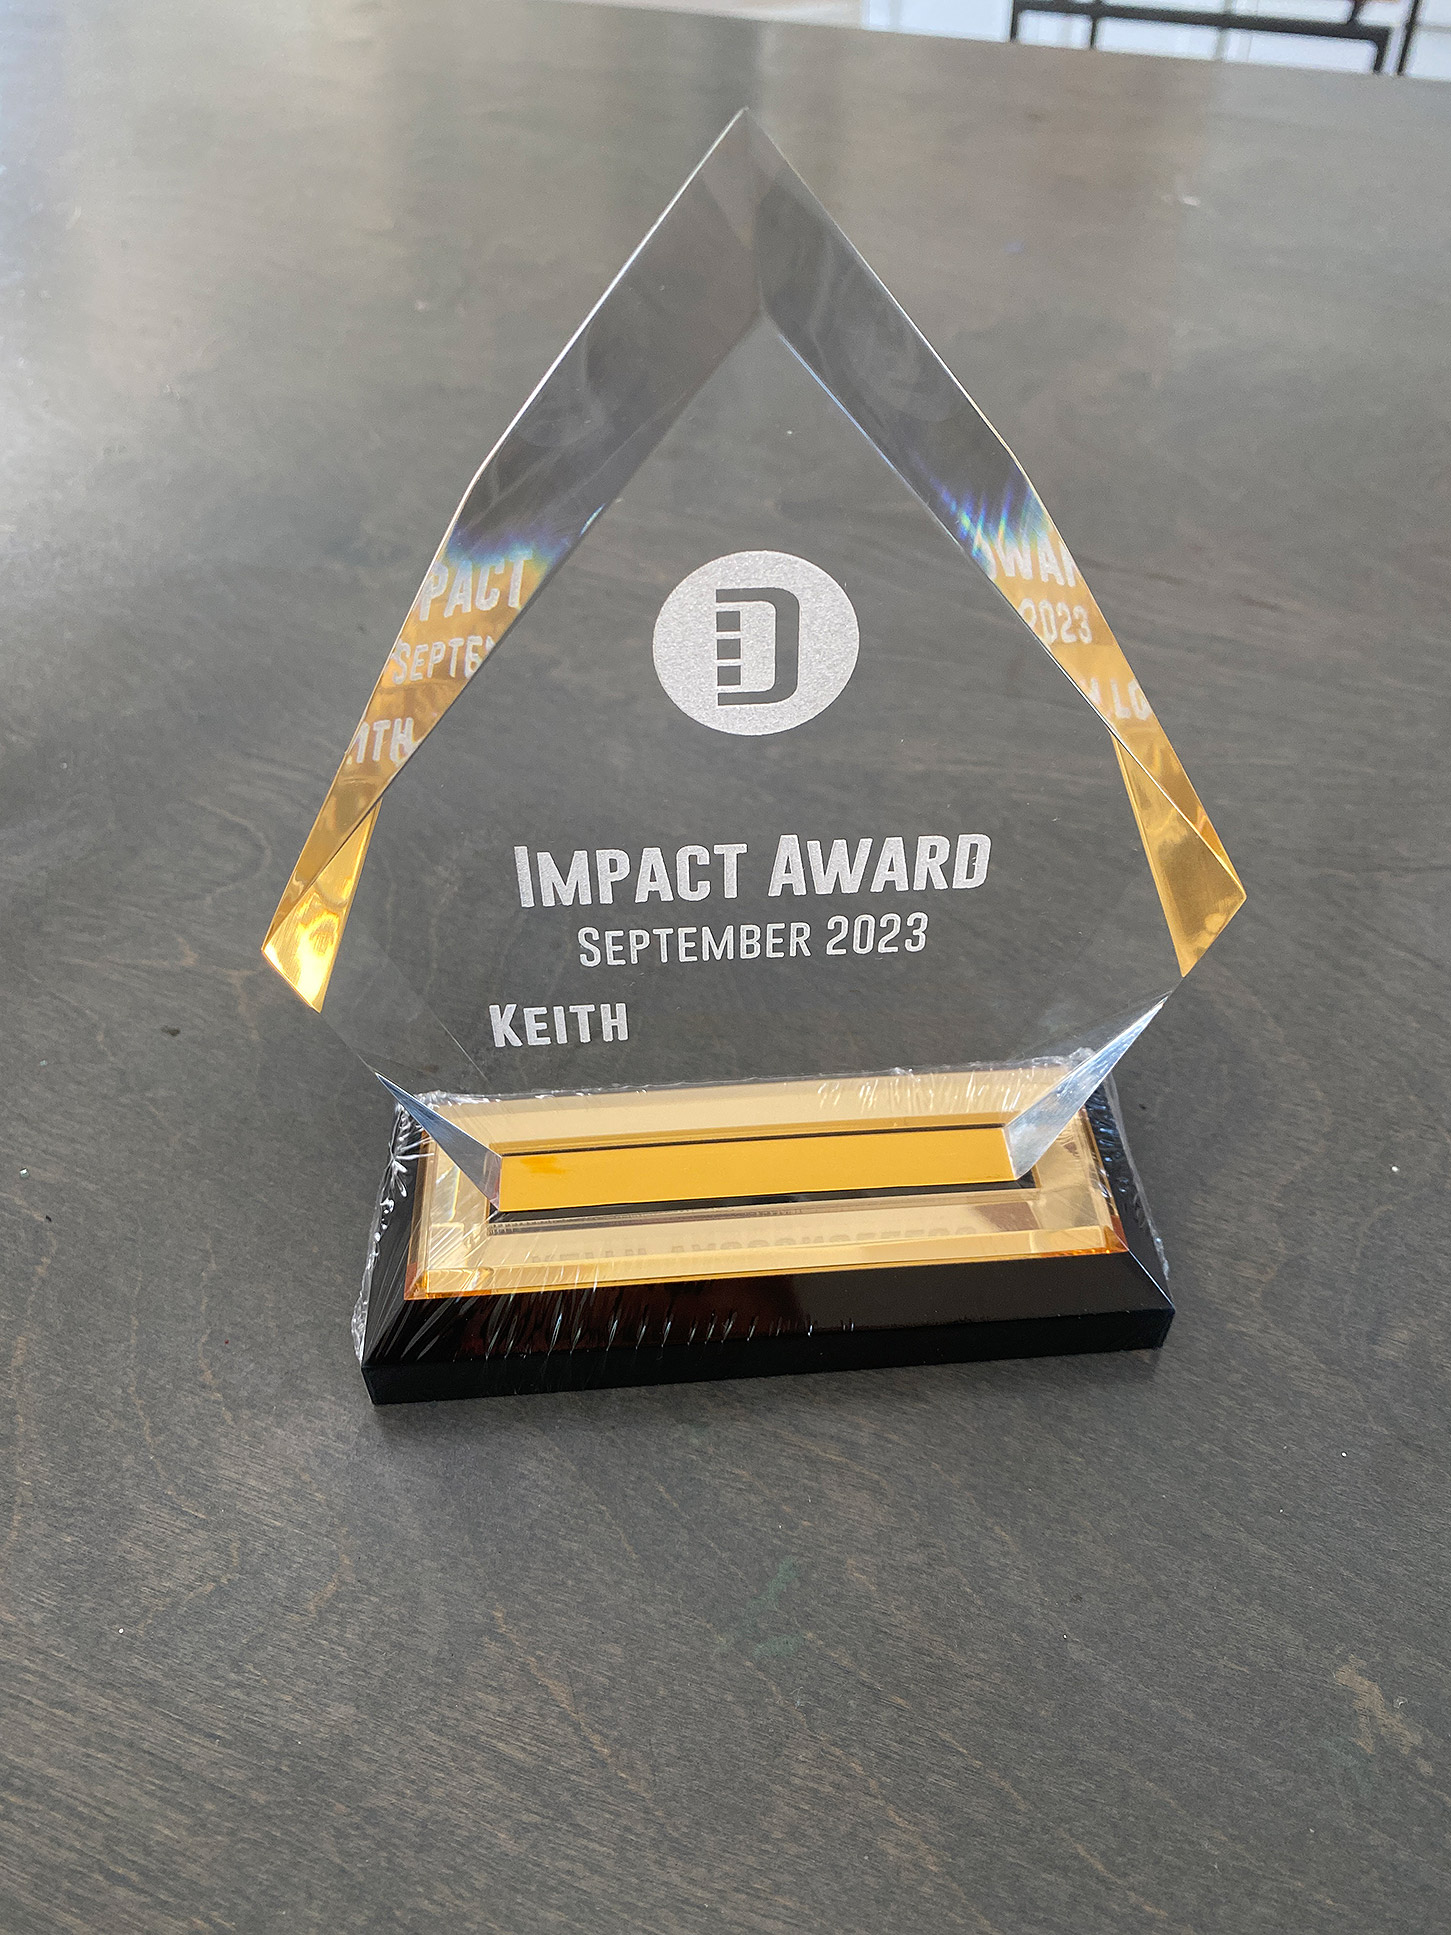
The Item I need to Engrave:
This 1″ thick acrylic award has an irregular shape with a differing front and back shape. It is however flat, which will work great for this technique. Curved objects are their own thing and may have different focusing challenges (cups for example really need a laser with a rotary an deep dishes or bowls are often subject to distortion when lasering)
NAVIGATE POSTS
Helpful Links
Latest Posts
Posts by Category
Explore Posts By Tags
Acrylic Adobe Illustrator Alcohol Ink Baby Room Beginner Post Book Binding BuyTheFile Christmas Felt freefiles Gifts Gilding Glowforge Holiday Jewelry Journal Kaleidoscope LED Notebook Resin Rubber Stamp Settings Sign Stamping Yupo
Get Your Own Glowforge Laser
If you have found this post helpful and would like to purchase a Glowforge of your own you can receive a discount using my referral link when you are ready to purchase:
Sign Up to Blog Newsletter
Why We Can't Use the Cardboard Jig Technique:
The reason we can’t just cut out a shape from (or score a line) on a piece of cardboard in the case of the acrylic award is that with the Glowforge when we remove the crumb tray, there is a narrow window within the Z (depth) axis that the machine will focus (half an inch up from where the crumb tray surface sits when it’s in the machine). All objects you want to engrave or cut must sit within this half inch window.
The acrylic award is an inch thick. Which means if I were to place a piece of cardboard under, then it will be too low for the laser and the machine will send an error and refuse to score the line. Even if I tried tricking the machine with a manual focus height or by focusing on a higher up object off to the side, the line would be massively out of focus and could potentially cause a fire.
Sure I could score/cut the jig first and then remove the crumb tray, but then we are left with the same issue of getting alignment once we remove the crumb tray. When I align a re-usable jig I typically score a line that matches a shape on the jig – we will still have an issue of the jig being too low and out of focus height to accommodate the 1″ thick award. If you have to make multiple of something – I do still recommend making a cardboard jig like that so you can just lift out and place in new objects, but this post is concerned with getting that alignment right on the first try assuming you’re just making these items intermittently, one at a time. This post will help you get the alignment right for that jig even though the laser cannot reach it.
NOTE: If you’re using a more industrial laser, you may have a bed that raises/lowers or a much wider focus range meaning you can just one of the other techniques from my other posts that’s much simpler. This is only for hobby lasers, or ones where you cannot raise/lower the bed to get your object in focus height without moving it. If your laser allows you to use the X/Y axis to tell you were to begin your job then you can do that instead as well.
The Process Overview
If you look at the acrylic award you’ll notice the front is a different shape from the back. It has multiple angles, and won’t fit easily into a rectangle or circle (so I cannot just score a basic shape and drop it in without risking it being rotated a bit. Here is how I overcome those issues for objects that have flat surface (I’ll add some notes for rounded objects)
- Trace the engraving face of object onto a piece of paper. It doesn’t have to be perfect but get as close as you can.
- Scan or photograph your tracing and make it into a vector (See the video)
- Set up your file by adding your artwork and then some additional lines to your shape which will act as registration marks – they can be anything, crossed lines like shown, circles, actual registration marks, squares etc.). Registration marks with crosshairs are the best though because they best help you determine if the object is right both right to left and that is rotated correctly. I’ll explain how and why i did it the way I did in the video below.
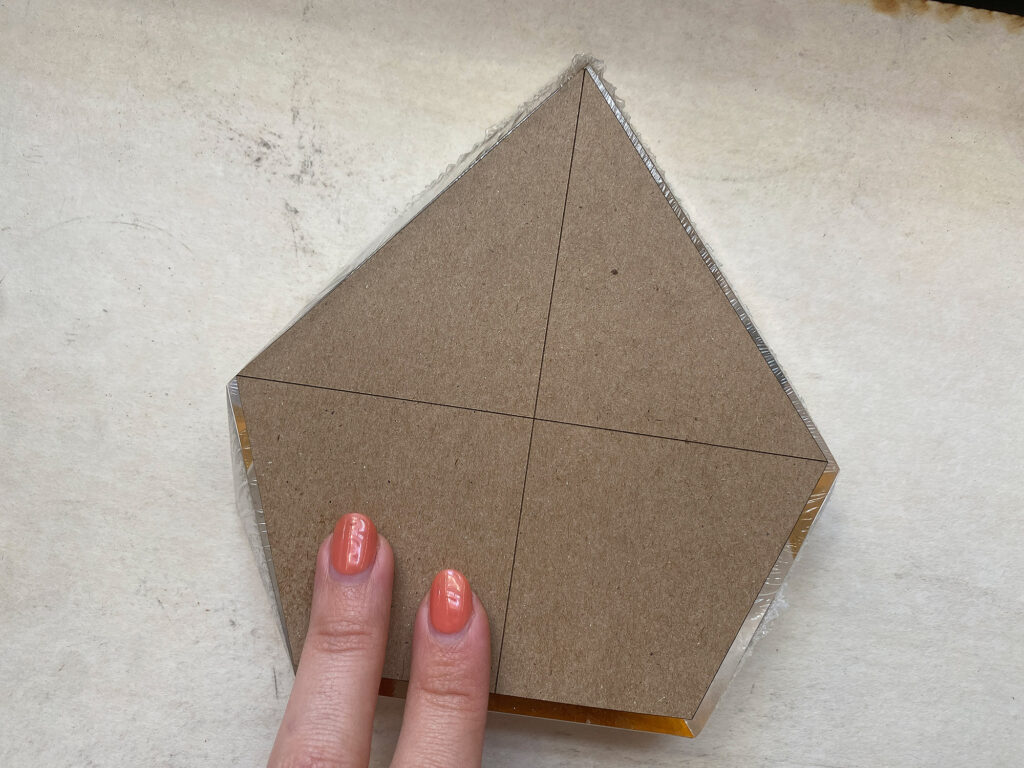
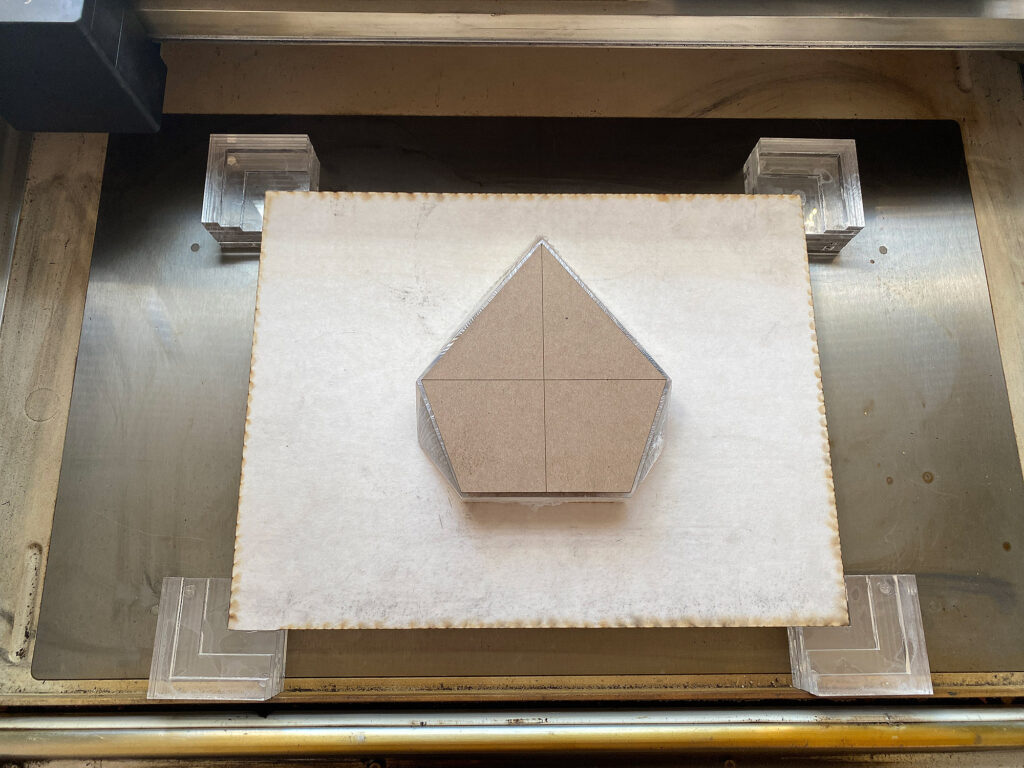
- Before removing the crumb tray, cut object shape from chipboard (and score registration marks on it)
- Remove the crumb tray, place your risers in, and raise your board and object to a height within the focus range using the focus height ruler to check – ensure your object is as centered as possible and that both your jig and the object are rotated the way you want.
- Place the chipboard onto the face of your object
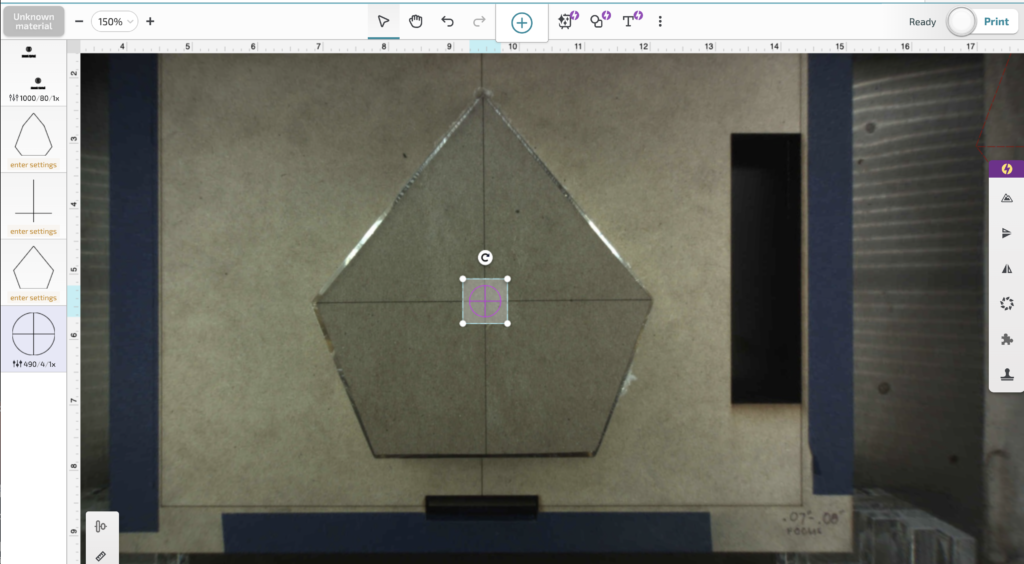
- Go into your Glowforge interface and set your focus height to the center of your object with the thin chipboard stuck on it- the chipboard is not so thick that that will throw off your engrave focus. Using your registration marks align your artwork to what you see in your camera as best as you can.
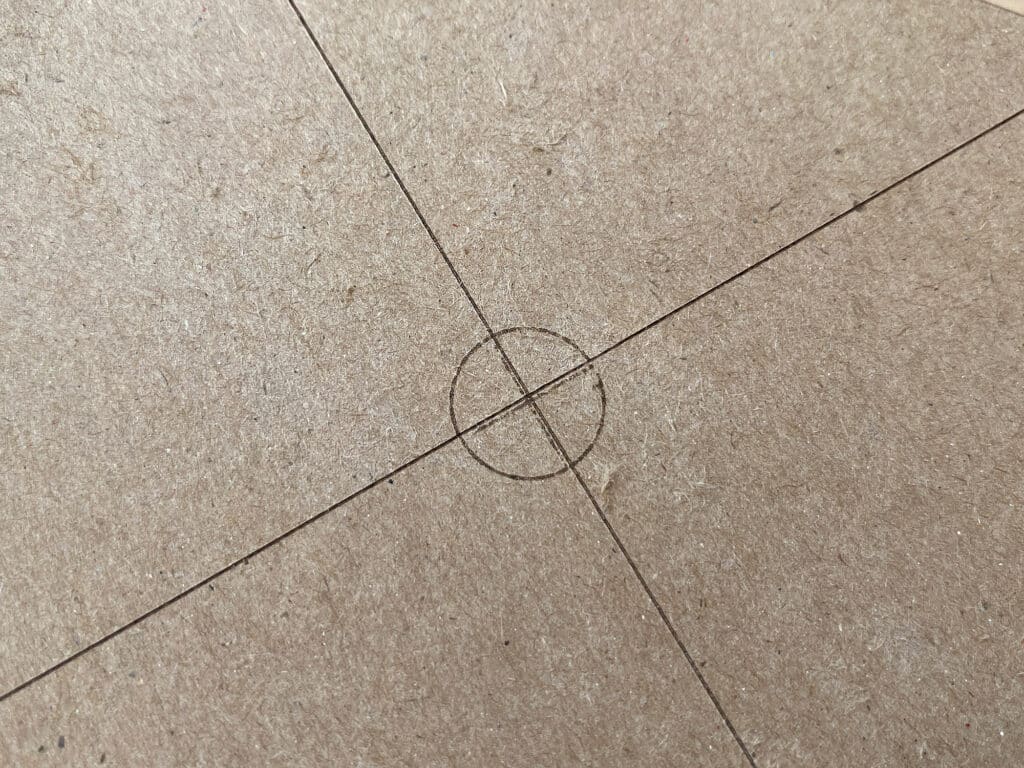
- Score your registration marks on the chipboard using a very low power
- Visually check alignment and move the object or the art as needed
- Repeat steps 8 & 9 until you have the alignment right, you can use a marker to color or cross out the registration scores so you don’t confuse which one you’re adjusting to every time you repeat these steps.
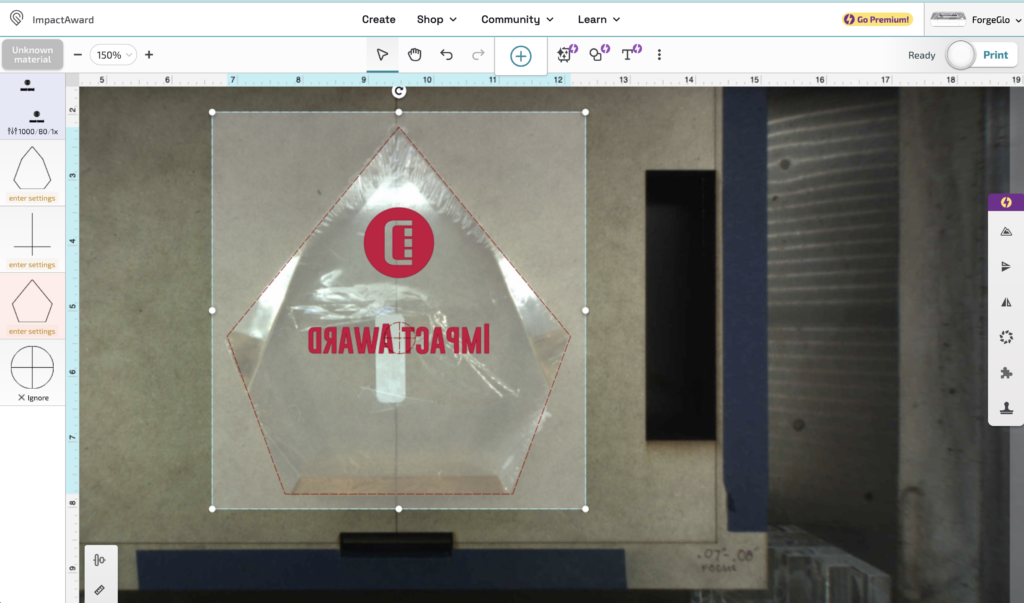
- Once you feel good about the alignment remove the chipboard and engrave your design as intended
IMPORTANT CONSIDERATIONS
You may be wondering – why chipboard? Couldn’t I just mask the object and do this same thing? Why yes you can, but the masking is very thin and you run the risk of scoring through it and ruining your object. The chipboard is thick enough to stand up to multiple low power scores. You will still want to stick it onto the object to keep it from blowing away but it is less likely to move than paper. Whether the actual item below the chipboard is masked or not is up to you – I like to mask acrylic with dish soap as it’s easy to remove without scratching the acrylic.
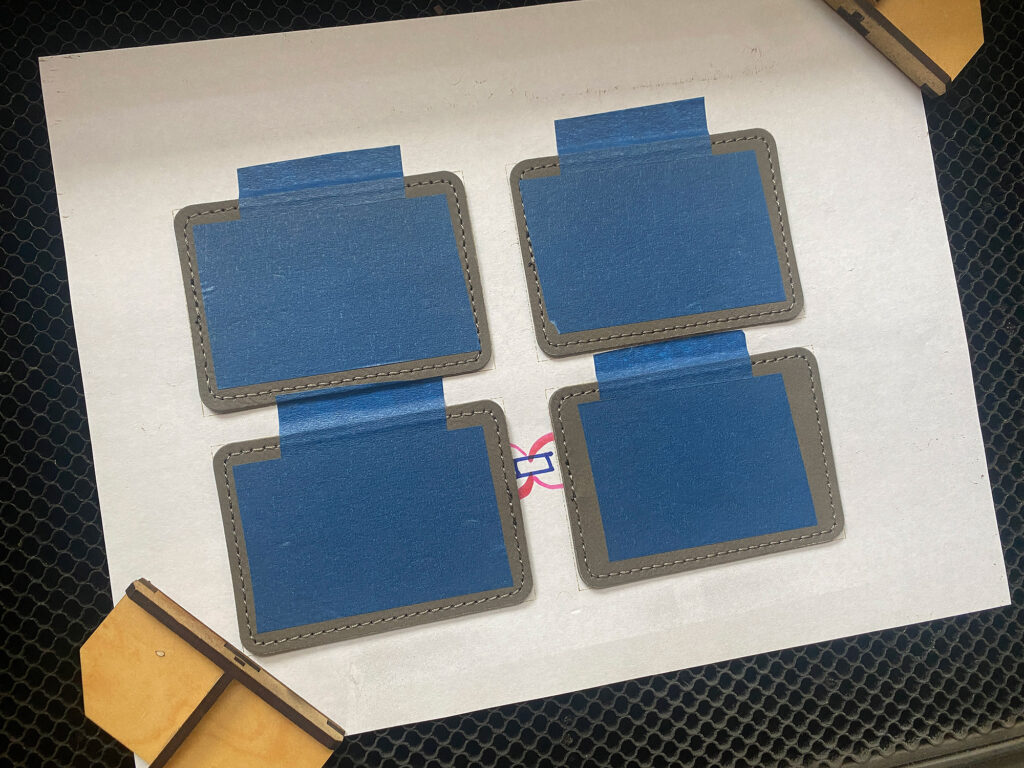
My typical way of making a jig is just to stick a piece of paper in with magnets, score an outline and then place the objects into that space. In the case of the patches below I also added a strip of tape because the air assist tended to move them.
What about rounded objects? If your object has a rounded surface like a flask, spoon, tube, etc. then you won’t be able to use chipboard. In that case I would recommend just masking (maybe even a double layer) and using a ruler to draw a dot, line, or box for where you need you art positioned (or at the center, whatever makes sense to you). You can still do this technique the only difference is you need to really test your settings to make sure that the alignment check score won’t go through your masking and mark the object. You may choose to make multiple layers of masking, or even tape down the chipboard to follow the curve – as long as you’re able to gently remove it without shifting the object anything you use will work.
STEPS 1-4 | Making your chipboard “mask” tester thing:
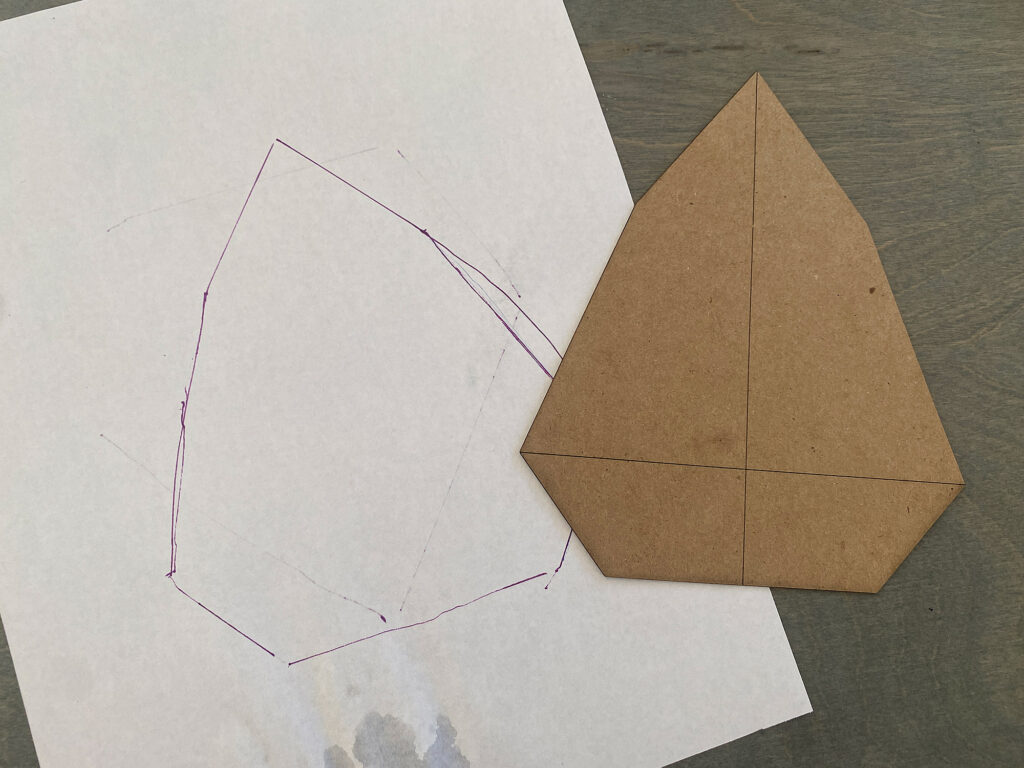
This is all pretty much covered in the video above, but remember if you aren’t super handy with Illustrator you can always cut this object by hand. The reason I took the time to make sure it was pretty close to the shape and size of the surface I was engraving (vs using a random torn scrap or a rectangle) is that it better allowed me to assess if everything was centered. You can see my chipboard shape is a little bit off in size. I’m not engraving near the edges for this design and so I wasn’t really worried about it. it’s close enough for me to tell and I’ll just ensure the chipboard is properly centered when I go to test it.
STEPS 5-7 | Placing your Object Into the Machine:
This is pretty straightforward. Use your focus height ruler to ensure your piece falls into that 1/2″ engrave/cut window for the laser. Also I recommend butting up your risers or board with the bottom edge of the machine. This will help keep everything straighter and help you avoid any rotation.
- Sometimes (I think this is a bug or maybe it’s the contrast/lighting and only affects me) it will refuse to allow you to set focus even when your object is in the correct height range. You will need to manually enter the height – my focus height ruler will help you do that
- The chipboard needs to be very gently stuck to the surface or it can blow away – If you mask your acrylic with dish soap that should be enough to stick it down. Otherwise, a loop of tape or something like that will be fine, just make sure it’s easy to remove. You can also apply dish soap masking gently after removing it. I just gently rub it over the surface (no need to let it dry, but you can let it dry if you need to do something else first)
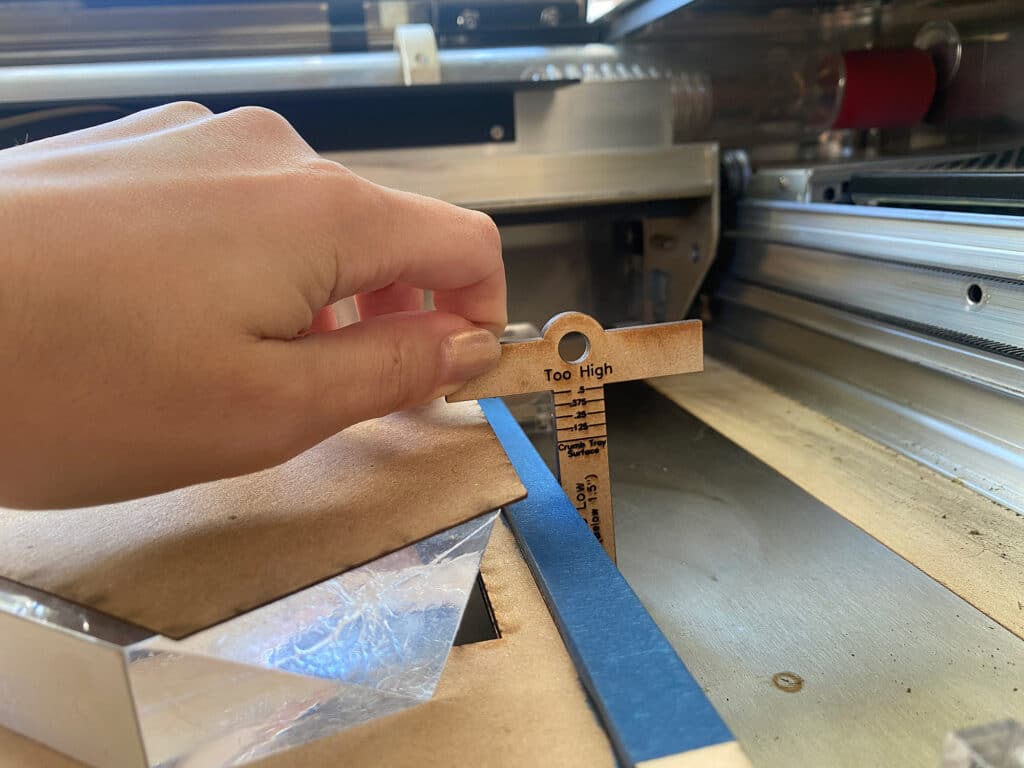
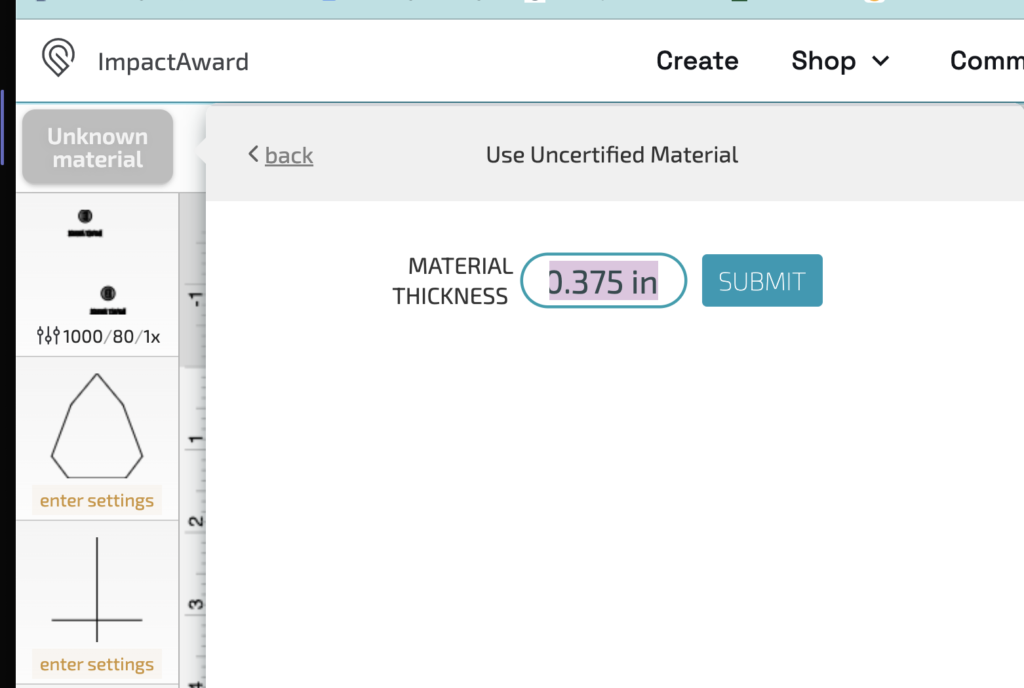
Set your material height to the measurement on my focus height ruler (or something close enough). I find this works better than using the set focus but you can use the set focus if you prefer.

This video will show you how I set up my object in the machine and use the focus height ruler to figure out my manual focus height (if the camera won’t set focus for you).
STEPS 8 – 11 | Aligning your Object:
Here are some tips for getting your alignment right. Once you’ve got it right, just remove the chipboard, turn off the crop marks, and then engrave.
- Only move one thing – the object or the artwork in your interface. If you try moving both or go back and forth you’re going to get confused, trust me. Many years of printmaking have taught me getting good registration means minimizing variables when you’re trying to get stuff perfectly aligned. I try to think of the registration mark as an immovable object in my mind and imagine moving the object underneath it to align it.
- It shouldn’t more than 1-3 adjustments to get it right. If you find yourself moving it around bunches of times, something probably isn’t right. You may be re-setting your focus height or trying to adjust based on the camera not the artwork you set or you may be looking at the wrong registration marks (I suggest marking the ones you’ve already used with a marker so you don’t confuse them with the next set you score)
- If you have to make more than one of whatever it is you plan to engrave then create a cardboard jig to rest your object in as well. This means you only have to do all the aligning/fiddling once and you can just lift out and drop in all subsequent pieces. If you’re not comfortable designing and cutting one, then you can just place your object on the supporting board and trace it. Just remember you’ll only want to move your art, not your object if you do that.

Remember – you are aligning to the registration mark in the INTERFACE – not the one you see on the camera. My camera is actually very accurate when the focus height is set right, bit even so, trust the interface – not the camera when using this method.
FINAL THOUGHTS
I know that this method may be a little awkward to visualize or follow by just reading, but once you’ve got a feel for it, it’s a very easy method.
FINAL TIPS:
- Remember, if you need to make more than one, you can cut yourself a regular jig on your crumb tray, and then set that on your riser board and secure it down. Once you have your artwork aligned in the interface you can just lift out and drop in your next object.
- Plan your artwork with the registration mark in mind. This will make it so much easier to line up. Ensure your registration mark (and the matching one in the artwork) are set as their own step so you don’t accidentally engrave it with your final artwork.
Where to Get the Materials:
Get 50% off your first Wish.com order with my code: mfvjgnw | I buy lots of odds and ends here, so if you need some small item and don’t mind waiting, this can be a fun shop to check out.
Black Diamond Pigments – These are some killer resin pigments.
The Amazon links below are typically affiliate links. They don’t cost you more but they do help me keep creating content.
- Chipboard pack – you can use scraps you find or buy a pack if you plan to make a lot of these
- Download my free Focus Height Ruler
Great Vendors for beautiful sheet materials: None of these are affiliate links! I purchase materials from all of these vendors because I like their products:
Woodcraft – Exotic Veneers, 1/8″ wood
Johnsons Plastics Plus – Rowmark Acrylic, Saddle Faux leather (laser safe), Finished plywood, Flexibrass etc. Veneers (with and without 3M)
Craft Closet – Shell veneer, acrylic (Glitter for days), wood, colorboard
Cerulean Tides- So many gorgeous acrylics
Smokey Hills – Wood, Plywood, Basic Acrylics, Patternply in Acyrlic and Wood(beautiful pattern printed boards)
Custom Made Better – So many fun different materials and they also release tutorials for learning new techniques
Obligatory Glowforge Discount Code Plug
If you found this post helpful and you plan to buy a Glowforge you can use my code (https://glowforge.us/r/QHDONFXB) for a discount of $125 off the Basic, $250 of the Plus, or $500 of the Pro:
Sign Up for Blog Posts Updates
And finally, if you’d like to be updated on posts like these in the future you can sign up for my email list. You will only receive an email if there is new content, and only once weekly in that case: